btw, I could calculate some nice shapes if you have an idea about the size you want to make. My first try is going to be a small bookshelf-loudspeaker with only half the twisting of the floorstanders. Let me know If you want the sizes and all..
Re: More on acrylic coatings
WHOA - I made a HUGE typo error. I meant to say that the tube cabinet sure DOES look cool. Sorry if you thought I was dissing your project. I think that these speakers would be something your friends would want to come over and take a look at and then they'll say something like "whoa dude ... those are.. uh... twisted" (that's the best I could come up with - it's 12:30pm and I just woke up )
)
diylabs said:I have no idea if a twisted tube has any acustic benefits, but it sure doesn't look cool, I think.
WHOA - I made a HUGE typo error. I meant to say that the tube cabinet sure DOES look cool. Sorry if you thought I was dissing your project. I think that these speakers would be something your friends would want to come over and take a look at and then they'll say something like "whoa dude ... those are.. uh... twisted" (that's the best I could come up with - it's 12:30pm and I just woke up
)I don't care about sharpening the drill. I'm not going to need it afterwards
Are you thinking of a hole saw like this ?
Yup, hole saws like that are available up to 6" (152mm) and sometimes matching them to pipe outside diameter can be a problem.If you're thinking of using one of these, I think you'll become an expert at sharpening it long before you're finished
My preference would be to use one like this It'll be adjustable, easier to sharpen, and faster in the long run.
About the sanding of the surface, the grinder method will work, but will depend on patience and strength. Your rowing workouts will come in handy.
If your shop is that complete, you could even try to make the proper plane to cut the surface. Of course the base will be compound curves, but tracable from the form). Even a small block plane, with the blade sharpened to a slight curve, will take a lot of material off quickly. You'll have one edge of each blank to act as a gauge.
Does anyone know what this surface is called? Is it a hyperbolic paraboloid?
apart from this I will only need drivers and a x-over, both of which I have made no decisions on yet.
This is where others on this forum can be invaluable. A project of this magnitude deserves topnotch drivers, xover, and especially the configuration of the TL. What do you say fellow DIY'ers? Any suggestions for drivers and TL calcs?
Have you considered a folded TL? Where the pipe goes down and back up inside the box, then exits front, back, or even the top of the box? Two holes the right sizes will work even better than one to extend the bass response, yes?
I'll bet 7V has a suggestion for you bookshelfs.
Well, I _was_ thinking of using the first kind, never saw the 2nd kind before. Would be much easier to match it up with some pipe!!! GREAT
About the bookshelves : I'll guess they're going to my gf. OR they're going to be my PC-speakers. Don't know what I'm going to do yet.
IF they're going to be my PC speakers, they'll be driven by a Quad 33/303 combo. If they're going to my gf, it will be driven by a very nasty and horrible panasonic mini-set.
btw, the floorstanders are going to be driven by a Marantz-PM80mkII
I've only skimmed this thread, but in my opinion, you should just ditch the veneer. I think it would be visually more striking if you used a solid wood, routed the edges, gave each segment a nice polyurethane coat, then stacked everything.
Because of the routing there would be no sharp edges, and I think the design would look much more DIY and impressive.
Another idea is to drill some small holes every 10 degrees around the perimeter of the inner circle of each segment, and use those to guide the axis of rotation. That way, you just twist each segment 10 degrees and line up holes. Once you're done, then you can insert a properly sized dowel into each hole along the entire length of the speaker to give some reinforcement. You might also think about inserting a PVC pipe down the tube as well for more stability and rigidity.
This is interesting enough that I might try such a feat. The only problem is that the public shop that I used to do my work has now shut down...
Maybe some day!
Cheers,
Brian
x. onasis said:I'll bet 7V has a suggestion for you bookshelfs.
Sorry, I've been away for a couple of days.
What bookshelfs?
Can I just refer you to the suggestions I made last time?
Use a Bandor 50mm driver.
Yes, you will need a sub if you want to play full-range - there's only so much a 2" driver can do.
No, don't bother with a tweeter. It will take away more than it adds.
Use curves.
Yes, by all means twist it.
Put a sock in it (sand sock) - no sorry that's just for columns.
How to finish the outside of the cabinet
After some careful thought, I think that I've come up with 2 different ways that I think would be good to finish the outside of the cabinets.
1: Using Filler and Venere
If you use a foam filler such as something called "great stuff", then you can spray some quick expanding foam into the gaps between layers, then use a utility knife or a wire mesh to scrape of the excess, leaving a semi-smooth finish. Then you can either use a uerethane/acrylic sealer before painting or you can simply apply a vinyl simulated black wood grain venere - it would probably stretch enough to finish the cabint. Just make sure you start from the top down to get the grain going the right way.
2: Bevel the Edges
If you bevel the edges of each layer when you cut them, then you can minimize the gap between layers. This assumes that you have a table or sliding miter that can cut a compound angle. I think I'm going to use plywood for a trial cabinet and use this method so that I can stain it for a cool sandstone layering effect.
I hope to start building tomorrow, so maybe I can post some preliminary photos online this week so that you can see what the twist looks like in actuality.
I've been thinking about this for a while, and with the upcoming free time over the holiday season, I think I will embark upon this project. I've come up with some very different ideas than what are presented in this thread.
First of all, did anybody ever try to build these? There was so much enthusiasm for building it, but the thread seemed to just disappear.
The way I think I will go about it is this: I will buy a 3.5' tall, 6" column of PVC for reinforcement. Then, I can get 24" x 48" x 2" thick sheets of Polystyrene (Styrofoam) for fairly cheap, which one can cut with just about anything. I was thinking I would cut them in 8" x 8" squares with 6" holes in the center for the PVC.
Now, assuming a fairly tame twist, I can trace a 7" square within the 8" styrofoam on the top. On the bottom, I can trace the twisted 7" square. All, then, that I need to do is cut the styrofoam with a knife so that it intersects the top and the bottom at the lines that I traced.
Assuming it takes about 2 minutes per side to trace the lines and do a cut, that's 42 pieces * 4 sides * 2 minutes = under 6 hours of work.
I now have Styrofoam that I can thread onto the PVC. Now what? It'll look a little blocky and rough. To fix this, file the sharp edges down a little bit, making sure not to rip any large chunks off. Mount a small ring of MDF at the top for the driver (a 6.5", say, a full-range Fostex?), then wrap the whole cabinet in a layer of fleece. Prime it with an epoxy or polyurethane resin until the fleece is totally saturated. Once sufficiently solid, start layering it with fiberglass and resin.
This would make for a sturdy shell for the whole cabinet. The same ideas have been used in car audio for cabinets, with great success.
Once sufficiently solid, the fiberglass shell could be sanded, polished and lacquered. It'd be like having a pair of Corvettes in your living room.
Let me know if I'm off my rocker.
-Brian
I think the styrofoam would be a great idea, and possibly lots better than 250 layers of MDF. One thing that I'd bear in mind though would be removing the PVC tube afterwards: 42 times a small amount of pressure = lots of pressure. If you leave it in to the end you'll never remove it, unless that's what you want. I think the idea about using "pilot holes" with dowel going down the length is good - hopefully you can get away without using a PVC tube at all - especially if you use more than 1 piece of dowel.
It's all very well with what it looks like on the outside, but what about functionality on the inside? Using multiple layers is a perfect opportunity to use design techniques that assist in the absorption of the "back wave", and loss of energy before the sound inevitably returns to the speaker cone.
😕 A question: why the focus on a simple cylindrical shape for the inside? I'd be worried that there would be strong standing waves (and related harmonics) both along the length of the loudspeaker, and from side to side. Judging by the number of equidistant parallel sides in a circle (infinite), I would guess that it's a really bad shape to use. If you decide to use dowel (or similar) as a guide, you could make the main cut-outs any shape you want. Irregular shapes would help with diffraction and therefore absorption etc. Some standing waves would still be unavoidable, but at least they won't be loud and obvious.
Remember that styrofoam is soft and mostly light gases, and it's good at increasing the effective air volume inside the box, and good at absorbing vibrations. This makes it good for sealed/ infinite-baffle type boxes, but probably not that great for ported designs - which often don't work well with lots of absorbant material.
BTW: don't use glue that's solvent-based as you'll badly damage the styrofoam. Try epoxy instead.
CM
hmmm. I never thought about styrofoam to be honest, don't know if it would work.
After calculating the amount (and weight) of the wood I had to use, I kinda gave up on it. Also because I couldn't find a hole-saw that was big enough AND the same size as PVC pipe available.
Let me see if I can find the program that calculated the shape for the box, If I can still find it I can send the angle for each slab to you.
Let me see if I can find the program that calculated the shape for the box, If I can still find it I can send the angle for each slab to you.
Thanks WVL, I'd like to see that too.
I think the styrofoam is a workable idea, and have a couple adds:
Florists use a tablesaw of sorts to cut styrofoam into exact and odd shapes, but its just a hot wire that does the cutting. It leaves a smooth, melted surface on the cut face, and is very fast.
A scroll saw would work nicely too, with very little "dust".
For quick and easy round cuts, a drywall keyhole saw will work, but is messy.
Also (in homebuilding) when you run 3" or 4" PVC drain pipe through framing, you never use foam to seal around the pipe. Any vibration or expansion of the pipe will cause it to have an unfixable squeak, so I think the idea of leaving the pipe out is wise too.
There are construction adhesives available for foam, and I wonder if waterbased contact cement will work.
I'd try a proto with plaster veneer over nylon mesh instead of bondo or fiberglass because it's quick and cheap. (Maybe the fiberglass over that.)
Glueing styrofoam
In my years of shaping custom windsurfers, I've used exclusively glued styrofoam for the cores. Shaping compound curves is relatively easy using a number of tools. I use a combination of hotwire, microplane rasps, and sandpaper for my work. Many shapers use power planers, but for my taste they just make too much of a mess.
Latex contact cement works fine for glueing. I haven't yet tried the latex based construction adhesives,like "liquid nails" etc. And the only problem I could see with it is it may not get enough air when gluing styrofoam to harden, but a quick test could check that out. If it does work ok, I would choose this for your application as it allows you to move the pieces around which the contact adhesive will not. As for laminating with fiberglass, I always use epoxy for it's superior strength/weight, but if you want to use polyester resin, you just have to paint the styrofoam with latex paint first and it will protect the foam from the solvent (styrene) in the resin.This is far more cost effective than epoxy, and you don't require the advantages epoxy offers.
Hope this helps
Chris
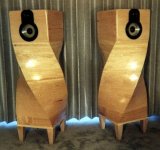

Wardsweb said:Like this?
WOOOOTT!!! my dream became reality! 🙂
how did you make that? or isn't it your own? it's not quite the bend I had in mind, which twists more at the bottom, and stops twisting at the top.
- Status
- Not open for further replies.
- Home
- Loudspeakers
- Multi-Way
- Pipe speaker with a twist