I'm fairly new at this, which is why I'd like to ask your opinions about my own little project.
I'm about to make a pipe-speaker, a speaker with a cilindrical-shaped inside. Most I've seen so far are based on sewage-pipes or something similar. I want to make one with a twist.
This is what I have in mind.
I want to make it using stacked pieces of wood, like such :

I've been thinking on how to proceed to make the whole speaker, I hope it's possible..
first I want to cut out all the single layers, and drill in the center hole, as well as the little hole (the little hole is in a different position for each layer, it will help me to get the right 'twist')
next I want to use a sewage pipe and a thin metal rod to put the pieces on. I will use the sewage pipe (the layers will fit around tightly) to center all the layers, and the small rod (fitting the small holes) to get the right 'twist'.. then all will be glued and pressed together.
My questions :
what do you guys think would be the best material? I've been looking around and 4mm MDF looks to be the best option. (thinner is better, as the result will be much smoother, so I don't have to sand like crazy..) I can get different materials, but they don't look right for building speakers.. any ideas?
Does anyone have experience with glueing that many stacks together? how much will one layer of glue add to the height? The height I'm aiming for now is about 100cm (not including feet). Which will position the tweeter at just about ear-height. (sitting in my chair)
Will the shape distort the sound too much? the one shown here is meant to be the left, I want to twist the right speaker in the other direction.. the idea is that the sound going downwards is reflected towards the listener.. (or is it a better idea to reflect it _away_ from the listener?!)
What about finishing? I'd really like veneer finishing, but I don't think it's possible to apply that to this shape? Any experiences?
Would it maybe be better to bend wood, rather than to stack? bending in this shape seems fairly impossible to me.
let me hear what you guys think. All suggestions are welcome.
(btw, this will be the first speakers I'll ever build, but I don't want to make some box-shaped ones to try stuff out.. it will not give me experience in making shapes like this )
I'm about to make a pipe-speaker, a speaker with a cilindrical-shaped inside. Most I've seen so far are based on sewage-pipes or something similar. I want to make one with a twist.
This is what I have in mind.
An externally hosted image should be here but it was not working when we last tested it.
(please do not mind the quality of the picture, I'm not using CAD programs, this is made in Maple V (a mathematical software package)I want to make it using stacked pieces of wood, like such :
I've been thinking on how to proceed to make the whole speaker, I hope it's possible..
first I want to cut out all the single layers, and drill in the center hole, as well as the little hole (the little hole is in a different position for each layer, it will help me to get the right 'twist')
next I want to use a sewage pipe and a thin metal rod to put the pieces on. I will use the sewage pipe (the layers will fit around tightly) to center all the layers, and the small rod (fitting the small holes) to get the right 'twist'.. then all will be glued and pressed together.
My questions :
what do you guys think would be the best material? I've been looking around and 4mm MDF looks to be the best option. (thinner is better, as the result will be much smoother, so I don't have to sand like crazy..) I can get different materials, but they don't look right for building speakers.. any ideas?
Does anyone have experience with glueing that many stacks together? how much will one layer of glue add to the height? The height I'm aiming for now is about 100cm (not including feet). Which will position the tweeter at just about ear-height. (sitting in my chair)
Will the shape distort the sound too much? the one shown here is meant to be the left, I want to twist the right speaker in the other direction.. the idea is that the sound going downwards is reflected towards the listener.. (or is it a better idea to reflect it _away_ from the listener?!)
What about finishing? I'd really like veneer finishing, but I don't think it's possible to apply that to this shape? Any experiences?
Would it maybe be better to bend wood, rather than to stack? bending in this shape seems fairly impossible to me.
let me hear what you guys think. All suggestions are welcome.
(btw, this will be the first speakers I'll ever build, but I don't want to make some box-shaped ones to try stuff out.. it will not give me experience in making shapes like this )
Will the shape distort the sound too much?
I'm no expert, but I think the consensus is on having minimal parallell walls on the inside to disperse the sound and thus reduce standing waves, and no sharp edges on the outside around the driver, especially equally distanced - to reduce diffraction effects (it's not clear where you'll be placing the drivers). Seems like your twisted 😉 design has some inherent advantages.
Good to see such an adventurous design. Let us know how you go about achieving it.
Your speaker looks interesting. Can you tell us what sort of bass-loading principle you are going for (1/4 wave, transmission line, sealed box, ported) and if you have decided on the drive units?
Generally, it's easier to cut out the external shape as well as the internal. This would mean less sanding and would enable you to use thicker segments. The whole thing wouldn't take as long to build.
Andy Graddon is compiling an excellent resource for curved speaker construction and this may be helpful.
PS: I think that veneering will be tricky (at least)
I like the design, a work of art to be sure. An ambitious woodworking project however, and to effectively create good art, one must show control of the medium, and the outside finish will be difficult. Especially in wood.
Veneering the curved surfaces won't be doable with full sheets, as wood isn't flexible enough to bend in two directions at the same time, you would have to carefully join many strips of veneer.
Have I got this right? You want to stack 4mm pieces to a height of 100cm? Isn't that 250 pieces of MDF?
Perhaps an easier way of getting your spiral shape might be to sandwich one or two inch (25 or 50mm) foam boards between the MDF ones, these would be easier to shape. Also, by alternating large and small inside holes you might be able to accomplish a v-shaped, down facing, interior treatment similar to 7V's Nonsuch design, utilizing the pipe for assembly allignment only.
As for the exterior treatment, I suggest plaster or auto body filler to give you a more workable finish.
I also hope you have as much success as Kneadle had with the design he couldn't build.
I also hope you have as much success as Kneadle had with the design he couldn't build.
Don't you mean more...lol
Hi Vikash- The design Kneadle couldn't build was a success.
And great fun for many watching, helping, and encouraging.
And great fun for many watching, helping, and encouraging.
@ 7V : I haven't quite decided yet. either it's going to be a closed box or vented. First I want to establish if this shape is going to work out at all, before I start picking out the drivers (I think I'd like a closed box best btw 😉.. The speakers I have now (Energy e:XL-26's) are vented, and have somewhat too much bass (they boom too much).
Also, what do you mean, cut out the exterior? I don't have to do very much sanding if I use enough layers. All the pieces are square. Also I think it would be *very* difficult (for me atleast) to make the slabs thicker and saw the outside in the right spiral shape...
i already saw that page you mentioned 🙂 Nice speakers!
@x.onasis : yes, that would be 250 layers. I don't like the idea with the different shaped holes to get a sawtooth, like the nonsuch speakers. That way I can't use my sewage pipe to position the slabs (btw, the pipe is only for constructing, will be removed when all the slabs are glued together.)
About driver placement : I wanted a normal placement with the tweeter above the woofer, like this :
then again, maybe because the curve gets stronger downwards, it would be easier to put the woofer above the tweeter (the top is the most flat)
Also, what do you mean, cut out the exterior?
I don't have to do very much sanding if I use enough layers. All the pieces are square. Also I think it would be *very* difficult (for me atleast) to make the slabs thicker and saw the outside in the right spiral shape...i already saw that page you mentioned 🙂 Nice speakers!
@x.onasis : yes, that would be 250 layers. I don't like the idea with the different shaped holes to get a sawtooth, like the nonsuch speakers. That way I can't use my sewage pipe to position the slabs (btw, the pipe is only for constructing, will be removed when all the slabs are glued together.)
About driver placement : I wanted a normal placement with the tweeter above the woofer, like this :
An externally hosted image should be here but it was not working when we last tested it.
then again, maybe because the curve gets stronger downwards, it would be easier to put the woofer above the tweeter (the top is the most flat)
I was hoping someone remembered. Not that I'm averse to self-promotion, but still...
I'm watching this project with interest. I'd like to see some alternative techniques to bending and twisting speaker enclosures so that I can eventually borrow the best of these techniques for my next project.
Search "spiral" for the completed project.
Battle on! Much Success awaits thee!
Dave
I'm watching this project with interest. I'd like to see some alternative techniques to bending and twisting speaker enclosures so that I can eventually borrow the best of these techniques for my next project.
Search "spiral" for the completed project.
Battle on! Much Success awaits thee!
Dave
Ignore me. I hadn't quite visualized the shape.WVL said:Also, what do you mean, cut out the exterior?
Good luck with this one. It will be fabulous if you can pull it off.
I've been playing around with the positioning of the drivers. After all woofer above tweeter has the better looks. What else could I take into consideration when determining position for the drivers?
Positive stuff :
- woofer above tweeter looks better
- woofer is now in the flattest part, easier to fit
- tweeter is still at about ear height
Any negatives you can think of?
btw, I also modelled the right speaker. Still no-one having a clue about the thickness of 1 glue-layer? The more I think about this, the more I think I need to do a small test-speaker first, in the same shape, but maybe 1/2 of the twisting. Otherwise the curves would become too sharp. Does a test 10X10X10 cm speaker-block sound good enough?
What I'm worried about most is the finishing of the whole thing. Does anyone have pictures of finishing MDF? Either I want a glossy finish, or maybe a satin finish to it.. What I'm mostly worries about is that I'm going to loose sharpness on the edges. So edges will look more like :
|
\_
then like
|_
both speakers :
(what do you think looks best? tweeter on top or the woofer?!)
btw, maybe you didn't notice, but the speaker gets thinner near the top, I think it looks best..
Positive stuff :
- woofer above tweeter looks better
- woofer is now in the flattest part, easier to fit
- tweeter is still at about ear height
Any negatives you can think of?
btw, I also modelled the right speaker. Still no-one having a clue about the thickness of 1 glue-layer? The more I think about this, the more I think I need to do a small test-speaker first, in the same shape, but maybe 1/2 of the twisting. Otherwise the curves would become too sharp. Does a test 10X10X10 cm speaker-block sound good enough?
What I'm worried about most is the finishing of the whole thing. Does anyone have pictures of finishing MDF? Either I want a glossy finish, or maybe a satin finish to it.. What I'm mostly worries about is that I'm going to loose sharpness on the edges. So edges will look more like :
|
\_
then like
|_
both speakers :
An externally hosted image should be here but it was not working when we last tested it.
(what do you think looks best? tweeter on top or the woofer?!)
btw, maybe you didn't notice, but the speaker gets thinner near the top, I think it looks best..
@ 7V :
okay, I'll ignore you for now 😉 (at least about the cutting of the exterior). BTW : I really love your speakers 🙂 How much is a pair? (not that I could ever afford some 🙂
Just for fun I thought I'd make a picture of how a thick slab would have to be cut :
there isn't a straight piece in the whole thing 🙂 (well, it's still made of square slabs ofcourse...). You see now why I'd want as much slabs as possible? sanding would be much easier then cutting any day of the week... (ofcourse at some point it's more work to make xtra slabs then to do xtra sanding. I estimate this point is around 4-6mm/slab).
okay, I'll ignore you for now 😉 (at least about the cutting of the exterior). BTW : I really love your speakers 🙂 How much is a pair? (not that I could ever afford some 🙂
Just for fun I thought I'd make a picture of how a thick slab would have to be cut :
An externally hosted image should be here but it was not working when we last tested it.
there isn't a straight piece in the whole thing 🙂 (well, it's still made of square slabs ofcourse...). You see now why I'd want as much slabs as possible? sanding would be much easier then cutting any day of the week... (ofcourse at some point it's more work to make xtra slabs then to do xtra sanding. I estimate this point is around 4-6mm/slab).
Wow! Cool design.
You might want to check out this site:
http://www.arbortech.com.au/woodmain.html
It has some great info on sculpting wood with an angelgrinder and some attachments. Look at some of the free plans, and the articles.
I'm thinking thicker layers of solid wood, maybe 1" or more.
You might want to check out this site:
http://www.arbortech.com.au/woodmain.html
It has some great info on sculpting wood with an angelgrinder and some attachments. Look at some of the free plans, and the articles.
I'm thinking thicker layers of solid wood, maybe 1" or more.
So if i get it right the inside of the box is a cylinder, and the wood is to give it a cool exterior, and as a side effect, damp the pipe?
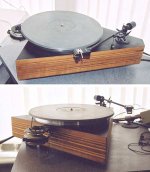
As far as finish i'd take advantage of the layers and just heavily stain the exposed material. I would laminate alternating layers of plywood & mdf. This would give the structure a better resonant signature & an interesting stratified finish. With the right stain mdf turns into quite a pleasant accent.
The edges above are just the mdf exposed when we chamfered the edge. An example of mdf/plywood sandwich attached below (it has a clear polyurethane finish).
dave
As far as finish i'd take advantage of the layers and just heavily stain the exposed material. I would laminate alternating layers of plywood & mdf. This would give the structure a better resonant signature & an interesting stratified finish. With the right stain mdf turns into quite a pleasant accent.
An externally hosted image should be here but it was not working when we last tested it.
The edges above are just the mdf exposed when we chamfered the edge. An example of mdf/plywood sandwich attached below (it has a clear polyurethane finish).
dave
Attachments
WVL said:
btw, I also modelled the right speaker. Still no-one having a clue about the thickness of 1 glue-layer? The more I think about this, the more I think I need to do a small test-speaker first, in the same shape, but maybe 1/2 of the twisting. Otherwise the curves would become too sharp. Does a test 10X10X10 cm speaker-block sound good enough?
Building a test piece is always a good idea 😉
Depending on clamp pressure, your glue layer should be less than 1/4 mm thick, and if using ply, or real wood, the glue will be forced into the grain and the glue layer will be insignificant.
What I'm worried about most is the finishing of the whole thing. Does anyone have pictures of finishing MDF? Either I want a glossy finish, or maybe a satin finish to it.. What I'm mostly worries about is that I'm going to loose sharpness on the edges.
Raw MDF is very vulnerable to edge damage, and so, although sharp edges are obtainable with careful sanding, they are very prone to knocks and suchlike.
Ply is much more robust, and even better would be a real hardwood, that would look pretty cool in my opinion.
Sanding will be a real pain, I suspect you will have to do the whole thing by hand, using custom curved sanding blocks, using machinery will probably end in lots of marks and more problems than it solves.
However, the concept is stunning, and if the time is spent on finishing, I suspect the results will be both different and superb 😎
Hello,
I have a slight suggestion that might make things easier. The smaller alignment holes will end up with non-round measurements from the edges and although you could approximate them, it would take a very long time to calculate the measurements for 250 different sheets and then measure and drill the hole on every piece, which i suspect would each need to be within 1/16" of their mark in order for the curve to look even. An alternative would be to draw a straight line down the edge of the sewage tubing, and then each layer would only need about 15 seconds with a protractor to find the correct spot on the inner circle to line up with the line on the pipe. The degree measurements could be easily be found; I'd use a graphing calculator and it would be simple to find a logarithmic function that would spit them out for you. Good luck, all these weird enclosures are making me want to start a new speaker project before I'm even done with my current one...
-Chris
>So if i get it right the inside of the box is a cylinder, and the wood is to give it a cool exterior, and as a side effect, damp the pipe?
correct! Also I very much like the reddish-MDF finish on the first speakers. However these ones will be layered MDF, and I don't think I'd like the regular vertical stripes (between MDF layers). I don't really like the looks of the ply/MDF layered turntable though..
I do have access to very good epoxys, like black stycast (can't remember the number, 1250 or so?). It's the eposy we use in the lab and is *VERY* strong+robust. it can also be applied very thin when heated with a hair-dryer 😉 (the hair dryer is one of the most used tools in the Leiden-physics laboratory 🙂. I think it would be very possible to make a nice black finish with these epoxys. Dunno if I can use them for free, I'd need a lot for these speakers, and it's very expensive, I'd guess about €200 for a litre..
btw, exactly _what_ is staining and 'chamfering the edge'? (my english is not that good, sorry)
@pinkmouse : I was thinking about using a piece of pipe (about 6 cm diameter) to use as a sanding tool. I'd wrap the sandpaper around it and use the pipe turned horizontally and make horizontal strokes. A pipe would fit the curves of the speaker best (maybe a different diameter would fit better..), making the sanding easier.
@psychokids : My math-program spits out as many angles as I need. The number of slabs is a simple parameter. Just have to change it and I have a complete new set of angles. I'm not going to use a graphing calculator, or any calculator to calc 250 angles 🙂)
about how I would drill the alignment holes : I want to make a piece of paper with lines (360 of em) coming from a center. In the middle of the center I'd fit a piece of pipe (a piece from the big inner pipe). Fit the drill above it in a fixed position. Then just use one of the _corners_ of a slab to fix the angle and drill. easypeasy. Also very fast...
I made a 'nice' paint-picture to explain what I mean. The black lines show me the angles (the piece of paper)..
The red thing is the pipe fixed on the paper. The green thing is the slab, which I fit around the pipe. Then I use on of the corners of the slab to rotate it to the right angle (see the arrow) Ofcourse there are a lot more lines (360 of em, so I can measure the angle to .5 degree). And I drill a hole (blue) with the drill fixed above it all. Next slab, measure angle, drill.. etc.. easy enough? I think so.
correct! Also I very much like the reddish-MDF finish on the first speakers. However these ones will be layered MDF, and I don't think I'd like the regular vertical stripes (between MDF layers). I don't really like the looks of the ply/MDF layered turntable though..
I do have access to very good epoxys, like black stycast (can't remember the number, 1250 or so?). It's the eposy we use in the lab and is *VERY* strong+robust. it can also be applied very thin when heated with a hair-dryer 😉 (the hair dryer is one of the most used tools in the Leiden-physics laboratory 🙂. I think it would be very possible to make a nice black finish with these epoxys. Dunno if I can use them for free, I'd need a lot for these speakers, and it's very expensive, I'd guess about €200 for a litre..
btw, exactly _what_ is staining and 'chamfering the edge'? (my english is not that good, sorry)
@pinkmouse : I was thinking about using a piece of pipe (about 6 cm diameter) to use as a sanding tool. I'd wrap the sandpaper around it and use the pipe turned horizontally and make horizontal strokes. A pipe would fit the curves of the speaker best (maybe a different diameter would fit better..), making the sanding easier.
@psychokids : My math-program spits out as many angles as I need. The number of slabs is a simple parameter. Just have to change it and I have a complete new set of angles. I'm not going to use a graphing calculator, or any calculator to calc 250 angles 🙂)
about how I would drill the alignment holes : I want to make a piece of paper with lines (360 of em) coming from a center. In the middle of the center I'd fit a piece of pipe (a piece from the big inner pipe). Fit the drill above it in a fixed position. Then just use one of the _corners_ of a slab to fix the angle and drill. easypeasy. Also very fast...
I made a 'nice' paint-picture to explain what I mean. The black lines show me the angles (the piece of paper)..
An externally hosted image should be here but it was not working when we last tested it.
The red thing is the pipe fixed on the paper. The green thing is the slab, which I fit around the pipe. Then I use on of the corners of the slab to rotate it to the right angle (see the arrow) Ofcourse there are a lot more lines (360 of em, so I can measure the angle to .5 degree). And I drill a hole (blue) with the drill fixed above it all. Next slab, measure angle, drill.. etc.. easy enough? I think so.
WVL said:btw, exactly _what_ is staining and 'chamfering the edge'?
stain is the "transparent" paint used to color wood (in the case of the pictured speakers, cherry stain on walnut faced mdf). Chamfering is takeing off the square corner -- at 45 degrees in this case. Rounding the corners may also be considered a chamfer.
dave
thanks! does anyone have an example how layered MDF looks stained? I think the red speakers are not layered. I'm a little scared the slabs will show, and I wouldn't like that.
WVL said:thanks! does anyone have an example how layered MDF looks stained? I think the red speakers are not layered. I'm a little scared the slabs will show, and I wouldn't like that.
They will. I believe you would end up with a speaker that is horizontally stripped. Not distinct strips but near the glue they will be darker and the stain will not hide the junction between pieces.
dave
Okay, I'm forgetting about staining 😉 I really want them to look like they're made from 1 piece. That leaves painting.
I think I'm going to the shop this week to buy some MDF, and try to produce a 15x15x20cm little speaker. Should be possible out of 1 piece of board. I already made my angle measurement paper, too bad it's only A4, will enlarge it at the copyshop. I'll also get some pipe... Let's see how good I will be able to sand this shape.
I'll keep you informed, also with lotsa pictures (guess you noticed I like to visualize things 🙂, keep your thumbs up for me!!!
Werner
(also, I gotta do this quickly, my gf is on holiday for 3.5 weeks 😉) hehe)
- Status
- Not open for further replies.
- Home
- Loudspeakers
- Multi-Way
- Pipe speaker with a twist