Doesn't bother me, just use twisted magnet wire, so they don't 'sing'. Anyway, sure beats the #$%^ out of spanning it with a typical co-ax's acoustically huge/turbulent tweeter panel.
GM
GM
Mr Chang, what is the layout of the cabinets behind the driver baffle? Is is just open, or are there any other twists and turns?
I never did see any drawings of the layout anywhere. Perhaps you can point me to it, if it is out there.
I never did see any drawings of the layout anywhere. Perhaps you can point me to it, if it is out there.
Godzilla said:http://www.zillaspeak.com/Crossover.asp
Those tweeters look delicious!
You may want to start with 2uf and work your way up or down from there.
The tweeter possitioning is just fine. You might consider sticking the tweeter in place temporarily with rope caulk or some other putty while playing with the cap values. This way you dont have to keep taking the tweeter in and out of its hole.
Enjoy the process!
Godzilla
Godzilla, I remember you from several years ago, when I traveled to the Single Driver Website. I read your project on this Pioneer driver and the Piezo tweeter. I have always been a firm believer that the piezo tweeter has been overly maligned, but have not done much with them for years. I'm also thinking that there is a difference between the Motorola/CTS units from the cheap knockoffs.
Here is the point, or better yet points, I am trying to make. Have you, or others used a dedicated thread here on this forum, devoted to the lowly piezo? And have you compared the tweeters Mr Chang has gotten to the lowly piezo, to see which sounds better?
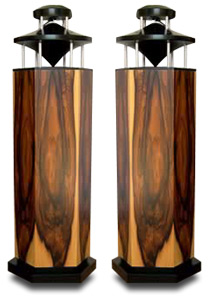
I'm in the process of going through a lesson in construction, where I will be making a six sided enclosure like that of the Duevel Venus. The picture is below.

I'm not overly enchanted with that additional tweeter blob sitting on the top, but DO like the concept of producing a horn effect by forcing the sound waves to radiate out in all directions from above, and making the top of the top radiator with just a slight curve. It seems to be a great idea, AND would allow the builder to show off his/her wood working/veneering skills at the same time. I would suspect that building a coaxial position for the tweeter above the main driver would allow for just the one radiator, and provide for a pretty good volume of cabinet and something that the ladies would swoon over. That's important don't you know?
Also I just bought a batch of unique walnut with a lot of the sap wood present, which would work pretty much like the pictures above, which uses Santos Rosewood(Santos and Waterfall Bubinga are my favorites). Below is a picture of what I just purchased, but have yet to receive.

The auction is right here. What is interesting is that he(Lepkowski) origionally had the auction set up as a 97 sq ft of walnut veneer auction. I PMd him and explained that I was interested in veneer with a lot of sapwood, and also possibly the heart wood coming to a point somewhere on the package, and out of the blue he dropped back on the total recorded amount to just 48 sq ft, which was half he was supposed to be offering, plus he also cut the price in half. So I got the entire 97 sq ft for a real song, and got the S/H thrown in to boot. Not bad for what I wanted to do. He must have figured that nobody would be interested in using this batch, and he probably got it for next to nothing. But if you look at what was done to the Venuses above, there is a lot that you can do with heart and sapwood mixed together.
I don't know what I am going to do with all that much veneer, but somehow I will be able to experiment and hone my veneering skills.
I figure that each cut of the MDF will require a 30% cut, and they should all fit accurately together, making a nice six sided cabinet.
Of course, I would have a hard time using a piezo, instead of the little fellow used above.
What do you all think?
John L said:never did see any drawings of the layout anywhere. Perhaps you can point me to it, if it is out there.
Plans on this page
http://www.frugal-horn.com/spawn-plans.html
This is the curvy version. Render is missing the suggested internal bracing.
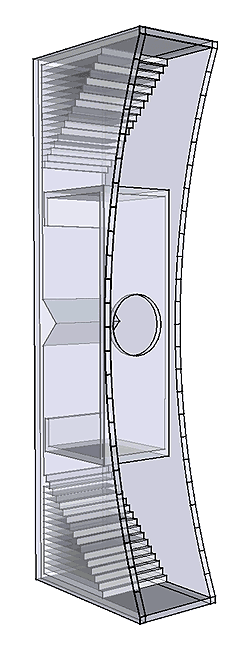
dave
John L said:Mr Chang, what is the layout of the cabinets behind the driver baffle? Is is just open, or are there any other twists and turns?
John L said:
Have you, or others used a dedicated thread here on this forum, devoted to the lowly piezo? And have you compared the tweeters Mr Chang has gotten to the lowly piezo, to see which sounds better?
What do you all think?
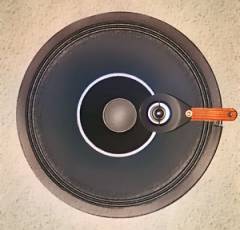
John L: there is nothing behind the tweeter, just open, make a small hole and push in the tweeter with a 2uF cap. And the sound comes alive.
I have used the piezo in another metronome project (rear firing with L-pad. (no BOFU). but to my ear, PE dome tweeter with BOFU is much better in high end.
gychang
Gychang stated
That may well be the case. However, I have read from numerous sources that the quality of the piezo depends on the manufacturer, and the model used. For instance the 1188A horn piezo is the top of the line and was the flagship of the Motorola/CTS line(they sell for over $50/each today without the horn attachment), so it would naturally be far better than the older 1005, which has appeared almost everywhere.
Anyway, I'm highly intrigued with the Pioneer and the tiny dome tweeter, along with it's possible use in the six sided enclosure.
We're always looking for something different, aren't we. 😉 Incidentially I got all my walnut from the seller today, and the combination of heart wood and sapwood from the young tree, really produces distinct, and heavy, grain that is beautiful to see.
I've discovered over time that if you are looking for a wide veneer, as most people are afraid to yield a veneer saw and match veneer, the product is less than interesting, lacks character, and tends to disappear into the background. However, by using a younger tree, you will find much more defined and large patterns, since the tree grows faster, and the tree rings are larger, producinG a more distinct pattern.
You will also get a lot more sapwood, which is not all that bad, if you are willing to be creative. That is why I was so taken with those rare Neubel Venus cabinets. Obviously they were much more expensive than just the run of the mill Venuses. And the courrent price for a pair of Venuses is around $5000. I suspect the workmanship in the cabinets constitute the majority of the cost.
I have used the piezo in another metronome project (rear firing with L-pad. (no BOFU). but to my ear, PE dome tweeter with BOFU is much better in high end. [/B]
That may well be the case. However, I have read from numerous sources that the quality of the piezo depends on the manufacturer, and the model used. For instance the 1188A horn piezo is the top of the line and was the flagship of the Motorola/CTS line(they sell for over $50/each today without the horn attachment), so it would naturally be far better than the older 1005, which has appeared almost everywhere.
Anyway, I'm highly intrigued with the Pioneer and the tiny dome tweeter, along with it's possible use in the six sided enclosure.
We're always looking for something different, aren't we. 😉 Incidentially I got all my walnut from the seller today, and the combination of heart wood and sapwood from the young tree, really produces distinct, and heavy, grain that is beautiful to see.
I've discovered over time that if you are looking for a wide veneer, as most people are afraid to yield a veneer saw and match veneer, the product is less than interesting, lacks character, and tends to disappear into the background. However, by using a younger tree, you will find much more defined and large patterns, since the tree grows faster, and the tree rings are larger, producinG a more distinct pattern.
You will also get a lot more sapwood, which is not all that bad, if you are willing to be creative. That is why I was so taken with those rare Neubel Venus cabinets. Obviously they were much more expensive than just the run of the mill Venuses. And the courrent price for a pair of Venuses is around $5000. I suspect the workmanship in the cabinets constitute the majority of the cost.
planet10 said:
Small enuff to stick it on the end of a cylindrical phase plugs to make a coax.
An externally hosted image should be here but it was not working when we last tested it.
dave
Ok Dave, you've sold me on this. This should work very well with the six sided cabinet, and the driver shooting upward and the sound wave radiating off the curved upper section.
An externally hosted image should be here but it was not working when we last tested it.
Is there any particular size dowel that is needed(no sense in ruining a nice pair of your works of art), or does it really matter as long as they don't contact the coil or cone?
Also, is there any particular problem with running the wire through the driver and up to the center of the speaker and then to the tweater? I've never taken a coax apart before.
I went ahead and ordered the tweat you show above. It's a little different from the one Chang is using, but I think it will look a little better on the end of a stalk in the middle of the Pioneer. What do you think?
John L said:Is there any particular size dowel that is needed(no sense in ruining a nice pair of your works of art), or does it really matter as long as they don't contact the coil or cone?
It should be as close to the diameter of the voice coil as you can get without it rubbing -- 0.5-1mm less in radius than the VC.
Also, is there any particular problem with running the wire through the driver and up to the center of the speaker and then to the tweeter?
You'd have to poke holes in the cone -- not really practical. As GM suggested a twisted pair of 30g magnet wire across the front of the cone is probably most practical.
dave
planet10 said:
You'd have to poke holes in the cone -- not really practical. As GM suggested a twisted pair of 30g magnet wire across the front of the cone is probably most practical.
dave
After thinking about it, I don't think I will have any real problem attaching the coax from the front, as with the Hammer Dynamics driver.
I could recess the driver about 3/4" from the top of the cabinet, which would hide it from sight. That would not be any real hurdle.
The real hurdle is going to be how to make a curved solid mass, that can work as the horn dispersal element at the top of the cabinet. I'm at a loss as to how I am going to make an inverted cone. I could go with laminated Baltic birch, but I don't own a large lathe, and could not do it any other way.
I've considered going to the Cary craft shop and making them on a potter's wheel, but there is a problem in doing it that way. Centering the clay on the wheel is not all that easy, but I have thrown cylinders many times on a wheel, so I am pretty well versed in the ceramics department. But again there is a problem, in the form of 'grog'. Grog is a rough material, like sand, or finely crushed rock, that is found in almost all potter's clay. It adds character to the clay when building up a cylinder, but it has a tendency to keep the clay from being the smoothest possible.
But even if I get a perfect cone that goes to a point, I still have to turn it over and clear out the inside, so as to make it light weight. And that would ruin the shape. the only thing I can come up with,....well actually two things, would be to center a bowl(or something like it) upside down on the wheel, and then placing clay on top of it. Then when I get it solidly placed there, take a cutting tool, and slowly remove strips of clay until I have made a nice cone, and the thickness is thin enough to be relatively light weight.
Then you would have to trim the clay, and run a wire under the entire thing in order to remove it from the wheel. Once the clay dried, remove the inverted bowl from the clay, and I should have a cone that could be used as the inverted horn. All I would have to do then would be to polish it, use a nice glaze and fire it. And lastly create a top cap that would sit on top of the ceramic deflector and give it a finished rounded top.
The other thing I could do would be to make an initial cone the way I want it to look, and then make a rubber mold of it. Once that is done, use the clay slurry that many use for pouring molds and pore the slurry into the mold. Once it is cried, crack the mold and make another.
I've spent a good deal of time in the last month going through hardware stores, department stores, Wal-Mart, Kitchen specialty stores, and places like Bed, Bath & Beyond, but have not found anything, other than a funnel, that remotely comes close to a cone like what I will need. It's really frustrating not to be able to come up with a suitable shape that I need.
Has anyone here used a lathe much? And if so, can you work with something like this?
An externally hosted image should be here but it was not working when we last tested it.
Duevel uses a large industrial lathe
An externally hosted image should be here but it was not working when we last tested it.
And they come up like this
An externally hosted image should be here but it was not working when we last tested it.
I like the idea of one of those cones, but the double cone system looks too gaudy to me. By making a Coax setup that extra topper would be eliminated, and it would definately look better. Also, the cone would help disperse the sound much better and give a presence and depth that a regular enclosure would not be able to do.
One other thing, should I try to shoot for a 3cf enclosure if possible? It may be impossible to do, unless I made the sides more than 8" wide. I'll have to recheck the volume I could attain from an 8" wall that is about 39" tall.
Sorry for the extra long, rambling post. 🙂
Re: Re: Re: The Chang combo!
I've ordered the speaker components, wow all 60 dollars worth, what a value! Soon I'll fabricate this fellow. I've been enjoying horns for the last thirty years. It'll be interesting to see how this combo sounds.
Any suggestions, or alterations, would be most appreciated. Many thanks to the folks (don't be shy, you know who you are) who's talent and perseverance have made this project possible.
Just wonderful! 🙂
gychang said:
I built the first one and I am glad someone else confirmed what I heard ..., my sister is trying to steal my speaker so I have grabbed more of the same tweeters. I don't deserve the Nobel prize, as I only followed the intellectuals suggestions and instructions. Thanks panomaniac for suggesting the combo.
Folks don't let the combo get away, just amazing.
An externally hosted image should be here but it was not working when we last tested it.
gychang
planet10 said:
Plans on this page
http://www.frugal-horn.com/spawn-plans.html
This is the curvy version. Render is missing the suggested internal bracing.
dave
I've ordered the speaker components, wow all 60 dollars worth, what a value! Soon I'll fabricate this fellow. I've been enjoying horns for the last thirty years. It'll be interesting to see how this combo sounds.
Any suggestions, or alterations, would be most appreciated. Many thanks to the folks (don't be shy, you know who you are) who's talent and perseverance have made this project possible.
Just wonderful! 🙂
Re: Re: Re: The Chang combo!
I am curious as to just how much volume is in the center enclosure portion of the loudspeaker. Is it closer to 2 or 3 cf?
I can't remember which thread it was on, but there was a link to the optimum enclosure size for the FOFR, and I think 3 cf was it. Am I correct?
An externally hosted image should be here but it was not working when we last tested it.
I am curious as to just how much volume is in the center enclosure portion of the loudspeaker. Is it closer to 2 or 3 cf?
I can't remember which thread it was on, but there was a link to the optimum enclosure size for the FOFR, and I think 3 cf was it. Am I correct?
Re: Re: Re: Re: The Chang combo!
~3,800 in^3 = 2.2 ft^3 = 62 litres
dave
John L said:I am curious as to just how much volume is in the center enclosure portion of the loudspeaker. Is it closer to 2 or 3 cf?
~3,800 in^3 = 2.2 ft^3 = 62 litres
dave
Re: Re: Re: Re: The Chang combo!
John L said:
I am curious as to just how much volume is in the center enclosure portion of the loudspeaker. Is it closer to 2 or 3 cf?
[/B][/QUOTE]
here is the dimensions on the cabinet, I used.
[url]http://homepage.mac.com/tlinespeakers/FH/download/Chang-NBVR-map-140807.pdf[/url]
gychang
I'm asking this because I am about to get around to beginning my project using the BOFR and the PE tweater. But I am going to use the six sided enclosure, and using the lathed upper piece as the horn for 360% dispersion. I suspect the sound will be a little bit different as the sound will be distributed more in all directions, allowing for what should be more depth of field.
But I am still attempting to understand just how much the upper and lower horn of the above project added to the unit. If the enclosure was made smaller, minus the upper horn, would that decrease the sound presence? I believe there is a thread on this smaller project, but don't think there was a comparison between the two.
How much effect is the dual horn outlets? It would be interesting to see how your project will sound with relation to what I have in mind. That would be something worth using as an excuse to attend a convention and giving the two a listen, matched up to each other.
I have already made preliminary test cuts, and pieced six cuts together, so I know how the setting on my table saw needs to be to make all six cuts match well prior to glueing. Now all I will have to do is make my rabbit cuts with the router, on one section of 48" substrate(I can make one pass with the router, for each rabbit, before I cut each piece individually). I have discovered that I can make six cuts that are slightly over 8", and by turning the cuts over, a 48" width will do the job with all six pieces and still leave a little bit left over. That way I can get the pieces for both sets of outer walls from one 4X8 sheet of material. Then the braces will have to be made from other pieces. That should cut down on the cost of plywood.
Once I start out, I will begin a thread on the project and take pictures as I go along. I am sure that you all will have may nice suggestions as I go along with it.
Thanks for the info.
John
I'm not sure what 'the' six sided cabinet is, so I've no idea I'm afraid.
As for the over-under mouth arrangement, there have been many posts on the subject, and it also depends on which variation you mean. Larger radiating area for a given footprint, superior image depth & dynamic presentation, focused radiation a la a focused array or a ~cylindrical projection in the passband similar to a line array (depending on curved or flat-fronted) etc. The focused versions are IMO superior, but the flat-fronted versions still have the other benefits if forward-firing is required.
As for the over-under mouth arrangement, there have been many posts on the subject, and it also depends on which variation you mean. Larger radiating area for a given footprint, superior image depth & dynamic presentation, focused radiation a la a focused array or a ~cylindrical projection in the passband similar to a line array (depending on curved or flat-fronted) etc. The focused versions are IMO superior, but the flat-fronted versions still have the other benefits if forward-firing is required.
Has the notion of one mouth forward, and one mouth backward been discussed yet? Seems like it may have some advantages, but also some disadvantages. Would be dependant on room and placement.
Scottmoose said:I'm not sure what 'the' six sided cabinet is, so I've no idea I'm afraid.
This.
An externally hosted image should be here but it was not working when we last tested it.
Instead of the tweater nipple on top, I will not add it, and the top of the horn attachment will be rounded to flow with the design.
Also, the size of the cabinet will be increased to be just a hair over 8" per side. That will allow for me to construct a cabinet that is between 2.5 to 3.0 cf in volume, which would be the optimum size for the BOFR. Rather than having everything fire in one direction, it would fire 360%, creating much more depth.
In that case, they're exact opposites & will sound like it. The box you indicate is an omnidirectional design, created to disperse radiation as evenly as possible. A horn & its variations are by contrast highly directional (hence the term waveguide is often employed). Both have their positive and negative points.
For example, the frequent reaction to hearing an omni is 'where are the speakers?' as they do their legendary 'we're not here' act. That comment is also sometimes followed, after the initial shock dies down, by the additional query of 'where exactly are the instruments? They don't seem very easy to locate.'
Meanwhile, the equally frequent reaction to hearing a horn of some variation or other is something on the lines of 'er, that's dramatic / big / precise / fast (varies depending on the type of horn).' And once that shock dies down, it's sometimes followed by 'a trifle too much so for my taste.'
As ever YMMV. Depends on what you're after.
BTW -don't get too hung up on 'optimum sizes.' There's no one optimum size -what's good for one application is not necessarily so for another. It depends what you're trying to achieve.
- Status
- Not open for further replies.
- Home
- Loudspeakers
- Full Range
- Pioneer 8" build, the Chang variant