

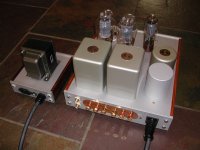
Nice! I love the top panel divided in two to allow easy access underneath. Great idea.
I'm also pretty convinced that Front Panel Express will be doing all of my further chassis panels... I'm done with that part of the DIY world.
I'm also pretty convinced that Front Panel Express will be doing all of my further chassis panels... I'm done with that part of the DIY world.
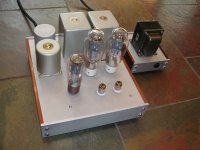
Finally finished my amp......
Can you tell me more about what you did with it?
Obviously separate power supply, is that to reduce hum?
Chassis? Did you build that from scratch or buy it somewhere?
What are you driving it with?
Thanks
Can you tell me more about what you did with it?
Obviously separate power supply, is that to reduce hum?
Chassis? Did you build that from scratch or buy it somewhere?
What are you driving it with?
Thanks
Yes, separate power transformer to reduce hum. I would have done more PS components on the PS chassis, but the PCB makes things convenient to leave them in the main chassis. I had umbilical connectors & cable laying around so what the heck.
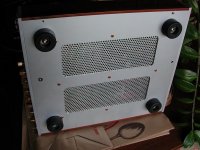
I built both chassis from scratch using a mill and a table saw....and planer, pop-riveter, lacquer sprayer, bead-blaster, etc etc......only took about 430 man-hours 😉.
I have a couple of preamps including an Aikido; lately I've been using an Anthem Pre-1.
A few details:
Power transformer is an Edcor XPR-131 with it's endbells stripped and painted with hammer tone Rustoleum.
I took the pics with a GZ37 rectifier in place; I'm presently using a 5AR4, but I'm going to pop in the GZ37 once I'm comfortable everything's in it's happy place.
James 6123 transformers on the 5K tap, James 5H choke, JJ 300B's
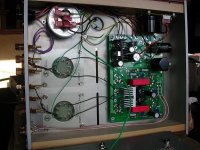
100uf ASC motor run bead-blasted, in parallel with a 180uf/500V Panasonic TS-UP mounted on the board. I also made a separate board to hold snap-in style bias supply caps since they were a little tall for the chassis. They are mounted to the sidewall under the hood. C1 is a 4.7uf.
It's presently set up with 360V/70ma on the 300B's. I plan on playing around with the 3.5K transformer taps etc.
I built both chassis from scratch using a mill and a table saw....and planer, pop-riveter, lacquer sprayer, bead-blaster, etc etc......only took about 430 man-hours 😉.
thats cool

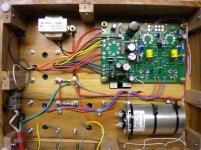
Looks good, bw. Any pictures of under the hood? Also, how do you reach the bias trimmers?They are mounted to the sidewall under the hood. C1 is a 4.7uf.
Any pictures of under the hood?
Also, how do you reach the bias trimmers?
The same way everybody else does.....😉 I considered topside taps and pot adjust, but it would be a fair bit of additional work....and the taps would be at B+ voltage

The dangling ground wire in the pic is leftover from an extra RC stage in the PS that was used to burn some volts when using a Hammond transformer. I removed the stage when I went with the Edcor.
Attachments
Thanks for posting those. Any thoughts on shortening the umbilical cord? Just wondering if there will be impedance issue if it's long. 😕 
I've got plenty of B+
I imagine that the voltage drop across the umbilical is insignificant, since the total current draw is less than 175ma, at least for the B+.
Thanks for posting those. Any thoughts on shortening the umbilical cord? Just wondering if there will be impedance issue if it's long. 😕
I imagine that the voltage drop across the umbilical is insignificant, since the total current draw is less than 175ma, at least for the B+.
Tubes finally came in the mail today....To say I couldn't be happier is an understatement. When I first noticed this amp I thought to build it point to point. Since I was using George's circuit, build manual, and shopping list I figured I owed him something...so I bought a board. Well, once I had the board in hand I couldn't resist just using it....Glad I did. The build was straight forward and the results so far are great....
Attachments

Tubes finally came in the mail today....To say I couldn't be happier is an understatement. When I first noticed this amp I thought to build it point to point. Since I was using George's circuit, build manual, and shopping list I figured I owed him something...so I bought a board. Well, once I had the board in hand I couldn't resist just using it....Glad I did. The build was straight forward and the results so far are great....
Very Nice! What species of wood? How do you do the corner joinery? Do you run the assembled miter through the saw with each side 45 degrees off of the table?
- Home
- More Vendors...
- Tubelab
- Pictures of your Tubelab amp