ShinOBIWAN said:The steps are pretty funky come night-time. The garden's like Disney Land with lanterns, spotlights, uplighters and a fountain with lights that take advantage of refraction within the water - one word 'Women'.
Oi! I used to be a lighting designer you know! If you don't watch out, I'll post some pics of my shows, then you will really see what tacky is. 🙂
pinkmouse said:Stunning job Ant, I'm very impressed. I can't wait to see the end results.
Thanks Al 🙂
pinkmouse said:
Oi! I used to be a lighting designer you know! If you don't watch out, I'll post some pics of my shows, then you will really see what tacky is. 🙂
😀
Its just a little too fussy for my liking, infact if it was upto me there'd be a big halogen lamp and that's the lot but apparently this is 'mood' lighting

It doesn't matter anyway because I've taken over the gazabo with all my cr*p, so there's no entertaining guests in the summer. Which suits me 😉
Totally amazing work. Congratulations on a system that not only is technically excellent, I'm sure sounds excellent and looks excellent too.

ShinOBIWAN...this really looks great, but you know that all ready 😀
Could you please post some picture off work in progress, I mean what tool you used when doing some thing...
I am fascinated with that finished on last picture and would like to know how to achieve that, so it would be great to see some pictures of one faze to another...if 'am not asking to much...picture says 1000 word's, I hope...
I know you describe all process in words, some off them I don't understand, since I’m not that good in English, and that why it would be great to see some more picture of work in progress.
Thanks
Josip
Well I've meaning to get round to this, and I hope Ant doesn't mind me attaching extracts from some of his email to me, but it's full of helpful stuff regarding his finishing techniques...
I'm completely self taught and just do thing by trial and error, which results in a fair amount of waste MDF when things don't go to plan. I'd say the main things I can suggest is be ambitious and definitely obsessive. Don't rush and if it doesn't fit right or look right don't be afraid to throw it in the bin no matter how attached you've grown to it after all the hours spent.
Perhaps the biggest tip I can give though is buy excellent quality tools (not neccessarily expensive) that offer repeatable accuracy.
Finally spend as much time as possible planning, this really can't be overstated when you start to add complicated shapes, angles and dimensions.
I personally use CorelDRAW 12 at first and set the entire thing to scale then do plan views of the front and side dimensions. This gives a good idea of proportion and position. After your happy with a design, transfer the whole idea along with dimensions into a 3d CAD package to really piece together the whole package, again I use an old version of AutoCAD that I bought very cheap off ebay a couple of years ago. It might not be cutting edge compared to the new versions but I've grown very acustom to it and can knock up a detailed design in a few days. The great thing about the 3D CAD is that you can explore the angles required for good fitment instead of having to use a ton of math, for example try working out how to calculate the cut angle on each piece of MDF that meet on a 16 degree absolute angle whilst simultaneously have sides that slope 8 degrees. All in all it saves a hell of a lot of time and can be moved around and changed relatively easily.
I'd say go a notch or two above what you feel really comfortable with. Make something that you've seen and liked the look of but never thought it would be possible, take the best bits from your favourite 'super' speakers from xxx manufacture and amalgamate into a unique design. It'll take you some time to build if done properly but the pleasure you gain from it all is pretty immense and thats before even screwing a driver into the cabinet.
I really know what you mean with the naff spray cans – you’re limited to pretty poor cellulose based paints which take forever to dry and aren't particularly durable even with several coats of laquer. Then you've got the fact that a bee's fart has more pressure than your average spray can and the fact that coverage is uneven and the spray fan is small neccesitating the can being held about 4 inch from the work you spraying to get anything like even coverage.
There's a couple of things that are important with compressors. The first is the tank capacity, the second is the max flow rate. Depending on the gun your using you'll need a minimum amount of PSI to allow the gun to lay the paint down correctly. Too much PSI from the compressor can be solved by using the flow rate valve but too little (even when the valve is opened fully means that the gun will be spitting out chunks of paint and will lack even worse than the spray can method. Also the tank capacity will determine how long between the motor running to top up this resevoir. I'd recommend 50ltrs as a minimum as I find its surprising just how often the motor kicks in and that isn't particular good for A: the compressor itself and B: The quality of the finish. A 25ltr type won't be much good for anything other than small jobs and certainly not a few hours use spraying a pair of average size speakers.
As a rough rule of thumb, gravity fed spray guns require less air flow than the suction types (paint cup on the bottom). Most pro spray shops use gravity fed (watch 'pimp my ride' on sky for example).
I use a Sealey 50ltr 2hp compressor which cost £130. Excellent compressor and was recommend to me by someone who sprays regularly:
http://www.tooled-up.com/Product.asp?PID=123239&MAN=Sealey-Compressor-50ltr-Direct-Drive-20hp
And an Aerofura gravity gun which again cost around £50 although the place I originally bought it from doesn't do them anymore. Its a good gun anyway and provides a very nice even spray + its easy to clean. Avoid the cheap crap as I bought a £20 one that kept blocking up causing the spray pattern to become uneven.
One thing is for sure, you'll be very surprised at how quickly you do coats because one pass on a compressor+spray gun setup is around 30cm width compared to around 5cm on the spray can. It also goes on fairly thick and extremely even so make sure you move with the gun at all times when spraying otherwise you quickly end up with rather large runs. Also be sure to hold the gun at least a foot away from the work to maximise the quality of the spray going down.
Finally don't forget to check these folks out:
http://www.paints4u.com/productsbyC...nSelection=6&SubCategoryID=101&Subselection=4
They supply everything you ever need, from primer, groundcoat, pearls all the way through to soft lint rags and high quality polishing/rubbin compounds. I've also found them extremely helpful over the phone and they can advise on which paints are most compatible with others etc.
One final note; be absolutely sure to have the correct safety equipment and if your using 2 pack (paints with a hardener component) then use a full air feed mask and be sure not to expose any part of your skin since isocynates contained in these paints is absorbed by the skin and you will not feel very well at all. Again its a lesson I learned the hardway and I actually ended up at my local doctors surgery after I had been having trouble breathing and felt very dizzy - it turned out it was the paint. The surprising thing at first was I did wear a mask although it was one that only filtered VOC's (Volatile Organic Compounds) and not the isocynates. The doctor took a quick look at the paint tin I'd brought in with me and said you must wear complete respiritory protection. So be careful.
2 pack paints dry extremely quickly, provide a near indestructable finish (its used on cars) and the gloss holdout is fantastic but If you don't fancy the cost of a full airfed kit (you can hire them though and that's what I do) then you can use waterbased, acrylic or cellulose based paints. All you need for these is a VOC mask and cover your skin and hair.
This airline works fine with the Sealey and is what I use:
http://www.paints4u.com/ProductDetails.aspx?productID=804
Use this black ground coat:
http://www.paints4u.com/ProductDetails.aspx?productID=5353
Mixed with these thinner (ratio 2:1 or 1ltr ground to 0.5ltr thinners)
http://www.paints4u.com/ProductDetails.aspx?productID=4926 (also available in 1ltr tins but 5ltrs is cheap enough anyway)
If you want a 2-pack finish use these clearcoats:
http://www.paints4u.com/ProductDetails.aspx?productID=4929 with
http://www.paints4u.com/ProductDetails.aspx?productID=4927
Or if you don't fancy the health risks, this is fine but takes awhile to fullly harden (month or two):
http://www.paints4u.com/ProductDetails.aspx?productID=4417 (no thinners
required)
This primer is fine:
http://www.paints4u.com/ProductDetails.aspx?productID=2109
Alternatively you can use 2-pack primers but I haven't tried this yet so can't comment on stuff that works well.
As well as this, buy yourself an excellent orbital sander and some top notch sand paper:
http://www.paints4u.com/ProductDetails.aspx?productID=6030
Use these to flat back the paint after apply the primer, but don't do the ground coat! Finally flat back the LAST clearcoating. Be sure to apply around 7 coats or more if you want to get a piano black or mirror finish.
After this buff out using Farecla G3 and then polish with a high quality wax polish. Also go light and be careful on corners with the orbital sander otherwise you'll go through the clear coat and back to the groundcoat/primer meaning the whole thing has to be done again. Its difficult to do if you've applied enough clear coats so don't be afraid to use the orbital with very fine sandpaper. Whatever you do don't sand by hand, it looks like crap with big waves and distortions in the mirror finish because of level impefection with that method.
Finally, if your using 2-pack paints buy one of these and some head-to-toe overalls:
http://www.paints4u.com/ProductDetails.aspx?productID=1299
If your using single pack or cellulose based paints then this will do fine:
http://www.paints4u.com/ProductDetails.aspx?productID=355
Whatever you do please, please make sure you 100% safe. This stuff is extemely nasty to unprotected lungs and at the end of the day, all you have in this life is your health.
Use this polish, its very good and much longer lasting than the rubbish they sell down at halfords etc. It has a very very fine cutting action which brings the laquer back to a great gloss look. Apply with a damp rag and be sure that its of the highest quality soft cotton or similar otherwise you'll end up putting very faint swirl marks in the finish that are visable from certain angles and light:
http://www.paints4u.com/ProductDetails.aspx?productID=536
Use the G3 rubbing compound, to get rid of the light swirl marks left from sanding - they will be extremely light though with 2000grit sand paper so only use as much as you need and then move on to the polish I mentioned above. Be extra careful on edges of a box as the pressure from the small surface area can mean you quickly go through the clearcoat and into the groundcoat. Always apply with a damp and soft rag.
http://www.paints4u.com/ProductDetails.aspx?productID=2789
Its easy to spray a box but tough to get a finish that's the equal of the quality you see on todays cars. Lots of work and the preperation and finishing must be very anal. Take time to ensure that each step is done correctly and you'll be amazed at the beauty you can come up with.
I'm sure I've shown you this before but take a look at this:
[link removed]
The satallite section has been prepared as I've described to you. The bottom section or the one with the woofers in has merely been sprayed and hasn't had the flatting out/polishing process described in the previous emails. The difference in the clarity of the reflection is very plain to see. Its a fair amount of effort but I'm sure you'll agree that it looks stunning and the sad thing is that photo only does it a fraction of justice. All the was achieved with exactly the products and paints that I've detailed out.
I keep getting all these hints that keep popping into my head that I feel that I should point out:
Make sure you apply plenty of priming coats, even with the wood hardener.
Especially where you have the 'grain' of the the MDF running in different directions or on joints. Then keep sanding flat between every few coats. Do this and get a nice thick layer of primer on. For the baffles on the Perceives where I've laminated several layers of MDF together, I must have done around 15 coats to absolutely ensure that I don't see the joints. This is before I've even applied the groundcoats and several clearcoats. Another tip would be to allow the primer to dry for a couple of minutes between coats. And also make sure that after the last sanding on the primer that you move to spray the groundcoat on the same day preferably as moisture may effect the application. Same goes for the clearcoats. So really what you want to do is spray many coats of primer over however long, let it dry and harden thoroughly for a week or two and then do all of the following in one
day: sand the primer flat, apply one final coat of primer and leave to dry for 30 minutes, then spray a couple of groundcoats and let dry for 30 minutes and then apply several (minimum 5 preferably 7) coats of clear coat with 10 minutes between each coat.
After this leave the finish to dry for 48 hours and then go about flatting the clearcoat for a mirror finish. The paint will take around a month or two to fully harden if your using cellulose or a few days with 2-pack. After this time you can go back and give the whole thing another go with the rubbing compound and polish as the shrink back on the paint will have dulled it somewhat. Once this is done, that gloss will last for ages and ages.
I'd recommend you use cellulose or 1pack paints because the health risks are elliminated with a VOC mask and overall's plus you save around £250 on a full airfed mask. I actually hire an airfed mask with a tank of air from out local HS hire shop. Works out around £25 for the week with a single tank of air, I do look like a diver but I don't care because I know my lungs are 100% safe and after my last experience with paints containing isocyanites I'm not taking ANY chances, can't stress that enough. Please be careful with the 2-pack stuff if you choose that route.
now, after reading all this, at least to me, it seams that finishing is the hardest thing to do...
well, I was prepared that finishing is not going to be easy, but this hard :-(
maybe I should ask someone at the car lacier to do some of that work for me...
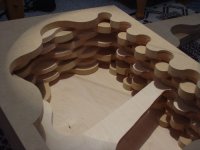
this is what I will have to finish .. .based on eVeII...
well, I was prepared that finishing is not going to be easy, but this hard :-(
maybe I should ask someone at the car lacier to do some of that work for me...
this is what I will have to finish .. .based on eVeII...
Attachments
All good advice from shinobiwan there. I will just add that I would use acrylic paint in preference to cellulose as it is more hardwearing and compatible. Note acrylic is not 2-pack, that's something else.
Ant, can you just confirm that you used Banda Wood Hardener throughout the project, or did you use the Ronseal at any time? The Bonda stuff seems to be half the price of the Ronseal so I'm thinking about trying that.
Ant, can you just confirm that you used Banda Wood Hardener throughout the project, or did you use the Ronseal at any time? The Bonda stuff seems to be half the price of the Ronseal so I'm thinking about trying that.
No problems with the quotes Vikash, hope it helps others out.
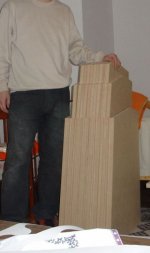
More progress:
Really starting to take shape now.
PS. Sorry for the large images but I thought it deserved it.
More progress:
An externally hosted image should be here but it was not working when we last tested it.
An externally hosted image should be here but it was not working when we last tested it.
Really starting to take shape now.
PS. Sorry for the large images but I thought it deserved it.
That's some truly exceptional design and finishing work. Very fine craftsmanship - something we see so little of these days in the consumer world.
OT: I followed your crossover thread with great interest, but decided to go with a DEQX. My computer skills and patience were not up to the task of being such an early stage adopter for the PC approach. At last report you were trying the DEQX. I'd be very interested in your experiences - I've had good results after some early stumbles. Either online or offline, if you have the time and inclination. sheldone( Circle A )cox.net
Sheldon
I've just finished fitting the speakon input connector and I decided to have a look to see how the rear support fit. I must say that I'm absolutely thrilled with the end results, it literally looks as if its a high-end commercial product which is exactly what I was looking for.
Final update for today:
Final update for today:
An externally hosted image should be here but it was not working when we last tested it.
An externally hosted image should be here but it was not working when we last tested it.
An externally hosted image should be here but it was not working when we last tested it.
Amazing work Shin. 
I'm really glad you've installed that support - I was getting nervous about the strain on the bottom section of the enclosure.
I'm really glad you've installed that support - I was getting nervous about the strain on the bottom section of the enclosure.
- Status
- Not open for further replies.
- Home
- Loudspeakers
- Multi-Way
- 'Perceive v2.0' Construction Diary