Hey Bob, that was a superb post 🙂
Big thanks for that and since I've got a hacksaw and a couple of new blades I'll give that a go. I'll give it a practice run on the wastage end but you made it sound easy and nearly fool proof - always a very good thing 😀
Big thanks for that and since I've got a hacksaw and a couple of new blades I'll give that a go. I'll give it a practice run on the wastage end but you made it sound easy and nearly fool proof - always a very good thing 😀
lufbramatt said:Ive fitted quite a few pairs of expensive suspension forks to mountian bikes, which involves cutting the "steerer tube" which sticks out the top to the right length. These are generally made from high grade cro-moly steel or pretty thick aluminium, and the best way ive found of cutting them is to use a plain old pipe cutter like this one http://www.ted-kyte.com/3D/Pictures/Pipe Cutter.jpg to start the cut off, guarantees a 90 degree cut, then once you're about half way through finish off with a hacksaw in the groove thats been made. Finish the burrs of with a file and its sorted 😀
Thanks Matt
Great suggestion and I've seen the plumber in action with one, definitely makes short work of copper.
Unfortunately the pipe I'm wanting to cut is 60mm diameter and the ones with enough cutting capacity are expensive according to a quick google.
I like Bob's description with the hacksaw because its cheap and sounds easy to do with a bit of care. So I'm going to give that a try but thanks for headsup.
You're welcome, anytime.
It's easy when you have done something hundreds of times before, and found all the possible mistakes which can be made!
Its one of the (very few!) advantages of getting old. 😀
It's easy when you have done something hundreds of times before, and found all the possible mistakes which can be made!
Its one of the (very few!) advantages of getting old. 😀
Hi Shin,
Just seen that the pipe is 60mm dia.
In that case, I reckon you will do better with 24TPI blades here, as they will probably be quicker and a bit less hard work.
With a larger diameter there is obviously more metal to cut, but unless you get too deep into the pipe's centre (so don't) the blade will be working at a shallower angle to the plane of the part you are sawing. It is this shallow angle, together with ensuring there are always several teeth in contact, which gives a good smooth cut, and helps to avoid any wandering.
It doesn't 'sound' as if you making so much headway as when you are cutting at 90 deg. to the metal's plane, but you are cutting a much longer length at any one time, so it is not really any slower.
Incidentally, the paper 'marking' trick will always work with any *parallel-sided* piece of metal/wood, or whatever, provided the paper's edge is straight. Just pull it tight around the job, and align the overlapping edges, and you will always end up with a true 90 deg cut, no matter if the job is round, rectangular, hexagonal etc.
Sure beats messing about with try-squares, or whatever, and I have few bits of thin plastic sheet in my scrap-box for this which last forever. For a 'one-off', paper is OK though, especially if it is placed on the 'wanted' side of the work, as if the very thin edge allows you to slip when running the pen around, it 'protects' the part you need to keep from being marked, anyway. 🙂
Just to add, bobkens masking tape method I actually have been using myself for a while now. I first devised it when trying to cut my 4 inch vents square. It works well as long as you take your time in the prep.
ShinOBIWAN said:
Thanks Matt
Great suggestion and I've seen the plumber in action with one, definitely makes short work of copper.
Unfortunately the pipe I'm wanting to cut is 60mm diameter and the ones with enough cutting capacity are expensive according to a quick google.
I like Bob's description with the hacksaw because its cheap and sounds easy to do with a bit of care. So I'm going to give that a try but thanks for headsup.
no worries- didnt realise the pipes were that big!
I cut through some 60mm dia solid alu bar yesterday to machine some 'speaker parts from- i let the huge great horizontal bandsaw down in the uni workshops handle that though 😀
Chopsaws are definately not suited to cutting steel! The hacksaw method will work fine, just take a little care starting off, though a power bandsaw is the way to go if you have lots to do. 🙂


hi shin,
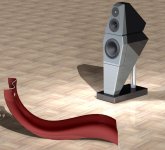
spent a day in the workshops soldering up crossovers and made good progress so had a spare half hour this evening- thought it might be interesting to do a quick CAD of the perceives 😀
If you want any more colours trying out for the baffles let me know and ill do some samples . . . put my speakers in just to make the reflections and shadows more interesting- how tall are the percieves? my quick mock up is just based on the phots a few pages back, but they seem to be quite tall- my speakers are 950mm!
O and i wasnt bored enough to model a whole new set of drive units so just used my models of the scan 8555, seas 27tbfg and seas mca15 🙂
Attachments

lufbramatt said:hi shin,
spent a day in the workshops soldering up crossovers and made good progress so had a spare half hour this evening- thought it might be interesting to do a quick CAD of the perceives 😀
If you want any more colours trying out for the baffles let me know and ill do some samples . . . put my speakers in just to make the reflections and shadows more interesting- how tall are the percieves? my quick mock up is just based on the phots a few pages back, but they seem to be quite tall- my speakers are 950mm!
O and i wasnt bored enough to model a whole new set of drive units so just used my models of the scan 8555, seas 27tbfg and seas mca15 🙂
Oh my... that is freaking awesome work Matt. Love it!
The only thing that isn't exceptional is the top section. The baffle looks a little too thin at the top. Still looks great but I prefer the look I already have - but then I would 😀
They're 1095mm high when measured from the bottom of the base to the top of the cabinets. And they're 670mm deep.
Once again Matt, a huge thanks for that and my god I want to be able to learn how to come up with stunning renders like that. Mine look positively aneamic in comparison.
Could you mock another up with the baffles in a dark blue, dark green and a brighter silver. And could you do the paint line on that splits the woofer cabinet up - pretty please 🙂
Once again
 You is the man Matt.
hi
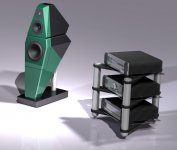
sorted the top bit, put the split line in- think thats how its meant to be, from going back a few pages thats the last paint scheme i found.
Heres it in green, together with some musical fidelity electronics and a cool hifi rack: (when i get bored i model things on proEngineer- ive got a whole collection of stuff including a plasma tv and a whole room with a fireplace to put products in- its too hard to light properly tho and the large model slows my pc down too much 🙁)
Attachments
Matt I seriously envy those skills. That's just mad 🙂
A huge thanks for taking whatever time it took to do those. You've let me get a better idea of where to head than I've ever had before. Usually I have to physically spray it to get an idea but this is so much neater.
I know its a bit much to ask but could you do the first colour you posted - the one with the gun metal grey in the new model you've created. And maybe one all in black if you've got the time.
May the gods smile on thee 😀
Ant
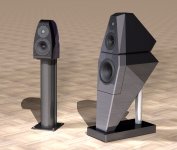
I actually prefer the silver one best out of them all. I pretty much suspect that the green and blue would be as they are. A more monochrome tone looks best IMO.
I'm going to try going with silver again I think but this time with a fine metallic rather than the 'fair ground stuff' I used before. I might also try tinting it with a small amount of black dye to take the brightness off the finish.
I'm going to try going with silver again I think but this time with a fine metallic rather than the 'fair ground stuff' I used before. I might also try tinting it with a small amount of black dye to take the brightness off the finish.
hehe thanks it gives me something to do- my protoype speakers had to be dismantled so i could solder up the crossovers properly, which means im left with a 15 year old pair of mission 760's to listen to which suck. a lot. so dont want to listen to music at the mo- well ive actually just spent the last hour listening to my mate richards fostex fe206e in a huge great front horn thats hes grp'd up- an interesting listen!
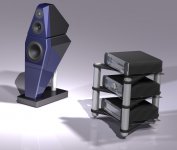
Anyway, heres a dark silver one for your enjoyment 😉
Anyway, heres a dark silver one for your enjoyment 😉
Attachments
Hello. I have been following this thread for some time now, and I must congratulate you for your outstanding vision and effort. Have you considered not painting your speakers? I think the front baffles would look fantastic covered in textured leather like the Sonus Faber Cremona Auditors. It would look different (classy IMHO) and be relatively easy to do as well. Your tweeter would contrast very nicely against textured black leather. I must apologise for not being able to contribute much to this forum. My DIY skills are completely untried. I come here mainly to get inspiration to give it a go sometime soon.
rv1890 said:What cad program are you guys using to produce the images??
Thanks
hi, im using PTC ProEngineer to do the CAD modelling- an industrial level package with a very steeep learning curve, but its one of the most powerful CAD packages with the ability to output CNC code, do mechanical analysis, animation, mould tool design, or quick visual renderings. oh and its £7000 worth- im using a uni license 😀
Im using the Photolux plugin to do the renders, which is based on lightwave. The renders above are only quick 30 second previews on low settings, but at high settings ive had renders take over 6 hours to complete 🙂
rv1890 said:What cad program are you guys using to produce the images??
Thanks
SolidWorks is a little less powefull for artistic smooth curves It think, but for most speaker cases, you could be up and running within a week or two.
Alibre had provided some free copies a while ago, not sure what they are doing now.
Generally very realistic rendering takes lots of practice and skills, but just engineering design can be accomplished in very short learning curves.
- Status
- Not open for further replies.
- Home
- Loudspeakers
- Multi-Way
- 'Perceive v2.0' Construction Diary