Hi,
Do you have the touchscreen Waveshare 5"? These displays can have different firmware. I have tried to explain that on this wiki page:
Disk Images * project-owner/PeppyPlayers.doc Wiki * GitHub
If you have display other than Waveshare 5" with firmware 1.1 then you need to use the Headless disk image and install display/driver (if any) on top of it.
I have never used Etcher but I don't think it's the root cause of the issue. Though you can try to burn the image one more time just in case. I use Win32 Disk Imager on my Windows desktop:
Win32 Disk Imager download | SourceForge.net
Please let me know if this info helped.
Good luck!
I honestly no clue if it’s waveshare... the backside of the display doesn’t say such either.. from what I see all the 5 inch screens look the same.. the box does have raspbian and Ubuntu mate images with touch support for this screen though..tried works well..let me try the headless install, I’m assuming I need to connect to an eth port to ssh,how do I identify the ip? Through the router? I'm not able to find a guide for the heless install..I can get as far as burning the image.. After that how do I figure the player? Pardon my rookie question... this is all new
Just took give a background, I tried volumio... The touch display plugin is a nightmare to configure...Kodi is smooth but the audio quality is nonsense..
Just took give a background, I tried volumio... The touch display plugin is a nightmare to configure...Kodi is smooth but the audio quality is nonsense..
Do you have the link to the site from which you bought the display?
If they supplied Raspbian image (it should be image without Desktop) with display you can try to install player on top of that Raspbian OS by following the Expert installation guide but it will take longer time as you need to install all components manually:
Expert * project-owner/Peppy.doc Wiki * GitHub
Again you can do that only if this is Raspbian Lite version of the OS which doesn't have the Desktop.
Yes, you can get IP from the router and use it for SSH connection (e.g. via putty).
You can install the Headless disk image the same way you installed the image for 5". Just grab it from this page:
Disk Images * project-owner/PeppyPlayers.doc Wiki * GitHub
After installation connect through SSH using username/password: pi/Hogarth. Then change the following settings in the file /home/pi/Peppy/config.txt (assuming your display has resolution 800*480):
width = 800
height = 480
hdmi = True
headless = False
You can use 'nano' text editor.
In file /home/pi/Peppy/screensaver/peppymeter/config.txt set:
screen.size = large
Change the file /boot/config.txt using command 'sudo nano /boot/config.txt', add:
max_usb_current=1
hdmi_group=2
hdmi_mode=87
hdmi_cvt 800 480 60 6 0 0 0
hdmi_drive=1
disable_splash=1
reboot:
sudo reboot
If you will be able to see the player UI we can continue from that point and try to configure the touch functionality.
How do you output audio? If you use onboard audio from 3.5mm audio jack the quality will not be better with Peppy player. If you need high quality audio you need to use either DAC or Amplifier.
Good luck!
Last edited:
Do you have the link to the site from which you bought the display?
yes.. here it is -https://www.amazon.ae/gp/product/B07NDZPG5P/ref=ppx_yo_dt_b_asin_title_o07_s00?ie=UTF8&psc=1
the raspbian image came with the desktop and touch (resistive) touch oob.
If they supplied Raspbian image (it should be image without Desktop) with display you can try to install player on top of that Raspbian OS by following the Expert installation guide but it will take longer time as you need to install all components manually:
Expert * project-owner/Peppy.doc Wiki * GitHub
Again you can do that only if this is Raspbian Lite version of the OS which doesn't have the Desktop.
Yes, you can get IP from the router and use it for SSH connection (e.g. via putty).
You can install the Headless disk image the same way you installed the image for 5". Just grab it from this page:
Disk Images * project-owner/PeppyPlayers.doc Wiki * GitHub
After installation connect through SSH using username/password: pi/Hogarth. Then change the following settings in the file /home/pi/Peppy/config.txt (assuming your display has resolution 800*480):
width = 800
height = 480
hdmi = True
headless = False
You can use 'nano' text editor.
In file /home/pi/Peppy/screensaver/peppymeter/config.txt set:
screen.size = large
Change the file /boot/config.txt using command 'sudo nano /boot/config.txt', add:
max_usb_current=1
hdmi_group=2
hdmi_mode=87
hdmi_cvt 800 480 60 6 0 0 0
hdmi_drive=1
disable_splash=1
reboot:
sudo reboot
Lemme try the methods given above - expert and headless. Will update as go alone. thank you so much for helping out.
If you will be able to see the player UI we can continue from that point and try to configure the touch functionality.
How do you output audio? If you use onboard audio from 3.5mm audio jack the quality will not be better with Peppy player. If you need high quality audio you need to use either DAC or Amplifier.
Yes via analogue jack.. the funny thing is I tried volumio (headless) on the RPi1 and audio was better than Kodi.. Not sure how that was achieved. I m not having studio quality audio, but not as bad as kodi 🙂.. plus im running them through an old creative 2.1 that I revived for this pet project. I did consider DAC, any one that you recommend ? something with 3.5 output?
Last edited by a moderator:
If you install the player on top of the Raspbian Desktop OS which was supplied with the touchscreen you can install it only as the desktop app. That means it won't start when Pi starts and you will need to start it from the desktop.
I would recommend to install the Headless disk image first. This way you can see the player UI in web browser and estimate sound quality too. To see web UI just connect to the Pi using its IP address from any computer/browser in your home network:
http://IP_ADDRESS_OF_YOUR_PI:8000
Player * project-owner/Peppy.doc Wiki * GitHub
If you like UI and sound then you can proceed with the display configuration by following the steps for the Headless image which I mentioned.
There are several models of the DACs and Amplifiers for Pi on the market. I've used mostly products from the Swiss company HiFiBerry:
HiFiBerry | Audiophile 24/96, 24/192 sound cards (Audio DAC and SPDIF out) for the Raspberry Pi, audio out, audio cards, audio projects
So you can choose DAC if you plan to connect it to your existing Amplifier or choose Amplifier and connect speakers to it directly.
Good luck!
Last edited:
If you install the player on top of the Raspbian Desktop OS which was supplied with the touchscreen you can install it only as the desktop app. That means it won't start when Pi starts and you will need to start it from the desktop.
I would recommend to install the Headless disk image first. This way you can see the player UI in web browser and estimate sound quality too. To see web UI just connect to the Pi using its IP address from any computer/browser in your home network:
http://IP_ADDRESS_OF_YOUR_PI:8000
Player * project-owner/Peppy.doc Wiki * GitHub
If you like UI and sound then you can proceed with the display configuration by following the steps for the Headless image which I mentioned.
Awesome. let me try that... Pardon my delayed reply, working in parallel on a case for the PI..to make it look like a retro radio.
BTW, are there universal touch drivers that I can install on top of Kodi?
There are several models of the DACs and Amplifiers for Pi on the market. I've used mostly products from the Swiss company HiFiBerry:
HiFiBerry | Audiophile 24/96, 24/192 sound cards (Audio DAC and SPDIF out) for the Raspberry Pi, audio out, audio cards, audio projects
So you can choose DAC if you plan to connect it to your existing Amplifier or choose Amplifier and connect speakers to it directly.
This sounds great. will take a look at hifiberry.
Thank you so much.
Pardon my manners, I have not asked if you and your family are safe with the Covid situation.
Good luck!
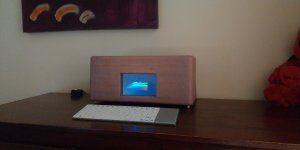
btw this is what I made.. made from scrap.
Awesome. let me try that... Pardon my delayed reply, working in parallel on a case for the PI..to make it look like a retro radio.
BTW, are there universal touch drivers that I can install on top of Kodi?
This sounds great. will take a look at hifiberry.
Thank you so much.
Pardon my manners, I have not asked if you and your family are safe with the Covid situation.
Good luck!
Attachments
Hi,
You have pretty good looking Kodi project. I tried Kodi long time ago and decided to create my own player 😉 So I'm not the right person to ask about Kodi.
If you will face any issues with Peppy player installation please let me know.
I'm pretty good at this strange time and wish the same to you.
Best regards
Thank you for the feedback.
Im using Kodi as still have issues making peppy work (or any other OS for the matter - Rune, Volumio, Moode, you name it) .. clearly im doing something wrong, need to go through the steps again. wait eureka moment... as is on starting the RPI for the first time, the display stops at the splash screen, is this where I connect via ssh to make the necessary changes?
Im using Kodi as still have issues making peppy work (or any other OS for the matter - Rune, Volumio, Moode, you name it) .. clearly im doing something wrong, need to go through the steps again. wait eureka moment... as is on starting the RPI for the first time, the display stops at the splash screen, is this where I connect via ssh to make the necessary changes?
Hi,
You have pretty good looking Kodi project. I tried Kodi long time ago and decided to create my own player 😉 So I'm not the right person to ask about Kodi.
If you will face any issues with Peppy player installation please let me know.
I'm pretty good at this strange time and wish the same to you.
Best regards
Hi,
You can follow my recommendations in post #125 and install the Headless image first. If it works that will prove that your program which burns image is OK, that your SD is OK and your Pi is OK. You can see UI in browser and you can test audio. We can continue from there.
Best regards
You can follow my recommendations in post #125 and install the Headless image first. If it works that will prove that your program which burns image is OK, that your SD is OK and your Pi is OK. You can see UI in browser and you can test audio. We can continue from there.
Best regards
Is it possible to have this Trackball with Scrollring plug in to the PC via USB and with magic it ist a volumepoti and play and stop dan skip
without any configuration comandline hassle
Orbit(R) Trackball mit Scroll Ring | Trackballs | Kensington
without any configuration comandline hassle
Orbit(R) Trackball mit Scroll Ring | Trackballs | Kensington
I've never tried to connect trackball to the Raspberry Pi. If it works as a regular mouse you can definitely use it with Peppy player or any other software controlled by mouse.
Best regards
Best regards
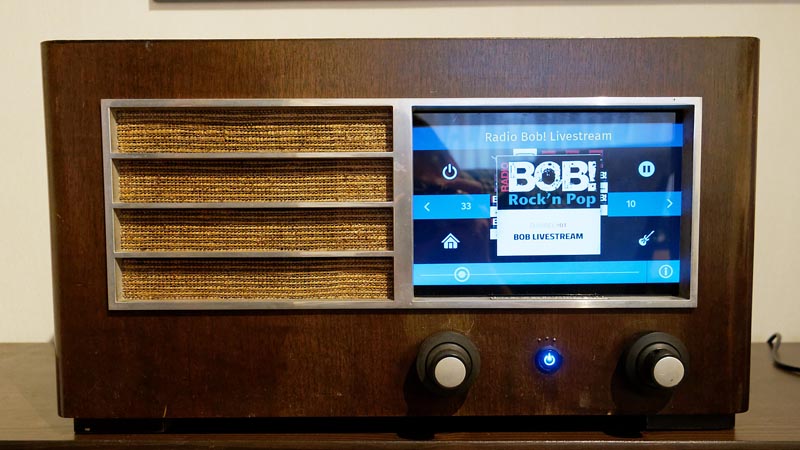
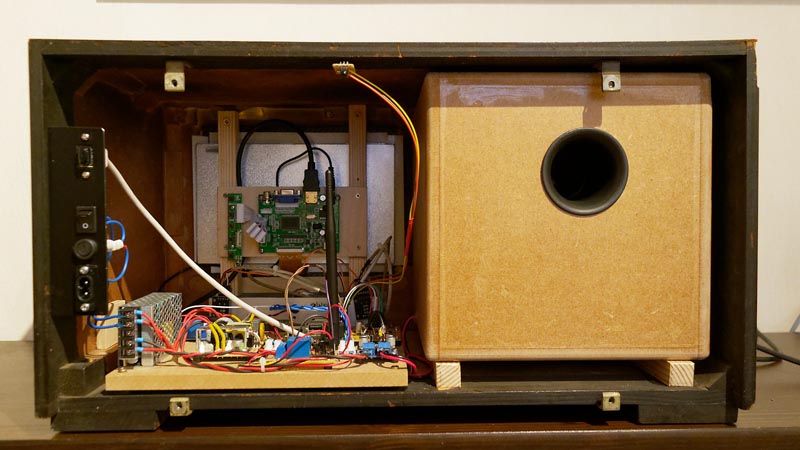
Here is the new addition to the Gallery - great project by Ingo (Germany).
This time Ingo used the enclosure from the vintage tube radio dated back to 1937.
Here is the list of the main hardware components:
- Raspberry Pi 3
- DAC PCM5102 I2S 32bit/384kHz Raspberry PI
- Amplifier DC8-24V TPA3118
- Bass reflex box with a 13 cm fullrange speaker
- HDMI 10" display with 1024x600 resolution
- Self-built relay card which switches on/off all components and provides graceful Raspberry Pi shutdown.
Gallery * project-owner/PeppyPlayers.doc Wiki * GitHub
By mistake I posted the message about new Peppy Player release in the different thread:
PeppyMeter
Unfortunately I cannot move it here.
PeppyMeter
Unfortunately I cannot move it here.
This is a really neat project! I have been following it for a while and it would be fun to build a cool little player like the ones posted here. Just need more time...
I just wonder a bit about your workflow. In your repo, you have everything in the master branch, and every commit message is just the edition. Why do you do it like this, and doesn't it get really difficult to keep track of your changes?
The normally recommended way is to commit often and write a short description of the changes in the commit message. That makes is much easier to keep track of what changes were made and when.
It's also not recommended to commit everything directly to master, because it's is a bit risky. It's better to make a new branch for each edition, and only merge it to master once the new edition is complete and tested. That way you ensure that the master branch is always in good shape.
Cheers, and keep up the good work!
Hi Henrik,
All your comments are reasonable and valid. I'm following the usual git procedure with different branches for different versions. I just don't expose/push those intermediate branches in GitHub. I merge them into Master and make only the Master branch visible. This works fine in case of the single developer when you don't need to merge multiple branches. The changes are still available and can be found if needed.
Best Regards
The bug in the Random Screensaver was found by one of the player users. Please refrain from using that screensaver until I provide the fix.
Best regards
Best regards
If you are planning to use the Random Screensaver please follow these steps:
1. login to Pi
2. cd Peppy
3. git fetch
4. git checkout origin/master -- screensaver/random/random.py
That should pull the patched file for the Random Screensaver from GitHub.
I'll fix the disk images during coming weekend.
I apologize for the inconvenience.
Best regards
1. login to Pi
2. cd Peppy
3. git fetch
4. git checkout origin/master -- screensaver/random/random.py
That should pull the patched file for the Random Screensaver from GitHub.
I'll fix the disk images during coming weekend.
I apologize for the inconvenience.
Best regards
All disk images are now updated. They include the following changes:
- The fix for the Random Screensaver issue
- The bug fix for the issue related to the Configuration Web UI for the Official 7" DSI touchscreen
Disk Images * project-owner/PeppyPlayers.doc Wiki * GitHub
- The fix for the Random Screensaver issue
- The bug fix for the issue related to the Configuration Web UI for the Official 7" DSI touchscreen
Disk Images * project-owner/PeppyPlayers.doc Wiki * GitHub
I'm glad to present the new project by Tobias (Germany). Like his previous project this one also has VU Meter based on the Nixie tubes.
Gallery * project-owner/PeppyPlayers.doc Wiki * GitHub
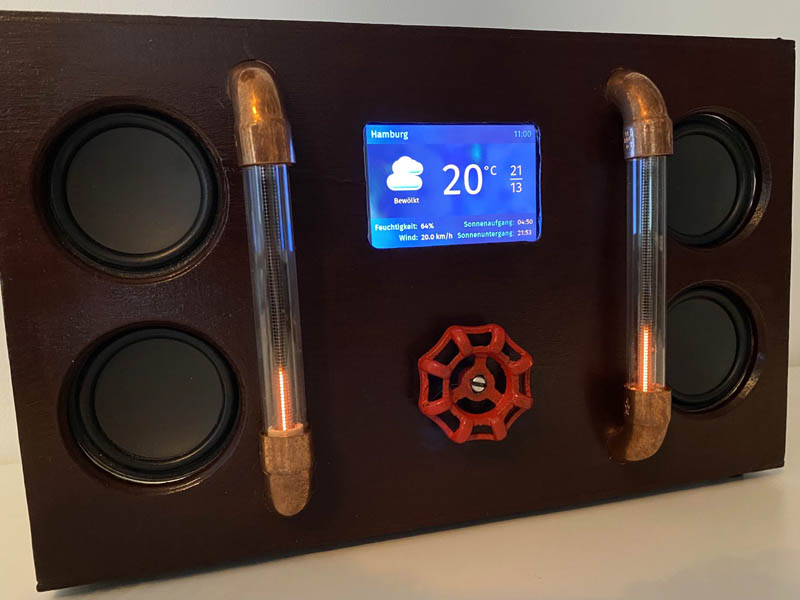
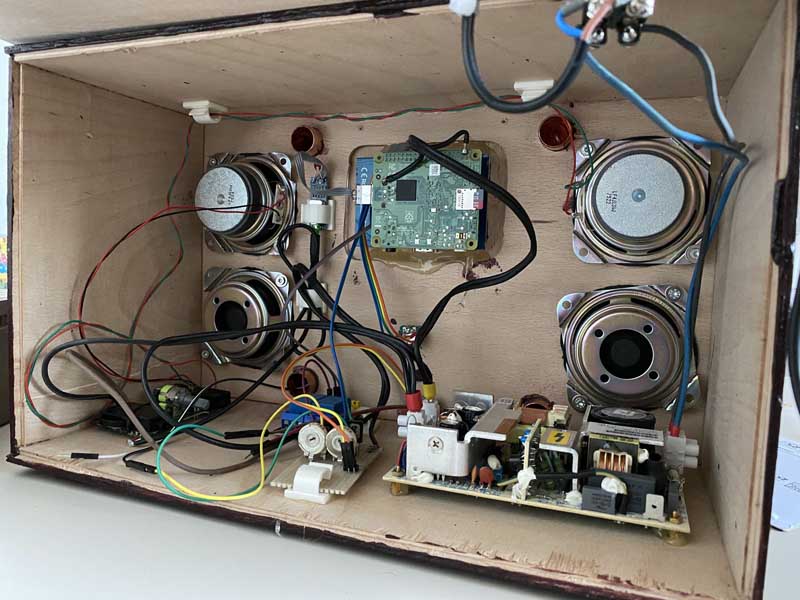
The self-made plywood housing consists of:
- Raspberry Pi 3 A+
- Kuman 3.5" 320x480 Touchscreen
- Turner Edition Disk Image for Waveshare 3.5'' (/boot/config.txt changed to dtoverlay=waveshare35a)
- 5V/11A Power Supply from Pollin (too much power, but it was at a good price)
- USB Sound Card
- Logitech Z200 speakers (disassembled, amplifier switched on by a relay card to avoid strange noises)
- IN-9 Bargraph tubes
- 150V DC supply (self made PCB, using Z-diodes powered by DC-rail of the power supply)
- PWM-power stage like here: PWM-VU-Meter PWM VU Meter * project-owner/PeppyMeter.doc Wiki * GitHub)
- Rotary-Encoder for volume
Gallery * project-owner/PeppyPlayers.doc Wiki * GitHub
The self-made plywood housing consists of:
- Raspberry Pi 3 A+
- Kuman 3.5" 320x480 Touchscreen
- Turner Edition Disk Image for Waveshare 3.5'' (/boot/config.txt changed to dtoverlay=waveshare35a)
- 5V/11A Power Supply from Pollin (too much power, but it was at a good price)
- USB Sound Card
- Logitech Z200 speakers (disassembled, amplifier switched on by a relay card to avoid strange noises)
- IN-9 Bargraph tubes
- 150V DC supply (self made PCB, using Z-diodes powered by DC-rail of the power supply)
- PWM-power stage like here: PWM-VU-Meter PWM VU Meter * project-owner/PeppyMeter.doc Wiki * GitHub)
- Rotary-Encoder for volume
Last edited:
- Home
- Source & Line
- PC Based
- Peppy player