Last time I received several questions related to the Peppy player.
There is no FAQ chapter on the player's wiki pages yet.
So I'll try to answer them here.
Q: Is there any ISO file for the Peppy Player?
A: There is no ISO file but there is IMG file which is functionally
very similar to ISO files but works with flash cards. You just write
IMG file to your micro SD flash card, insert the card into your
Raspberry Pi and you are ready to go. All player's image files can be
found here:
Disk Images * project-owner/PeppyPlayers.doc Wiki * GitHub
Q: Is there any player EXE file which I could install and run?
A: Peppy Player is a Python application. It's distributed as a set of
Python scripts. Even though there is a way to make executable file
from Python scripts it's not a usual way of distributing Python
applications.
Q: There are several Disk Images which one I need to choose?
A: It depends.
If you are planning to control player from browser in
any mobile device then you need to install Headless disk image.
If you already have LCD/Touchscreen for which the disk image
is available then you need to install that disk image. If you are just
going to buy LCD/Touchscreen then you need to install the disk image
for the LCD which you are buying.
From my expirience HDMI LCD/Touchscreens have better performance over
SPI LCDs. There is only one disk image for the 5" HDMI Touchscreen
right now. I hope to add more in the future.
Q: Is it possible to add my own links to web radio stations?
A: Yes, the process was described on the following wiki page:
Languages * project-owner/Peppy.doc Wiki * GitHub
in section 'Create web radio playlists'. If you create brand new radio group
you also have to provide two images 'folder.png' and 'folder-on.png'. They
will represent your radio group in the 'Genre' menu. Also make sure that
the station image filenames are the same as the radio station names which
you define in the stations.m3u file.
New version (El Greco Edition) of the Peppy Player was just released.
New features:
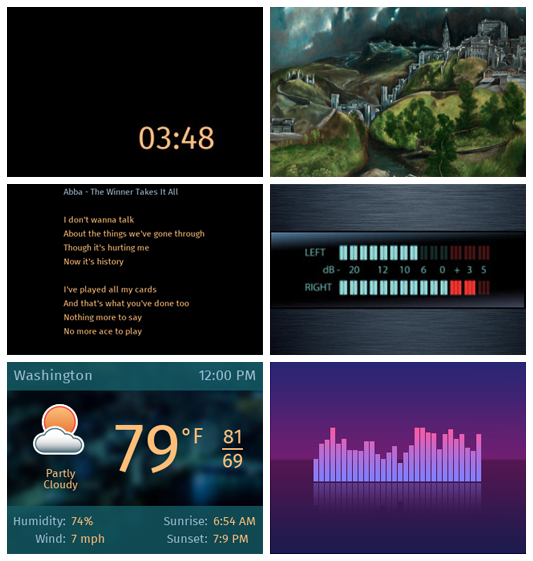
* Added new resolution (800*480) to the VU Meter screensaver.
* Implemented Radio Favorites. Radio stations from the different genres/groups can be added to the favorites playlist.
Radio Favorites * project-owner/Peppy.doc Wiki * GitHub
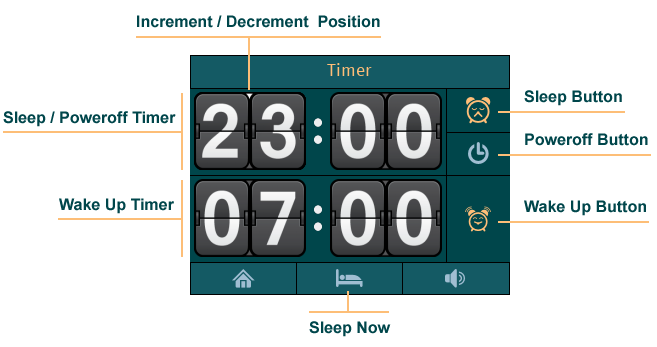
* Added timer functionality. It provides autonomous mode when there is no need to switch the player on and off manually.
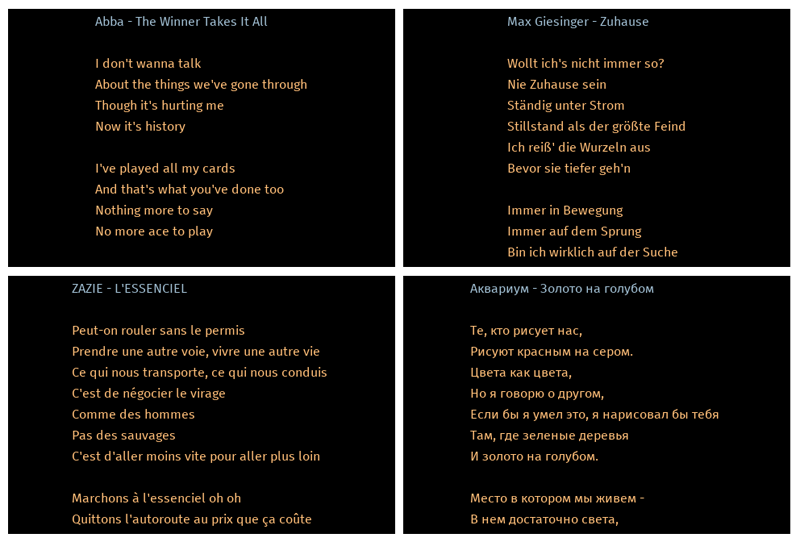
* Implemented song lyrics screensaver.
* Implemented random screensaver which shows screensavers from the user-defined list in the random order.
* Provided new disk image for Waveshare 2.8" touchscreen.
Peppy player powered by the following software and services:
New features:
* Added new resolution (800*480) to the VU Meter screensaver.
* Implemented Radio Favorites. Radio stations from the different genres/groups can be added to the favorites playlist.
Radio Favorites * project-owner/Peppy.doc Wiki * GitHub
* Added timer functionality. It provides autonomous mode when there is no need to switch the player on and off manually.
* Implemented song lyrics screensaver.
* Implemented random screensaver which shows screensavers from the user-defined list in the random order.
* Provided new disk image for Waveshare 2.8" touchscreen.
Peppy player powered by the following software and services:
From Jan 3 2019 Yahoo retired YQL service:
YQL - Yahoo Developer Network
That means that the Weather screensaver plugin in the Peppy player will not work anymore.
I'll fix the issue in the next release.
YQL - Yahoo Developer Network
That means that the Weather screensaver plugin in the Peppy player will not work anymore.
I'll fix the issue in the next release.
New version (Durer Edition) of the Peppy Player was released.
New features:
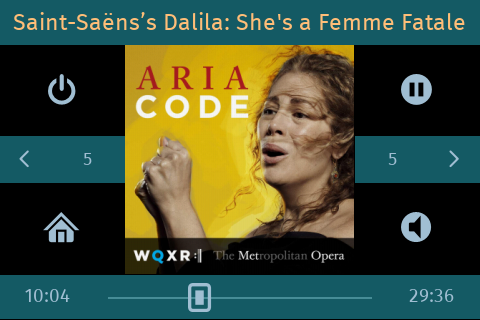
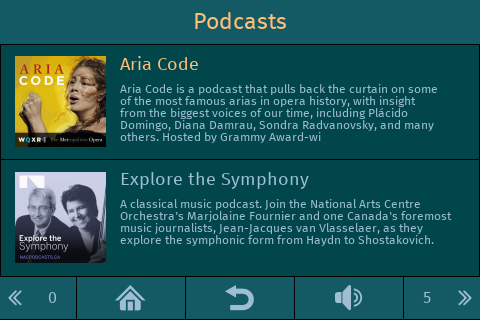
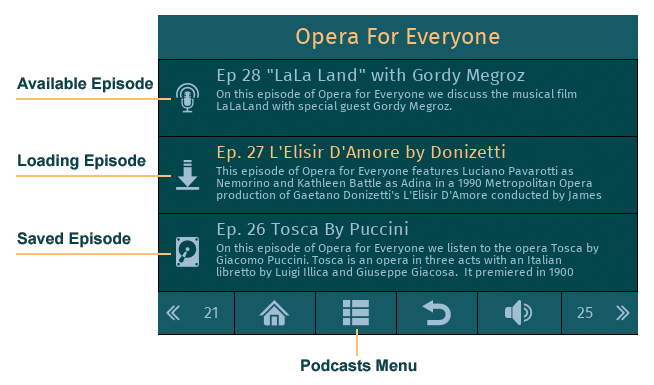
* Implemented support for Podcasts.
Podcasts Player * project-owner/Peppy.doc Wiki * GitHub
Podcasts Browser * project-owner/Peppy.doc Wiki * GitHub
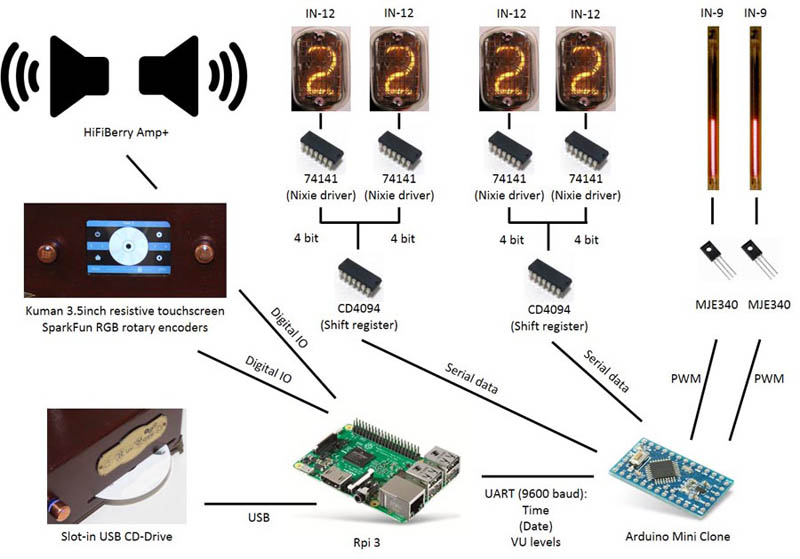
* Added PWM output to VU Meter.
PWM VU Meter * project-owner/PeppyMeter.doc Wiki * GitHub
* Added support for user-defined startup and shutdown scripts.
Startup & Shutdown Scripts * project-owner/Peppy.doc Wiki * GitHub
* Fixed the issue with Weather Screensaver.
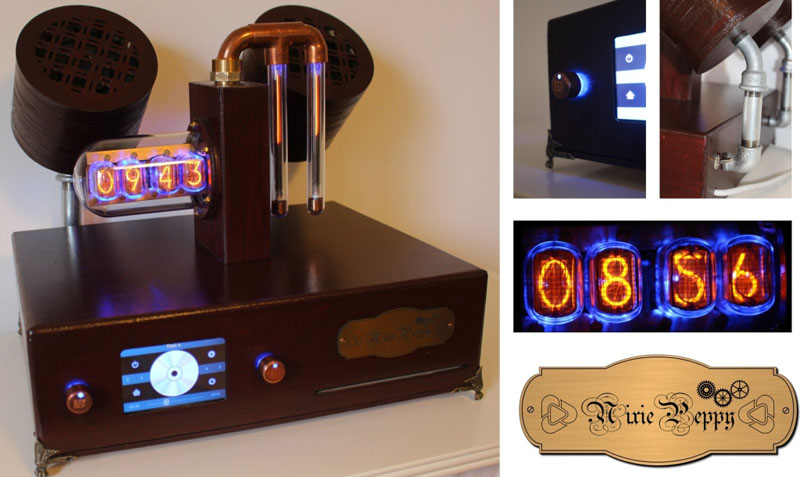
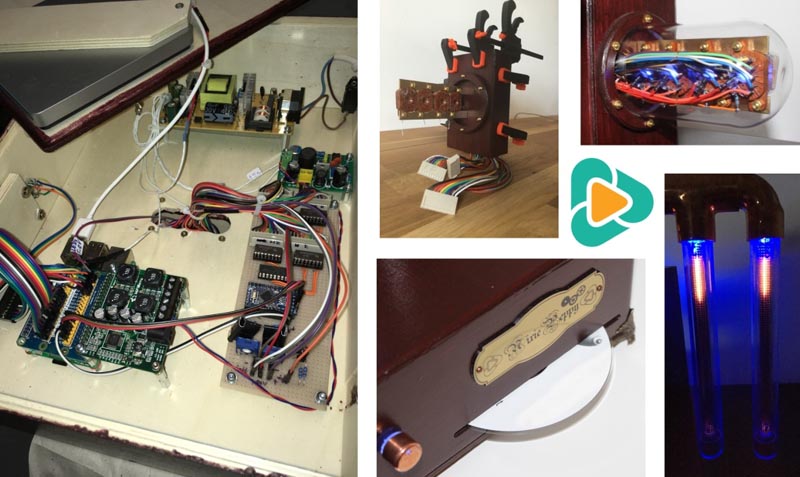
* Updated the Gallery with new images of the NixiePeppy project created by Tobias (Germany, Hamburg):
Gallery * project-owner/PeppyPlayers.doc Wiki * GitHub
Here is the project's introduction video on YouTube: https://youtu.be/Qb_7MUZivbU
New features:
* Implemented support for Podcasts.
Podcasts Player * project-owner/Peppy.doc Wiki * GitHub
Podcasts Browser * project-owner/Peppy.doc Wiki * GitHub
* Added PWM output to VU Meter.
PWM VU Meter * project-owner/PeppyMeter.doc Wiki * GitHub
* Added support for user-defined startup and shutdown scripts.
Startup & Shutdown Scripts * project-owner/Peppy.doc Wiki * GitHub
* Fixed the issue with Weather Screensaver.
* Updated the Gallery with new images of the NixiePeppy project created by Tobias (Germany, Hamburg):
Gallery * project-owner/PeppyPlayers.doc Wiki * GitHub
Here is the project's introduction video on YouTube: https://youtu.be/Qb_7MUZivbU
Last edited:
I enjoy the focus of your project on design, while keeping high technical standard. Very unique.
I enjoy the focus of your project on design, while keeping high technical standard. Very unique.
Thank you phofman! I'm still fighting with VU Meter issues:
Hight CPU usage after client disconnect * Issue #21 * pimoroni/pivumeter * GitHub
but this is different story...
New project was added to the Gallery:
Player with the official 7" Raspberry Pi Touch Display by Koepisch (Germany)
Gallery * project-owner/PeppyPlayers.doc Wiki * GitHub
Koepisch made several code modification in order to make Peppy software working with the official 7" touchscreen. I hope to integrate those changes into one of the next Peppy software releases and prepare new disk image for the display.
Here is the author's description of the project:
The project took several months and became the music player for my daughter. I had to make some software adjustments. The standard Pygame event processing had to be switched to the MultiTouch driver. The colors were changed too.
In terms of hardware, I installed the display without rotation. A HifiBerry DAC+ Card didn't have onboard connectors and used an extra audio output socket instead. A 2-pin power switch has the LED which switches between red (off) and green (on). The power supply was wired via an extra connector.
Hello,
Can you help how can I get the 7" raspberry display work?
Should I start from the durer-waveshare.5.0-hdmi.zip image and can I switch from HDMI to the official display?
Thanks,
JG
Can you help how can I get the 7" raspberry display work?
Should I start from the durer-waveshare.5.0-hdmi.zip image and can I switch from HDMI to the official display?
Thanks,
JG
I have "unofficial" disk image for the official 7" display 🙂
https://github.com/project-owner/Peppy/releases/download/2019.03.08/durer-official.7.0-desktop.zip
This is the easiest way to try the player. You just need to install disk image, connect display, speakers and you are ready to go. This disk image will allow to start player as any other application from the graphical desktop. The image is based on the regular Raspbian Desktop OS.
To make it working as a console application (without graphical desktop) needs more efforts. You can get all steps from here:
Peppy WebRadio - Seite 12 - Musikboxen, Webradios, Musikplayer - Deutsches Raspberry Pi Forum
It's in German but Google translate will do the job. If you will face any issue you can either ask the questions on that forum (it's very responsive) or here.
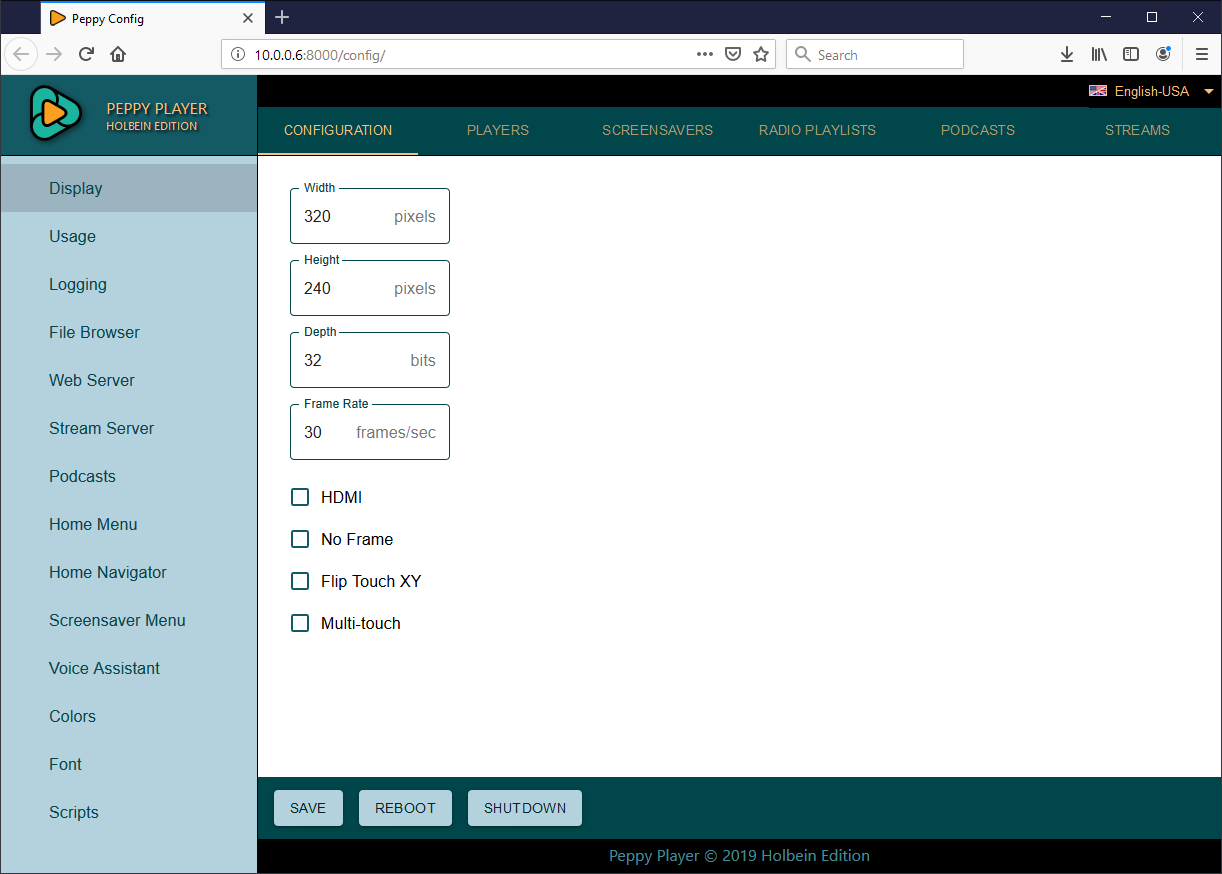
New version (Holbein Edition) of the Peppy Player was released.
According to the download statistics of the last two player releases the Headless disk image is the most popular one.
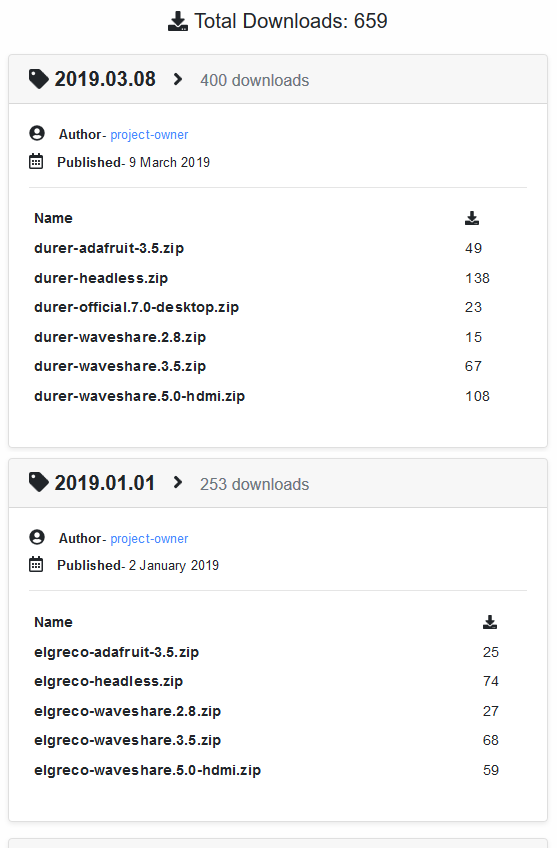
Therefore in this release some effort was put into developing a web UI for the player configuration:
Configuration * project-owner/Peppy.doc Wiki * GitHub

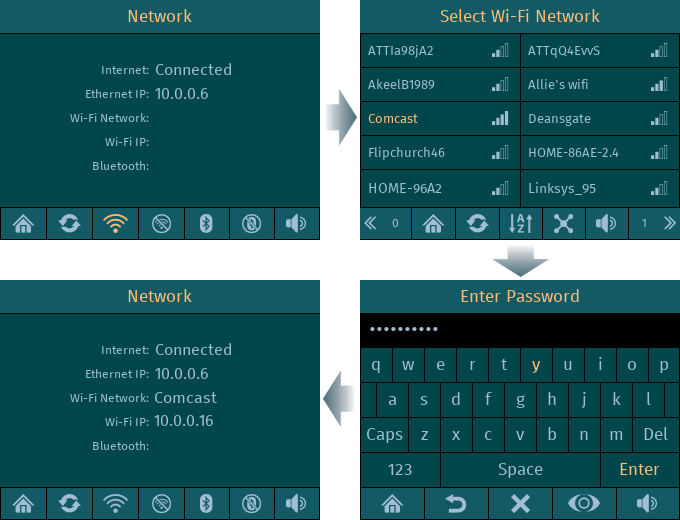
In addition to that new functionality for connecting to a Wi-Fi network was implemented:
Network * project-owner/Peppy.doc Wiki * GitHub
Another new features include:
- Made Home Navigator configurable. All items in the menu can be switched on/off:
Home Screen * project-owner/Peppy.doc Wiki * GitHub

- Added 'Start Now' option to the Screensaver navigator. It allows to start screensaver immediately.
- Provided new disk image for the Official 7" Touchscreen. It supports long press and sliding actions (sliding volume/equalizer knobs).
- Fixed the issues in the mpd playback and audiobooks.
According to the download statistics of the last two player releases the Headless disk image is the most popular one.
Therefore in this release some effort was put into developing a web UI for the player configuration:
Configuration * project-owner/Peppy.doc Wiki * GitHub
An externally hosted image should be here but it was not working when we last tested it.
In addition to that new functionality for connecting to a Wi-Fi network was implemented:
Network * project-owner/Peppy.doc Wiki * GitHub
Another new features include:
- Made Home Navigator configurable. All items in the menu can be switched on/off:
Home Screen * project-owner/Peppy.doc Wiki * GitHub
- Added 'Start Now' option to the Screensaver navigator. It allows to start screensaver immediately.
- Provided new disk image for the Official 7" Touchscreen. It supports long press and sliding actions (sliding volume/equalizer knobs).
- Fixed the issues in the mpd playback and audiobooks.
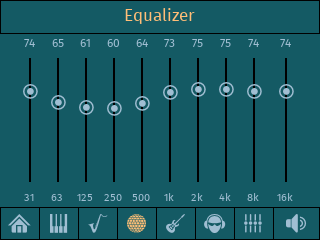
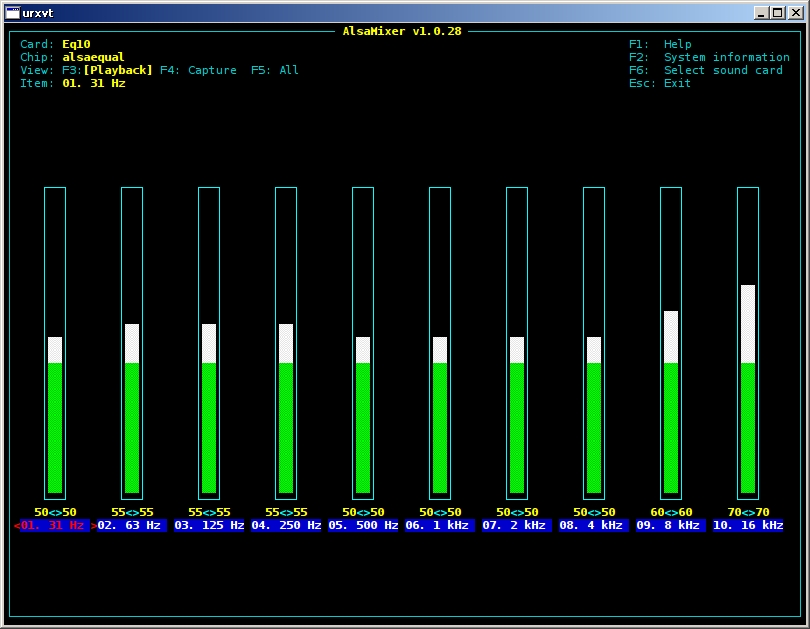
- Implemented Equalizer UI.
Equalizer UI * project-owner/Peppy.doc Wiki * GitHub
Equalizer functionality was based on ALSA Equalizer
plugin. UI has five pre-defined frequency profiles for such music genres as Classical,
Jazz, Pop, Rock, Contemporary. Here is the screenshot showing Equalizer UI:
Can equalizer be installed on Linux as a standalone app, without any of the other software, and without the hardware?
thx
Peppy player is using Alsaequal ALSA plugin. I believe it can be installed on any Linux distribution. I used the following command to install it on Raspbian OS using apt-get package manager:
You can use a package manager specific for your Linux distribution.
Then you need to add Equalizer plugin to your ALSA audio chain in file .asoundrc located in your user folder. Here is the example of that file:
Peppy.doc/.asoundrc-equal at master * project-owner/Peppy.doc * GitHub
The type of plugin is 'equal'.
When all that done you can set different bands from command line. The following page describes the whole process:
Adding equalization using alsaeq | HiFiBerry
And here is the player code snippet for setting equalizer band values:
Peppy/util.py at 5ed7747c5864bf7516f713cd50fdc3ff1a3f0f73 * project-owner/Peppy * GitHub
Code:
sudo apt-get install -y libasound2-plugin-equalThen you need to add Equalizer plugin to your ALSA audio chain in file .asoundrc located in your user folder. Here is the example of that file:
Peppy.doc/.asoundrc-equal at master * project-owner/Peppy.doc * GitHub
The type of plugin is 'equal'.
When all that done you can set different bands from command line. The following page describes the whole process:
Adding equalization using alsaeq | HiFiBerry
And here is the player code snippet for setting equalizer band values:
Peppy/util.py at 5ed7747c5864bf7516f713cd50fdc3ff1a3f0f73 * project-owner/Peppy * GitHub
Thx @rpi. I've already got alsaequal running on my arch.
But the eq is a terminal gui. I'd like to get the peppy EQ GUI. That's the only part of peppy I want, actually.
But the eq is a terminal gui. I'd like to get the peppy EQ GUI. That's the only part of peppy I want, actually.
It's a part of the player right now. If you have Python programming skills you can make it as a stand-alone app. I did that for VU-Meter. Originally it was also the part of the player then I created stand-alone app.
unfortunately, i don't program python. thx tho'
There's the alsamixergui, but it doesn't seem to persist L-R locking on the EQ bands, when you re-open it. That's an inconvenience. And not as pretty as yours 🙂
There's the alsamixergui, but it doesn't seem to persist L-R locking on the EQ bands, when you re-open it. That's an inconvenience. And not as pretty as yours 🙂
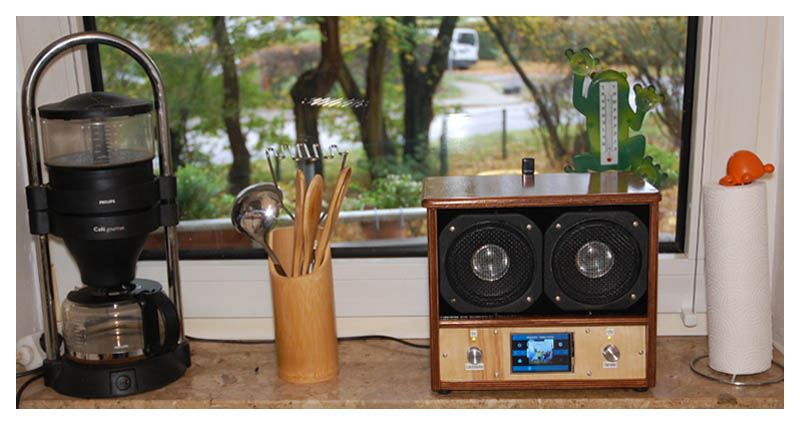
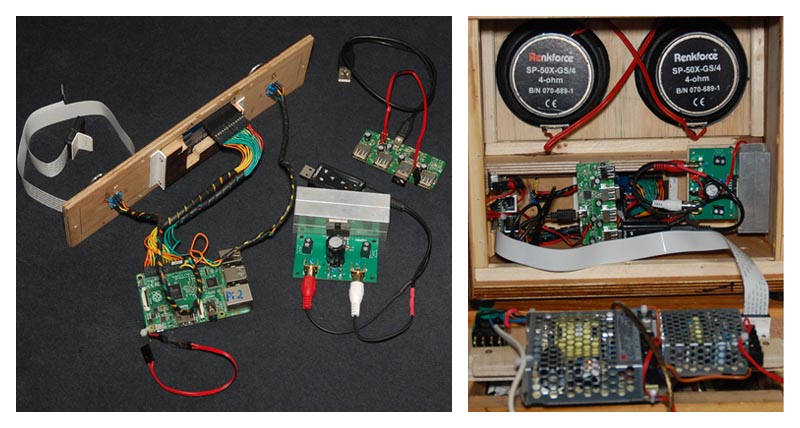
I've just added two new projects to the Gallery.
Portable player by Francesco (Italy):
Gallery * project-owner/PeppyPlayers.doc Wiki * GitHub
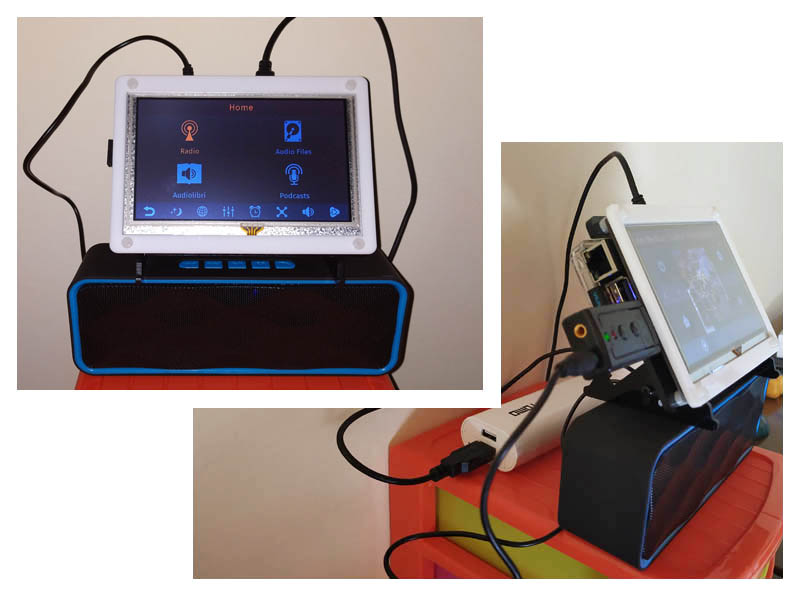
Herbert's Küchenradio (Germany):
Gallery * project-owner/PeppyPlayers.doc Wiki * GitHub
Portable player by Francesco (Italy):
Gallery * project-owner/PeppyPlayers.doc Wiki * GitHub
Herbert's Küchenradio (Germany):
Gallery * project-owner/PeppyPlayers.doc Wiki * GitHub
Simply amazing.
How do the voice commands work? Do you have to own the tracks, or does it fetch from google?
How do the voice commands work? Do you have to own the tracks, or does it fetch from google?
Thank you!
The player is using Google Assistant, which is a web service:
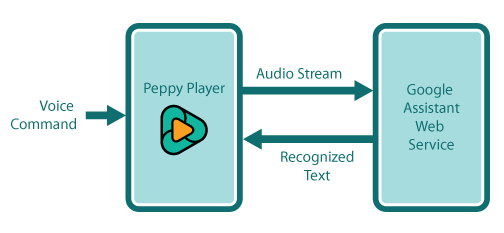
In case of web services (Google Assistant, Amazon Alexa, Facebook Wit etc) the whole speech recognition logic is hosted on the corresponding web site. You just get recognized text and react in your software accordingly.
There are some speech recognition systems which can run locally on your machine and don't need the Internet access. I've tried one of them - PocketSphinx:
GitHub - cmusphinx/pocketsphinx: PocketSphinx is a lightweight speech recognition engine, specifically tuned for handheld and mobile devices, though it works equally well on the desktop
That was not so good experience. Its out-of-the-box functionality is almost unusable. You need to teach/train the model. But how you can deploy the software which will need that from each user? Though for your personal usage you can probably do that.
The new engine appeared recently: Snips | Voice AI Platform
But I suspect it's based on the PocketSphinx.
I'm trying to refactor the voice assistant in the player. Hopefully in the next release it will be more usable.
The player is using Google Assistant, which is a web service:
In case of web services (Google Assistant, Amazon Alexa, Facebook Wit etc) the whole speech recognition logic is hosted on the corresponding web site. You just get recognized text and react in your software accordingly.
There are some speech recognition systems which can run locally on your machine and don't need the Internet access. I've tried one of them - PocketSphinx:
GitHub - cmusphinx/pocketsphinx: PocketSphinx is a lightweight speech recognition engine, specifically tuned for handheld and mobile devices, though it works equally well on the desktop
That was not so good experience. Its out-of-the-box functionality is almost unusable. You need to teach/train the model. But how you can deploy the software which will need that from each user? Though for your personal usage you can probably do that.
The new engine appeared recently: Snips | Voice AI Platform
But I suspect it's based on the PocketSphinx.
I'm trying to refactor the voice assistant in the player. Hopefully in the next release it will be more usable.
Last edited:
OK, but then you have to parse the received text and make sense of the commands. Sounds pretty AI to me. Do you have a fixed format, or do you use some AI tricks? In any case this direction makes your project a different league.
The voice assistant in the player executes simple navigation commands like 'go home', 'go back', 'play', 'pause' etc. That doesn't need too much AI 🙂 It just receives the recognized text and checks if that text/command belongs to the current screen. If it does then it executes that navigation command.
The next level will be more complicated commands for example 'play pink floyd album wish you were here'. Even in this case you can just break the sentence into groups and react accordingly. More advanced approach is to create intent using web service and it will apply that logic for you and it will return something like this:
{intent: "play", artist: "pink floyd", album: "wish you were here"}. Then using this info you just lookup in your collection. Here is example:
Wit.ai
- Home
- Source & Line
- PC Based
- Peppy player