After reading through the site, I feel VERY tempted to start building right away. But I really do think it's too big for now... Maybe, to get a little exeprience first, it might be a good idea to build the small XLS10 project first, and this one later when I have more room to put it to work properly...
Hi, the only way to delete the 90mm x 306mm + 22mm of the back of the cabinet is building a passive sub without an amp. The 90mm is the amp space, the small chamber is just empty space that can be filled with sea sand or some other dense material to prevent it from ‘causing coloration.
There is another design with the passive XLS on the side, look @
http://www.minhembio.com/zilch/37418[URL]
Regards
There is another design with the passive XLS on the side, look @
http://www.minhembio.com/zilch/37418[URL]
Regards
Attachments
Yes, that's the one I ws thinking of initially. That will fit much better in terms of dimensions. Someone here mentioned the danger of Passive radiator "lag" because of the added weight, so I was thinking of mounting the woofer firing downwards and the PR firing forward. That should take care of lag. I really think, no matter how tempting, that the large sub is out of the question for now because of it's sheer size. Maybe when I've got a bigger home...
http://www.vikash.info/audio/xls10/index.asp
http://www.vikash.info/audio/xls10/index.asp
So I just started with the finish, sanding everything took me about 90 min. First primer 15 min. Now I can see what needs some filling to get a perfect finish. I'm thinking of 3 more coat layers to get the disired result befor putting on a top coating, using water proof sanding paper 400 before the final finish.
Attachments
I assume, as you're started with the finishing of the cabinet, that the sub is a succesful project?
Regards
Regards
Yes, the results are way beyond my expectations, and I’m a critical listener. Maybe try to tune some with the weight of the passive woofer, but as I’m going to use this sub mostly in a 2.1 setup, don’t think that adding weight is going to give me a smooth enough response. So if the passive radiator is able to handle the sound pressure I want using 265 grams, then this is it. Finish it, (don’t know what kind of top coat, and what color), put sand in the chamber above the DS 2.0, and assemble speakers and amp.
Has anyone a suggestion for the coat? I was thinking of a nice black piano finish, but I don’t now if I can do that part of the painting myself. Do I need to spray it?
Kind regards,
John
Has anyone a suggestion for the coat? I was thinking of a nice black piano finish, but I don’t now if I can do that part of the painting myself. Do I need to spray it?
Kind regards,
John
To my opinion, if you want a high gloss finish spraying is a must. Apply several thin coats with wet sanding in between. When done, let the paint dry and harden out properly and give it a good polish. I know that's easier said than done. Maybe this sub is a good project to practice your spraying skills 😉
As they say, "Practice makes perfect"
Regards
As they say, "Practice makes perfect"
Regards
johnaudio said:So I just started with the finish, sanding everything took me about 90 min. First primer 15 min. Now I can see what needs some filling to get a perfect finish. I'm thinking of 3 more coat layers to get the disired result befor putting on a top coating, using water proof sanding paper 400 before the final finish.
Hi John,
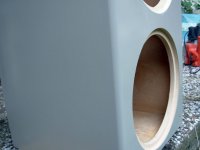
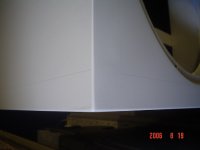
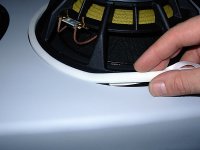
I see that you haven't used chamfered (45°) sides of the wood to assemble the enclosure. I've done the same with my previous enclosure, but for 2 month's ago when the temperature here was over 35degrees C all the interfaces became vissible as you can see in the attached picture. (this was for a XLS12 and PR with MDF of 30mm thickness).
In my last and new enclosure for this woofer and PR I've made all the interfaces chamfered, and I've also used cookies (or how do you call these flat wooden egged shaped pieces of wood to use in a glued interface). This way there was no need for screws and here are no interfaces vissible.
Greets
Ben
Attachments
I 've seen joints like that before. You need to dado each corner to increase surface area for the glue interface. Looks like a "L" if you don"t understand what I'm saying. Makes assembly more accurate and rigid at the same time.
Spraying your cabinet with 2 part high fill grey primer (fiberglass boats and old corvettes used this) and waiting a couple of weeks before you sand down for the final finish coat .
This will eliminate any slightly visible joint lines that seem to always appear. There must be some movement going on that time will cure especially if your going to put a piano black high gloss that reveals everything.
Regards
David
Hi david,
Thank you for your advice, I’ve used coat filler to eliminate any slightly visible joints, after I had put on a thin layer of grey high quality primer. After sanding down most filler again, I’m starting to get a nice result, without joints showing. I decided to go for a satin black finish, to match with the Dynaudio’s, so I hope this is going to work. I ones made the joints like you exsplained, but I don’t have the tools here. Next time I will angle them in 45 degrees, because that, I think, is cosmetic wise by far the best solution.
Kind Regards,
John
My sub is about to be finished, right know I'm "running in" the XLS 10 to get it loose, and to enjoy the cat... CLICK HERE FOR A PEEK
Spray filler (putty)
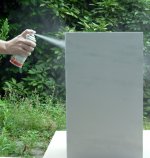
Yesterday I started spraying 3 thin layers of spray putty, it covers all of the sanding marks, and will provide a smooth even layer for the final coat. The coarsest paper I use for sanding spray filler is 400 and I keep on sanding until I get down to using 1000 or 1500 paper. Coarser paper than 400 will make it very difficult to get all the sanding scratches out. I do all sanding wet, making sure that the film is kept wet at all times.
Pictures
Attachments
From your pictures:
What do your cat find? Conebreakups, flapping spider or whatever it is investigating? 😀 😀
Nice work!
What do your cat find? Conebreakups, flapping spider or whatever it is investigating? 😀 😀
Nice work!
hi
What did you use for your very first coat as its time for me to paint my box and im caught in 2 minds im either going to use a mdf paint on primer then a high fill grey spray primer or just the high fill spray primer what would you suggest not really want to use the paint on stuff if i dont need to
cheers
Hi,
I used a good quality primer, not specialy for MDF, one thin layer, then used paint filler to fill any joint lines. After sanding this, I used 2 more thin layers of primer (wet sanding 400 between layers) to get a good surface. To equalize the last things like orange-skin effect, I use 3 layers of spray putty, like used on car body work (3 to 5 minutes between layers). Going to sand this wet 1000/1500, and then it will be ready for the final spray coat, 3 thin layers again like the spray putty. In about 30 minutes from the third layer, put on the clear coat, same procedure, 3 thin layers, and that should be it... After two weeks polish it if you like a showroom shine finish..... I know it is a lot of work, but it is worth it 😉
Good luck!
Regards, John
I got me some foam tape to make the chassis fit air tight in the cabinet. I'm giong to use M4 T-Nuts with key bolts to mount the units. But this week; the final paint job, wish me luck....😉
Regards, John
www.johnaudio.nl/pictures
Regards, John
www.johnaudio.nl/pictures
Attachments
That wasn't easy, put on the final 3 coats and 3 coats of clear paint... But most of it looks fine 🙂 I don't know if I am going to use something else for the sides and the back, because it's a lot of shiny finish  But more about that later after polish.
Regards John
Pictures
But more about that later after polish.Regards John
Pictures
Attachments
Couldn't figure out what you were talking about till I watched the video long enough to see kitty QA-ing the sub.4fun said:From your pictures:
What do your cat find? Conebreakups, flapping spider or whatever it is investigating? 😀 😀
Nice work!

Nice job John!
It's awesome!!
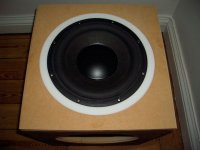
It’s up and running, and I can tell it’s worth waiting and being patience. It sound much more impressive then I had expected. It’s awesome!!! I’ve put some soft rubber feet under it to loose unwanted contact with the floor (wood). This week I’m going to do some positioning and measuring with WinMLS to tweak my settings. For now I’m very happy with the result.
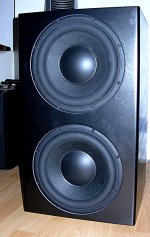
If you want to build a sub like this and have the space. (H 600 x W 350 x D 350 mm.), you will have a sub that will do an excellent job for cinema use but will knock you of your feet playing music in 2.1 or 5.1. If you use an amp that is able to handle speaker input, (like the Hapex 2.0 I used) you can integrate this sub in any music system, stereo or multi channel setup. If you are more into movies, you can consider the use of a heavier passive unit. I used 265 grams, but for higher SPL you can use 400 or 600 grams weight to have more control over the passive unit’s Xmax Peak.
The Peerless XLS 10 is able to handle all kinds of music, Toto’s gong drums are awesome without any coloration, and classical basses are warm and sound like you are in front of the orchestra yourself! You have to experience it yourself! Take the time to prepare everything well, and take the time to build it with care. You won’t regret a minute of your decision!
Regards, John
Pictures of the XLS 10 project
It’s up and running, and I can tell it’s worth waiting and being patience. It sound much more impressive then I had expected. It’s awesome!!! I’ve put some soft rubber feet under it to loose unwanted contact with the floor (wood). This week I’m going to do some positioning and measuring with WinMLS to tweak my settings. For now I’m very happy with the result.
If you want to build a sub like this and have the space. (H 600 x W 350 x D 350 mm.), you will have a sub that will do an excellent job for cinema use but will knock you of your feet playing music in 2.1 or 5.1. If you use an amp that is able to handle speaker input, (like the Hapex 2.0 I used) you can integrate this sub in any music system, stereo or multi channel setup. If you are more into movies, you can consider the use of a heavier passive unit. I used 265 grams, but for higher SPL you can use 400 or 600 grams weight to have more control over the passive unit’s Xmax Peak.
The Peerless XLS 10 is able to handle all kinds of music, Toto’s gong drums are awesome without any coloration, and classical basses are warm and sound like you are in front of the orchestra yourself! You have to experience it yourself! Take the time to prepare everything well, and take the time to build it with care. You won’t regret a minute of your decision!
Regards, John
Pictures of the XLS 10 project
- Status
- Not open for further replies.
- Home
- Loudspeakers
- Subwoofers
- Peerless XLS10 with XLS 10 slave 265gr.