hi,
Try win98 paint or gimp or lightshot, any program that will let you crop the image.
Lots of free board making programs out there use google!
This is a free version read about the limitations http://www.cadsoftusa.com/download-eagle/freeware/
You tube tells how to use eagle.
NS
Try win98 paint or gimp or lightshot, any program that will let you crop the image.
Lots of free board making programs out there use google!
This is a free version read about the limitations http://www.cadsoftusa.com/download-eagle/freeware/
You tube tells how to use eagle.
NS
Last edited:
I have gerbtool but is complicated, I do just print it like it is, is good enough.
I have eagle, but the pcb was in sprint layout and I can not import in eagle.
thanks for help.
regards
I have eagle, but the pcb was in sprint layout and I can not import in eagle.
thanks for help.
regards
Last edited:
I did made a negative artwork with Gerbv but it give a black border because it is colour inverted to get what I want, I do not now if there are other ways so the black borders are not present, maybe here I get a answer. I get it from gerber output to postcript with gerbv.
thanks
IF your process requires negative image, then you need the black border too, which would mean a copper free area in the final PCB .
I have now made the print after making the film, I have found ink who is so black nothing go through, I have the negative resist and have the temp of the laminator 120 degree, I have change the rolls in that laminator so 1.6 mm can go through by putting copper sliding bearings in it. that works like a charm.
I did print high photo resolution with also use of the black cardridge, it did very wel, never had such black result. pcb is sharp developed just try some cardridges, I did use cheap ones from local store.
I need some practice to get resist on pcb without wrinkles, but tips are welcome afcourse.
regards
Attachments

Last edited:
I find that "floating" the resist on under water really works well. Just put board and film in a container of water, slowly lift the board up to the film, lift out of the water and gently smooth with your thumb to get all the water out from under the film. You can gently dry the film at this point if you want (I use a squeegee, gets the water out without wrinkles). Found this method in one of the many on-line videos on board making. Note: use water around room temp. Too warm and the film will stick to the board before you can get it smooth. Too cool and the film will not stick, making it difficult to keep aligned and un-wrinkled when running it through the laminating machine.
I put the board with film in an absorbent, paper carrier and then run it through the laminating machine. this keeps the film from being wrinkled by any slippage or differential motion going through the rollers (keeps the roller clean, too).
Finally, dry it very well. I let mine dry overnight.
Bill
I put the board with film in an absorbent, paper carrier and then run it through the laminating machine. this keeps the film from being wrinkled by any slippage or differential motion going through the rollers (keeps the roller clean, too).
Finally, dry it very well. I let mine dry overnight.
Bill
Last edited:
I found a brother B&W laser printer with doors on the front and on the back ,it says it will run card stock ,so I'm going to try some different thickness of circuit boards to see if they will make it through it ,and come out like I want it too. Has anyone got this to work correctly,I am going to warm the board up before it goes through,it ran 4 sheets of paper easy so i will try it.
Will any toner work with any printer ,I have search on the net for black plastic toner but most are made for a specified machine.
Nice boards Kees52,I will try that if the printer won't run the boards,
Makin' good music !
NS
Will any toner work with any printer ,I have search on the net for black plastic toner but most are made for a specified machine.
Nice boards Kees52,I will try that if the printer won't run the boards,
Makin' good music !
NS
Generally people apply the toner to a transfer vehicle, not to the PCB itself. Then, the transfer paper/film is laminated to the PCB. One reason is that the PCB is such a heatsink that it's likely that any printer will not be able to fuse toner directly to a copper heatsink.
The imaging drum in a printer is usually pretty hard. I'm fairly confident you'll destroy the drum - or at least scratch it beyond repair - if you feed PCB material through. Then add that most (all?) printers have photo sensors that will cause the printer to stop printing if a non-standard paper size is detected. Surely, you don't want to cut all your board material to standard paper sizes.
I'd stick with brochure paper and just do the toner transfer. It's pretty easy and the results are generally good.
Tom
I'd stick with brochure paper and just do the toner transfer. It's pretty easy and the results are generally good.
Tom
Putting a board through a laserprinter wil not work, it will be damaged because the path is never straight, and card bord is 0.2 mm thick and can bend, a pcb do not and is 1.6 mm thick, I did it with the epson inkjet DX8450 in photo mode.
Make pictures with a very bright sun behind it, in freehand so it is not sharp, but give idea how black it is with that cheap chinese ebay transparancies.
regards
Make pictures with a very bright sun behind it, in freehand so it is not sharp, but give idea how black it is with that cheap chinese ebay transparancies.
regards
Attachments


well I guess that's not going to happen,lol.
Back to Square one,
Thanks for the reply's,I think I will try the blue transfer method next time I make boards,I used that procedure a long time ago and had trouble appling the spray to the boards maybe it has improved, the end result looks good!
NS
Back to Square one,
Thanks for the reply's,I think I will try the blue transfer method next time I make boards,I used that procedure a long time ago and had trouble appling the spray to the boards maybe it has improved, the end result looks good!
NS
Last edited:
I think I will try the blue transfer method next time I make boards,I used that procedure a long time ago and had trouble appling the spray to the boards maybe it has improved
No, the spray on resist is as useless as it has always been. Buy pre-coated boards or use dry film negative resist with a laminator.
I use Bungaurd PCB material with photo-sensitive layer.
I print directly from Boardmaker to overhead transparency sheets.
Exposure done with special UV light "tubes", about 1.5 minute.
Etching with Ammoniumpersulfate solution. "Coppersulfate" (that brown stuff making nasty stains on your clothing) results in corroded boards, no matter how long I rinse them.
In Photographic terms I am making contact prints 1:1
contact printing
My dad rest his soul was a commercial Photographer,
I used to used his contact box it was 8x10" I just changed the bulb and was in bus. I can make one and get a uv bulb, What wavelength?
I have some pre sens boards but they are 10 years old,but what the heck I''ll try them any way,
I have had good etching results with muratic acid (get at home store) and 1:2 h202(household hydogen peroxide) works well a little heat helps too.Adding table salt helps some too,I used a pyrex dish I borrow from the mrs. to etch in.
I rinse the board for a few mins and allow to dry( can put it in the oven on 110degrees for a few and let it cool down and use it then.
I coat the finished board with rosin flux,it doesn't corrode the traces,make it solder EZ too.
So where do I get pre sens boards in the USA?
Thanks !
Ns😀
🙂I use Bungaurd PCB material with photo-sensitive layer.
I print directly from Boardmaker to overhead transparency sheets.
Exposure done with special UV light "tubes", about 1.5 minute.
Etching with Ammoniumpersulfate solution. "Coppersulfate" (that brown stuff making nasty stains on your clothing) results in corroded boards, no matter how long I rinse them.
In Photographic terms I am making contact prints 1:1
My dad rest his soul was a commercial Photographer,
I used to used his contact box it was 8x10" I just changed the bulb and was in bus. I can make one and get a uv bulb, What wavelength?
I have some pre sens boards but they are 10 years old,but what the heck I''ll try them any way,
I have had good etching results with muratic acid (get at home store) and 1:2 h202(household hydogen peroxide) works well a little heat helps too.Adding table salt helps some too,I used a pyrex dish I borrow from the mrs. to etch in.
I rinse the board for a few mins and allow to dry( can put it in the oven on 110degrees for a few and let it cool down and use it then.
I coat the finished board with rosin flux,it doesn't corrode the traces,make it solder EZ too.
So where do I get pre sens boards in the USA?
Thanks !
Ns😀
Last edited:
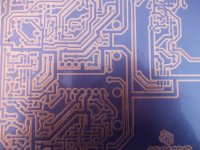
Test yellow artwork print.
I have tryed to print yellow artwork and expose in on uva light for 10 minutes and this give good result, very nice and clear pcb.
Keep in mind that this pcb is very old and also the photolayer on it so it did need long exposing but with yellow it did suprising well.
The print is very small 3.5 x 3.5 cm for comparisment so everything is more magnified.
regards
Attachments

I know that the HCl + H202 solution can be stored and used multiple times and it is many times cheaper than FeCl3 and poses no real threat if thrown away. Can you look up that paper for the correct proportions, if nto a problem for you? Vielen dank 🙂
... For a hobby lab with occasinal use, I'd go with a Hydrochloric acid and hydrogen peroxide mix, on a throw away basis. ...
Maybe you can throw away a mixture of hydrocloride/muratic acid and hydrogen peroxide rather carelessly prior to it's use as an etchant. Maybe. Who ever would do that?
But as soon as you've put a piece of PCB into it once, you'll have copper ions in your solution. And these are very hazardous to the environment, especially to your hometown'S sewage plant. This is, btw, a common problem to all d.i.y. etching procedures.
I started etching PCBs in 1985 and have been through the three common etchants:
Ferric chloride
Cupric chloride
and some sort of "etch crystals" that resulted in a blue solution (no idea of the chemistry).
I think your etching crystals are ammonium or sodium persulfate? Both are rather temperature sensitive. So you wish to heat your etchant to get reasonable etching times, but you mustn't overheat it to prevent it from disintegrating.
Best regards!
I have bought this laminator second hand, a nice thing who can even as high as 160 oC.
however it is badly damaged by the mail office who send it to me (Kiala).
https://www.youtube.com/watch?v=71QqBL6qmYA
But is a very strong one.
however it is badly damaged by the mail office who send it to me (Kiala).
https://www.youtube.com/watch?v=71QqBL6qmYA
But is a very strong one.
Nice industrial type,LOL. That's should last a long time,I didn't know about foil,pretty neat.
NS
NS
Nice industrial type,LOL. That's should last a long time,I didn't know about foil,pretty neat.
NS
We always keep learning.
I have a crack in the silicone roll.
regards
- Status
- Not open for further replies.
- Home
- Design & Build
- Construction Tips
- pcb etching