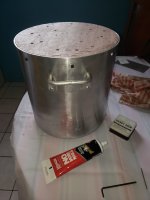
The flange is entirely encased in rubber, it makes a good seal without a secondary gasket.
I won't do another one without some precision guided cutting device.
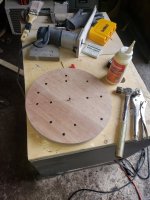
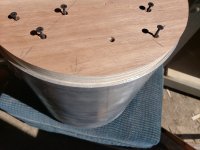
Tolerances should be within thousands of an inch, if you want it to perform well and also not look sloppy. Accomplishing one baffle with hand tools felt like a feat. of backyard engineering in itself. It took the good part of a day to make one baffle and two jigs 🤔
Well, I had to make two rings then sandwich them together, since I doubled up on the 3/4" stuff.
I linked the sub back there somewhere,
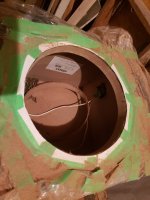
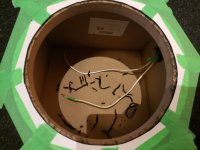
But here's how the gasket looks..
I won't do another one without some precision guided cutting device.
Tolerances should be within thousands of an inch, if you want it to perform well and also not look sloppy. Accomplishing one baffle with hand tools felt like a feat. of backyard engineering in itself. It took the good part of a day to make one baffle and two jigs 🤔
Well, I had to make two rings then sandwich them together, since I doubled up on the 3/4" stuff.
I linked the sub back there somewhere,
But here's how the gasket looks..
Attachments
Last edited:
I could of used somethings else but prefer the look of stainless. And for its high tensile strength, it offers very little to no give. I used it for bracing. Those also suspend the sub a couple inches up off the floor. The footers will bolt directly to the bottom of that. Salamanders would look sleek on it. I'm good with results so far. Though I still want to frost finish the aluminum and shoot it with a clear, but I also must replace my sander first. I'll upload updates a bit later that can explain better than description.
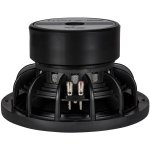
The Dayton Titanic sub assemblies are chunky, the spider sticks out to far and stops it from seating in place. I missed that part in specs. But no they don't fit standard size 10" pre made boxes. I had to shave 1/8 or more off with a jigsaw. Not anything to complain about though.
Attachments
Last edited:
As Dayton advertised, the Titanic does pretty well in small sealed cabinets. They actually push boundaries further than I did. I have done nothing much as far as tuning goes, at least spikes and decent stuffing. Possibly a simple unobtrusive inner brace. Its not that big and may not be necessary.
It didn't complain about sitting in the corner, it went right to work. I like it. It faithfully played the music I have thrown at it so far. It needs proper tuning and testing.
It didn't complain about sitting in the corner, it went right to work. I like it. It faithfully played the music I have thrown at it so far. It needs proper tuning and testing.
Last edited:
I got another baffle mounted. They take me about a full day from start to finish. I still have sanding to do, + + +. There is still a lot to do. I will press along with some form of Gallo Reference copy cats. It should be fun to build. I won't repeat the mistake on this one. I hope the hammer welts all sand out, and should. I should of removed a touch more material. Alsp I dimpled the metal when drilling, I bet the baffle hung up. I failed to clean those points better. By that point I was obligated. I had to pull out my steel machine hammer to seat it the rest.
I still owe a completed sub. Coming right up, soon. Putting on some final touches to button it up.
I still owe a completed sub. Coming right up, soon. Putting on some final touches to button it up.
Attachments
I'm aborting the subs but will be going forward with 3-ways. Being that the buckets push parameters too far.
The wedge box i bought online is slightly larger, but still not quite there. Sq is going up with the increase. So I began some cubes from scratch this morning. With good quality birch and walnut veneer. The same material I had planned to use on the bucket clamps.
Its 12"x12" size would better suit this sub in the 8"version. I will finish them. I'll show you were i left off on those. I like the concept I came up with.
All the hardware and thread bar, bolts locks and washers all stainless. Will continue further updates, time is of the essence.
After I knock out a box enclosure I will go forth with the 3ways. And use the buckets there. Open baffle, maybe. With enclosed woofers.
Attachments
With good quality birch and walnut veneer
...well that I can get behind.

Its almost too nice looking to cut up.
I meant to ask you jm, what species is the darker stuff on the 1st box you turned out? Reminded me of a sunburst.
What to do with exposed end grain, some type of heat activated woody veneer would be a best? Or manual glue, or 3m sticky backed?
I like nice plywood ends showing on just about everything except speaker boxes. With other designs its welcome. It has a DIY charm about it.
My bucket sub thread was officially derailed. And thats ok. Ill be picking it up after I source a bunch of parts.
If you mean the dark reddish strip down the middle of the woofer, that's the last scrap of Bubinga I had left. Since it makes hard maple feel like putty it was the ideal use case for it.
On sub 1, the thick strips covering the end grain are all soft maple. Glued with Titebond or T2. I've never used the iron-on stuff or veneer that comes in sheets so I don't know enough to advise on that, but I've covered a lot of endgrain and everything else with strips I cut myself and never had an issue.
On sub 1, the thick strips covering the end grain are all soft maple. Glued with Titebond or T2. I've never used the iron-on stuff or veneer that comes in sheets so I don't know enough to advise on that, but I've covered a lot of endgrain and everything else with strips I cut myself and never had an issue.
This is the hardwood walnut stuff I was mentioning jm (outer piece). I may not quite have enough for the entire cabinet, I have three x whats shown. The centre has a double thickness ply sheet all the way through. Sandwiched between several thinner. It makes a good solid thud when you knock on it. My understanding the guy I get some of that comes from diseased trees.
Those are the same pucks you pictured as something they else 😉
They actually do work pretty well.
The more I listen to the Dayton the more impressed I am with it and like it. It sounds very very clean and punchy, right in the chest. I like it with the analog kick drum especially, single or multiples. It doesn't fall apart unless the recording sucks. I think the new larger cabinet will only improve on things.
I'll take a break first, temps dropped. Here during transitions phases we can get all four seasons in a single day.
Attachments
![20230418_082532[6376].jpg](/community/data/attachments/1073/1073866-7274d6808a39b47d9cdfeeb29002aa08.jpg?hash=cnTWgIo5tH)
![20230418_070114[6373].jpg](/community/data/attachments/1073/1073865-9d8af93e0d1c9c6b695f4248df1f1b97.jpg?hash=nYr5Pg0cnG)
![20230418_070151[6370].jpg](/community/data/attachments/1073/1073864-0ec594d38ce288cdea0336b56fa81ee8.jpg?hash=DsWU04ziiM)
Looks like good plywood to me. I've never bought plywood from the wood store, just the home store, but I've always been curious about it. I'm sure it will do a great job. Glad your using nice ply and not mdf.
I think I understood how the feet worked after you showed the screws, the first ones I didn't see holes though the puck so I was confused by that.
About that 8" sub, the good one, yeah, I deviated from protocol on both the subs. While I'm satisfied with both for their respective use cases, normally I would spend top dollar -- DYI level top dollar not high-end top dollar. I should have bought the 150$ 8" not the 40$ one. Given the cost of my time put into the enclosure, and given the cost of space, saving a hundred bucks hardly matters.
It sounds like your already getting hooked. If your not content there's a good chance it will urk you until you build another one. I'm nearly constantly going over ideas lately that I see cabinet panels and dimensions and plans when I close my eyes before I fall asleep :/.
In the end you'll become a better craftsman so its a positive if you stay with it anyway. I have a couple to do actually, to pair up the sub I uploaded back there.
The wedge is super tight, I didnt know what to expect, mostly to hear it do something. and it did more, it covers ranges I listen, and checks several boxes. I want to go a little larger on cabinet space, without over shooting it, or by much. The wedge does things right I like a lot, it even covers movie effects mostly. When I read it performed as it does I was a bit comprehensive.
Anyhow, knowing all this now Im afraid of over shooting the sweet spot by going too big.
If someone ran it through a program that would be awesome. But ultimately you know after hearing it built. I wont get into computers (because I cant at this time) but just say they arent being kind to me. And this laptop I dug out is on its last limb, barely letting me go online as it is.
Last edited:
No good j, the puck carbides. They get ripped out after they take a good hold and sink in to the hard oak floor. From adjusting it too much works them loose. It is ok though, I have a better idea.
"... I have a better idea"
I'm sure you do.
In other news, I was just eyeballing the space between my new sub and the shelf area above, and I could fit another 8" enclosure in there if I can stack this one on top. any problem with that?
If I do get another, it's no holds barred on the driver, I won't spend less than 150$. The enclosure won't be fancy since it won't be visible. But, I have to wait until, eh hum, certain people leave the house for a couple days so they can't see what I'm doing.
In other news, I was just eyeballing the space between my new sub and the shelf area above, and I could fit another 8" enclosure in there if I can stack this one on top. any problem with that?
Chance is that putting them close together won't be as effective as spreading them further apart to gain a more balanced sound and fewer room nodes. And close to the floor. Other than that, the more subs the merrier. As many as four in my circumstance.
Chance is that putting them close together won't be as effective as spreading them further apart to gain a more balanced sound and fewer room nodes. And close to the floor. Other than that, the more subs the merrier. As many as four in my circumstance.
Last edited:
I averted back when I mentioned. But this is where I left off. I like how the lip turned out on the better half, the seam is nice and clean. My screw up with the pilot holes resulted in destroying the walnut veneer. Only a small strip will be showing with the driver mounted but I wanted it that way for a reason. The up right columns would of been the same colour/veneer and I wanted that detail as small as it is.
Anyway too small for a sub-woofer. Better used for gallo reference low ends. Which will not be in the budget yet. As you can see the direction I started going. The pots should work better for those. I learned while making these. Any others should be nicer. And I will try to get stainless steel like the tubs on the Gallo example. Although aluminum is easier to work with. The SS should be sized accordingly. I can and have cut the hardest steels, but with hand tools in a yard and the cuts it involves ill take a hard pass.
Anyway too small for a sub-woofer. Better used for gallo reference low ends. Which will not be in the budget yet. As you can see the direction I started going. The pots should work better for those. I learned while making these. Any others should be nicer. And I will try to get stainless steel like the tubs on the Gallo example. Although aluminum is easier to work with. The SS should be sized accordingly. I can and have cut the hardest steels, but with hand tools in a yard and the cuts it involves ill take a hard pass.
Attachments
![20230424_060718[6471].jpg](/community/data/attachments/1075/1075689-6e58f32bcee16862a95dc429eb64327c.jpg?hash=bljzK87haG)
![20230424_060724[6472].jpg](/community/data/attachments/1075/1075690-f26c011d6dd0e7746b81cbccf5a9fcf4.jpg?hash=8mwBHW3Q53)
![20230424_060737[6470].jpg](/community/data/attachments/1075/1075691-66a867f65d35b3d9ff8059b747cf6cb2.jpg?hash=Zqhn9l01s9)
![20230424_060745[6469].jpg](/community/data/attachments/1075/1075692-51afe7c519cc675de1be7af41bb9562e.jpg?hash=Ua_nxRnMZ1)
I don't know if they are too small for a sub, lol, but those gallo speakers would be an epic built to aspire to. So if you are going to use stainless steel for the gallo and the present buckets are too small for a sub, then what are you going to do with the present buckets? that's a lot of work to abandon.
Its not very complicated to copy the main structure. The upright columns that hold everything up will consist of four laminated layers of plywood. Cut to size and shape with a roller guided router that follows a pre formed mdf template. IMO the upright columns will be easier to make than the bucket baffles were.
The Gallo low range employ smaller woofer cabinets.
Btw my nephew took the other one. He said his friends were mobbing his trunk to check it out. They are still at the age when everything seems fresh and cool.
The Gallo low range employ smaller woofer cabinets.
Btw my nephew took the other one. He said his friends were mobbing his trunk to check it out. They are still at the age when everything seems fresh and cool.
- Home
- Loudspeakers
- Subwoofers
- one sub bucket coming up