
tomtt
WOW! Damn - now I have another project to play around with to add to my wish list. Just go ahead and shoot me!
Thanks for the info - I love it - and this guy is way outside of the box!
WOW! Damn - now I have another project to play around with to add to my wish list. Just go ahead and shoot me!
Thanks for the info - I love it - and this guy is way outside of the box!
Well - until I can get around to learning how to make my own paper for cones I'll guess I'll be working on the Mamboni Walsh 5 remakes.
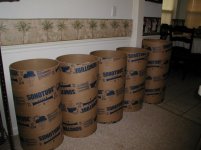
Cut down some more SonoTube today. It's pretty slow going cutting this stuff up with those little plastic knives tho 😱 - and you go through a bunch of 'em!!
I'm making 3 speakers - two to keep and one as a "test-tube" to play with mod's on. Concerned with wall flex - but will address that at a later place and time. Might put one of those 14 inch babies inside an 18 inch tube and use some expandable foam between the walls to improve flex resistance and deaden things up a bit. Sounds a bit more practical than filling the base up with Jello pudding.
Anyone know where I can pick up one of those old quadraphonic units that were around in the 70's? Quad sound and an 8-track!
BudP would shoot me - most likely several times!
Attachments
c2cthomas said:Hi Mamboni!
I used your 1.5 inch sized equilateral triangles and varied the size of the felt pieces used on the dome assembly @ 1.75, 1.50, and 1.25 inches.
I assumed the hook up was going straight to the woofer + to + and - to - , and then from the + side of the woofer through the cap and 4 ohm resistor in series to the + side of the tweeter. Correct?
I'm working on an "Olsen" variation of your theme but I am concerned with edge reflection so I'm going to include BudP's EnABL pattern as well. The attached example uses "Golden Section" ( Fibonacci) section triangles and I have those placed - will add EnABL after I post.
I believe that your triangles serve as a torsion mechanism that damps the major cone flexing with a variable degree of mechanical resistance vs. frequency and that BudP's EnABL will act as a "trap" on frequencies reflected from the speaker edge by setting up an mechanical interference on the cone surface. Should be interesting!!
Glad I purchased an extra speaker to mess around with!

Yes, the woofer is wired straight from the amp. But, some suggestions:
I would wire the woofer (+) to the binding post (+) because although the woofer is firing down into the box and is actually 180 degrees out of phase vis-a-vis a forward firing woofer, the tweeter will be in correct phase.
I preferred the sound of the tweeter wired in what is opposite phase: woofer + terminal to tweeter (+) terminal. The woofer coil inductance is causing phase shift, and I believe that the tweeter wired in this opposite phase sounds better. So, you are correct as you stated + to +. But I wanted to point this out: that in reality the woofer and tweeter are being wired in opposite phase because the back of the woofer cone is the sound producer being mated with the tweeter. I hope this is clear.
Hi Mamboni!
Thanks very much for your feedback - but with the Heils being a dipole I'm not to concerned - heck all I have to do is turn the Heil around 180 degrees! I just wanted to be sure that the resistor and cap were in series - was not sure if you had the resistor in parallel or not.
😀
I'm playing with BudP's EnABL patten at this very moment - getting closer! 😉
Heils Dipole
I keep hearing people say this.
It seems to me that the heils are a bipole, not a dipole. Think about the mode of operation: the folds compress to compress air, and expand to rarify air. This action would be the same on either side of the diaphragm, no?
I keep hearing people say this.
It seems to me that the heils are a bipole, not a dipole. Think about the mode of operation: the folds compress to compress air, and expand to rarify air. This action would be the same on either side of the diaphragm, no?
Hi badman,
You are correct Sir! I do stand corrected - and offer my humble apologies to any and all. BTW when one side is squeezing the air out the opposite side is sucking it in - so they are out of phase - generally speaking.
Thank You!
You are correct Sir! I do stand corrected - and offer my humble apologies to any and all. BTW when one side is squeezing the air out the opposite side is sucking it in - so they are out of phase - generally speaking.
Thank You!
Aren't the two things you just said inconsistant? It seems that Badman is saying that they are bipoles- the front and back are IN phase, no?
So both sides should be squeezing air out at the same time, right?
I'm confused
So both sides should be squeezing air out at the same time, right?
I'm confused
All involved,
The Heil is not exactly a dipole or a bipolar emitter, but mostly, since air is rarefied on one side while being pressurized on the other side of the mylar sheet, it is technically a Dipole, just as a permanent magnet is a Dipole. See this site for some descriptions and pretty good diagrams of a bit later production than the ESS model.
http://www.soundimage.dk/Different-col/AirMotion.htm
Bud
Mamboni Variations in D Minor
Having thrown the idea over the transom, here's what I was thinking of in more detail.
1) Visualize 5 big triangles extending all the way from the edge of the cone to the dustcap or the voice coil. They aren't necessarily equilateral triangles, they could have narrower (skinnier) profiles if that works out better. For purposes of illustration, assume the edge-to-dustcap distance of each big triangle is 2.618 inches.
2) There is a medium-size triangle flanking each side (left and right) of the big triangles, so we have 5 big triangles and 10 medium-size triangles. The cone-edge-to-inner-point distance is 1.618 inches for the mid-sized triangles.
3) There are lots of little triangles lining the edge of the cone - these fill in the leftover spaces between the 5 sets of larger triangles, and are 1 inch deep.
4) Scale the dimensions as appropriate to the size of the cone, but keep the size ratios in the Golden Section 1 : 1.618 : 2.618, a subset of the Fibonacci Series.
Unlike the constant-size-triangle approach, this is a "variable-geometry" approach that has substantially different cone-termination distances for different parts of the cone, as well as discouraging the dominant side-to-side and 4-way lateral breakup modes.
note to self - do not go writing stuff at the forum when tired and or in to much of a hurry to check details. 
To those who wish to see a definition of Dr. Heils Air Motion Transformer please see http://en.wikipedia.org/wiki/Air_Motion_Transformer where it is referred to as a dipole tweeter.
The folks at Oskar Heil Speakers refer to it as bi-directional.
For me - I have simplified things down to - it is one sweet sounding tweeter!! AND I'm putting that sucker on top of MY very own set of speakers that use a Walsh type driver (another way cool transducer with very sweet sound) built by myself with loving care and with guidance from some great and kind people such as Mamboni, BudP and Lynn. For a first time DIYer I just can't imagine having such a great time, learning so much so fast, and building what should be a very fine set of speakers.
BTW - cost to date - around $400.00 for the pair! You can't beat that with a stick!! 😉
As for me - I think I might be going bi-polar!
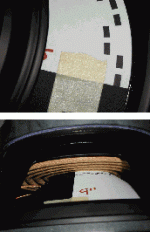
photo's of the BudP's EnABL pattern we are working on for the project. Now I just have to see if I can get some type of applicator into that tiny space near the VC!
The "white" area in the photo represents the stencil base material and the "black" areas will be the pattern voids where BudP's coating materials will be screened onto the speaker cone. Or you can still use the lettering pens that Bud has discussed in other post. 😉
To those who wish to see a definition of Dr. Heils Air Motion Transformer please see http://en.wikipedia.org/wiki/Air_Motion_Transformer where it is referred to as a dipole tweeter.
The folks at Oskar Heil Speakers refer to it as bi-directional.
For me - I have simplified things down to - it is one sweet sounding tweeter!! AND I'm putting that sucker on top of MY very own set of speakers that use a Walsh type driver (another way cool transducer with very sweet sound) built by myself with loving care and with guidance from some great and kind people such as Mamboni, BudP and Lynn. For a first time DIYer I just can't imagine having such a great time, learning so much so fast, and building what should be a very fine set of speakers.
BTW - cost to date - around $400.00 for the pair! You can't beat that with a stick!! 😉
As for me - I think I might be going bi-polar!
photo's of the BudP's EnABL pattern we are working on for the project. Now I just have to see if I can get some type of applicator into that tiny space near the VC!
The "white" area in the photo represents the stencil base material and the "black" areas will be the pattern voids where BudP's coating materials will be screened onto the speaker cone. Or you can still use the lettering pens that Bud has discussed in other post. 😉
Attachments
Badman,
The Heil drivers actually perform their activity in a kind of swaying motion. All of the pleats open on one side while the pleats on the other side close. The diaphragm actually "sways" away from the pressure wave it is creating, which, to a degree negates both the pressure wave and depresure wave. This acts, ultimately as a sort of mechanical feed back mechanism and does linearize the emitted wave front, across the diaphragm, just as it emits into the air from the final edges of the pleats. Weird to wrap your head around for sure.
Bud
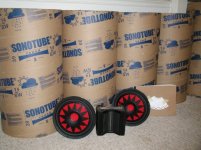
Just a little progress update.
Second speaker has had what I call the Mamboni Magic applied and is awaiting BudP's EnABL pattern. BudP and I have been working on developing a process by which to apply his pattern with a stencil and we have the pattern sized pretty well for the Pioneer 10 inch speaker that Mamboni specks in earlier post. Now to get the silkscreen stencil produced and tested - should be in the next day or two - providing that it is successful we will be able to show those interested what all is involved.
I still trying to get my MDF carved up for the speaker end caps and center brace. I thought that I would be able to rent a plunge router but have not had any luck finding a rental unit - or any buddies that have one either. Might wind up bitting the bullet and making a purchase - that will blow the budget - sigh
Only took an hour to apply the Mamboni Magic to the second speaker! Much less time than the first - getting over the learning curve is great!😀
Considering a future in consulting, speaking engagements, and how to do it DVD's - - Ok maybe for a soda.
Cheers
Second speaker has had what I call the Mamboni Magic applied and is awaiting BudP's EnABL pattern. BudP and I have been working on developing a process by which to apply his pattern with a stencil and we have the pattern sized pretty well for the Pioneer 10 inch speaker that Mamboni specks in earlier post. Now to get the silkscreen stencil produced and tested - should be in the next day or two - providing that it is successful we will be able to show those interested what all is involved.
I still trying to get my MDF carved up for the speaker end caps and center brace. I thought that I would be able to rent a plunge router but have not had any luck finding a rental unit - or any buddies that have one either. Might wind up bitting the bullet and making a purchase - that will blow the budget - sigh
Only took an hour to apply the Mamboni Magic to the second speaker! Much less time than the first - getting over the learning curve is great!😀
Considering a future in consulting, speaking engagements, and how to do it DVD's -
- Ok maybe for a soda.Cheers
Attachments
Hi Bud,
Thanks for sharing your thoughts. I agree that we all do share a similar final goal. How to get there is something I've been attempting for the last 23+ years. And needless to say, I would certainly welcome a time where I don't have to worry about the sound of my equiptment.
I'm going to try the Manboni Walsh speaker with a pair of 15" Altecs. My crude experiment suggests that it is worthwhile to pursue. And I will use the Enabl treatment on the cone; Manboni on the inside and Enable on the outside (facing outward).
Where might I learn more about your litz wires and your method of uncovering the "back half of musical notes"?
Hi Guys,
This is a fascinating thread!
I’m in the process of designing an omnidirectional speaker myself. It is sort of a meld between what Duevel has done with their concave cone diffusers and the BeoLab 5. Below is a pdf of the current plan. I’m about 90º complete with building a prototype for design testing. There is a thread about it over at HT guide forum, here, if you want to read more. Mentor2 Omni Thread
Essentially it is a 3way comprised of all up or downfiring drivers, two 8” woofers (RS225 metal cones), which fire at each other, but are separated by a diffuser, an upfiring 2” metal dome (RS52) which uses a modified PE 8” waveguide and fires into a concave cone diffuser, like the Duevel’s use. Housed in this diffuser is an upfiring ¾” soft dome neo tweeter (Dayton ND20FB), in a modified 6.5” MCM waveguide, firing up into a 7-1/2” dia. concave cone diffuser. Also attached is a photo of the incomplete test system. I have done a quite a lot of measurements to try and determine the right drivers, right diffuser types, diffuser heights, etc. The attached graph is a preliminary plot of the 3 driver’s outputs with the waveguides and diffusers intact.
I’m not trying to hijack this thread. I’m posting for a couple reasons. One, there is clearly some serious interest in omnidirectional speakers amongst you all. Second, I’m thinking that the Mamboni felt-BudP Enable-or Olsen modified Mamboni felt treatment might be of use in my design. What do you all think?
I was thinking that it would most surely help the woofers to do one or several of these treatments, but possibly all the drivers. Also, it might be helpful to treat the front side of both waveguides. It might also be helpful to treat the bottom side of the concave diffusers. Any thoughts?
Finally, it occurs to me that perhaps my tweeter implementation, using the waveguide/concave cone diffuser might be of interest to you all in your omni efforts, since it might allow you to continue the omni sound through the entire FR of the speaker, rather than switching over to directional for the tweeter.
I’d be happy to provide any measurements I can (I use SoundEasy, but I’m relatively new to it) and do some experimenting with the various processes you are working on/providing before and after measurements, etc.
BTW, have you all thought about adhesive backed felt? They sell it at many hardware stores or you can buy better stuff at McMaster-Carr online? This would seem to be a quicker way to install the felt treatments at lest ofr testing and yet let them remain removable if the experiment needs to be altered.
Also, we used to use adhesive backed printed sheets at work. They are of a pretty thick mylar-like material and might work as templates for the enable process. Also there are clear acetate that you can print on that could be cut into a template. I also wonder if there would be a non-permanent enable product that might be used. For example, take a bunch of the enable rectangles, print them on the adhesive mylar, cut them out and stick them on individually or in pairs if that was ok. They would be easy for anyone to make and fully removable, though that adhesive is very aggressive.
Just some food for thought. I’d like to hear any of your thoughts on how the ideas you guys are testing might work with my omni application, etc.
Thanks!
An externally hosted image should be here but it was not working when we last tested it.
An externally hosted image should be here but it was not working when we last tested it.
An externally hosted image should be here but it was not working when we last tested it.
Attachments
Whoops, I forgot to post the responce graph I mentioned above. 😱
An externally hosted image should be here but it was not working when we last tested it.
Hi Bud,
Thanks for the feedback!
Do you have some specific recordings that you use for your piano and string listening session?
Are you talking about eh 3" Vifa Dome? I looked at it, but was concerned about what looked to be very quick off axis roll off. It looks like the new version might be better, but I could not find a performance graph on it. Since we are essentially listening 90º off axis with an up firing driver, there tends to be a very quick roll off with many drivers that severely reduces the range you can use it in. The concave cone diffuser helps, but it is good to start with a driver that has very good off axis performance to start with. I hear you on the phase screen, however. I wish it was removable. I can always go back and try the Vifa, if the RS52 is not satisfactory. However, it has gotten very good testing reviews, for example here:http://206.13.113.199/ncdiyaudio/mark/Testing/Midrange2/midrange_2_test_data.htm
and here:http://www.zaphaudio.com/smalltest/
I'm not clear on your thoughts about the EnAble use with the wave guides? Do you think it would help? If so, how would it be applied? Also, what about on the concave cone diffusers? I know there will be diffraction issues that will result from those round wave guides and diffusers and thought maybe the EnAble pattern would be an option help attenuate them.
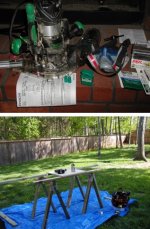
Construction update:
Well yesterday I bit the bullet and purchased a plunge router - and seeing how I thought it unwise to sit on my butt and spin in order to cut circles I also purchased a circle cutting jig. Other item purchased included a respirator rated for toxic dust and fumes, safety goggles that would fit over my glasses, a disposable dust suit, router bits, and some lumber and braces to make a work stand out of. About the only thing I had on hand were some general carpentry tools and ear plugs.
So I banged together a work stand and placed it on a tarp outside in the fresh air where the breeze would blow the light dust away from me and after reading the instruction manuals (yeah, I read those things), I got to it and routed up some MDF and plywood.
Good thing I measured the inside diameter of the SonoTube before I started because the 14 inch stuff that I'm using measures more like 14.75 inches ID. Guess I'm going to have a little more bass than I expected! 🙄
Cold day outside today - still 45f at noon so I got a late start. Will finish cutting things up tomorrow and then it's on to putting things together!
Well yesterday I bit the bullet and purchased a plunge router - and seeing how I thought it unwise to sit on my butt and spin in order to cut circles I also purchased a circle cutting jig. Other item purchased included a respirator rated for toxic dust and fumes, safety goggles that would fit over my glasses, a disposable dust suit, router bits, and some lumber and braces to make a work stand out of. About the only thing I had on hand were some general carpentry tools and ear plugs.
So I banged together a work stand and placed it on a tarp outside in the fresh air where the breeze would blow the light dust away from me and after reading the instruction manuals (yeah, I read those things), I got to it and routed up some MDF and plywood.
Good thing I measured the inside diameter of the SonoTube before I started because the 14 inch stuff that I'm using measures more like 14.75 inches ID.
Guess I'm going to have a little more bass than I expected! 🙄 Cold day outside today - still 45f at noon so I got a late start. Will finish cutting things up tomorrow and then it's on to putting things together!
Attachments
c2cthomas,
BudP posted to contact you for the Mamboni / EnABL treatment details. Do you have a workable process (that anyone can do) of putting EnAbl on the pioneer woofer?
What type of treatment (paint or veneer or…) are you going to do with the sonotube?
R. Jamm
BudP posted to contact you for the Mamboni / EnABL treatment details. Do you have a workable process (that anyone can do) of putting EnAbl on the pioneer woofer?
What type of treatment (paint or veneer or…) are you going to do with the sonotube?
R. Jamm
Hi R Jamm,
Working on EnABL pattern to be used with a stencil type application now. BudP has been super with providing different size patterns shaped for the basket side of the Pioneer 10 inch and I have obtained some flexible silkscreen sheets that look fairly easy to use from http://www.store.cbridge.com/pc/STP-KIT/KIT-STP-001/Basic+Starter+Kit+with+StencilPro
I'm also wondering if plain old photo sensitized silkscreen that you can get at just about any arts craft store will work - but that stuff usually needs UV lamps to expose the pattern with. Still - it could be worth a try.
Not nearly as difficult a process as doing a framed silkscreen for a circuit board - and doesn't require any UV lamps either! The basic kit comes with everything you'll need except the pattern - which will be made available by BudP or me after a little bit of refinement and debugging. Still some details to work out with exposure times, pattern application, - specific step by step stuff - which I will be working on this weekend and should have some preliminary results to report. I had to order the paint and conformal coating at my local hobby shop and hopefully it will arrive tomorrow. Then some testing to see what a successful application method will be. The paint is a thin acrylic and that is going to take some fooling around with to see how I can prevent it from running down the cone as it's being applied. The conformal coating is simply brushed on but BudP wants me to do some testing first to see how much needs to be applied.
I'm considering a nice veneer wood finish for the base units that I will put into my living room - but the test rig I'm simply going to primer a sort of medium gray because it's going to get beat up quite a bit while I fool around with different damping treatments of the SonoTube. I am also considering using a padded leather finish to match the furniture or some short fiber carpet - the padded coverings would also be to damp the SonoTube. OR I could slap on a bunch of LED's and go with the scoreboard look - hmm - NO!
Hope this helps - after this weekend I'll know a lot more!
- Status
- Not open for further replies.
- Home
- Loudspeakers
- Multi-Way
- OHM Acoustics "Walsh F" Speaker remakes