Member
Joined 2002
Ouch, £3k + VAT for 6 baffles in Corian.
The fiancee reckons this Corian stuff must be made out of ground up moon rock for that price. 😀
Sticking with doing this myself. Everyone else is ridiculously overpriced.
engaged ?
engaged ?
Yeah getting married August 2012. She keeps spending my speaker money on wedding related crap.
Member
Joined 2002
Yeah getting married August 2012. She keeps spending my speaker money on wedding related crap.
congrats, ooh BTW, get use to that ! lol! did all that last year LOL!
Yeah getting married August 2012. She keeps spending my speaker money on wedding related crap.
That's when you "elope" with a priced fixed wedding package to some exotic locale. 😉
..and oh yeah, congratulations! 😀
Hello Shin, great looking speaker designs.
I've been in a similar situation. Had quotes to cnc some cabinets, price ranged from 2x to 5x what I considered a fair price. I then went looking for my own cnc machines. The one in the eBay link is one of the types I was looking at. Came it at around $3500 usd delivered but excluding local port charges and tax. It gets even better though, a full sheet machine from the same manufacturer is only $600 usd more. If those prices are inline with your budget, and your happy to import a new machine, drop me a pm and I'll pass on the manufactures details.
While sorting out a CNC machine I got two more quotes back for the cutting. Couldn't believe that there was a 1000% difference in price between the two companies, yes that's not a typo - one thousand percent. And it gets better, the cheapest guys are not only going to cut my MDF, they'll assemble it and paint it, or for less than my best local price on cutting. So yeah no cnc machine for me, but I've significantly cut down on the amount of my time I have to invest in assembly.
Moral of the story, keep getting quotes, and from my experience dedicated cnc companies are the most expensive, your better of talking to kitchen joinery and boat building companies who need work to fill in the quite times.
Good luck.
PS are you open to licensing your cabinet designs?
PPS wait until you have kids, you'll have even less money and time up your sleeves, buy everything you will need now!
Last edited:
I once looked into going into production with a design. I found a small shop that would build a monitor size box for $200 a pair in quantity. $500 a pair for 5 or less pairs. Now they were nothing special, but that was veneered, finished and ready to assemble. I agree you should be able to find someone who can do this cheaper. If you were nearby in the US, I have a buddy with a sign business who has a 5' X 12' X 3' - 5 axis router. He would likely build you as many prototype boxes as you needed in return for a finished pair of speakers. He picked up his router for $16k at an auction.
Moral of the story, keep getting quotes, and from my experience dedicated cnc companies are the most expensive, your better of talking to kitchen joinery and boat building companies who need work to fill in the quite times.
Hi Gooki and thanks.
That's a good point. I've been approaching dedicated cnc companies. Things might have turned out differently if I'd found something like you suggested but I've decided to buy the machinery myself now. I'm a bit of a control freak when it comes to speakers so this is the best way.
PS are you open to licensing your cabinet designs?
Yes. I'm doing design work right now in the form a huge dipole line array system for a fellow DIY'er. The parts list per speaker reads 8x BG Neo10, Custom Mundorf AMT tweeters, 9 x Dayton PS220 and 4x 21" Precision Devices PD2150 in a separate enclosure. All aluminium and acrylic construction with a novel suspended array system for mids and tweeters.
Very cool design and probably one of the better speakers on the planet. The more I work on it the more I want I pair 😀
Very cool design and probably one of the better speakers on the planet.
..The more I work on it the more I want I pair 😀

Yeah getting married August 2012. She keeps spending my speaker money on wedding related crap.
You can always give her an engagement gift that consists of a beautiful pair of speakers!
What was that movie..."I'd buy your chairs.."
ShinOBIWAN,
Nice work.
If you can stay away from CNC machines using round linear bearings. They have less
precision and are usually custom made for the machine and will be difficult to replace when worn-out.
Nice work.
If you can stay away from CNC machines using round linear bearings. They have less
precision and are usually custom made for the machine and will be difficult to replace when worn-out.
Got a render of these OB speakers you mentioned?
As you'd imagine, yes, I do have renderings but sadly they're not mine to share. Seaspeak and ScottG came up with the design and I've just done the mechanical and aesthetic CAD work ready for fabrication. You can read more about it in Seaspeaks thread here:
http://www.diyaudio.com/forums/mult...a-dipole-line-array-seeking-comment-long.html
Yeah getting married August 2012. She keeps spending my speaker money on wedding related crap.
If you ask her she would say you are spending the wedding money on speaker related crap. 😀
If you ask her she would say you are spending the wedding money on speaker related crap. 😀
This is true.
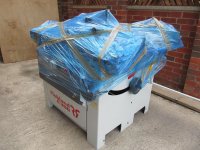
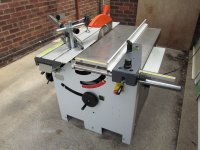
New toy arrived this morning.
Pretty cool seeing it hoisted off the back of a truck with a crane. After that it was a simple job of taking the shipping crate apart and using a pallet truck to get it off the pallet and into position.

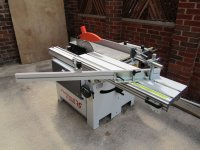
After unpacking, I spent about 3 hours assembling the saw. The sliding table was a pain in the backside to get perfectly level on both ends. It would have gone much smooth with two people but I got there in the end and you only do it once. If you go with the 2.5m long table you'd definitely need 2 people for that. Only other slight annoyance was setting the ruler for the parallel fence. The manual was vague at best and in the end I simply eye balled down the edge of the ruler and adjusted until it was in line with the blade. Hardly scientific. I would have spent more time but after messing with the sliding table I just wanted it together. Fine tuning can come later. 🙂
A couple of shots of the sliding table in action. Well worth over an hours head scratching and cursing! 😀


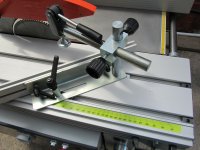
Here's the mitre fence with +60/-45deg adjustment and a hefty adjustable clamp. Unlike the ruler for the parallel fence this was already calibrated at the factory and assembly was just a couple of hex head screws into the sliding table.

The parallel fence and ruler. The fence is basically a huge block of iron - doubt that will flex when doing cuts 😉 Need to set the ruler correctly so if it looks wrong it probably is. Any tips for setting accurately would be welcomed.

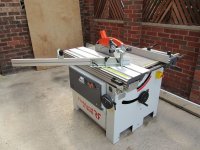
My overall impression is still the same - a very well built machine that will last a life time given proper care and maintenance. It's also upgradable with a larger sliding table, outrigger table and rear/right extension tables. This will allow to rip up to approx 10ft x 7ft with ease. Of course I'll need a bigger workshop before I can take advantage of that!
I'm looking forward to getting some cuts done so I can fine tune things. This thing is going to be extremely accurate and easy to use once that's done.
I'll end by saying I wasn't entirely happy with Robland though. The saw has a hefty cast iron table that showed rust spots all over it. Hardly impressive for a new machine. I rang the supplier up, they apologised and said it should be kept coated in machine oil or WD40. When it was assembled at the factory it looked like that wasn't done! 🙄 I've put a little metal polish over it and it came up like new but I shouldn't have had to mess around like that in the first place. Robland need to get their act together as that shouldn't happen on a machine at this price.
And last but not least, the Jet dust extractor. That Dyson bloke ain't got nothing on this.


Pretty cool seeing it hoisted off the back of a truck with a crane. After that it was a simple job of taking the shipping crate apart and using a pallet truck to get it off the pallet and into position.
After unpacking, I spent about 3 hours assembling the saw. The sliding table was a pain in the backside to get perfectly level on both ends. It would have gone much smooth with two people but I got there in the end and you only do it once. If you go with the 2.5m long table you'd definitely need 2 people for that. Only other slight annoyance was setting the ruler for the parallel fence. The manual was vague at best and in the end I simply eye balled down the edge of the ruler and adjusted until it was in line with the blade. Hardly scientific. I would have spent more time but after messing with the sliding table I just wanted it together. Fine tuning can come later. 🙂
A couple of shots of the sliding table in action. Well worth over an hours head scratching and cursing! 😀
Here's the mitre fence with +60/-45deg adjustment and a hefty adjustable clamp. Unlike the ruler for the parallel fence this was already calibrated at the factory and assembly was just a couple of hex head screws into the sliding table.
The parallel fence and ruler. The fence is basically a huge block of iron - doubt that will flex when doing cuts 😉 Need to set the ruler correctly so if it looks wrong it probably is. Any tips for setting accurately would be welcomed.
My overall impression is still the same - a very well built machine that will last a life time given proper care and maintenance. It's also upgradable with a larger sliding table, outrigger table and rear/right extension tables. This will allow to rip up to approx 10ft x 7ft with ease. Of course I'll need a bigger workshop before I can take advantage of that!
I'm looking forward to getting some cuts done so I can fine tune things. This thing is going to be extremely accurate and easy to use once that's done.
I'll end by saying I wasn't entirely happy with Robland though. The saw has a hefty cast iron table that showed rust spots all over it. Hardly impressive for a new machine. I rang the supplier up, they apologised and said it should be kept coated in machine oil or WD40. When it was assembled at the factory it looked like that wasn't done! 🙄 I've put a little metal polish over it and it came up like new but I shouldn't have had to mess around like that in the first place. Robland need to get their act together as that shouldn't happen on a machine at this price.
And last but not least, the Jet dust extractor. That Dyson bloke ain't got nothing on this.
Attachments


Last edited:
The twins that have just been delivered are not identical.
Will you be trying again given the news you passed on a few days ago?
Will you be trying again given the news you passed on a few days ago?
The most important first step is be sure everything is level! A carpenters level is not accurate enough, use a machinists level. Mine has one division for .005" out of level per foot. Makes leveling easy and accurate. Of course I lent it to a "Cabinet Maker" who could not get anything level. He was using 1/4" thick shims!
To check the rip fence for parallel set it for say 30" and rip a piece 24" long. Then set it for 1" and rip the 30" piece into 1" strips. The last strip will not have parallel edges! Measure the difference and divide by 60 for the correction per foot of fence length.
To check the fence miter cut a square piece 23 x 23. Then set the fence to 45 degrees cross cut the piece and 1" of error is about 2.5 degrees.
To check the blade tilt miter cut at 25 degrees a trued stick. Flip and check for a 90 degree corner.
Takes me about 2 days to set up a machine. First day is to just say hello, learn where all the adjustments are and get it close. Second day allows for temperature and floor to settle. A few weeks later is a good time to check again.
Rust on the top is just a friendly warning. Never let wood sit on top of the machine, the moisture in the wood can cause rust. I have Johnson's paste wax in a can with a rag kept in the can always on hand. Be sure to clean the dust off before waxing.
Last edited:
Thanks Simon. Very good information there.
Your post prompted me to search around a little more and I found a couple of useful video's on utube which are fairly universal for most table saws:
YouTube - Table Saw Setup/Tuneup (Pt 1)
YouTube - Table Saw Setup/Tuneup (Pt. 2)
Re: The rust spots on the iron table.
I've had a mail back from Robland about this and they recommend rubbing down the spots with fine wire wool and then apply something called Boeshield every 6 to 12 months depending on usage and humidity to prevent a repeat.
UK supplier here: Boeshield T9 Boeshield -12oz (DK7130) - Buy online from Rutlands.co.uk
The twins that have just been delivered are not identical.
Will you be trying again given the news you passed on a few days ago?
🙂 Don't joke about that, the twins gene runs in her side of the family. One small person at a time is more than enough!
You've been busy. Beautiful work as always David.
Can you elaborate more on why the SS15WU sounded poor in the midrange? I was looking at your center speaker which highlighted the problem and two of the cabinet walls are very close to the the rear wave. I'll likely have the same issue too if indeed that's the problem. Did you try the driver sans box to see if the midrange improved any?
The sound could best be described as soundingl like you were wearing socks on your ears. It had a thick hazy quality and not much detail, like what you would expect when you use a woofer too high up in frequency. I seriously doubt it had anything to do with the box internals (I didnt try it sans box). I havent seen a waterfall graph for it but my hunch is it wouldnt be pretty. Its been a while but I'm pretty sure the frequency response measured fine so it wasnt crossover related.
Last edited:
- Status
- Not open for further replies.
- Home
- Loudspeakers
- Multi-Way
- Oh no, he's back