You may soon get an opportunity to here it at a show… the purpose is to use to demp their TT. I hope customers start asking for copies.
dave
dave
Agree.I would build a frame which would define the shape of the curved walls, then I would bend multiple layers of 1/4 inch material and glue them in place [...]
This seems a lot easier than routing out a very large number of stackable plates.
Alternatively:
The line arrays Wesayso built (and several other examples here) are essentially tall & skinny wine barrels.
You could build them from staves, just like a wine barrel, and that would waste a lot less material.
If you end up skinning them with fibreglass, as Wesayso did, the aesthetics of the ply are irrelevant.
If you do want the "rustic" aesthetic of the plywood edge, again, you can get that without wasting tons of material.
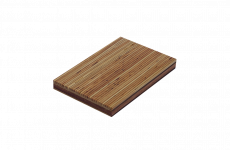
Just cut the staves from plywood that ALREADY has that look. Here's a link to a seller. Pic also attached, for when the link breaks 🙂
Maxi Edge | Maxi Edge Plywood | Maxiply
If you wanted to get the inside (pointlessly?) ribbed and rippled, you could just glue a bunch of offcuts in there. Or dimple the inside faces of the staves before you glue them up.
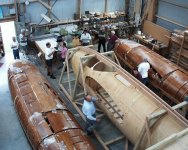
Bending wood across bulkheads and frames is how wood boat hulls are built.
The mosquito was similar (they were made with plywood pressed into concrete forms).
Low waste, good strength:weight ratio. The plywood was better (and cheaper) than aluminium, which was a super important consideration at the time.
Attachments
Last edited:
If you want the plywood look, you could always cut 1/8" strips of ply and glue the to the outside of a conventional box, as I did with these.
There are a couple of off the shelf options that would be heaps easier IMO:
The Maxi Edge stuff, or a local equivalent. Good if you need lots.
Maxi Edge | Maxi Edge Plywood | Maxiply
Look at laminated cutting boards and similar objects, that already have the appearance you want.
This option is good for small panels, and an easy way to get exotic wood (or bamboo) without the delay and cost of making a specialty order.
Ikea and other cheap(ish) stores are good for this.
Attachments


Cracked case are those middle braces in the drawing compliant mechanisms?
Pretty cool stuff could be done with 3D printing. How about trying stiffness and damping on same honey comb structure?😀
Few examples of compliant mechanisms
Metamaterials create mechanisms from a single piece of plastic - YouTube
3D Printed Compliant Mechanisms: 10 Great 3D Models | All3DP
I think that what you are referring to as a compliant brace is actually the divide between two chambers, both drivers have their own chamber ( shaped to defuse any reflecting sound waves, hence the " petal " shape ) , both chambers are then aperiodicly vented to the main enclosure. I am experimenting with compliant braces though, but it does seem very hit and miss, they're either to stiff or to soft.

Here's another idea for a stacked cabinet construction. It would be VERY rigid and have no ( or very little ) standing waves.
That's cool.
I've just had my template water cut in aluminum so a bit late now but I might give that a go at some point.
I've just had my template water cut in aluminum so a bit late now but I might give that a go at some point.

Hi all.
Just a thought, in relationship to the original post. I just built a pair of Loki speakers from Madisound (was curious about concentric). Looking at the photos on the MF-201 manufacturer's webpage (and the ones posted on this forum thread), I can not shake the impression that the driver and crossover are very similar (!!!) to the madisound kit, as many would have noticed already. And the frequency response and impedance graphs measured at NRC that are published elsewhere (see review of thewse speakers) confirm Seas measurements, down to the box tuning frequency.
So this fellow buys a pair of Madisound Loki driver+crossover kits (450$US total) and sell his product for 3500$US a pair. So the fancy box, tuned to the same frequency as the Seas one (350$US for a pair from Madisound), costs you about 3000$, give or take.
I am not dissing the fellow builder--hey, we live in the same city, so I might even pay him a call! He can charge whatever he wants for his work, which is of very good quality.
Rather, I was just trying to get an estimate of the ratio of the price of a commercial speaker vs a DIY one, and in this case it is about 3500/800 ~ 4.4 if you buy the finished boxes. If you build them, we could say we'd have a factor of 5 instead, more or less.
Which gives some strength to what fellow DIY people often quote for the reason a DIY speaker is worth building: a factor of 5 reduction in price compared to equivalent commercial products. Cheers!
--Christian
Well, Cal, I am speechless. But why don't you place the fishes behind the spekers they came from? They probably feel more comfy that way.Not if you have plans for the leftovers. Recut and painted, a fish wall worked well
And I think I have seens this "technique" before, but nevertheless I think it is fun. A while ago I planned to cover my builds with zebrano, but someone else grabbed the pile of striped veneer. Zebrano is really beautiful, by the way, not just striped.
In a stack like mine? I'd do rods again. but use something that can be deformed ever so often. The wood will expand/contract. With a lot of force actually. So making many smaller stacks with a deformable layer between each and holding it up with rods seems like a possible solution. It is what I have now, and has been solid for over 5 years of use.
You were exactly right. I'll do a full build at some point but...
This was the 2nd main prototype

The 3rd which was to match split very quickly and badly - I hadn't completely covered the outside so the MDF shrank - I think it was 10mm shorter than the one above!


Gutted
Eventually, the 2nd started to split too - when I took the drivers out, the inside must have dried out and shrunk.

I'm all in at this stage, I've spent about £1000 on drivers and about £400 on crossover parts.
I went back to the guy I'd found to CNC the slices for me and he suggested moisture resistant MDF.
So I did 4 things (which is never great when diagnosing a problem):
1) Used MR MDF
2) Left every slice to acclimate in my living room for 2 weeks.
3) Sprayed Shellac-based primer inside and out of every slice (64 in each speaker)
4) Built each speaker in sections
However, I used the threaded rod again and clamped all the sections together to bodywork the whole speaker in one go.

When they were perfectly sanded (about a months work) I undid the rod and split them:

Then I put based coat and clear coat while they were together again, then split them for colour sanding and machine polishing.

I used some 2mm foam sheet cut to match the profiles. Here you can see the rounded over joins as I'm building them upside down in the kitchen!

Here's the top after some colour sanding and machine polishing:

In situ side view

Both done:

I've started prototyping the centre speaker:

They sound epic. I had to give them a nice new amp so a 400W/channel Lyngdorf 2-channel was purchased.
They were built to be non-ported and tuned to about 45Hz but with some Dirac Live DSP, they're able to drop to 32Hz
Last edited:

They are impressive. My skills are pretty pathetic by comparison (or even without comparison. 😛 ) Given the build technique I would expect any cabinet resonances to be very mild and well damped. Hopefully the moisture problems/splitting are a thing of the past.
There might be some sort of malaise about the world, 😉 I have started several threads recently that went absolutely nowhere.
There might be some sort of malaise about the world, 😉 I have started several threads recently that went absolutely nowhere.
They've been in and working for about 6 weeks now and are still holding up.
Struggling to find the mojo to finish the centre speaker though.
Struggling to find the mojo to finish the centre speaker though.
Are you planning the center channel to be horizontally placed, like your old one?
If I were you I'd make a one woofer copy of your left/right speaker, the side by side woofers in a center channel are quite limiting. Vertical placement would have my preference. Your TV is high enough to get away with it.
After that center channel next up is a matching subwoofer? 🙂
If I were you I'd make a one woofer copy of your left/right speaker, the side by side woofers in a center channel are quite limiting. Vertical placement would have my preference. Your TV is high enough to get away with it.
After that center channel next up is a matching subwoofer? 🙂
Originally I was just going to make a shorter vertical version but it would to accommodate the projector screen that comes down which is why I started seeing is I could mount the tweeter and mid vertically.
I'll probably mount a bass unit either side to keep the crossover the same.
I have thought about a sub but the JL sub is awesome.
I'll probably mount a bass unit either side to keep the crossover the same.
I have thought about a sub but the JL sub is awesome.
Last edited:
Hi rngDeadeye,
It was interesting to read about your Translam speaker cabinet build. Great insights. How is your last build from 2021. The one with 64 slices. Are they still sound and looking great?
i completed a build last year and my speakers have started to develop lots of cracks. Even after the first two month cracks were forming, now with a change in humid lots are appearing. it’s a dry Sydney winter. it would be a costly shame to scrap the cabinets.
just contemplating whether to try again using your method (follow the 4 steps) or try something different.


any feedback would be great.🙂
It was interesting to read about your Translam speaker cabinet build. Great insights. How is your last build from 2021. The one with 64 slices. Are they still sound and looking great?
i completed a build last year and my speakers have started to develop lots of cracks. Even after the first two month cracks were forming, now with a change in humid lots are appearing. it’s a dry Sydney winter. it would be a costly shame to scrap the cabinets.
just contemplating whether to try again using your method (follow the 4 steps) or try something different.
any feedback would be great.🙂
- Home
- Loudspeakers
- Multi-Way
- Now that's what I call a cabinet!