A variac is a useful piece of equipment. If the power supply is new, I give it 90 Vac at first, then slowly crank up to 120 Vac.
If new channel boards are going into a chassis with a previously used power supply, then I skip ahead to the white smoke indicator.
If new channel boards are going into a chassis with a previously used power supply, then I skip ahead to the white smoke indicator.
I thought as much, coming from the author of all those excellent build guides.Well, I’m exaggerating to make a joke, but still…
🤣^^ this is a good procedure!
That beats what I do… which is turn it on and look if any of the automatic “error indicating smoke and flames” engage.
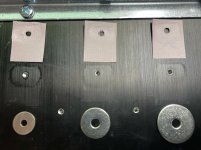
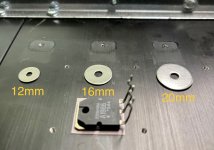
Dykem or magic marker on base of washer and on device. Fine file or diamond lapping stone (best) to remove stain. Install with Belleville Lock Washers.Trying to finish the Boards and mount them on the heathsinks today, while choosing the washer I found something interesting, see the picture so I’m debating between 16mm and 20mm, what do you think?
They were all tightened up to 9nm.
Adding a second picture, in this one you can see the damage that the pads took with the different washers, clearly the biggest the washer the least the damage.

When lapping is used the stress on the bolt assembly will drop the high torque wasted on flattening the device and washer for more useful contact.9nm is too high, most manufacturers specify 1 to 2nm for TO247 / TO3P package devices.
There really is no other way to do it.
Most manufacturers have application notes on this - some are below. I think Mr Pass mentioned once that Pass Labs tightens the mounting screw on the TO247 Fets to 1.2nM.
You will find they use different units to specify torque, but when converted to nM, they are lucky to reach 1nM.
https://www.infineon.com/dgdl/Infin...n.pdf?fileId=db3a3043429a38690142a3a1f142107f
https://www.ti.com/lit/an/snoa460/snoa460.pdf
https://www.renesas.com/us/en/document/apn/247plus-package
https://aosmd.com/res/application_notes/package/AN101_TO220_Guidelines.pdf
https://www.ti.com/lit/an/snoa460/snoa460.pdf#:~:text=The maximum recommended torque force to mount a,device, render it non-functional, and is not recommended
Depending on manufacturers specs on flatness, if the pieces are not, torque will rise. Heat transfer suffers.You will find they use different units to specify torque, but when converted to nM, they are lucky to reach 1nM.
Simple to check as this is DIY and parts wil not come to user in best possible condition. Simple to check this up front.
Can anyone elaborate on this.. Obviously with more output devices you get more power, but do you not also get more noise (generally)?That's right.
With bipolars, more is more.
Hahahaha
I'm just wondering if these is some characteristic of BJTs that lowers the overall THD when lots of them are in parallel? Perhaps a stupid question.
My assumption was that devices had to be matched and selected for gain/ lowest noise.
Thanks 🙂
output devices ..... are not likely to contribute to overall noise
in fact, in general, wherever you parallel devices, noise goes down ........ how much - that depends of actual stage
when speaking of OS, naah .......
in fact, in general, wherever you parallel devices, noise goes down ........ how much - that depends of actual stage
when speaking of OS, naah .......
Hi Nelson,
Gary S has been guiding me on a rebuild of my Stasis 2 , I’ve basically replaced everything internally bar the transformer .
I’m now at the stage of biasing the amp but I’m not get any voltage ( mv ) at the 1 ohm resistor ?
When I turn the P2 pot nothing happens, it does give a variable voltage at D+ and D- .
I’ve checked over everything over and over , no shorts etc and I’m getting 72v at the rails .
Any ideas please?
Btw I’m a complete amateur ( never done this before)
no need to bring that in this thread, when you already have your own dedicated thread
everyone will help you as much they're able to help, better to keep all info in one thread
.............in fact, good that you asked for help here, some of members actually building this one could chime in your thread and offer some measuring data of their amps
everyone will help you as much they're able to help, better to keep all info in one thread
.............in fact, good that you asked for help here, some of members actually building this one could chime in your thread and offer some measuring data of their amps
Hopefully someone may learn from what I haven’t done 😁no need to bring that in this thread, when you already have your own dedicated thread
everyone will help you as much they're able to help, better to keep all info in one thread
.............in fact, good that you asked for help here, some of members actually building this one could chime in your thread and offer some measuring data of their amps
Sorry Zen , desperate measures and all that. 👍🏻
no need for sorry
Nelson, in 1974 I enlisted in the USAF. In 1975 I was stationed in northern Japan, working as a Morse code intercept operator. One of the equipment maintenance guys that worked in my area was a true hi-fi addict. He was responsible for giving me a life-long interest in the pursuit of the reproduction of good music. My first amplifier was a Quatre Gain Cell DG-250. It was a very good sounding amplifier, but it was famous for buzzing and popping. Eventually, it died.Not too long ago I received a request for some help from an owner of
an old Threshold Stasis amp, whose amp was broken and where some
previous work had left some issues with the circuit board.
As many of you will know, I have lots of time on my hands 😉 and a
sentimental desire to revise old product in light of the wisdom I have
acquired in 50 years.
So.
I revised the circuit, making it more simple, and laying out a circuit board
which should be usable for all known versions with minor adaptation.
Attached are various schematics and graphics and also the gerber files
for the circuit board, which was made my pcbway.com, who will ask
what dimensions are, which is 5.5" x 3.5"
This thread will also serve as the location for asking additional questions
and so on.

My second amplifier has been a Nelson Pass Threshold 400A. It has worked flawlessly all of these years since about 1977! For many of those years it powered Magneplanar MG-IIBs.
I eventually sold the Maggies, and purchased Definitive Technology BP10s. Now I am looking into building some of your newer amplifiers, because I would like to bi-amp my speakers and I would also like to have some other options to listen to, besides the 400A. I am also interested in building several different types of full-range speakers, which would benefit from your lower-powered class A amps.
However, I don't want to neglect my faithful Threshold 400A amplifier. So I am wondering if you have any thoughts and/or suggestion about what I might do to it to modernize it and possibly improve its sound?
Nelson, thank you so much for all that you and your companies are doing to make the pursuit of quality audio sound available to the masses, and, especially for the DIY community!
Paul Glaus "Goalsetter"
- Home
- Amplifiers
- Pass Labs
- New Stasis front end

