just remember that big washer, spring washer and gate/base resistor - all of these are intrinsic part of mosfet/bjt biggie, and life will be less complicated
all learned about each of these, in harder way ...... go figure
all learned about each of these, in harder way ...... go figure
How critical is the size of Q5 and Q7 heatsinks, I have some that are 19.05X13.21X9.52 rather than 19.05X13.21X12.7 (984-ATS-PCB1014)?
all learned about each of these, in harder way ...... go figure
Seems like the only way I learn anything...
It's alive...
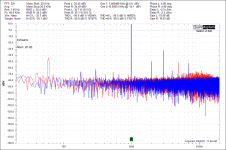
Bias at about 335mA gives about 50C - ambient temp 19C
Attached is QA401 output. Can't go higher using just the QA401 or output clips (401 limitation) and was too lazy to connect preamp.
Am listening to the amp with DAC connected directly and it sounds great. Plus it will heat my basement...
Thanks to Nelson and ZM for making this happen. It was less stressful than the Sony VFET build. Am now waiting for the impending SIT amp and have another set of SITs ordered from Watanabe San.
Attachments
It's alive...
Bias at about 335mA gives about 50C - ambient temp 19C
.
Very Nice, congratulations!!!
I'm still waiting for my PCBs, they've been in Tennessee for 3 weeks...
I'm getting impatient.

I believe it measures better than shown on QA screen
probably operator issue
I mean, better it is ......... 🙂
is that 1W@8R , or?
and, it could be clearer if you show just one channel on screen
ediedit- always keep things at -10dbfs ......... you'll see difference
probably operator issue
I mean, better it is ......... 🙂
is that 1W@8R , or?
and, it could be clearer if you show just one channel on screen
ediedit- always keep things at -10dbfs ......... you'll see difference
Attachments
Last edited:
Good work, congratulations on the build - yes as ZM pointed out, get yourself some large diameter mud guard washers for the transistors (with a spring washer as well).
From your measurements, that ends up being around 98 watts heat dissipation per heatsink with your 35VDC rails.
Did you use pico's chassis - 4U x 500mm deep?
From your measurements, that ends up being around 98 watts heat dissipation per heatsink with your 35VDC rails.
Did you use pico's chassis - 4U x 500mm deep?

... output transistor screws - bigger washers and (I hope you have these at least) spring washers, are nice to have, for better sleep...
Be careful with the spring/lock washers: the M3 ones need about 1.5 Nm to close, but the recommended torque for the TO-3P/TO-247/TO-264 is only 0.7-0.9 Nm (=not very tight in English). No biggies, just be careful, unless you want to find out if your transistor is genuine by popping it open. 🙂
is area of pressure defined, when they wrote that ?
frankly, never even got to think about that, thinking that big washer is wonder part
in fact, I still think that, after zillion transistors (both dead and alive) unbolted and bolted
still , interesting to see what's in papers
frankly, never even got to think about that, thinking that big washer is wonder part
in fact, I still think that, after zillion transistors (both dead and alive) unbolted and bolted
still , interesting to see what's in papers
e.g. Sanken, page 6. Note that using a big washer will spread the force to a wider area, therefore the pressure is lower, so your transistor may have a good survival rate.
I must say I'm a bit surprised by this recommandation. My small torque wrench at its lowest setting does about 4 Nm, and that's barely above finger tight.
I must say I'm a bit surprised by this recommandation. My small torque wrench at its lowest setting does about 4 Nm, and that's barely above finger tight.
Last edited:
Thanks for the link ZM - so it seems that 0.8 Nm is the recommended torque - probably up to 1 Nm with a large diameter washer.
This begs the question, does anyone have any info on a suitable small torque wrench that would suit this application?
This begs the question, does anyone have any info on a suitable small torque wrench that would suit this application?
you know - I don't care what they write for torque , as long split/spring washer is shown on pics, I'm going to squeeze it flat and by feel :
page 11/23,
https://www.st.com/resource/en/tech...h-hole-device-packages-stmicroelectronics.pdf
page 11/23,
https://www.st.com/resource/en/tech...h-hole-device-packages-stmicroelectronics.pdf
This is great info ZM thanks, what's the outside diameter you like using on the flat washers?
I haven't been able to find anything for M3 screws that's bigger than 12mm outside diameter.
I haven't been able to find anything for M3 screws that's bigger than 12mm outside diameter.
So ST Micro recommend 0.55Nm - a bit all over the place. I would use your method ZM with a large OD washer (12mm is fine for an M3 flat washer - I don't think you will find them larger than that, unless you make your own) and a spring washer and do the screw up gently till the spring washer is just compressed to a flat.
I wonder for instance, what the techs do at Pass Labs when installing the myriad of output devices they go through in the power amps they are manufacturing. It would be interesting to know if they use torque wrenches to tighten the screws?
I can guess that Pa once was bored and bought mini torque thingie to use for exact purpose, just to give it as gift to someone, after day or two
and that must be decades ago, hard to imagine anything at PL being overengineered (neither product nor production procedure step)
that, as we know, and he certainly know better , is worse than something being underengineered
of course, I can be wrong 158%, not first, not last time
(details - any PL or FW amp, with OS part having dissipation above some level is having non squishy, most likely mica+goop thermal interface ; any bellow that is having squishy bubblegummy thermal interface - maybe to keep part at nice and cozy temperature, while being far bellow critical point and , besides, no need to have white fingers
maybe I'm wrong, maybe I'm right ...... keeping my 2 cells occupied )
This is great info ZM thanks, what's the outside diameter you like using on the flat washers?
I haven't been able to find anything for M3 screws that's bigger than 12mm outside diameter.
12mm is plenty, 15mm is Plethora
🙂
ZM, again in overunderstanding phase
- Home
- Amplifiers
- Pass Labs
- New Stasis front end