Hi again Charlie ... Just a brief comment .. I have been considering wood for an electrostatic design of mine and looked into the options and potential challenges with wood for quite some time.
I also was helped by a distributor of "panzerholz" here in Denmark who had the German manufacturer custom-make some 5mm thick panzerholz samples for me. FYI - in case you are not familiar with panzerholz - it is a resin infused (birch to my memory) plywood which is quite solid/stiff and also is more damped than normal MDF or Plywood.
I also read on the internet and spoke with people about preventing wood of any kind from absorbing moisture e.g. by using special lacquers etc. Eventually I learned that it seems that wood - cannot - be prevented from absorbing moisture. Even if one uses very thick layers of ?? protective cover the wood eventually will adjust to the surrounding humidity. I reckon this may be one of the reasons why previously icon painters used wood slabs which had been stored for a very long period - I've heard up to a 100 years so that internal tensions etc. could be released.
About the Panzerholz samples I received they more or less immediately bent some millimeters over an A4 size surface - I reckon that to not have this happen one would have to use substantially thick slabs ... I have some that are 30mms thick and as of now they apparently don't bend.
I have resolved to using plastic where precision matters even if I would prefer to use a natural material.
Congrats ;-)
Jesper
I've used red oak, cut on a table saw, for all my speaker builds since 2008, including the stator wire support lattices. My assembly method for the stators banks everything to a flat reference surface on my jig for bonding-- so that any small cutting errors in the wooden pieces are pushed away from the critical diaphragm/stator gap rather than into it, and are absorbed into the glue joint bond lines. I've never had any problems with arcing or other details bowing at all. The wires are perfectly flat on plane and the gap constant and true. Were the wires to be assembled over the support lattice rather than visa-versa as I do it; any cut errors would then impinge into to the diaphragm/stator gap, to bad effect.
Last edited:
@CharlieM:
Hmmm ... yes, I reckon that in many cases doing something the "right way" is key to success. And also using the appropriate materials for the purpose ... To this end can I ask you what tolerances you work with? And if you have chosen red oak for a particular reason? Looking in the wood database it appears to be slightly softer than bur oak, yet a bit "stronger" mechanically.
Cheers,
Jesper
Were the wires to be assembled over the support lattice rather than visa-versa as I do it; any cut errors would then impinge into to the diaphragm/stator gap, to bad effect.
Hmmm ... yes, I reckon that in many cases doing something the "right way" is key to success. And also using the appropriate materials for the purpose ... To this end can I ask you what tolerances you work with? And if you have chosen red oak for a particular reason? Looking in the wood database it appears to be slightly softer than bur oak, yet a bit "stronger" mechanically.
Cheers,
Jesper
@CharlieM:
Hmmm ... yes, I reckon that in many cases doing something the "right way" is key to success. And also using the appropriate materials for the purpose ... To this end can I ask you what tolerances you work with? And if you have chosen red oak for a particular reason? Looking in the wood database it appears to be slightly softer than bur oak, yet a bit "stronger" mechanically.
Cheers,
Jesper
Hello again Jesper,
I chose red oak for the speaker frame and stator details because it's readily available and it matches the AA oak plywood used for the center portion of the baffle (where the woofer cutout is). AA plywood is generally available in either birch or red oak, so I opted for red oak.
A synthetic material cut on a CNC mill would give the best accuracy but plastic isn't as aesthetically appealing as wood. And I believe my stator design gives very accurate results by optimizing tolerances.
Generally; even a cheap table saw will give repeatable cuts within 1/64" and my Delta cabinet saw does substantially better.
When designing a wood stator; it's important to make it rigid and flat in the horizontal direction, flexible in the vertical direction, and make the tolerances go the right way.
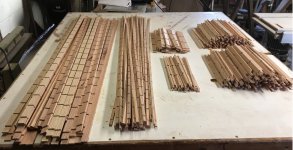
The attached photo shows the stator details for eight speakers.
On the left; the slotted vertical side rails and center supports are purposely flexible so that when the stators are mated together; adhesion to the urethane foam tape spacers is sufficient to restrain them in parallel along their entire 48"
On the left; the horizontal wire supports are quite rigid across their 12" width and perfectly flat on edge, where they contact the wires. I verified flatness using a my table saw bed for reference-- I couldn't slide a 0.001" feeler gauge between them and the saw table. Had any not been perfectly flat on edge; I would have placed a sheet of sandpaper on the saw table and block-sand them flat.
The joints where the horizontal wire support slats insert into slots in the vertical rails are priority toleranced @ +.000 / -.015" rather than an equilateral tolerance. This insures the slat bottoms out to the wires first-- as opposed to possibly bottoming out to the side rail and bridging over the wires. Any error creates a slightly thicker glue-line but that's all.
Prior to gluing up the stators; I pre-fit he details on the saw table and used a feeler gauge of same thickness as the wire diameter to verify a snug or interference fit to the gauges ( i.e...a "no go gauge").
After assembly; the panel is still somewhat flexible in the vertical direction but once it's mounted in the speaker frame, the frame holds is straight in the vertical direction. The panel is nested in the speaker between layers of 1/8" foam rubber gasket tape front and rear. Wood moves normal to the fiber direction with humidity changes; so here there is practically no effect in the dimensions that matter.
A final word about using wood:
Wood typically has built in stress and bows when you cut it. To get a straight piece, you have to "sneak up"on the final dimensions by doing multiple cuts, removing a small amount of material with each cut, eyeballing the board between cuts and flipping the board as needed for the next cut. As a general rule, if you detect a bow after a cut, the next cut should be on the convex edge or face, which tends to bow the board back toward straight.
Yup... you gotta sneak up on straightness.
BTW... this was a helluva lot of work!
Attachments
Last edited:
Wow Charlie ... thanks for the elaborate detailing of how you achieve good tolerances. I have read it a couple of times and I reckon I can visualize most of the approaches you use to get things straight and good tolerance where it matters. I am thinking that it's a fine bit of design considerations you have done here ;-)
I also appreciate your "final word about using wood": I will let it simmer in my thoughts as I likely will also be using wood for some of my designs (sustainability, "feel") and getting it right in terms of straightness is a key parameter. I am also thinking that if I want to facilitate straightness then one way of doing this could be to cut as you suggest (cut small pieces, eye balling, suitably re-orient) and in between these cuts subject the wood to relevant temperature and humidity changes so as to "provoke" the inner tensions to show up ... Does this make sense to you?
Thanks again for elaborating, Charlie, and again - impressive work (IMHO ;-))
Cheers,
Jesper
I also appreciate your "final word about using wood": I will let it simmer in my thoughts as I likely will also be using wood for some of my designs (sustainability, "feel") and getting it right in terms of straightness is a key parameter. I am also thinking that if I want to facilitate straightness then one way of doing this could be to cut as you suggest (cut small pieces, eye balling, suitably re-orient) and in between these cuts subject the wood to relevant temperature and humidity changes so as to "provoke" the inner tensions to show up ... Does this make sense to you?
... I can imagine, Charlie ... and although this is one of the reasons (besides precision and freedom of shape) why I am so pleased with my CNC, then given your thoughts about how to get a piece of wood straight I can also see a limitation to its use - at least when desiring to get a piece of wood straight for a longer period of time (i.e. outside of the CNC milling action). Here human assessment seems to be required ...BTW... this was a helluva lot of work!
Thanks again for elaborating, Charlie, and again - impressive work (IMHO ;-))
Cheers,
Jesper
Last edited:
This will probably be my last post about this project, unless it's in response to a question. The project (all four speaker pairs) are completed, including front/back magnetic grill covers.
I will never have the energy to do anything like this again-- but I have my dream speakers for life, and I think the recipients of the other three pairs will be very pleased.
Thanks to all here who've helped me along the way... here's a final VIDEO
Charlie
I will never have the energy to do anything like this again-- but I have my dream speakers for life, and I think the recipients of the other three pairs will be very pleased.
Thanks to all here who've helped me along the way... here's a final VIDEO
Charlie