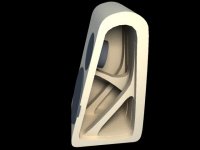


Actually, I dont think it will be all that bad. Just clamp it down and go at it with a jig saw and several blades. The interior dosnt have to be perfect, and the exterior only has to be close, since I will be going at it with a profesional duty belt sander to get everything flat. From what I can tell, it will be very very dead, the front baffle will be an inch thick, and everywhere else, I will try to keep it to .75".
The drivers will be Peerless 850122 and Seas T27TFFC, it will be sealed, and there will be a sub filling in the lower 2 octaves.
The sub is going to be a dual push-push 831857 peerless, in a small box with a linkwitz transform.
-Paul Hilgeman
The drivers will be Peerless 850122 and Seas T27TFFC, it will be sealed, and there will be a sub filling in the lower 2 octaves.
The sub is going to be a dual push-push 831857 peerless, in a small box with a linkwitz transform.
-Paul Hilgeman
Hi,
I don't think the wood work will be all that bad either. It does, however, look very interesting! I hope it goes well. If your woodwork is anything like your 3D modelling, it will! 😉
Gaz
I don't think the wood work will be all that bad either. It does, however, look very interesting! I hope it goes well. If your woodwork is anything like your 3D modelling, it will! 😉
Gaz

He! He! He!
"ku ku pic where are you..."
it was the picture...
when I start writing the reply, the pic wasn´t there...
BTW, nice design 😉
Kindest regards to you
Pedro Martins
Hi,
If you're thinking a belt sander will sand this smooth, then I think you're being optimistic..
I'm doing my mid/tweet cabs right now, and decided to sand the first slice perfect, then add a slice (1mm bigger all round) at a time , and use the flush trimmer bit on the router after every slice. This ensures an almost perfect surface to start sanding on..
Hth,
Cheers
Rob
Hey Paul..
.. where did you get the idea for those 😉
can I requistion the images for my "Translam" page please???
(with your name attached of course)
.. where did you get the idea for those 😉
can I requistion the images for my "Translam" page please???
(with your name attached of course)
Gradds, can you please take a look at this thread:
http://www.diyaudio.com/forums/showthread.php?s=&threadid=20431
I think they need your help.
The Vifa units i used for MTM (p17wj and d25AG) will blow the budget.
'Pologies for the thread tangent, we now return you to your regular speaker construction method.
BTW, damn nice design, I like it.
Instead of jigsaw (and assuming you have dust extraction) how about making a form for the exterior to guide a router?
that way, all sections will be identical.
drew
I don't know, Drew....
....they seem to plenty confused enough already... instead of asking the basic questions first !!!
we will see what eventuates ;-))
....they seem to plenty confused enough already... instead of asking the basic questions first !!!
we will see what eventuates ;-))
Internal bracing
As RobWells said, use a router
1) Make the first internal brace your master, sand it with a sanding block till itls perfect. A belt sander can take off to much material.
3) Use the master to mark you other parts.
4) Then use a jig saw or a bandsaw to cut out the part, however don't cut on the pencil line leave some extra.
5) Clamp the template to peice you reproducing and route out the extra off. Of course you will need stright carbide bit with a bearing to follow the master.
6) If you have a router table this will be better.
7) Since there are going to be internal braces Baltic Birch might be better than MFD depaning on what you do for the external skin.
No, I did not ever get around to making this speaker.
Instead I did a dipole design with an active crossover.
www.geocities.com/paul_hilgeman/shorties.html
Andy, Yes, by all means use them.
Instead I did a dipole design with an active crossover.
www.geocities.com/paul_hilgeman/shorties.html
Andy, Yes, by all means use them.
Cool enclosure
Paul,
Is there any company using an enclosure like this? I was thinking that a better way to build this cabinet is on a CNC router. I know you do not have one, however many woodworking shop do. So if you can produce a AutoCAD of the cabinet slices this could be done in a hour. They would more than likely charge you about 75.00 to 100.00 and hour for labor, so if you have the drawing you would be in great shape.
The CNC router would cut the perfect. The next issue would be the alignment when gluing up the slices. Of course, you still have the speaker cut out. In addition, I do not think you have any choice but to use MDF or and Hardwood because of end grain. If you use MDF, you would have to seal the end of the fibers.
🙂
- Status
- Not open for further replies.
- Home
- Loudspeakers
- Multi-Way
- New Speaker Construction