I've read a few threads about assembling speaker boxes with Titebond II and a nailgun. Sounds good!
But does this need an air gun for nailing 18mm birch plywood together?
In the UK there are electric guns like Tacwise EL500 that can use 50mm brad nails in a wimpy way. Basically for tacking on thinner ply I think. Is an electric gun an option? Would be more economic but would it cope?
Can somebody enlighten me on the A to Z of nail guns for building speakers with 18mm birch ply panels?
Andy
Whether or not an electric nailgun would be sufficient depends on its ability to drive the nail and set the head a little below flush. If it has adequate power to do so, it would be just as useful as a pneumatic gun. While this tecnique (brads and glue) can work, the brads do not provide sufficient clamping force to get optimum glueline strength by themselves. They are OK as an assembly aid but the major joints should be properly clamped for best results. BTW, I prefer using a biscuit joiner to obtain stronger joints...the biscuits help with alignment and assembly and, once properly clamped, provide superior strength.😎
Andy,
Nail guns in general are great tools. They are convenient and fast. However, plywood end grain is not the best place to be nailing into. If you do go the nail route the crown or flat head staples, in my experience grab better in plywood.
Your best overall end result will be with glue and clamps. Birch plywood saws to a very neat edge and miters well. If you use a good quality wood glue, Titebond or Elmer's are two, you will have a nice strong box. You can use staples or nails to hold everything together while the glue drys but, do not rely on them for finished bond. As I said earlier using some good bar clamps and mitering the joints will make it last. Clamps are a must for strong glue joints.
To get the best finish a new sharp fine kerf blade will make the cuts nicer.
It is also much easier to cut the speaker holes out of the front cover before the box is assembled.
Tad
Bar clamps are a cheap solution. Can you use the quick ratcheting type? At what intervals should you use them? Like for a four foot high box, would you use three or four or what?
andy
andy
I'm presently building a pair of half Changs with 18mm Baltic birch, a pneumatic Porter Cable crown stapler, and some titebond type I PVA glue. I'm rabbetting/dadoing the joints, and they are coming out great so far. I also use a table saw blade that is specifically for plywood/laminate etc (80 tooth ATB IIRC), and the cuts it makes are the cat's pajamas.....
I have found that crown staples work much better than 18g brads for ply. If you use a nailer/stapler, just make sure that you adjust the gun to sink the top of the fastener slightly below the surface. Slightly below is better than slightly above. The glue is what holds it all together in the end.
If using a stacked dado (at least in a non-metric country), you can use dado shims to get the rabbetts/dados 18mm wide.
If you have a long joint you can use clamping cauls (a thick board between clamps and workpiece to spread clamping pressure over the joint. I would use 4 to 5 clamps across a 4' joint with cauls. My favorite clamps are Bessey K type...expensive but once you use them the rest of your clamps will gather dust. Good luck!
BTW, I prefer using a biscuit joiner to obtain stronger joints...
Hey, everyone loves biscuits, right? 🙂
But what do you think of dowel joints in comparison? For those of us who don't build enough to justify the cost of a biscuit joiner. Are they a decent choice?
I've seen studies where joints were built with various methods (plain glued, doweled, biscuit, through mortise & tenon) & the biscuit joints were about as strong as a through mortise & tenon & far stronger than other methods. I think dowels do a good job of getting proper joint alignment but are not nearly as strong as a bisuit joint. Also in my experience the setup and boring of dowel joints is slower & fussier than cutting biscuit slots. YMMV!
I'm new to these jointing techniques, though I did dovetail and mortice and tenon in school. I've been looking up these various cabinet making techniques. So far, biscuit joints look interesting. I'm going off nailers a bit - looks like I'd need an air powered one for 18mm ply, and that would be noisy, big and expensive.
This is more interesting than I thought - I had no idea so many jointing techniques existed.
andy
This is more interesting than I thought - I had no idea so many jointing techniques existed.
andy
Just looked at this youtube video for Joint Genie. This dowel jig looks pretty useful and easy to use - like Dowelmax in the USA.
YouTube - Joint Genie!
Anybody use these jigs for 90 degree corner joints?
andy
YouTube - Joint Genie!
Anybody use these jigs for 90 degree corner joints?
andy
Here's my two cents:
Nail gun and a thickened polyurethane construction adhesive. They come in caulking tubes under various names.
That is for a box that is utilitarian and you never want to get it apart. What ever you afix with that evil glue will de-laminate before the joint fails. It also expands as it cures to seal less then perfect joinery.
If you want to go fancy and do blind fastening methods a biscuit joiner is by far the easiest tool to work with. My current model is by porter cable and is for the money the best available compared to all others I have used.
My qualifications are simple. Almost thirty years as a custom cabinet maker. Only 9 kitchens so the bulk of the work was very fancy stuff.
I have been doing loudspeaker case work since 1989 professionally and semi professionally.
And for what it is worth I build a structurally sound cabinet out of what ever sheet good the client wants and then veneer it. Makes a beautiful finish and simplifies many design problems.
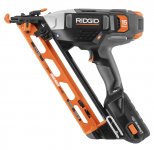
As for nailers this is my new favorite toy for job site work:
Good for when you don't want to carry around a compressor or if you don't have a compressor!
Mark
Nail gun and a thickened polyurethane construction adhesive. They come in caulking tubes under various names.
That is for a box that is utilitarian and you never want to get it apart. What ever you afix with that evil glue will de-laminate before the joint fails. It also expands as it cures to seal less then perfect joinery.
If you want to go fancy and do blind fastening methods a biscuit joiner is by far the easiest tool to work with. My current model is by porter cable and is for the money the best available compared to all others I have used.
My qualifications are simple. Almost thirty years as a custom cabinet maker. Only 9 kitchens so the bulk of the work was very fancy stuff.
I have been doing loudspeaker case work since 1989 professionally and semi professionally.
And for what it is worth I build a structurally sound cabinet out of what ever sheet good the client wants and then veneer it. Makes a beautiful finish and simplifies many design problems.
As for nailers this is my new favorite toy for job site work:
Good for when you don't want to carry around a compressor or if you don't have a compressor!
Mark
Attachments
Andy,
Never tried one but I agree they look interesting. On your earlier post it is ironic...it's an everyday occurrence on diyAudio to see people augur themselves in over the "best" speaker drivers, crossover capacitors, cable, binding posts etc. But when it comes to building the box (or OB, planar frame,etc) the construction details that provide a sound structural foundation definitely take a back seat. It's probably my curse as a mechanical engineer to obsess over the latter!
Never tried one but I agree they look interesting. On your earlier post it is ironic...it's an everyday occurrence on diyAudio to see people augur themselves in over the "best" speaker drivers, crossover capacitors, cable, binding posts etc. But when it comes to building the box (or OB, planar frame,etc) the construction details that provide a sound structural foundation definitely take a back seat. It's probably my curse as a mechanical engineer to obsess over the latter!
There are enough arguments over bracing, that's for sure. 😉 And the MDF vs Ply goes on and on.
But yeah, much more discussion of box building is in order. Thanks guys for your input.
For pros like Andy and Mark it's great to have the best tools, same can be said of electronic tools. But it's also nice to know what the occasional "budget builder" can do to build a strong box without spending a fortune or years learning the craft.
For example: For the occasional or even 1 time builder, is it worth $100 to buy a Ryobi biscuit joiner? What percentage of the project budget should it be? Ditto for a good table saw or router. I know how much better my results are with the better tools (because I lack the craft) but how does one determine how much to spend on tools?
Not an easy question, I know.
A skill saw and a straight edge work in a pinch. As do a cordless drill and screws and the correct adhesive.
Tenacity is the greatest trait when it comes to doing things yourself.
The tools are not the end result. Simple tools can provide impressive results if you are willing to take your time and think out a project.
As for biscuit joinery. For simple 90 degree case work you can buy a 3/32" slotting cutter and shaft and use a router. That is quick a inexpensive. Allows the vast majority of joinery to be accomplished.
Mark
Attachments

That's easy...
any excuse to buy a new toy is always welcome😉😉
...ask the wife... she'll fill you in... 😱😉
😱😉
then again, I s'pose you could always use dovetails or finger joints if one was feeling especially OCD on a project (like I did 35 years ago building a stereo cabinet out of birch 3/4" veneer; what was I thinking?)...😱...it still exists, wife is using it for a sewing cabinet..it actually fell down a set of stairs moving and barely had a scratch...😉
There are enough arguments over bracing, that's for sure. 😉 And the MDF vs Ply goes on and on.
But yeah, much more discussion of box building is in order. Thanks guys for your input.
For pros like Andy and Mark it's great to have the best tools, same can be said of electronic tools. But it's also nice to know what the occasional "budget builder" can do to build a strong box without spending a fortune or years learning the craft.
For example: For the occasional or even 1 time builder, is it worth $100 to buy a Ryobi biscuit joiner? What percentage of the project budget should it be? Ditto for a good table saw or router. I know how much better my results are with the better tools (because I lack the craft) but how does one determine how much to spend on tools?
Not an easy question, I know.
any excuse to buy a new toy is always welcome😉😉
...ask the wife... she'll fill you in...
😱😉then again, I s'pose you could always use dovetails or finger joints if one was feeling especially OCD on a project (like I did 35 years ago building a stereo cabinet out of birch 3/4" veneer; what was I thinking?)...😱...it still exists, wife is using it for a sewing cabinet..it actually fell down a set of stairs moving and barely had a scratch...😉
Panomaniac,
That is indeed a tough balance to strike. You can do high quality work with simple tools (check out an 18th century highboy) but that usually implies a more highly developed skill set. The most important lesson I have learned over time is, once you have determined you need a particular tool buy a good quality contractor version (Dewalt, Porter Cable, Makita, Hitachi, Bosch, etc) rather than a cheaper home-handyman grade. They work better and last longer (forever in a hobby setting) - buying cheaper & replacing later with the good stuff is no way to save money!
If we focus on speaker projects with sheet goods (ply, mdf, etc) my list of gotta haves goes like this:
-contractor table saw or good quality circular saw with guide rail
-high quality blades for same
-router with circle jig(s) and high quality bits
-plate joiner or slotting bit for router
-random orbit sander
-cordless drill/driver (2 if you can swing it really speeds things up & 1 of the two right angle for tight spaces)
-assortment of good clamps
If you are just getting started it is often possible to 1st focus on the joinery & assembly tools by finding a local cabinet/woodworking shop that can take your bulk materials and cut list and do the cutting to size. Especially in these slow times they are receptive and with their tools and setup skills it can go very fast and at a reasonable price. Just my 2 cents.
Thanks Kevin, good list!
Spot on about the skill set. I've built cabs with a cheap little $100 table saw and with my trusty circular saw and saw board. They kinda, sorta fit OK. A router trim bit comes in very handy. But I once built some speakers with the big, expensive table saw at work. They fit perfectly! Obvious case of the tool better than the man. =)
Good advice on having them cut by someone else. I've done that. My first speaker project many years ago I took the plans to the lumber yard to have them cut. The old drunk who ran the saw griped no end about not being able to "cut these to millimeter precision!" But he did, sub-millimeter. Everything fit so well.
Having built cabinets using screws, clamps, and pneumatic staples the biggest thing that stands out is with screws and clamps the force is applied continuously and will squeeze out excess glue giving a very tight joint.
With pneumatic staples (nails should be the same) the force is applied very quickly. The glue is very viscus and does not squeeze out at all. if you have a thick layer of glue and staple it, the glue joint stays thick and does not squeeze out like with screws and / or clamps. The joints are still very strong though.
With pneumatic staples (nails should be the same) the force is applied very quickly. The glue is very viscus and does not squeeze out at all. if you have a thick layer of glue and staple it, the glue joint stays thick and does not squeeze out like with screws and / or clamps. The joints are still very strong though.
The most important lesson I have learned over time is, once you have determined you need a particular tool buy a good quality contractor version (Dewalt, Porter Cable, Makita, Hitachi, Bosch, etc) rather than a cheaper home-handyman grade. They work better and last longer (forever in a hobby setting) - buying cheaper & replacing later with the good stuff is no way to save money!
+1 on the contractor grade tools, IMO they are worth the extra $$. Homeowner-handyman grade tools are brands like Black & Decker, Ryobi, Rigid, etc-(note some of these companies also make a "pro" line). They'll work fine for occasional use, but if you use them frequently, contractor grade is money well spent. The homeowner grade stuff has a very short design life. That being said, I have an ancient Ryobi 10" surface planer that's had a few miles of oak pushed through it and it's still up and wobbling along......
With pneumatic staples (nails should be the same) the force is applied very quickly. The glue is very viscus and does not squeeze out at all. if you have a thick layer of glue and staple it, the glue joint stays thick and does not squeeze out like with screws and / or clamps. The joints are still very strong though.
Good point. Also note that it's possible to "over clamp" a glue joint (especially with pipe clamps) which ends up squeezing most of the glue out of the joint, so you need to develop a feel for the right clamping force.
I also have a porter cable biscuit joiner and IMHO it's one of the nicer ones around. Biscuits are significantly easier to deal with than dowels, since you only need precision in one direction (y-axis), instead of 2 (X/Y). Cheap biscuit joiners can be a PITA; you want an easy to use "fine adjust" on the height adjust and a fence that stays in square.
One other point-if you are doing basic rabbeted butt joints for the back panel and front baffle, you want to err on the side of a wider rabbet than the material thickness, as it's easy to use a flush trim bit (or sand) the side edges flush with the front/rear panel surface. If your front/rear panel is standing proud of the side edges, that's a much tougher problem to deal with.
Maybe a tad off-topic, but when using PVA glue, best results are when you pre-glue both pieces that are to be joined, and allow that layer to tack up a little before installing and clamping.
I also am patient with clamping. Fresh glue will tend to absorb into the wood, so the more you keep in the joint early on the better. After maybe 15 minutes is when I apply the clamps and the excess gets squeezed out- but by that time you have good absorption and tackiness, so you don't end up with a river of glue pouring out of your joint. Rather, you get a build up of glue at the edges, which helps seal the joint airtight.
I also am patient with clamping. Fresh glue will tend to absorb into the wood, so the more you keep in the joint early on the better. After maybe 15 minutes is when I apply the clamps and the excess gets squeezed out- but by that time you have good absorption and tackiness, so you don't end up with a river of glue pouring out of your joint. Rather, you get a build up of glue at the edges, which helps seal the joint airtight.
- Status
- Not open for further replies.
- Home
- Loudspeakers
- Multi-Way
- Nail guns for assembling speaker boxes