Hello everyone,
Being a long time fan of Mauro's design and it's sound, i wanted to take the My_Ref to the next level.
This has similarly been done previously, resulting in the excellent sounding FE (fremen edition) for example. A lot of good progress has been done to arrive to Rev C, Evo, and FE so this is definitely an effort build on the shoulders of giants, so to speak. FE is considered the current go-to for My_ref editions so i might use it for comparison in the following text, but it should in no way be taken as lessening the effort that was put into it or it's results.
However, I wanted to adress a lot of the limitations i found with these designs and the result is a new re-imagining of the My_Ref, in honor of Mr. Penasa. I will try to layout some things that have changed:
Improved PSU
As a comparison, FE main powersupply performs its function well, but is fairly simplistic and relies on massive capacitors for filtration, increasing both PCB size requirement, being harder to fit into a case, while offering lower PSRR.
My_ref design is very low in distortion and noise floor so we must pay special attention to PSU.
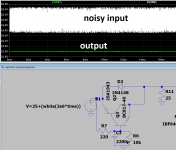
We can improve the situation, AND at the same time be more efficient on the use of capacitors by using capacitance multiplier.
It works by multiplying the capacitor on the base by the gain of the sziklai pair, its gain is calculated as hfe1 * hfe2 + hfe1
The beta (hfe) varies with current, so we will only guesstimate in the ballpark here but for 2SA1943 and bc817, its about 60*300 = 18000, multiply that by the capacitor value and its your effective value....it's a lot of filtering.

The results are even better for a normal PSU, notice on the simulation the noise has a magnitude of almost 1V but it is effectively filtered out.
What this means effectively is that you are not bound to only expensive PSU solutions, you can easily use common SMPS for power, further lowering cost and size requirements, while giving better performance than its predecessor.
There are also two thick holes for leads where you can connect them to a cap bank somewhere else inside the case, but dont get too overboard with this, there is no need really.
Another benefit is more removal of high order harmonic content from the noise spectrum. Another benefit is the higher the load, the more filtering you get.
On the PCB these are mounted very close the LM3886, both for performance, layout, but also potentially cooling reasons as you can then heatsink mount them. This is recommended but perhaps not even necessary if you listen to about 10-20W volumes, as they only dissipate in the hundreds mW range then.[/SPOILER]
Improved Opamp PSU
We have a MOSFET based regulator with high PSRR, while at the same time being able to deliver a lot of current.

Just as a comparison, here FE uses also a CCS, a simple LM317 and one resistor. It works good enough though.
Special thanks to Tibi on this one!
Solid state relay
The original circuit for the relay is simple in design and performs very well, but an SSR offers advantages over a mechanical one. My_ref is not so powerful to warrant a lot of concern over it but i wanted to offer the option to use an SSR, so now you can either choose to just use the G5LE relay or go for an SSR. Depending on your wishes and budget, you have the option to choose for yourself 🙂[/SPOILER]
New BOM
There has been a lot of talk of the effects of various components on the sound of the amp, in particular output resistors. You have an option for a normal axial resistor, TO-220 packages, but most importantly, and my recommendation, the use of ISA-PLAN manganin/zeranin power SMD resistors from Isabellenhuette. They sound excellent, have under 3 nanohenry of inductance and are IMO a superior option.
A lot of the stuff said that applies for FE applies here as well, for bypassing C9 capacitor (jumper provided) and which resistors are important to get right (12K and 390 are critical). The stock compensation here is for an OPA1641, but legacy backwards compatibility is retained with LM318 with its compensation (jumper provided). 150pf capacitors are very good PPS (polyphenylene sulfide film capacitor) from panasonic, and so on..
When using the OPA1641, C9 is bypassed, and i would especially recommend this setup for nearfield or critical listening.
There is an option to use balanced input, albeit as of right now i have not tested it as i dont have anything outputting balanced, so this is definitely a subject of further evaluation. But basically long story short, this board is highly configurable and achieves a lot.
Installation of components is via and interactive html page, highligts position of component on board and you can mark it as complete, makes installation a breeze.[/SPOILER]
Last but also importantly
Improved PCB layout
One of the things i didnt like about FE was its unecessarily long traces, and a fairly long current return path for the output (it almost couldnt be longer, it goes diagonally across the entire board). The resistors have marked directionality, despite the components themselves not being directional, and this was never explained (?). Even has a jumper wire for a trace, suggesting this is a 2 layer design (but i dont know this for sure) and he didnt want to disturb the current return of the top trace through the ground (which is good thinking, but shows the kind of compromises made.) All of this made me decide it might be best to start from scratch with an own board.
We have a 4 layer board, and the inner 2 are perfectly uninterrupted, except where i want them interrupted with a keep-out zone. There is a lot of copper on this board, copper fills were also used for some critical connections (such as the output, or power rails). It is a compact design, measuring about half the size, at 100x55mm. Actually, i will probably increase the width to 65mm, main reason i designed it this tight to the point everything on the silkscreen is overlapping (unimportant, its just numbers, also with html bom tool you dont even look for markings on board as its highlighted) was for use in a super-compact case.
If anyone else wants the board, i might make a new more "relaxed" one.
IMO, i've made prettier boards, but im pretty happy with how it turned out electrically.

The board is designed for ±24.0V to ±32.0V DC input, providing anywhere from 30 to 50 watts. More than enough in my opinion, but it's up to you if its a concern. Side note, but for me this "you must have 500w class-D" talk is just marketing numbers game, proof enough is to see Pass designs of 10-25W sound beautifully and powerfully.
As for distortion measurements, i dont have gear that measures so low currently. Go see how well FE measures, and fill in the blanks in your imagination. But THD-N, while being a good feature, isnt even the main thing of this amp, just icing on the cake 🙂
It can be built both boards for maybe...150$-ish? But the main thing is, you CAN build it with cheaper SMPS, in a smaller case and get top notch performance, so the total system build is actually really good. It was one of the design requirements i wanted to fulfill.
Hmm, what else to say, if i forgot something feel free to ask...a loot more could be said, but i got tired of writing after a while, and a lot of it is carry-over information from previous my_ref's.
Im courious to see any comments or thoughts we are all here in the DIY community to communicate after all.
Being a long time fan of Mauro's design and it's sound, i wanted to take the My_Ref to the next level.
This has similarly been done previously, resulting in the excellent sounding FE (fremen edition) for example. A lot of good progress has been done to arrive to Rev C, Evo, and FE so this is definitely an effort build on the shoulders of giants, so to speak. FE is considered the current go-to for My_ref editions so i might use it for comparison in the following text, but it should in no way be taken as lessening the effort that was put into it or it's results.
However, I wanted to adress a lot of the limitations i found with these designs and the result is a new re-imagining of the My_Ref, in honor of Mr. Penasa. I will try to layout some things that have changed:
Improved PSU
As a comparison, FE main powersupply performs its function well, but is fairly simplistic and relies on massive capacitors for filtration, increasing both PCB size requirement, being harder to fit into a case, while offering lower PSRR.
My_ref design is very low in distortion and noise floor so we must pay special attention to PSU.
We can improve the situation, AND at the same time be more efficient on the use of capacitors by using capacitance multiplier.
It works by multiplying the capacitor on the base by the gain of the sziklai pair, its gain is calculated as hfe1 * hfe2 + hfe1
The beta (hfe) varies with current, so we will only guesstimate in the ballpark here but for 2SA1943 and bc817, its about 60*300 = 18000, multiply that by the capacitor value and its your effective value....it's a lot of filtering.
The results are even better for a normal PSU, notice on the simulation the noise has a magnitude of almost 1V but it is effectively filtered out.
What this means effectively is that you are not bound to only expensive PSU solutions, you can easily use common SMPS for power, further lowering cost and size requirements, while giving better performance than its predecessor.
There are also two thick holes for leads where you can connect them to a cap bank somewhere else inside the case, but dont get too overboard with this, there is no need really.
Another benefit is more removal of high order harmonic content from the noise spectrum. Another benefit is the higher the load, the more filtering you get.
On the PCB these are mounted very close the LM3886, both for performance, layout, but also potentially cooling reasons as you can then heatsink mount them. This is recommended but perhaps not even necessary if you listen to about 10-20W volumes, as they only dissipate in the hundreds mW range then.[/SPOILER]
Improved Opamp PSU
We have a MOSFET based regulator with high PSRR, while at the same time being able to deliver a lot of current.
Just as a comparison, here FE uses also a CCS, a simple LM317 and one resistor. It works good enough though.
Special thanks to Tibi on this one!
Solid state relay
The original circuit for the relay is simple in design and performs very well, but an SSR offers advantages over a mechanical one. My_ref is not so powerful to warrant a lot of concern over it but i wanted to offer the option to use an SSR, so now you can either choose to just use the G5LE relay or go for an SSR. Depending on your wishes and budget, you have the option to choose for yourself 🙂[/SPOILER]
New BOM
There has been a lot of talk of the effects of various components on the sound of the amp, in particular output resistors. You have an option for a normal axial resistor, TO-220 packages, but most importantly, and my recommendation, the use of ISA-PLAN manganin/zeranin power SMD resistors from Isabellenhuette. They sound excellent, have under 3 nanohenry of inductance and are IMO a superior option.
A lot of the stuff said that applies for FE applies here as well, for bypassing C9 capacitor (jumper provided) and which resistors are important to get right (12K and 390 are critical). The stock compensation here is for an OPA1641, but legacy backwards compatibility is retained with LM318 with its compensation (jumper provided). 150pf capacitors are very good PPS (polyphenylene sulfide film capacitor) from panasonic, and so on..
When using the OPA1641, C9 is bypassed, and i would especially recommend this setup for nearfield or critical listening.
There is an option to use balanced input, albeit as of right now i have not tested it as i dont have anything outputting balanced, so this is definitely a subject of further evaluation. But basically long story short, this board is highly configurable and achieves a lot.
Installation of components is via and interactive html page, highligts position of component on board and you can mark it as complete, makes installation a breeze.[/SPOILER]
Last but also importantly
Improved PCB layout
One of the things i didnt like about FE was its unecessarily long traces, and a fairly long current return path for the output (it almost couldnt be longer, it goes diagonally across the entire board). The resistors have marked directionality, despite the components themselves not being directional, and this was never explained (?). Even has a jumper wire for a trace, suggesting this is a 2 layer design (but i dont know this for sure) and he didnt want to disturb the current return of the top trace through the ground (which is good thinking, but shows the kind of compromises made.) All of this made me decide it might be best to start from scratch with an own board.
We have a 4 layer board, and the inner 2 are perfectly uninterrupted, except where i want them interrupted with a keep-out zone. There is a lot of copper on this board, copper fills were also used for some critical connections (such as the output, or power rails). It is a compact design, measuring about half the size, at 100x55mm. Actually, i will probably increase the width to 65mm, main reason i designed it this tight to the point everything on the silkscreen is overlapping (unimportant, its just numbers, also with html bom tool you dont even look for markings on board as its highlighted) was for use in a super-compact case.
If anyone else wants the board, i might make a new more "relaxed" one.
IMO, i've made prettier boards, but im pretty happy with how it turned out electrically.
The board is designed for ±24.0V to ±32.0V DC input, providing anywhere from 30 to 50 watts. More than enough in my opinion, but it's up to you if its a concern. Side note, but for me this "you must have 500w class-D" talk is just marketing numbers game, proof enough is to see Pass designs of 10-25W sound beautifully and powerfully.
As for distortion measurements, i dont have gear that measures so low currently. Go see how well FE measures, and fill in the blanks in your imagination. But THD-N, while being a good feature, isnt even the main thing of this amp, just icing on the cake 🙂
It can be built both boards for maybe...150$-ish? But the main thing is, you CAN build it with cheaper SMPS, in a smaller case and get top notch performance, so the total system build is actually really good. It was one of the design requirements i wanted to fulfill.
Hmm, what else to say, if i forgot something feel free to ask...a loot more could be said, but i got tired of writing after a while, and a lot of it is carry-over information from previous my_ref's.
Im courious to see any comments or thoughts we are all here in the DIY community to communicate after all.
Attachments
Last edited:

It is an interesting project for sure. You have clearly done a lot of careful work on it. I am not well versed in amplifier design theory, so I cannot comment on the technical merits of your project. I imagine others would be interested to know if you have built one yet, and if you have any distortion spectra results in your simulations/measurements.
I’ll certainly be following your progress. Good luck!
I’ll certainly be following your progress. Good luck!
Thank you for your kind comment, and you are very right that im not "marketing" this well, because i didnt get to the meaty part of it, the results.
Actually, I have built one before and it sounded wonderful (as does the FE), but i thought of some improvements and re-layed out the PCB, thus leading to this version (and from here on out im counting versions, so let's say this is v1.0).
Im about to put the PCB's into fabrication tommorow so i just made the thread a few days prior if a fresh pair of eyes can see something i missed or neglected. There is a lot of knowledgable people i respect on this forum, this is where lifelong senior EE's go to spend their retirement because they still have the bug, and they carry a lot of experience under their belt.
I will have to buy a new measurement interface if i am to measure the distortion, that is planned this month as well, i tried before but the interface was the limiting factor. I will probably get the PCB's and assemble them by then, so the timing works out. Then i will post some more concrete numbers 🙂
After all this time, what about the results?
It's a very interesting update of the original, I'm very curious to see the schematic and design of the PCB 🙂
It's a very interesting update of the original, I'm very curious to see the schematic and design of the PCB 🙂
Neat project. Bold move to use the word requiem in the name. 🙂
The board looks nice and compact. What are the dimensions? I suggest adding mounting holes in a future revision. Having the board dangle by the component pins is not a good idea. Eventually the pins will fatigue and break.
Have you had a chance to build and measure this amp?
Tom
The board looks nice and compact. What are the dimensions? I suggest adding mounting holes in a future revision. Having the board dangle by the component pins is not a good idea. Eventually the pins will fatigue and break.
Have you had a chance to build and measure this amp?
Tom
OP was only active for an initial week after joining. Indeed, interesting project, but I fear we only will have a requiem for the requiem.
- Home
- Amplifiers
- Chip Amps
- My_Ref Requiem - a new iteration