I fell in love with electrostats, so I decided to build one after years of hesitation. Please pardon my rough and rudimentary approach in this initial attempt.
The attached image details the dimensions and basic structure of the speaker. As I am a beginner, a lot of the parts have to be bought for the first time, and they might be inappropriate. It would be amazing to hear your advice regarding my choice of parts.
Parts:
I hope this speaker will be able to make a recognizable enough sound when I finish the assembly. Thank you all for reading.

The attached image details the dimensions and basic structure of the speaker. As I am a beginner, a lot of the parts have to be bought for the first time, and they might be inappropriate. It would be amazing to hear your advice regarding my choice of parts.
Parts:
- Aluminum perforated plates: these I would probably order through ebay and cut them to shape
- 1/16" insulation plates: simple plastic of this thickness should do the job
- Mylar: a roll of transparent mylar from tapplastics.com with a thickness of 0.005
- Amp: TPA3116D2 Dual-channel Stereo Digital Audio Power Amplifier Board 2*120W D Class
- Step up transformer: IWISTAO 20W Tube Amplifier Output Transformer Pull-Push Z11 Silicon Steel Horizontal Installation
- DC Bias Supply: I could either get one of those "negative ion generators" off of ebay that claims it can produce 5.5k Volts with an adequately high voltage input, or build one with a tiny transformer and cockcroft walton voltage multiplier circuit covered in eevblog. Though that route seems more dangerous as a transformer is probably capable of supplying lethal current at my target ~ 1.5kV, and I don't know what size transformer I should be looking at either.
- Coating power: probably some generic graphic rubbed on with a cotton ball
- Copper strip: a roll of copper strip to apply the bias voltage to the diaphragm
- Miscellaneous: cables/breadboard/trs/rca connectors etc. probably not important enough to be mentioned
- Cement contact glue: to hold the tension of the mylar with the insulation plastic.
I hope this speaker will be able to make a recognizable enough sound when I finish the assembly. Thank you all for reading.
Last edited by a moderator:
That should probably be 0.0005" (half mil). 0.005 (5 mil) is very thick for an electrostatic speaker diaphragm. Half mil is harder to find at typical plastic suppliers, but not impossible.a thickness of 0.005
That should probably be 0.0005" (half mil). 0.005 (5 mil) is very thick for an electrostatic speaker diaphragm. Half mil is harder to find at typical plastic suppliers, but not impossible.
Price right now is $35/25'
These seem to be too narrow for a speaker, I will have to keep digging. Thank you for letting me know.
I realize this is confusing if you aren't familiar with the units, but film thicknesses in the US are often spec'd in mils (mils being milli-inches, 0.001 inch, more commonly referred to as thousandths of an inch). That's the unit I was using.
So 25.4 microns per mil (but not per millimeter, obviously 🙂). Half micron film will be very fragile, and would be more typically used in something like a headphone built by an experienced constructor. I don't think you'd ever get a piece to survive hand rubbing graphite.
Most hobbyists years ago used half mil Mylar (12 micron, AKA 48 gauge) because it was thin enough to get pretty good high frequency performance, but not so thin that it's fragile. People pursuing lighter diaphragms typically stop at around 3 microns for normal speakers. But again, 3 micron Mylar is a lot more fragile than 12 micron.
Discussion here:
https://www.diyaudio.com/community/...al-anyone-tried-different.316319/post-5286725
https://www.diyaudio.com/community/...ers-as-microphones.231062/page-3#post-3427260
Last edited:
Oh I see, so thickness is measured in terms of mils (thous of inches) when I am shopping for Mylar sheets in the US.
Electrostatic Speaker Membrane Dupont Mylar C 12um 20M from a Taiwan supplier on eBay would be ideal then. If I can gather the rest before this arrives, then I will make one using the cling wrap first.
P.S.
And it would seem that a piece of perforated aluminum is a lot more expensive than what I thought it would be initially. They go for $19/12”x12” piece of perforated aluminum…
Film thickness is a mix of terminology, especially since DuPont film is now DuPont Teijin. It's just something to be aware of and careful about. Microns are more straightforward in this case, so there's some benefit to using that unit.
This perforated sheet is typically anodized, so you'll have to scrape/grind that off to make a connection to it, but this style perforated metal was typically cheaper/easier to find years ago. Ace hardware used to stock it, but doesn't look like they do anymore. If you can find someone local that has it, you can pick through the sheets and find the flattest one, which is often helpful. I haven't bought any perforated metal in a long time, so I'm not sure if there's a better option today.
https://www.homedepot.com/p/M-D-Bui...ncane-Aluminum-Sheet-in-Brass-57125/205058561

I have some suggestions:
This steel perf is cheap, you can solder the leads to it, and the perf size and open area are about right:
https://www.onlinemetals.com/buy/ca...eel-perforated-sheet-a36-round-hole/pid/13516
Your proposed 5k bias voltage is too high for your proposed 1/16" diapragm-to-stator gap (d/s), and would likely result in arcing.
For perf-metal panels especially, a good rule of thumb for the bias voltage is not to exceed 1/2 the breakdown voltage of the air gap, which is about 100 volts/mil. The breakdown voltage for a 0.063 air gap would be about 6,300 volts and, so your safe bias voltage would be half that: 3,150 volts.
I no longer use perf-metal stators for my ESL builds but I used to, and there is a back page on my website devoted to perf-metal panels which you might find helpful.
My website main page: http://jazzman-esl-page.blogspot.com
Perf-panel backpage: http://jazzman-esl-page.blogspot.com/2010/01/building-stat-panels.html
Pay particular attention to smoothing-over all sharp points along the cut edges of the stators. Any sharp points focus the HV corona, and arcing from those points is the number one cause of failure in DIY perf-metal ESLs.
Also; because the perf holes are die-punched thru the metal from one side, the hole edges are smoother on the punched-in side and sharper on the punched-out side of the sheet. So, to mitigate arcing, make sure to place the SMOOTH SIDE FACING THE DIAPHRAGM.
Good luck with your project!
Last edited:
Yes, that is why I plan to use 1.5k for my first try. The article I read suggested 3kV max too.Your proposed 5k bias voltage is too high for your proposed 1/16" diapragm-to-stator gap (d/s), and would likely result in arcing.
And thank you very much for the perforated steel sheet recommendation, they are very enticing! Though my plan changed to use aluminum window screen instead for their cheapness and ready availability. I plan to measure their conductivity too before cutting since these loose wires might not conduct too well.
As for the insulation, I am looking at 1.5mm PLA boards or 1.5mm smooth abs plastics. I plan to melt 4 strips of these onto the screen, put some tension on using those 4 strips as anchor, and then glue/melt an inner frame under tension. Hopefully I will report back a success with the process.
- insulation: 1.5mm thick smooth abs sheets (ones on ebay are very expensive at ~$10 for 20cmx30cm + additional shipping, looking for alternatives)
- stator: aluminum window screen (purchased) $17
- mylar: (purchased) $35
Step up transformer and dc bias supply design here I come.
You probably already know this, but window screen will need to be glued down over a supporting grid to hold it flat and stable. Plastic egg crate type florescent light diffusers like these work well as support grids: https://www.homedepot.com/p/Plaskol...ight-Ceiling-Panel-1199233A/202025149#overlay
There are nuances in the choice of stator.Yes, that is why I plan to use 1.5k for my first try. The article I read suggested 3kV max too.
And thank you very much for the perforated steel sheet recommendation, they are very enticing! Though my plan changed to use aluminum window screen instead for their cheapness and ready availability. I plan to measure their conductivity too before cutting since these loose wires might not conduct too well.
As for the insulation, I am looking at 1.5mm PLA boards or 1.5mm smooth abs plastics. I plan to melt 4 strips of these onto the screen, put some tension on using those 4 strips as anchor, and then glue/melt an inner frame under tension. Hopefully I will report back a success with the process.
- insulation: 1.5mm thick smooth abs sheets (ones on ebay are very expensive at ~$10 for 20cmx30cm + additional shipping, looking for alternatives)
- stator: aluminum window screen (purchased) $17
- mylar: (purchased) $35
Step up transformer and dc bias supply design here I come.
If you buy a perforated sheet of metal, its acoustic transparency should be within 60/40%, where 60 is the area of the holes and 40 is the area of the electrode.
In such a ratio the high frequencies will be well developed.
But it is not desirable to be carried away by a large area of acoustic transparency, because the area of the electrode (active metal) directly affects the sensitivity of the driver.
If the area of the electrode is small, the sensitivity will drop.
In this case the window grid should be looked at with caution, it is necessary to measure with a caliper its wires and windows between the wires, they should be approximately 60/40%.
There are nuances everywhere in electrostatic speakers. So many that I can't imagine anyone getting it right the first time. That doesn't mean it's not still fun though.There are nuances in the choice of stator.
At 0.06" spacing, you'll lose a little over 4 dB going from 40% open 0.018” thick aluminum with 0.125” holes on 0.1875” staggered centers to window screen on egg-crate diffuser.
rough and rudimentary approach in this initial attempt
My general advice is to keep it rough and rudimentary in the beginning. Unless you are following someone else's precise build methods, you're going to do quite a few things sub-optimally. Stick with an easy build method and don't get overly attached to what's just a prototype. The first panels I made were kind of a mess, but they played music and taught me things. And it was fun to listen to a driver I'd built myself, even when it didn't do what I'd hoped.
Over the years, and roughly in order, I built stators of: rigid wire (insulated poorly with corona dope paint), perforated plastic with conductive coatings (insulated poorly with same paint), plain perforated aluminum, perforated aluminum with epoxy powder (good insulation, wrong volume resistivity, whole other topic), window screen on egg-crate light diffuser (both insulated and insulated, but the insulation didn't really work properly), PVC coated stranded wire on egg-crate light diffuser (hey, hey, finally got to one of the right kinds of insulation), and circuit boards.
The fastest/easiest to build are perforated metal with no insulation. Sticking with aluminum makes cutting easier. This style panel has its limits, but it's an easy way to dip your toe in the ocean. What you sacrifice is mostly longevity and panel silence, neither of which really matter in the beginning. And of course safety is impacted as well, since you can do stupid things like holding the panel so your hand bridges both sides of the high voltage audio signal while you reattach that alligator lead that just fell off. You probably don't have to wonder why such a specific event still sticks in my mind after a number of years. I don't recommend that boo-boo.
I also started off precisely tensioning mechanically. That went out the window pretty fast after switching to heat shrinking. So much easier, and easy is good when you're learning. A Makita variable temperature heat gun is my tool of choice for this, but there are cheaper ones out there if you don't want to splurge. Heat guns that only have 2 temperature settings don't give enough control to make it easy. They'll do if you're careful though.
Last edited:
It depends on what we are focusing on, a woven mesh in the form of a stator (if it is selected and made correctly) is much better for HF.
The point is that the sound coming from the diaphragm easily bypasses the round wires of the mesh and goes out into space.
In the case of flat, perforated metal, the sound from the diaphragm bumps into the flat part of the stator and returns back to the diaphragm and thus forms a very unpleasant and audible coloration of electrostatics, which is called "film sound".
In this respect "window mesh" looks more attractive, but this conditional mesh should be made of thicker wire and glued on the reinforcement (cage) very and very evenly, so that the area would be ideal in horizontal form.
For bass register - everything is exactly the opposite, the ratio of perforation transparency to electrode metal should be 40/60, but 60 is the area of the electrode, because the larger the area of the electrode - the more intense and energetic the attraction of the diaphragm to the stator, but the small acoustic transparency of the stator serves as a natural filter for the decline of HF.
Last edited:
And if we focus on all the minutia of everyone's perceptions about what's important and what's not, it's less likely anyone will build anything because it's overwhelming. That's one of the reasons my initial replies to this thread focused on a simple aspect that needed to be addressed, and not much more.
So again, my advice is to keep it simple and build things. Over time each builder will gravitate toward the methods and performance aspects that are important to them. No one is going to walk in with all the right knowledge and all the right experience to build a great speaker in their first go, unless they are building a kit and/or following precise build instructions to essentially do the same. The more likely path will require multiple rounds of revision, so my advice is to keep it cheap, simple, and small on the front end and don't become obsessed with any particular performance aspect.
So again, my advice is to keep it simple and build things. Over time each builder will gravitate toward the methods and performance aspects that are important to them. No one is going to walk in with all the right knowledge and all the right experience to build a great speaker in their first go, unless they are building a kit and/or following precise build instructions to essentially do the same. The more likely path will require multiple rounds of revision, so my advice is to keep it cheap, simple, and small on the front end and don't become obsessed with any particular performance aspect.
The author of this topic can choose what he wants to do - the simplest or take into account the experience of other users, their mistakes and do something more useful for him than the simplest.
My wish is that you should not be afraid to do complicated things!
My wish is that you should not be afraid to do complicated things!
Oh yes, a lot of advice from knowledgeable people, I am learning!
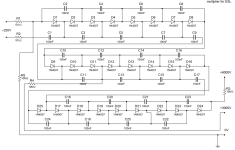
So the screen just arrived today, a quick measure with a multimeter told me that it is very conductive with <3 ohms of resistance in the surface area I will be working with. For now I will see if egg-crate + aluminum screen combination will produce a recognizable sound, and go from there.
As I am thinking of designing the high voltage DC bias supply, it would be of immense help if I can see schematics of such a circuit with specified transformer, resistor, and capacitor values. (I have in mind a transformer connected to a cockcroft-walton cascade voltage multiplier.) Problem is, plugging a transformer directly into the wall just sounds like a bad idea that will kill me (not sure how I would form a closed loop with the diaphragm circuit but the exposed parts are still dangerous), and I do not have an AC signal generator. I am waiting to gather all the electronic parts so I can buy them mostly in one batch from mouser, avoiding paying for shipping multiple times.
A proper design that will not burn the breaker and my wires down while supplying 1.5kV would be greatly appreciated!
I recommend the diyaudio forum, but:
Read it FIRST, and only then ask questions. Please respect the forum!
Read it FIRST, and only then ask questions. Please respect the forum!
Maybe I have to plug it into 115V AC mains after all.
Searching on mouser yielded a Hammond step down transformer 6K68HF (out of stock) that when connected in reverse, accepts 115 VAC and outputs 230 VAC, leading to a bigger cascade / appropriate voltage rectifier circuit to bring it up 6.5 times with room to adjust.
Or I could pick an even higher primary voltage and figure out a way to supply the lower secondary. Which is what the Hammond BE7G offers.
DC to DC transformers searches using V only as a filter yielded exotic industrial control transformers, which is probably not what I want.
Edit:
I think I will settle on the 24VAC to 347VAC Hammond BE7G as the transformer, and build a rectifier on top of it. Sorry for the questions above.
Last edited:
My apologies. I did use Google to go through the posts regarding electrostatic speaker high voltage bias supplier circuits, but was not able to use those results since the transformers mentioned were quite old and not available anymore. However, I did take inspiration from Jazzman’s blog, and I think I will be using his circuit design, albeit to a lower output voltage by adjusting the rectifier ladder. Thank you for your reminder, I will be more mindful.Please respect the forum!
My apologies. I did use Google to go through the posts regarding electrostatic speaker high voltage bias supplier circuits...
Attachments
- Home
- Loudspeakers
- Planars & Exotics
- My First Project: Small Electrostatic Speaker Build