Ha, well sadly, I already spent a chunk of change on very nicely veneered maple ply. The screws were part of my original plan for the aesthetics, although I have waffled a bit on that and am thinking about hiding them. I picked up yet another wood filler at lunch time today which I will run some experiments with this evening...fingers crossed that it matches fairly well. If not, I might just go "totally deliberate" and fill the holes with black putty. "Well of course you can see where the screws are...I totally intended to look this way!"
Good luck getting a filler that will match the maple sufficiently, and accept any of the oil finishes shown without changing color and calling attention to the patches.
These guys offer a great selection of fixings and small tools, jigs, etc, including my all time favorite tape measure. https://www.fastcap.com/products
Perhaps too late for this project, but maybe bookmark them for future work.
These guys offer a great selection of fixings and small tools, jigs, etc, including my all time favorite tape measure. https://www.fastcap.com/products
Perhaps too late for this project, but maybe bookmark them for future work.
[friday night humor]
With all of this recent talk about filling and/or plugging the screw holes in the maple veneer on my ply, and from looking at where many of my audio compatriots in this thread are posting from, it occurs to me that my more civilized neighbors to the north might be experiencing distress at the thought of someone simply puttying some nice maple. Now, I will admit that my first instinct was to listen to the little voice in my head which was saying, "you dun go down to McDonalds for some fries and break them suckers off in there 'murcahhhhhhh", coupled with a strong compulsion to finish the enclosures with hamburger grease and gunpowder. Lord knows that McDonalds fries might be THE most long lasting solution, given that even bacteria won't touch them for an indefinite period of time. But, I already bathe with burger scented soap as part of maintaining my right to vote, and I probably don't need my speakers to smell the same as I do, so I figure I will use the Watco Tung Oil finish.
[/friday night humor]
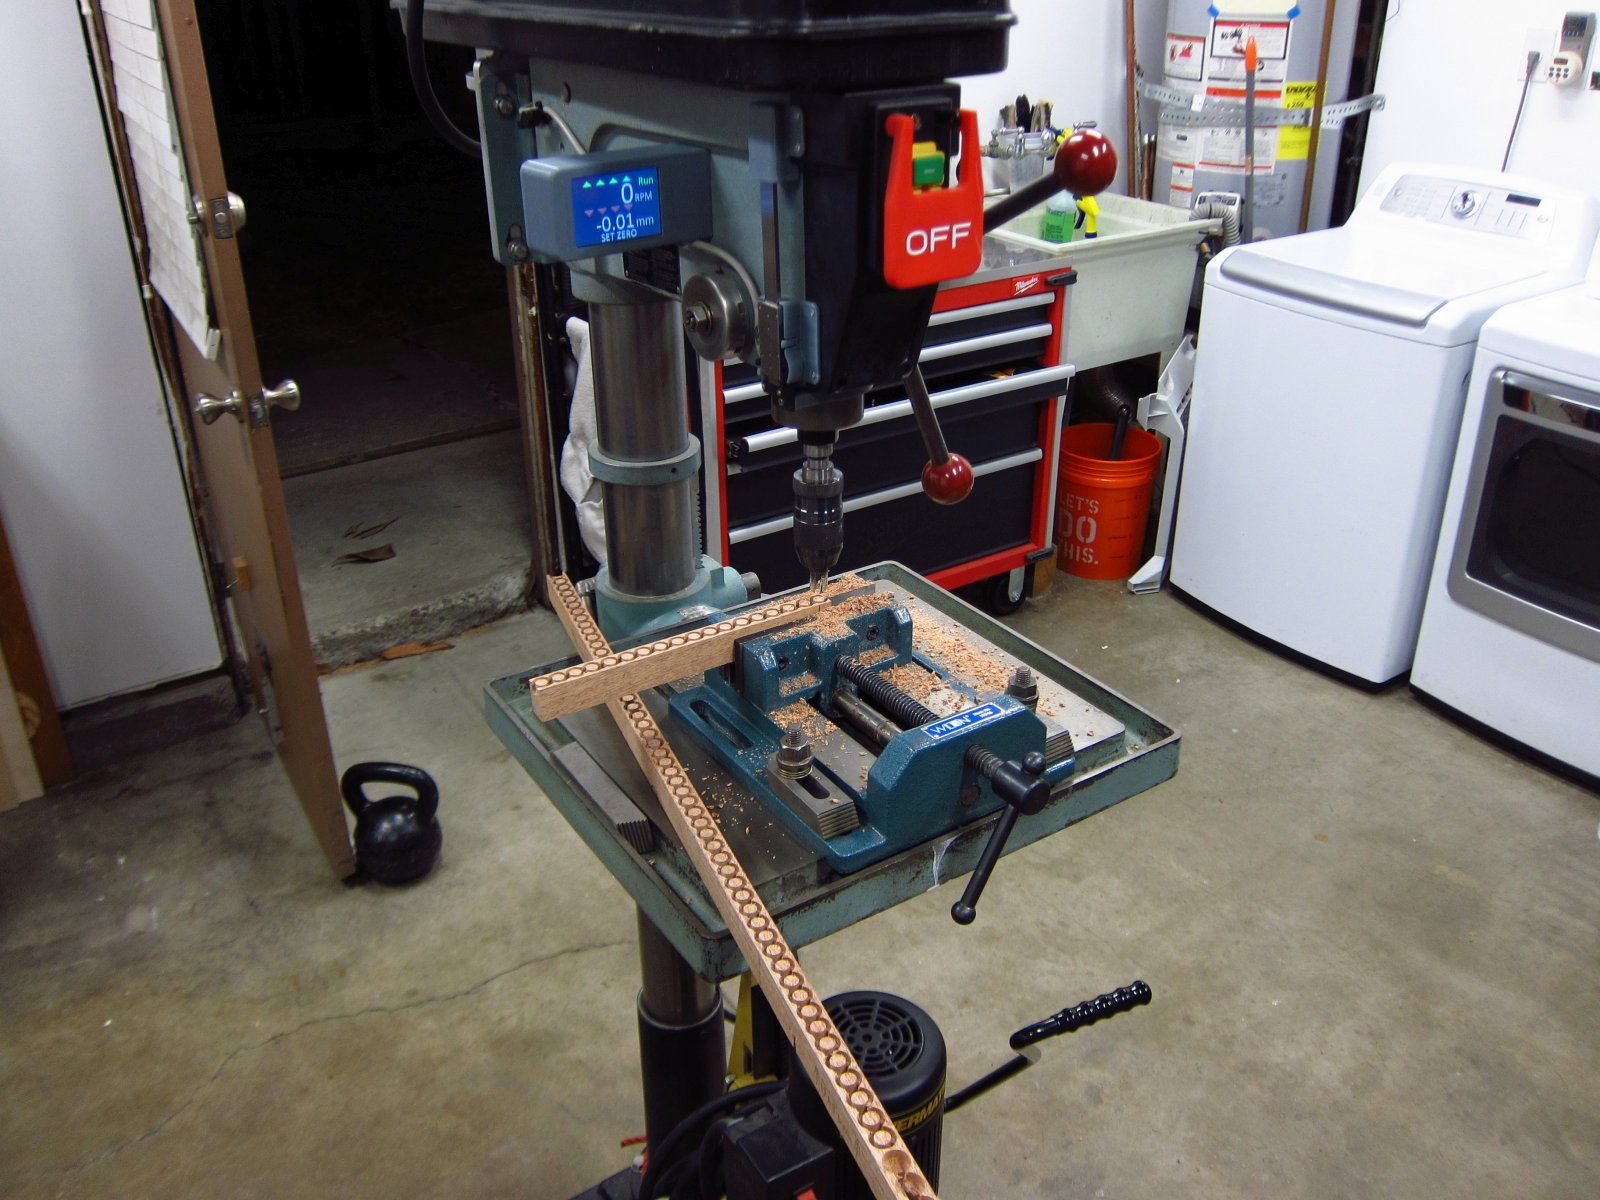
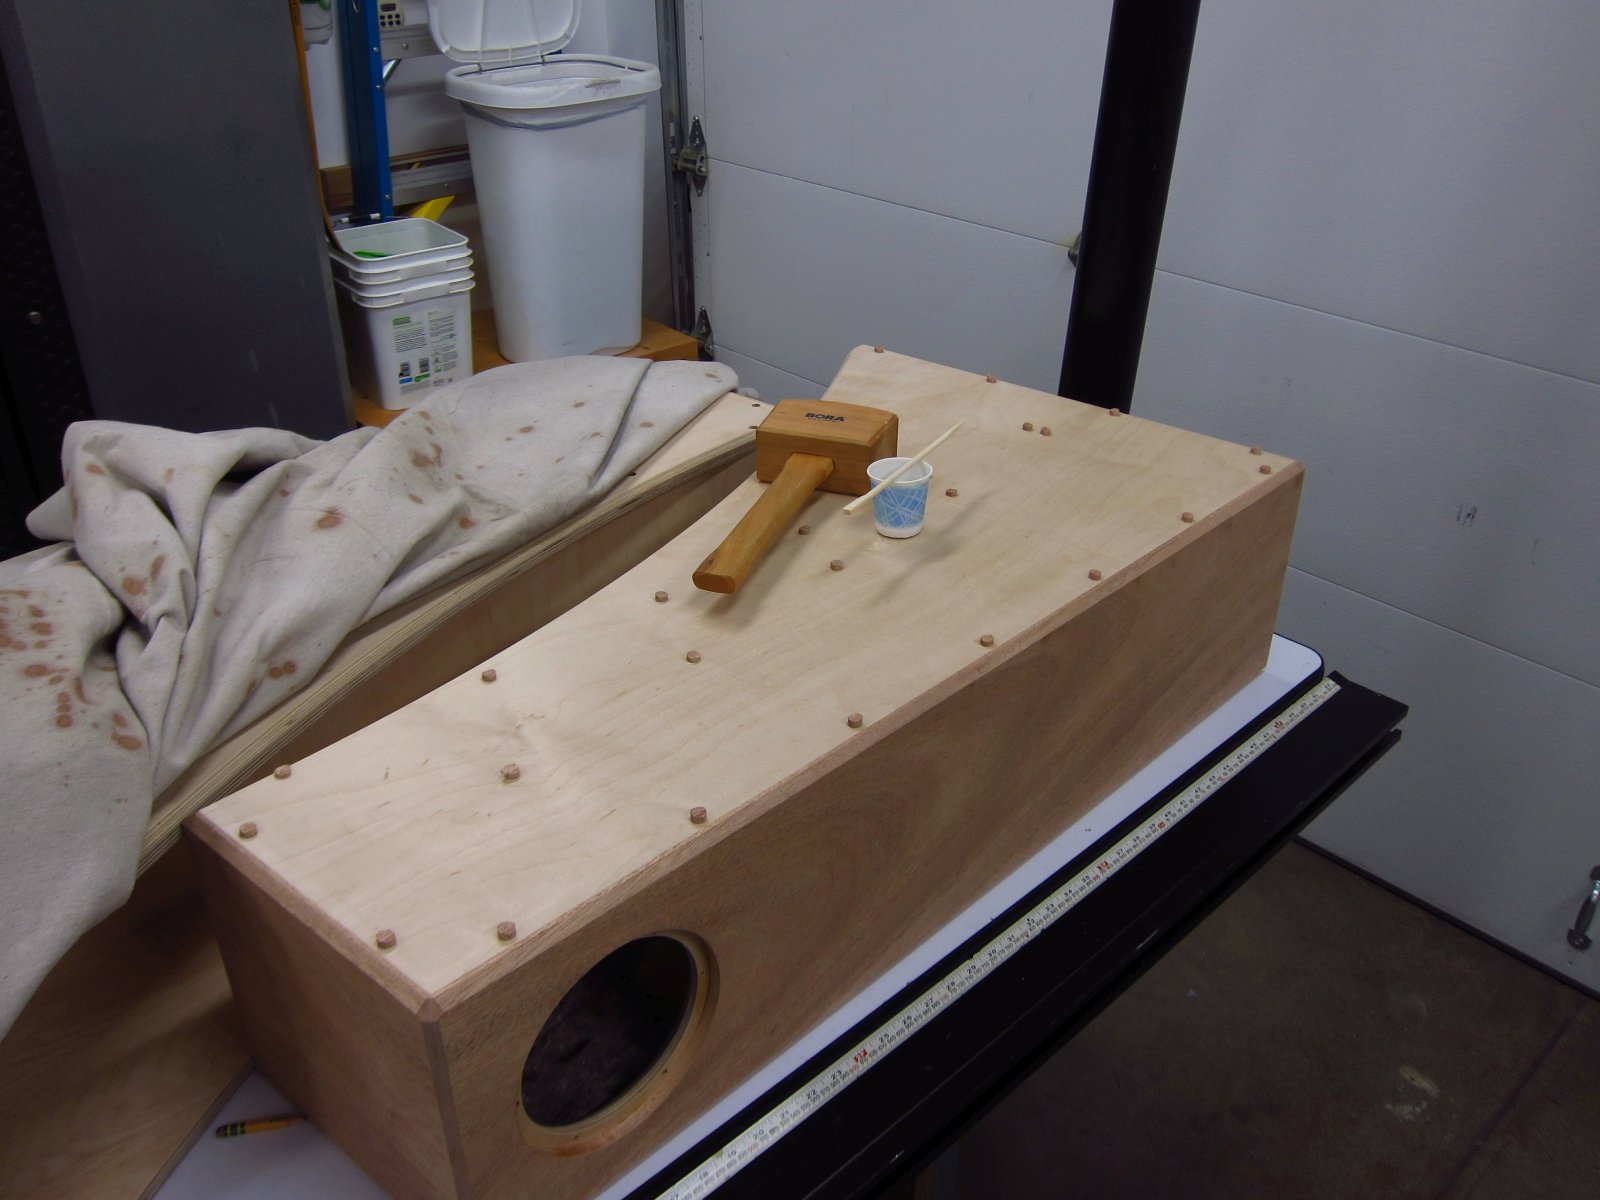
As for the screw holes, I am increasingly leaning toward plugging them with maple to make them nearly invisible. I have 96 holes to deal with, which really isn't that bad. I ran some experiments with my 1/4" forstner bit (Freud "Precision Shear") and it sure makes a flawless bore. So, I can get the enclosures fixed up on my drill press and scoot them around to counterbore all of the screw holes, tap in some maple plugs, flush trim them, sand and then finish as usual. I will order up some plugs and do some experiments in scraps to determine if I think that I can do this consistently 96 times lol.
Here is an account of the progress that I made this evening.
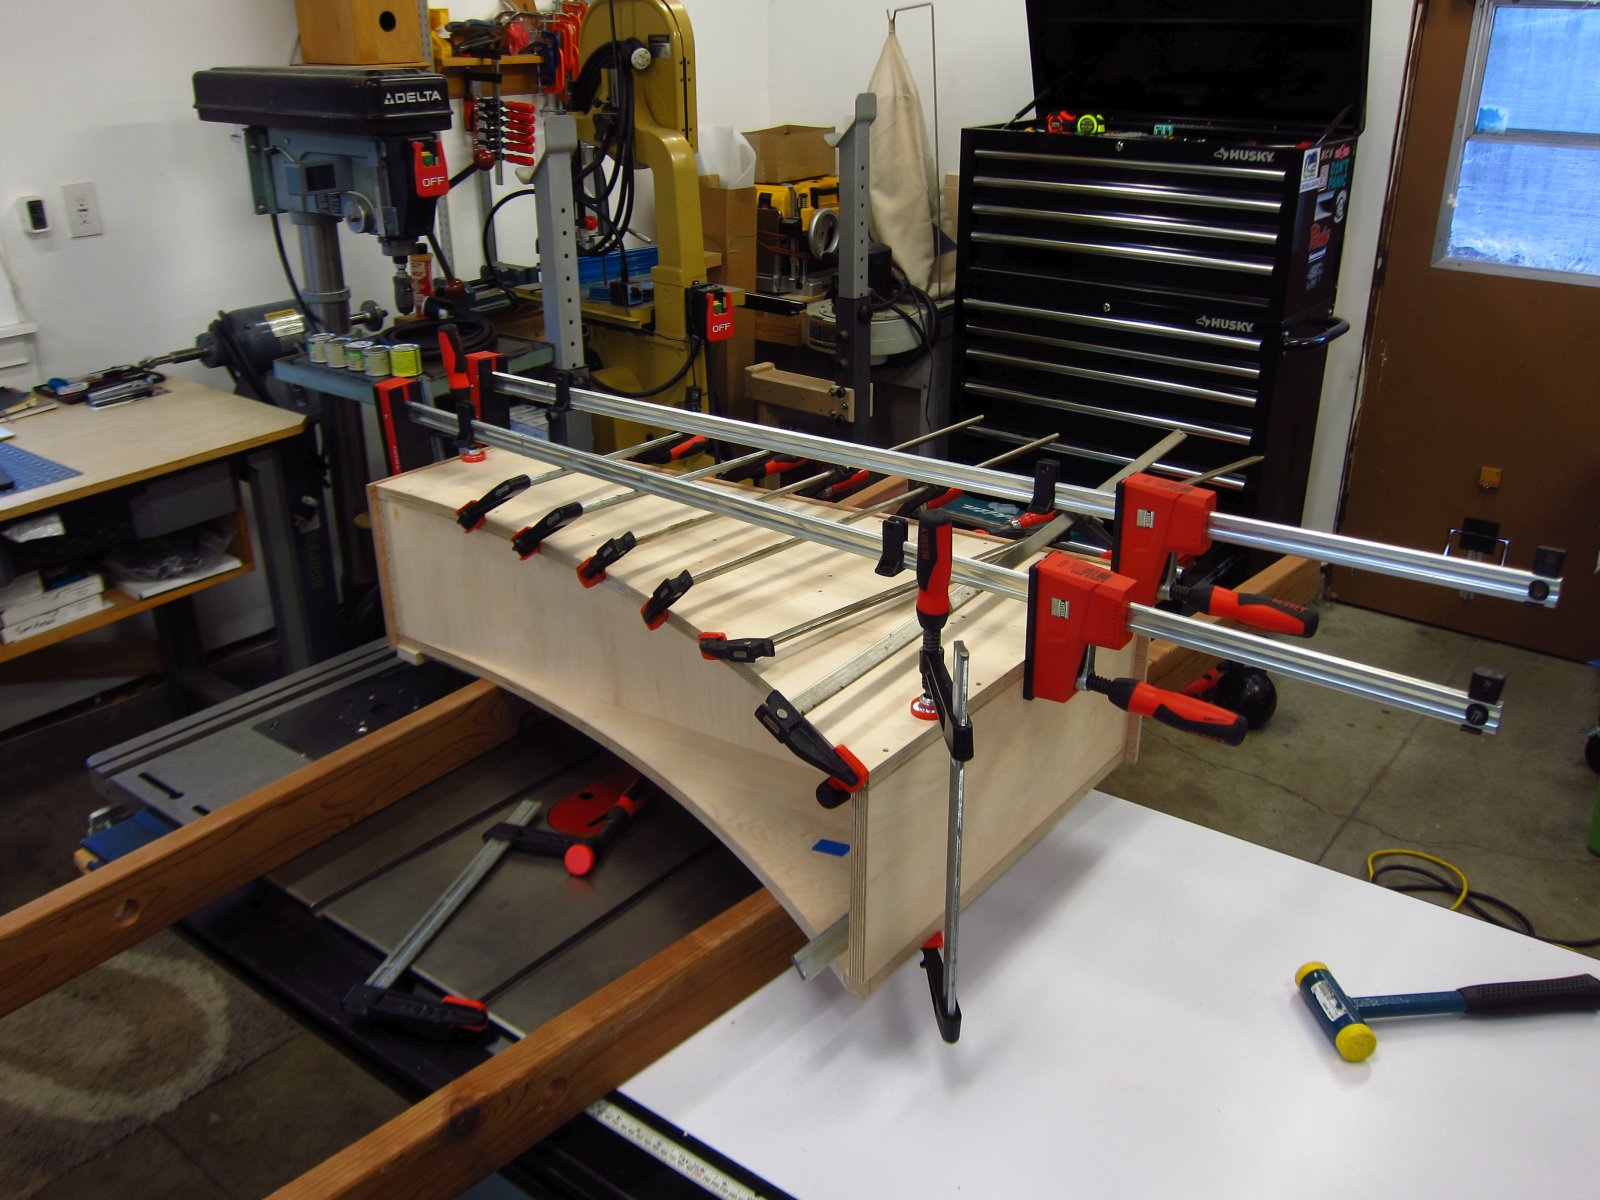
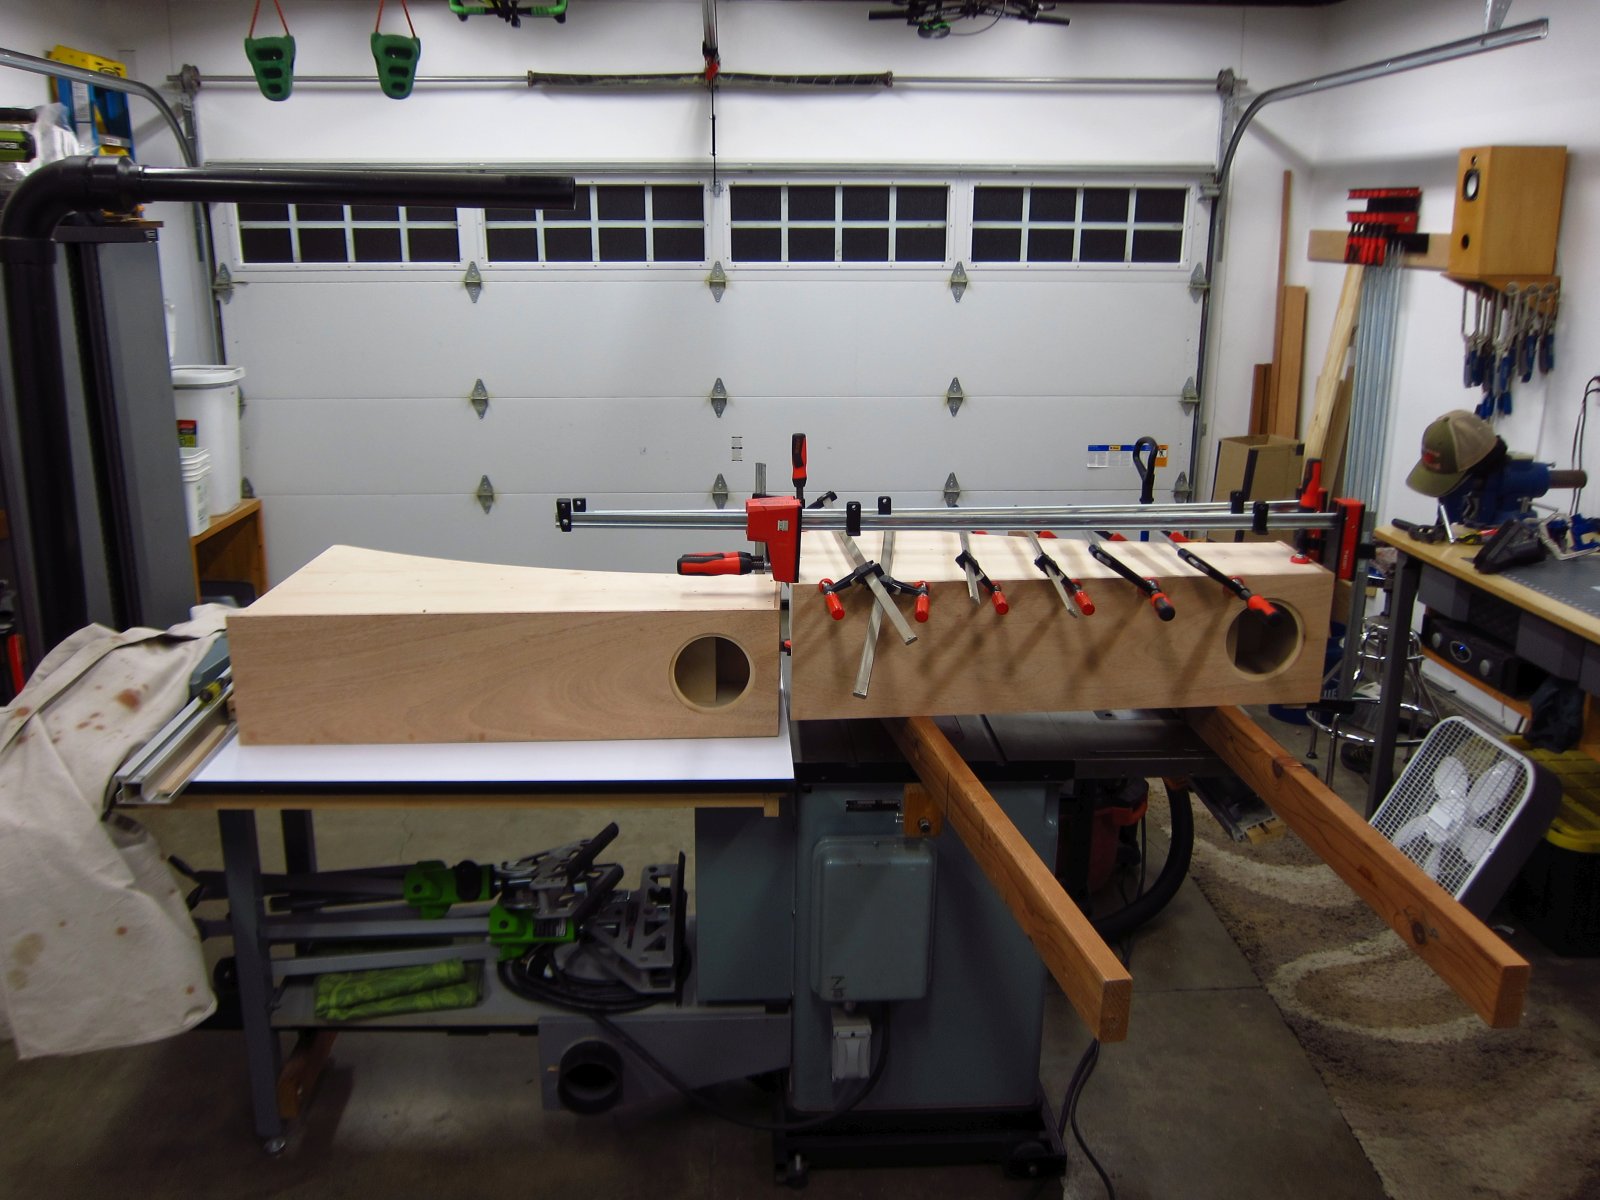
I got the first side glued into place on the second enclosure. This time I used a lot less glue and had very little cleanup to do. If anything, I might have overcorrected and not used quite enough. Whatever, it is thoroughly screwed together and there was enough squeeze-out in most places to indicate that it is fine.
http://www.e30tuner.com/speakerbuilding/images/fhxl_2021/fhxl_057.jpg
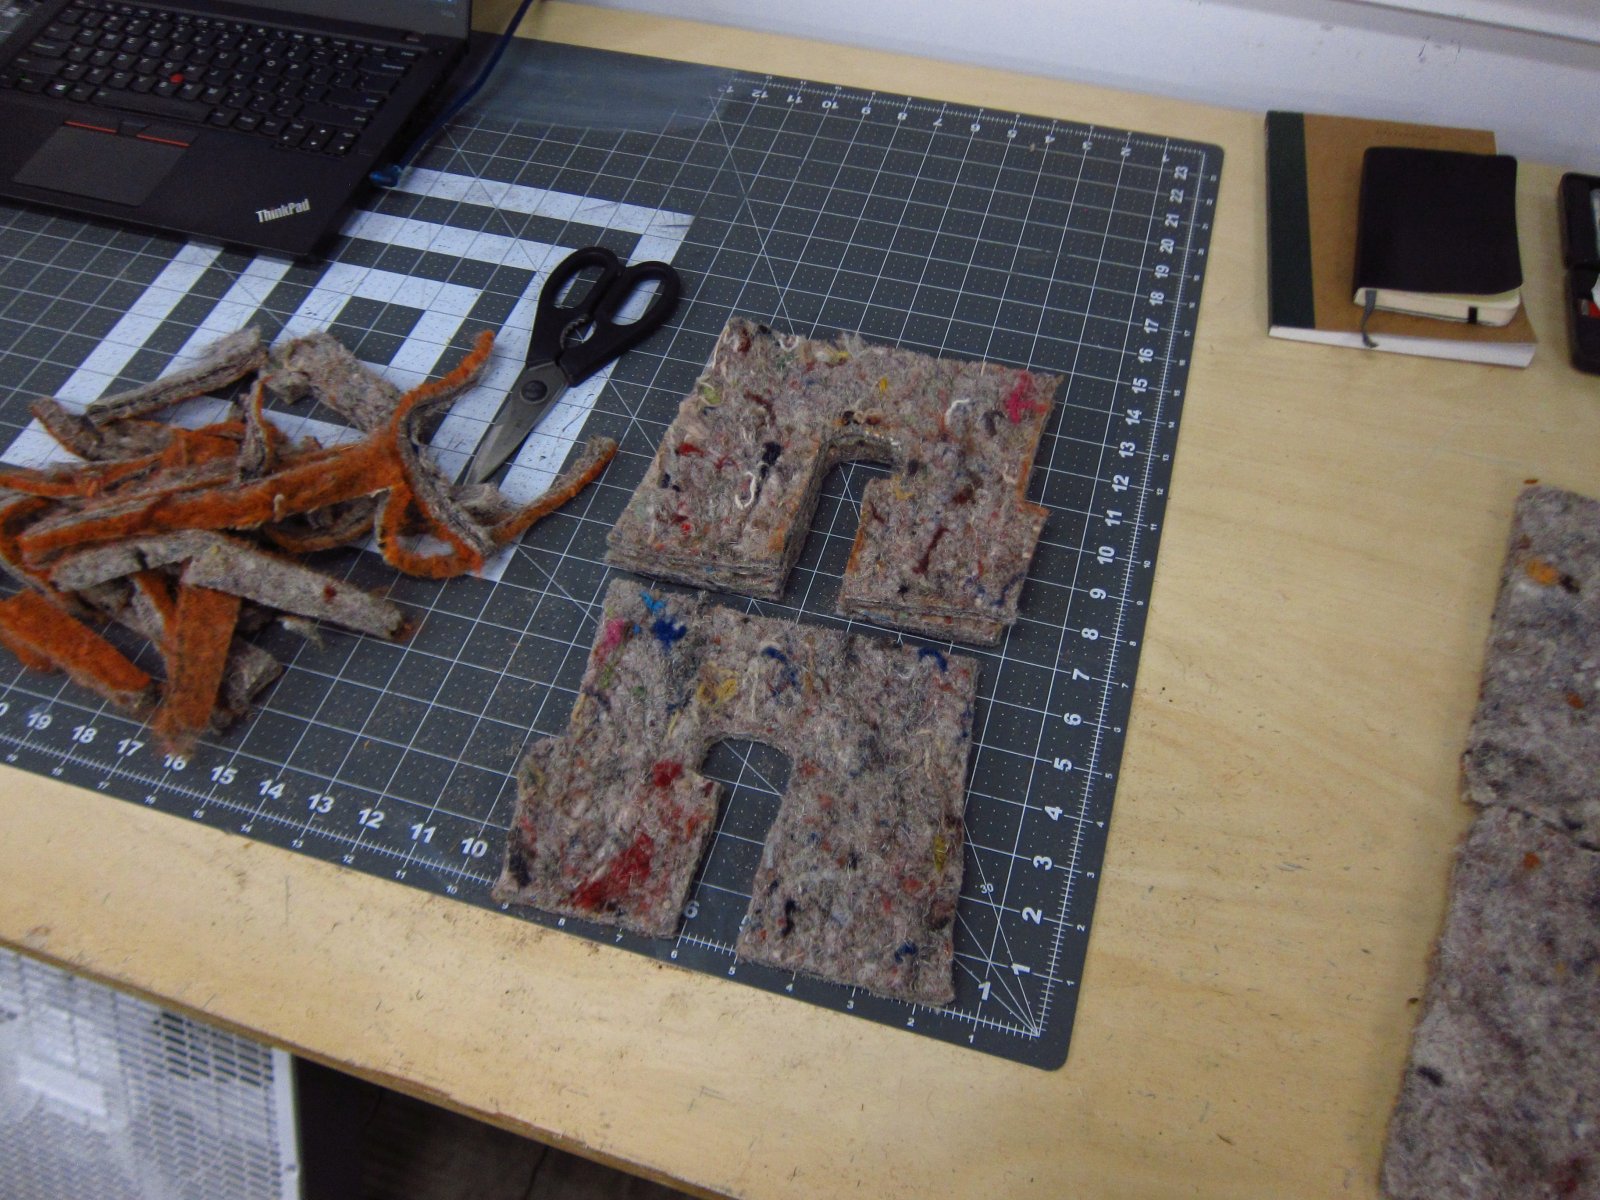
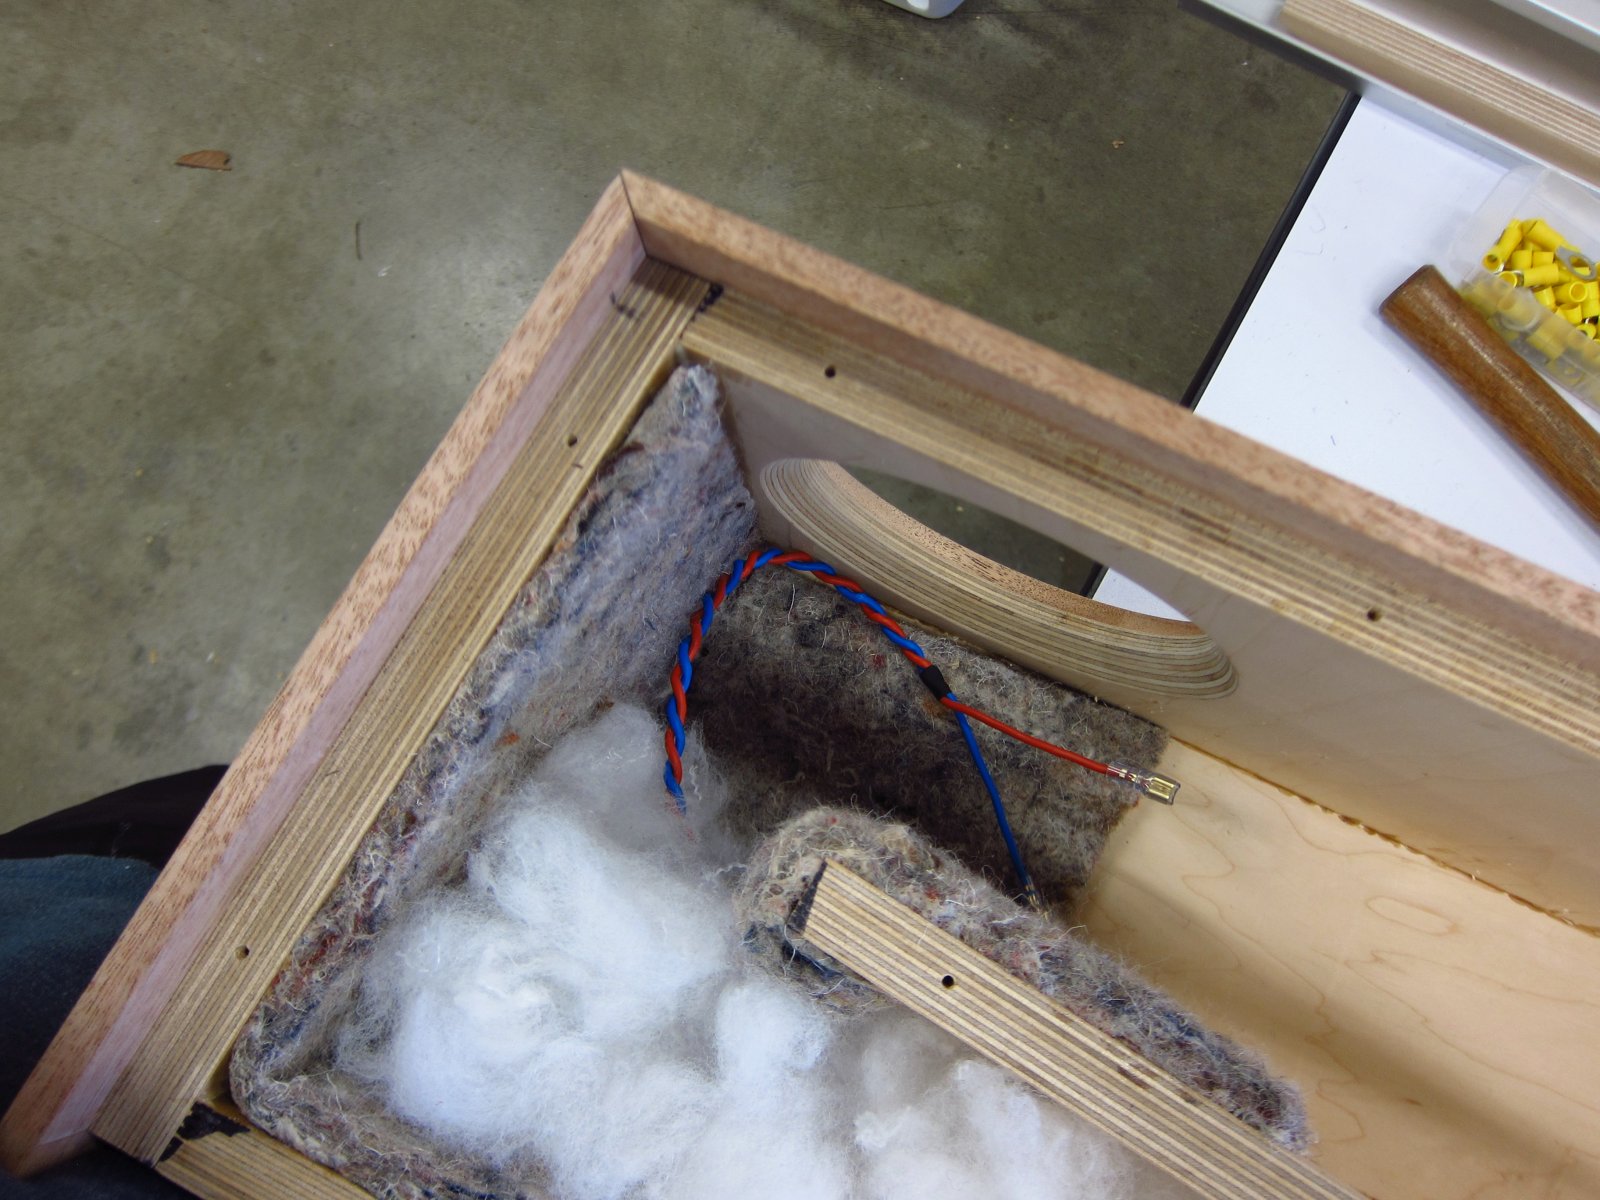
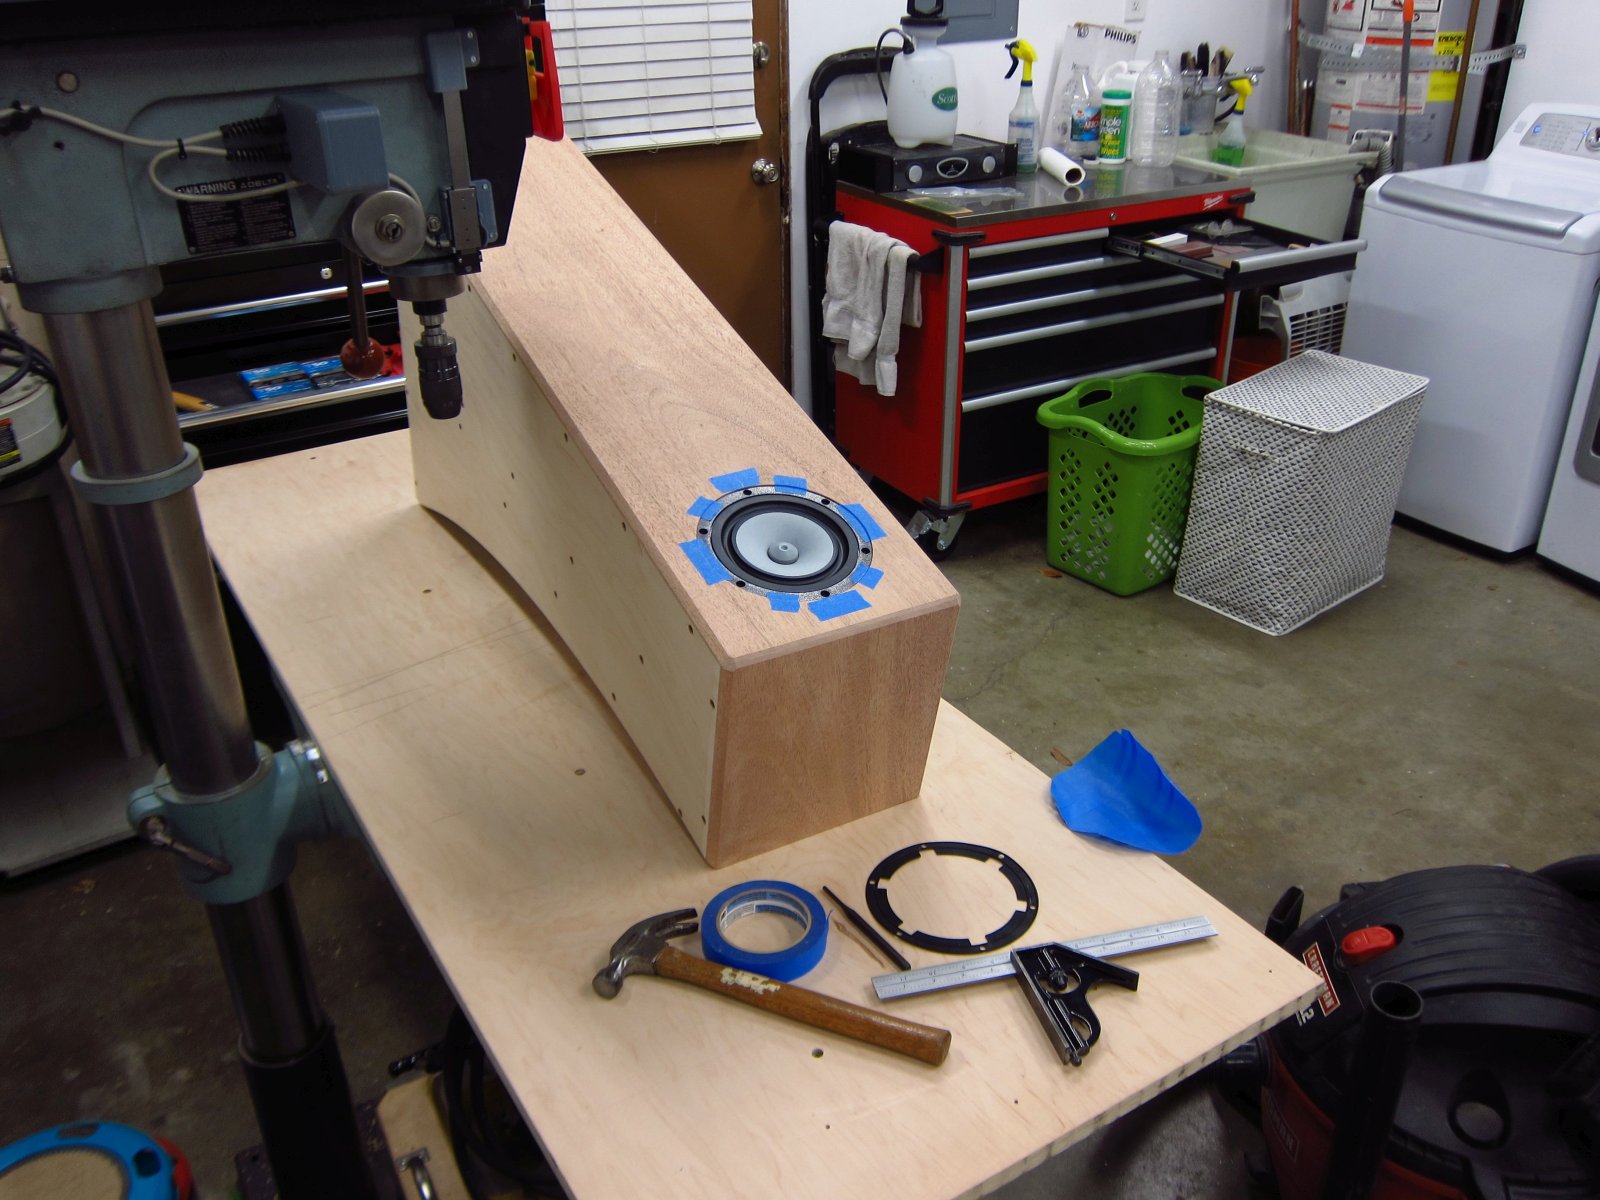
I also cut out all of my felt liner pieces. KJF provided...a more-than-big-enough sheet. It makes a bit of a dusty mess, so once I get the pieces fully glued into place I will give their exposed faces a thorough vacuuming with my vac's brush attachment.
http://www.e30tuner.com/speakerbuilding/images/fhxl_2021/fhxl_058.jpg

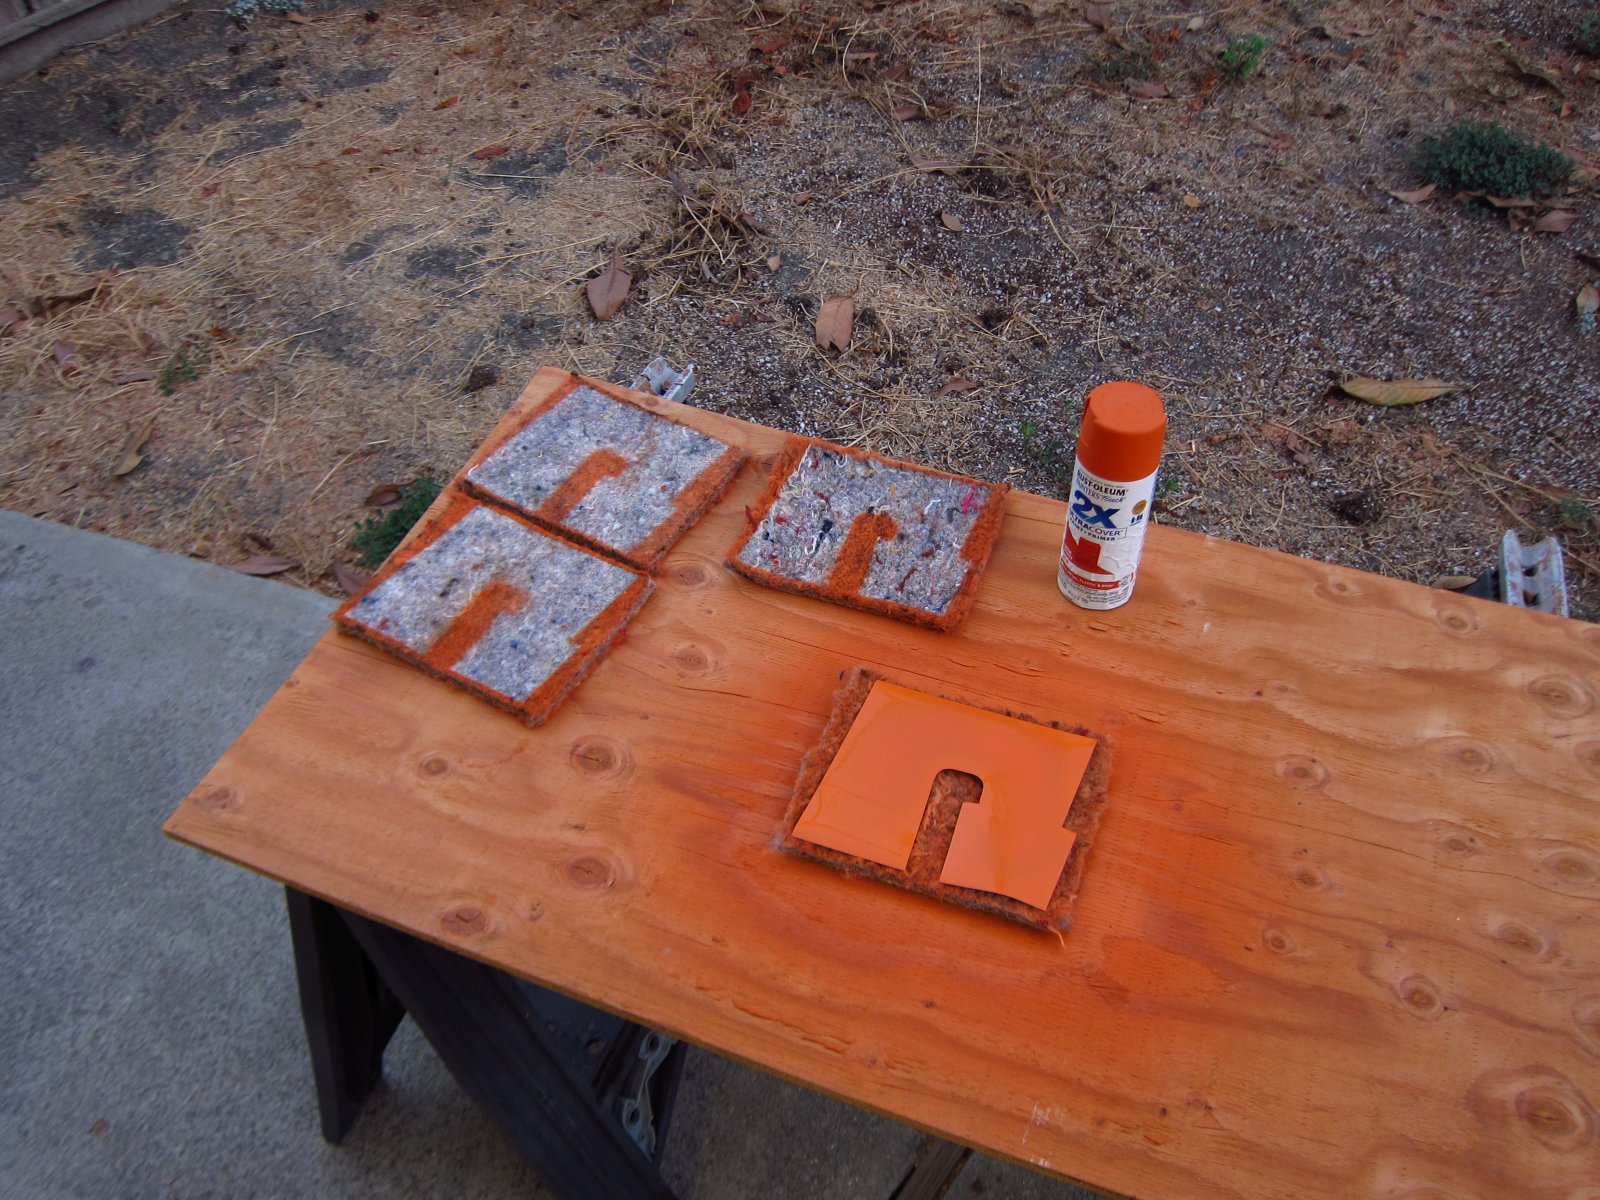
To make things simple, I printed out the template for the side pieces, cut it out from the paper, laid it onto the rough rectangular pieces and used some left over orange spray paint to clearly mark the off-cut areas. Laziness level: High. After doing other things for an hour, the paint was dry and I used some heavy scissors to cut out the desired shapes,
http://www.e30tuner.com/speakerbuilding/images/fhxl_2021/fhxl_059.jpg
http://www.e30tuner.com/speakerbuilding/images/fhxl_2021/fhxl_066.jpg
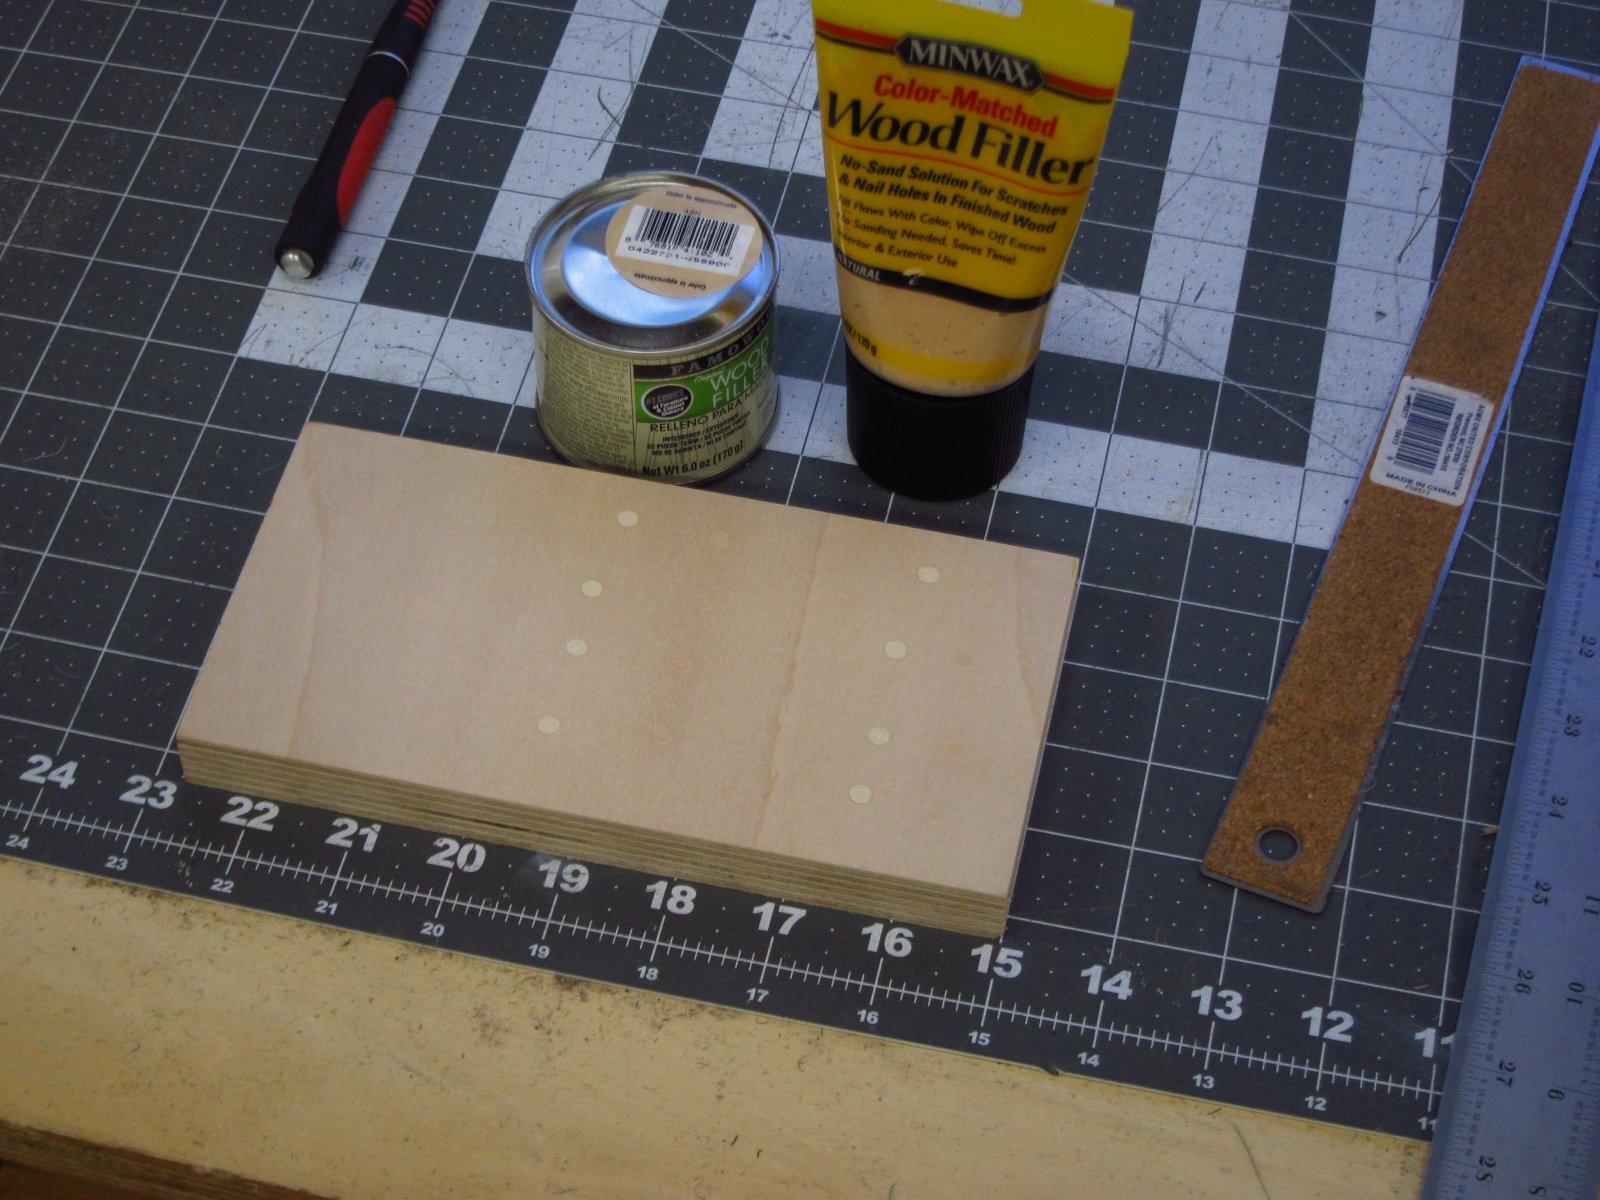
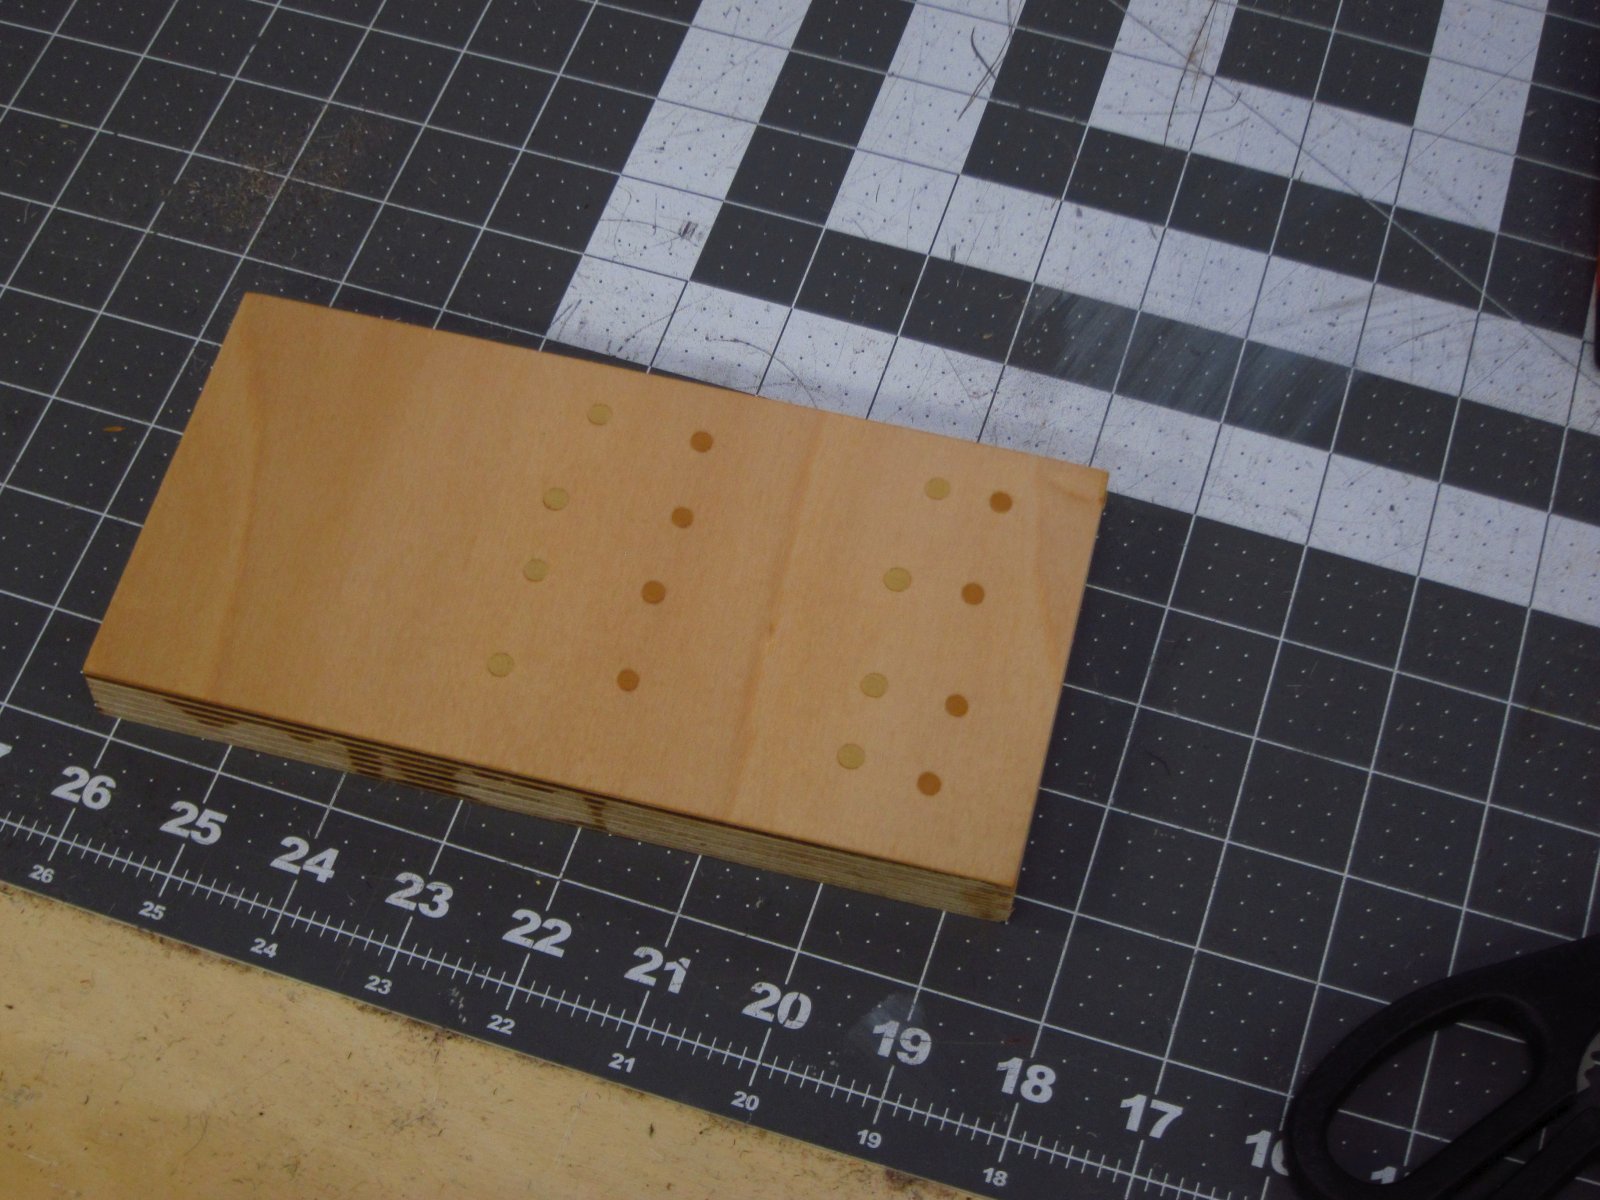
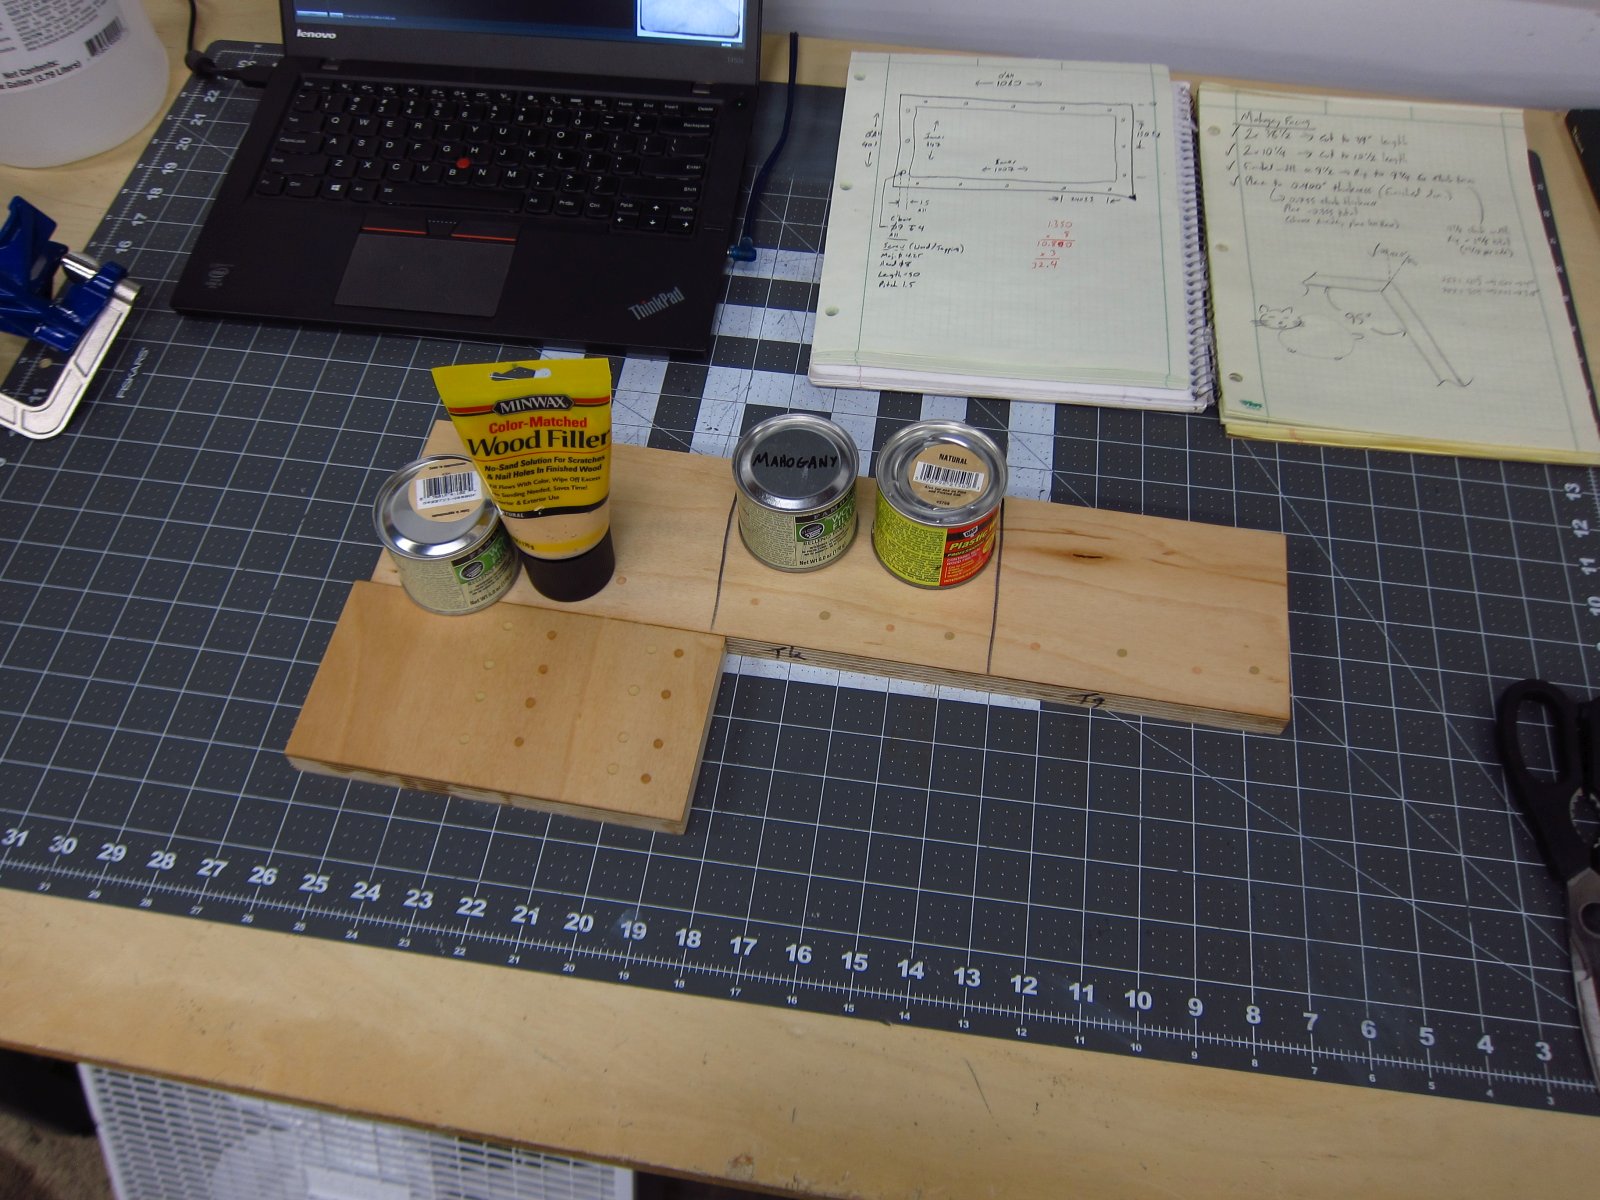
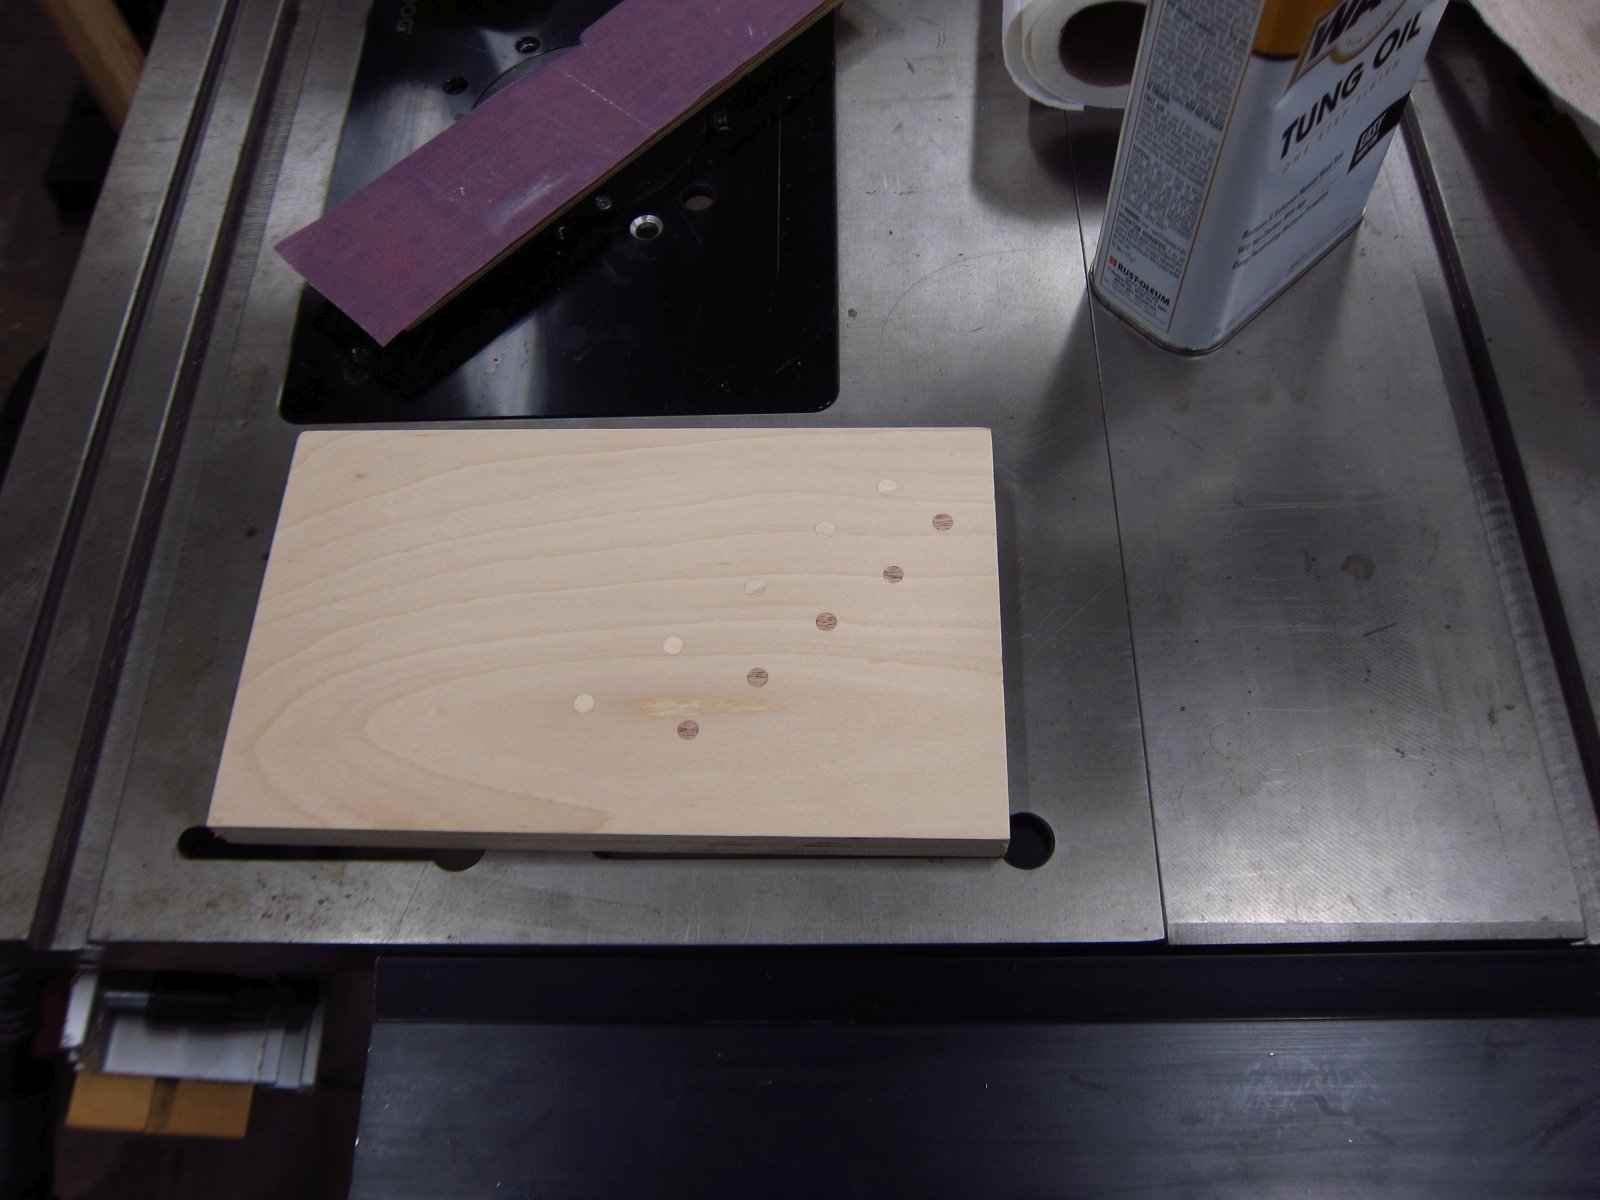
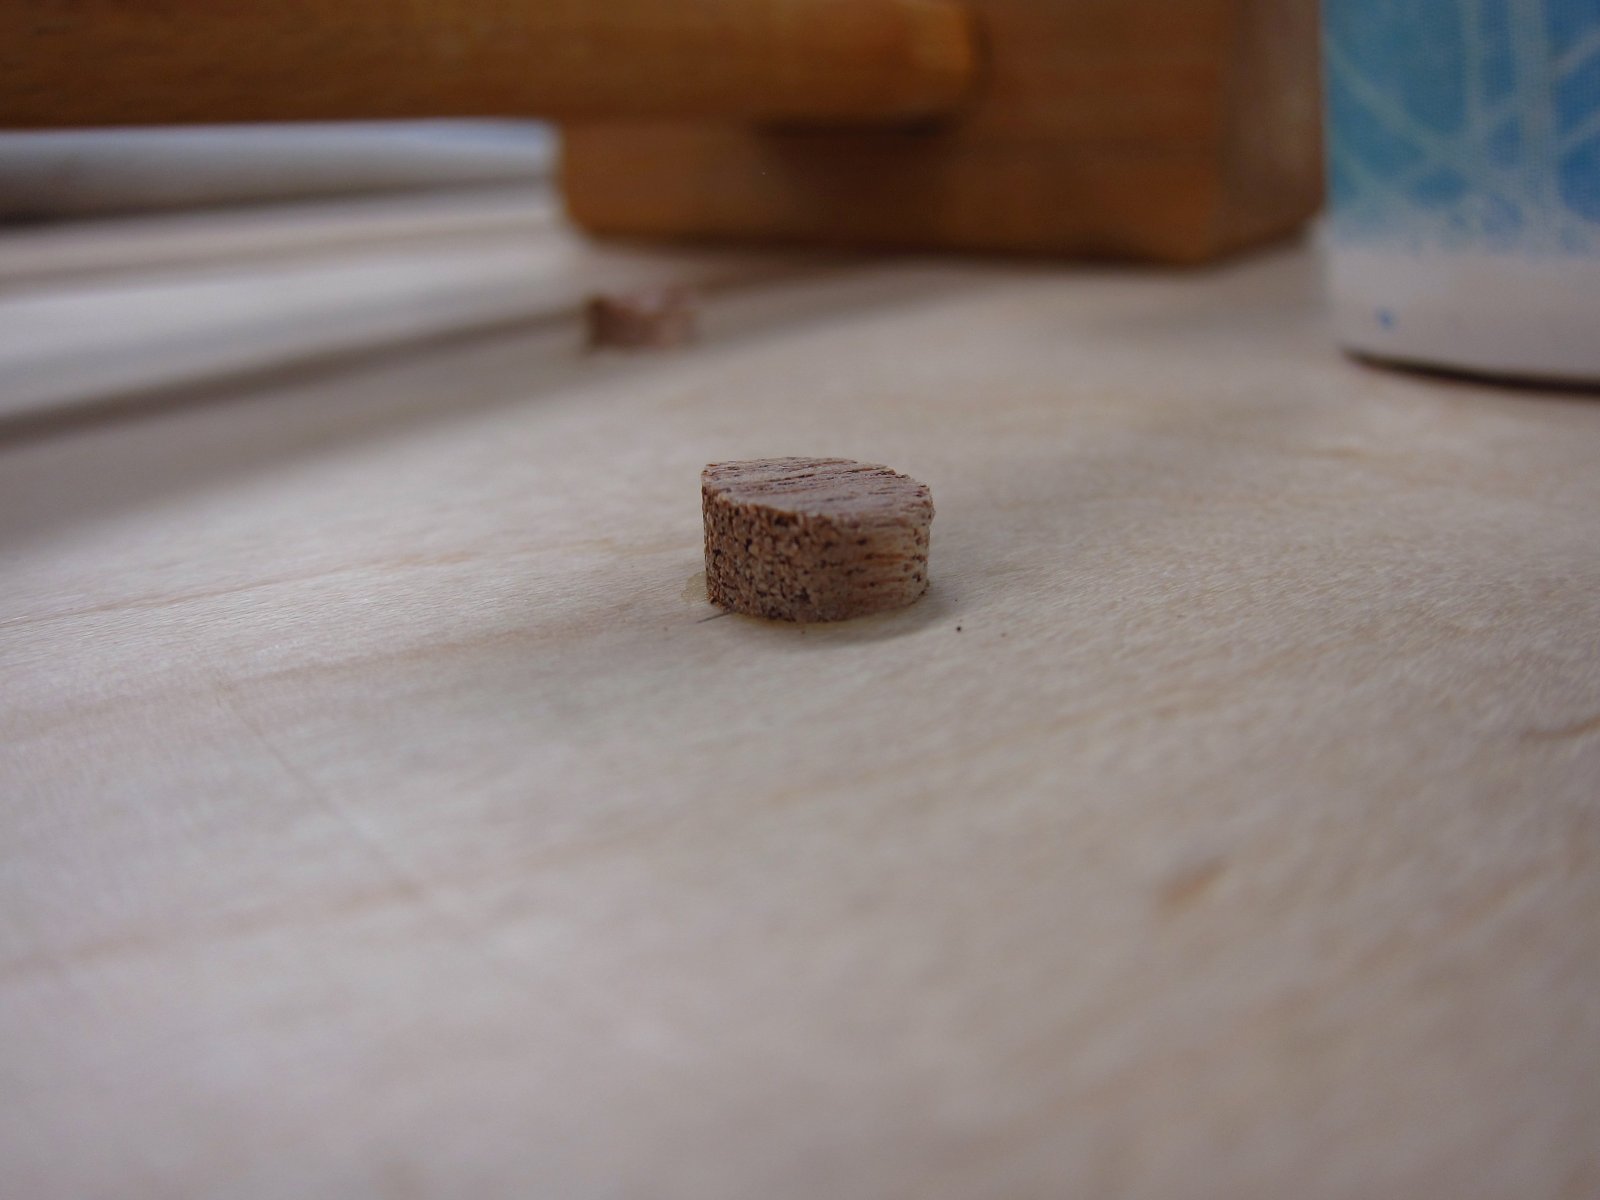
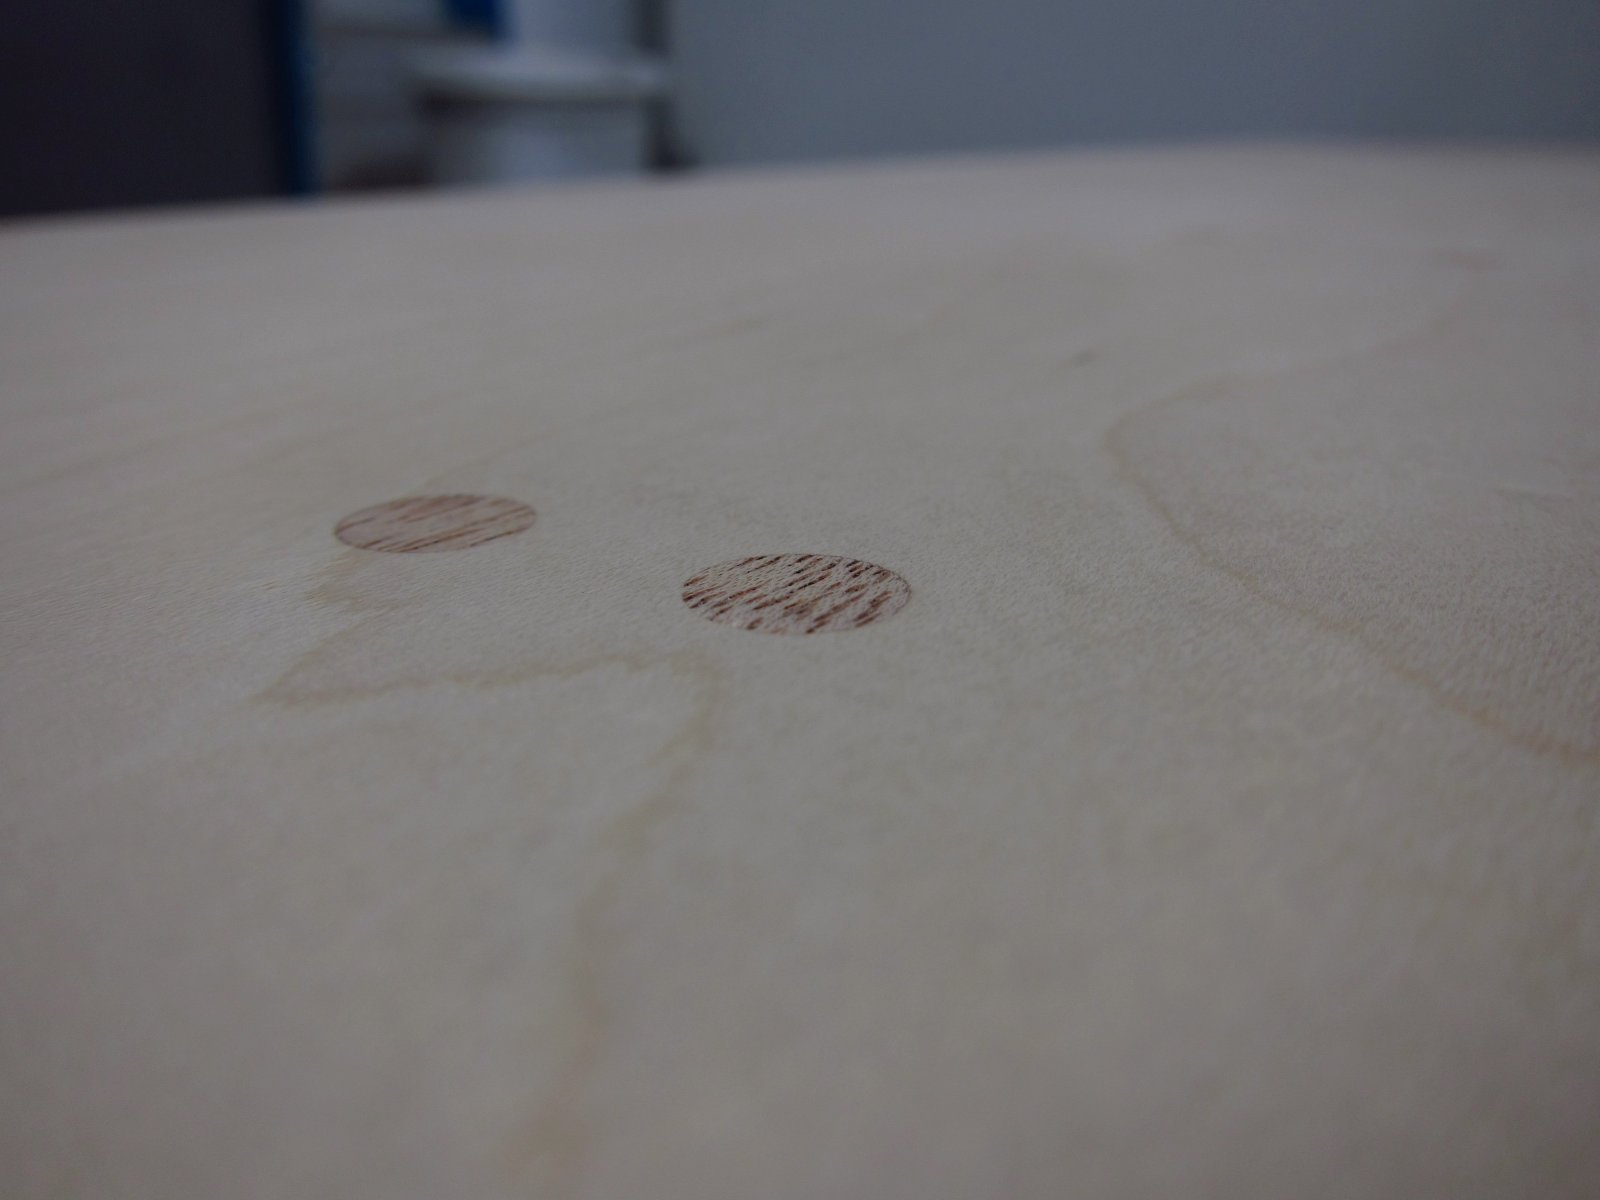
I picked up two more wood fillers to try out as well. With no finish, the Minwax product was nearly invisible and I got my hopes up. Yes, there are 16 holes here, with 2 different fillers.
http://www.e30tuner.com/speakerbuilding/images/fhxl_2021/fhxl_060.jpg
As predicted by another member, applying some Tung Oil finish created a comically bad mismatch between the wood and filler. Now, I will give this a few days to cure since some of the effect will diminish, but I don't expect things to be as good as they were unfinished.
http://www.e30tuner.com/speakerbuilding/images/fhxl_2021/fhxl_061.jpg
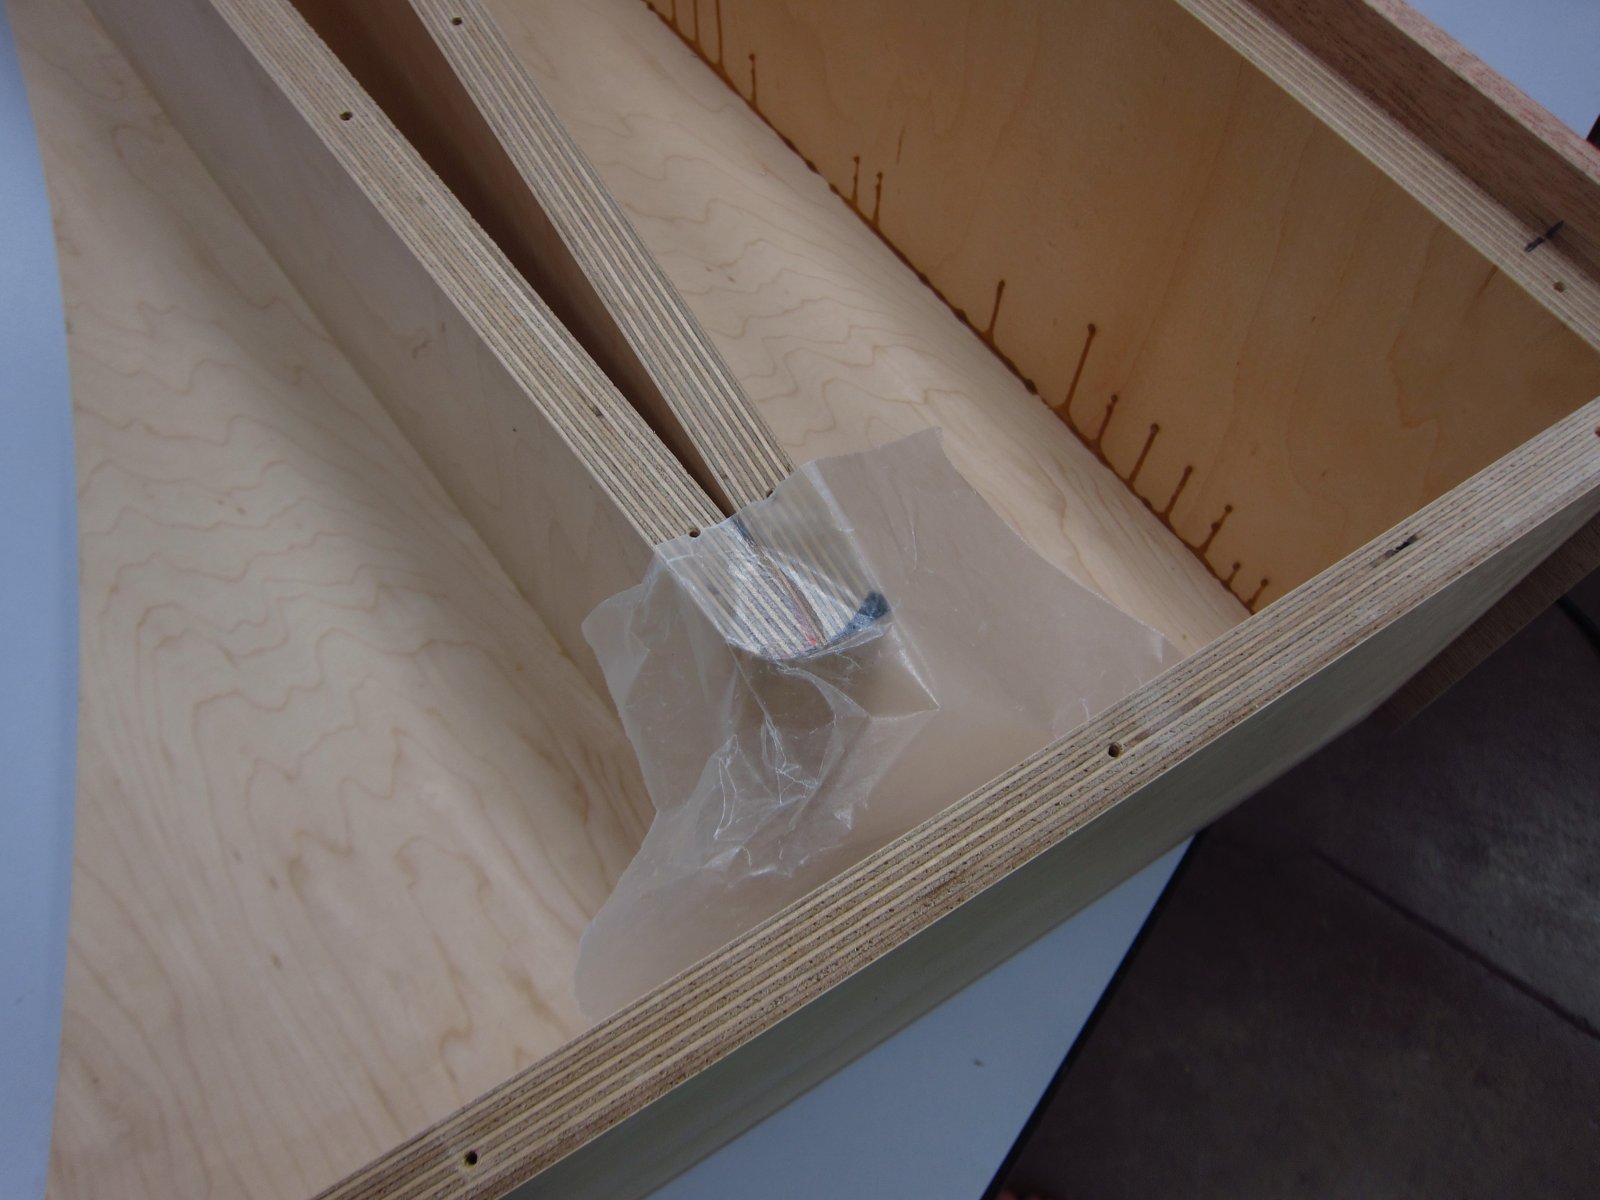
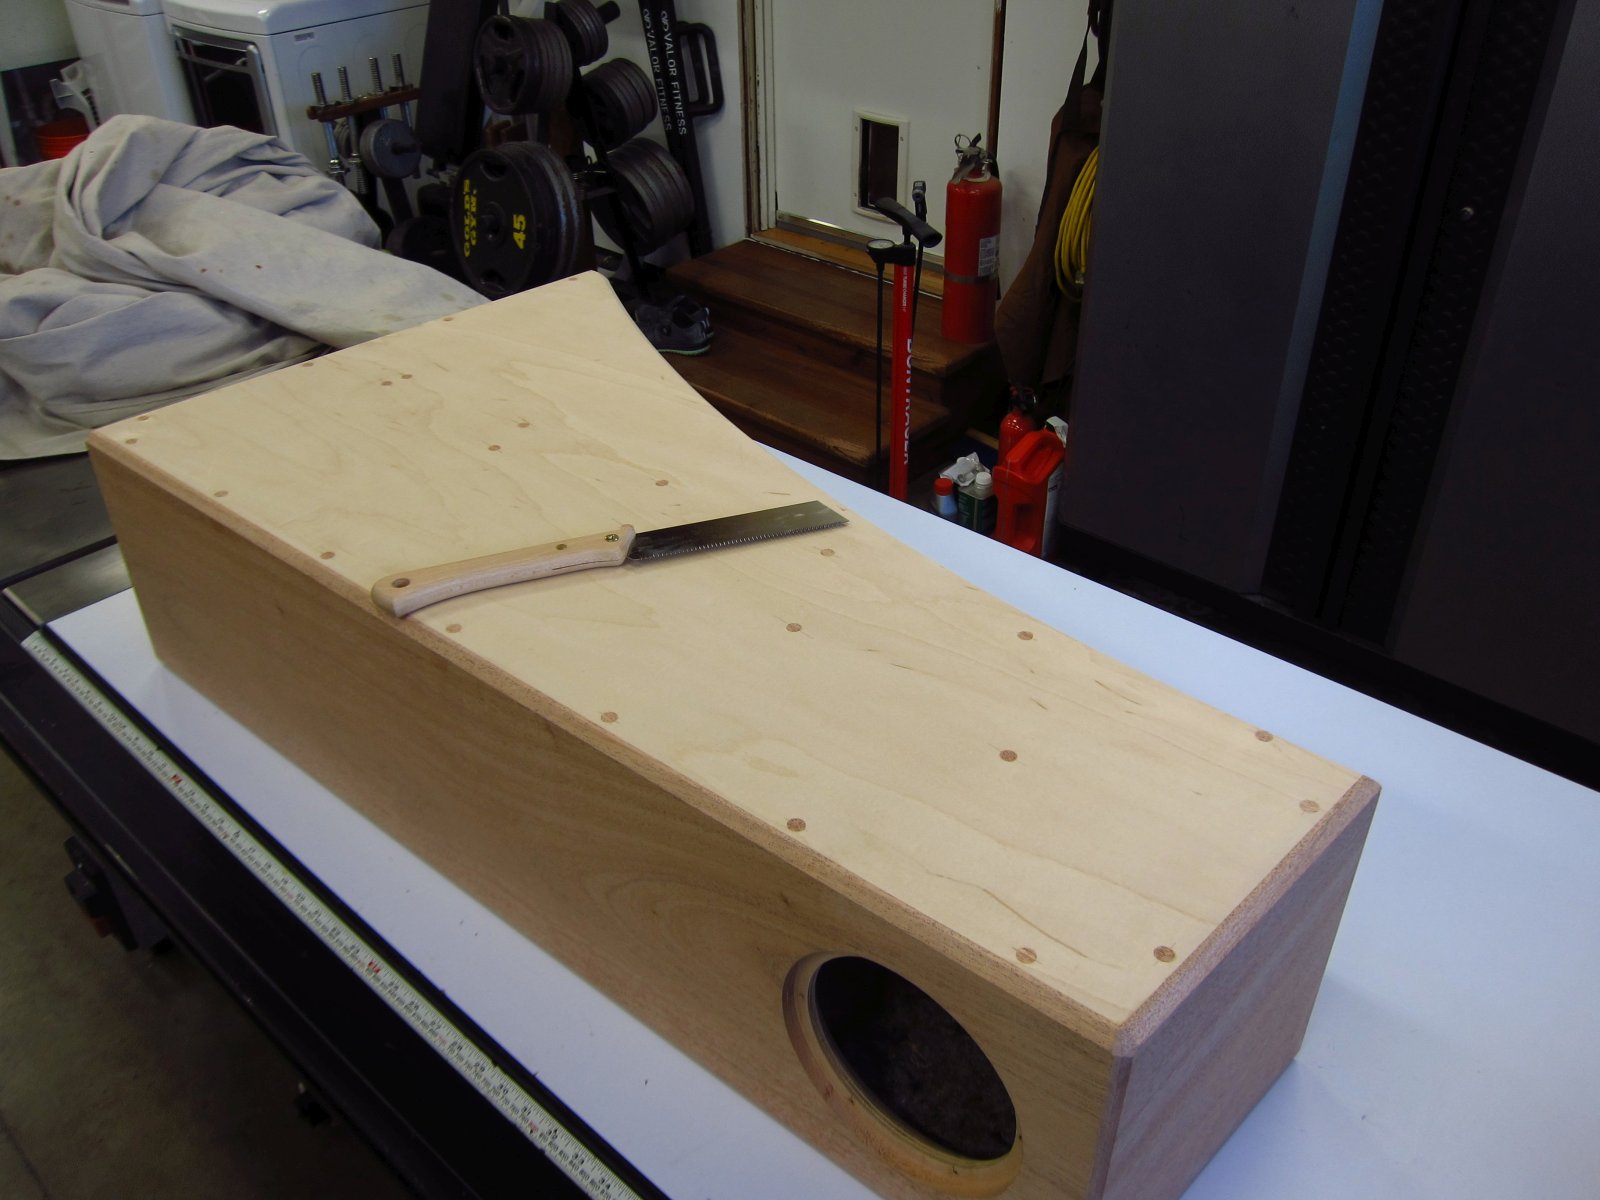
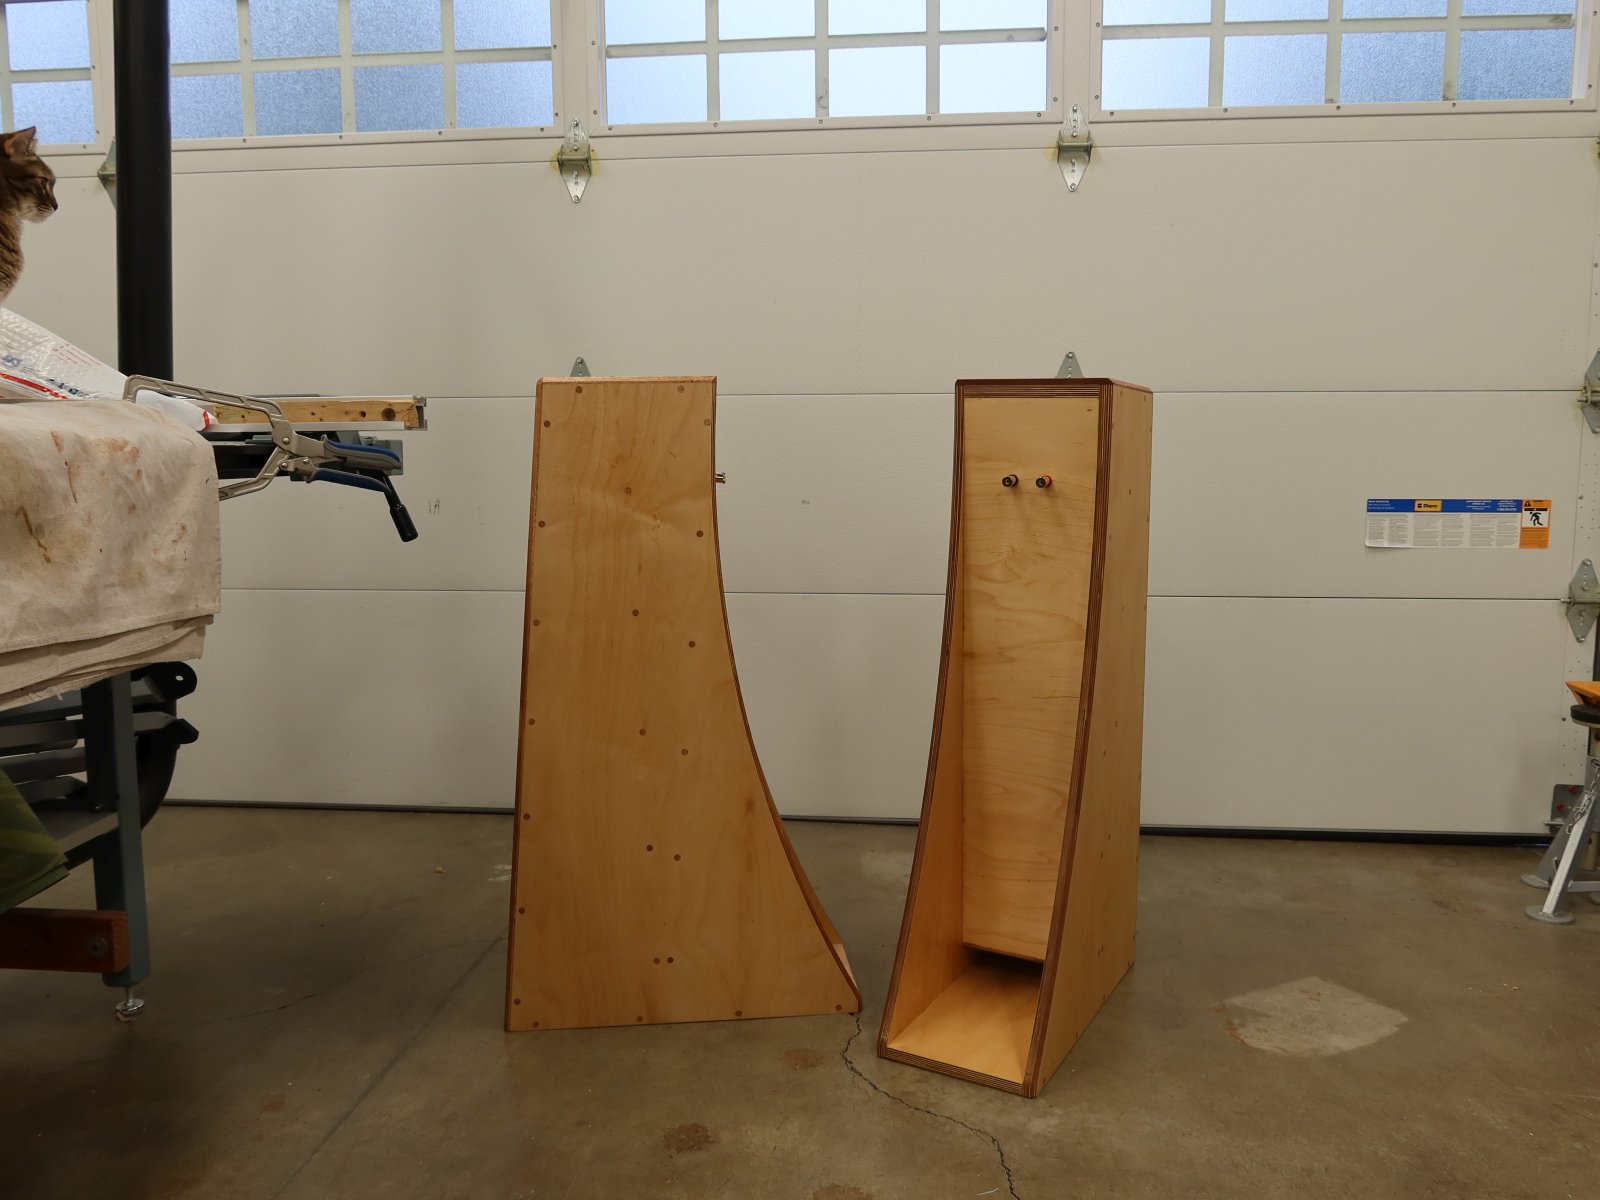
I pulled the unglued side panel off of the first speaker to remove the wax paper and give things a look. The wax paper worked exactly as desired to protect against the construction adhesive. Said construction adhesive also filled in the bottom of the throat section very nicely and should provide a great seal. You will note the amount of glue run-out, hence why I was careful to use less the second time around. I chipped a bunch of it out with a chisel.
http://www.e30tuner.com/speakerbuilding/images/fhxl_2021/fhxl_062.jpg
http://www.e30tuner.com/speakerbuilding/images/fhxl_2021/fhxl_063.jpg
http://www.e30tuner.com/speakerbuilding/images/fhxl_2021/fhxl_064.jpg

Test-fitting the felt pieces went well, and I just need to go get some spray adhesive to set it all into its final position.
http://www.e30tuner.com/speakerbuilding/images/fhxl_2021/fhxl_065.jpg
The pair is coming along nicely. 50% of the glue-up operations are done!
http://www.e30tuner.com/speakerbuilding/images/fhxl_2021/fhxl_067.jpg
Looking at the filler test piece from today, and comparing it to one from earlier in the week, it does look like the difference between maple and filler decreases a little as the oil finish cures. We'll see how things look on today's test piece by next week. As noted above, I will probably just suck it up and re-bore the screw head holes and fill them with some maple plugs. As usual, failures provide lessons.
http://www.e30tuner.com/speakerbuilding/images/fhxl_2021/fhxl_068.jpg
With all of this recent talk about filling and/or plugging the screw holes in the maple veneer on my ply, and from looking at where many of my audio compatriots in this thread are posting from, it occurs to me that my more civilized neighbors to the north might be experiencing distress at the thought of someone simply puttying some nice maple. Now, I will admit that my first instinct was to listen to the little voice in my head which was saying, "you dun go down to McDonalds for some fries and break them suckers off in there 'murcahhhhhhh", coupled with a strong compulsion to finish the enclosures with hamburger grease and gunpowder. Lord knows that McDonalds fries might be THE most long lasting solution, given that even bacteria won't touch them for an indefinite period of time. But, I already bathe with burger scented soap as part of maintaining my right to vote, and I probably don't need my speakers to smell the same as I do, so I figure I will use the Watco Tung Oil finish.
[/friday night humor]
As for the screw holes, I am increasingly leaning toward plugging them with maple to make them nearly invisible. I have 96 holes to deal with, which really isn't that bad. I ran some experiments with my 1/4" forstner bit (Freud "Precision Shear") and it sure makes a flawless bore. So, I can get the enclosures fixed up on my drill press and scoot them around to counterbore all of the screw holes, tap in some maple plugs, flush trim them, sand and then finish as usual. I will order up some plugs and do some experiments in scraps to determine if I think that I can do this consistently 96 times lol.
Here is an account of the progress that I made this evening.
I got the first side glued into place on the second enclosure. This time I used a lot less glue and had very little cleanup to do. If anything, I might have overcorrected and not used quite enough. Whatever, it is thoroughly screwed together and there was enough squeeze-out in most places to indicate that it is fine.
http://www.e30tuner.com/speakerbuilding/images/fhxl_2021/fhxl_057.jpg
I also cut out all of my felt liner pieces. KJF provided...a more-than-big-enough sheet. It makes a bit of a dusty mess, so once I get the pieces fully glued into place I will give their exposed faces a thorough vacuuming with my vac's brush attachment.
http://www.e30tuner.com/speakerbuilding/images/fhxl_2021/fhxl_058.jpg
To make things simple, I printed out the template for the side pieces, cut it out from the paper, laid it onto the rough rectangular pieces and used some left over orange spray paint to clearly mark the off-cut areas. Laziness level: High. After doing other things for an hour, the paint was dry and I used some heavy scissors to cut out the desired shapes,
http://www.e30tuner.com/speakerbuilding/images/fhxl_2021/fhxl_059.jpg
http://www.e30tuner.com/speakerbuilding/images/fhxl_2021/fhxl_066.jpg
I picked up two more wood fillers to try out as well. With no finish, the Minwax product was nearly invisible and I got my hopes up. Yes, there are 16 holes here, with 2 different fillers.
http://www.e30tuner.com/speakerbuilding/images/fhxl_2021/fhxl_060.jpg
As predicted by another member, applying some Tung Oil finish created a comically bad mismatch between the wood and filler. Now, I will give this a few days to cure since some of the effect will diminish, but I don't expect things to be as good as they were unfinished.
http://www.e30tuner.com/speakerbuilding/images/fhxl_2021/fhxl_061.jpg
I pulled the unglued side panel off of the first speaker to remove the wax paper and give things a look. The wax paper worked exactly as desired to protect against the construction adhesive. Said construction adhesive also filled in the bottom of the throat section very nicely and should provide a great seal. You will note the amount of glue run-out, hence why I was careful to use less the second time around. I chipped a bunch of it out with a chisel.
http://www.e30tuner.com/speakerbuilding/images/fhxl_2021/fhxl_062.jpg
http://www.e30tuner.com/speakerbuilding/images/fhxl_2021/fhxl_063.jpg
http://www.e30tuner.com/speakerbuilding/images/fhxl_2021/fhxl_064.jpg
Test-fitting the felt pieces went well, and I just need to go get some spray adhesive to set it all into its final position.
http://www.e30tuner.com/speakerbuilding/images/fhxl_2021/fhxl_065.jpg
The pair is coming along nicely. 50% of the glue-up operations are done!
http://www.e30tuner.com/speakerbuilding/images/fhxl_2021/fhxl_067.jpg
Looking at the filler test piece from today, and comparing it to one from earlier in the week, it does look like the difference between maple and filler decreases a little as the oil finish cures. We'll see how things look on today's test piece by next week. As noted above, I will probably just suck it up and re-bore the screw head holes and fill them with some maple plugs. As usual, failures provide lessons.
http://www.e30tuner.com/speakerbuilding/images/fhxl_2021/fhxl_068.jpg
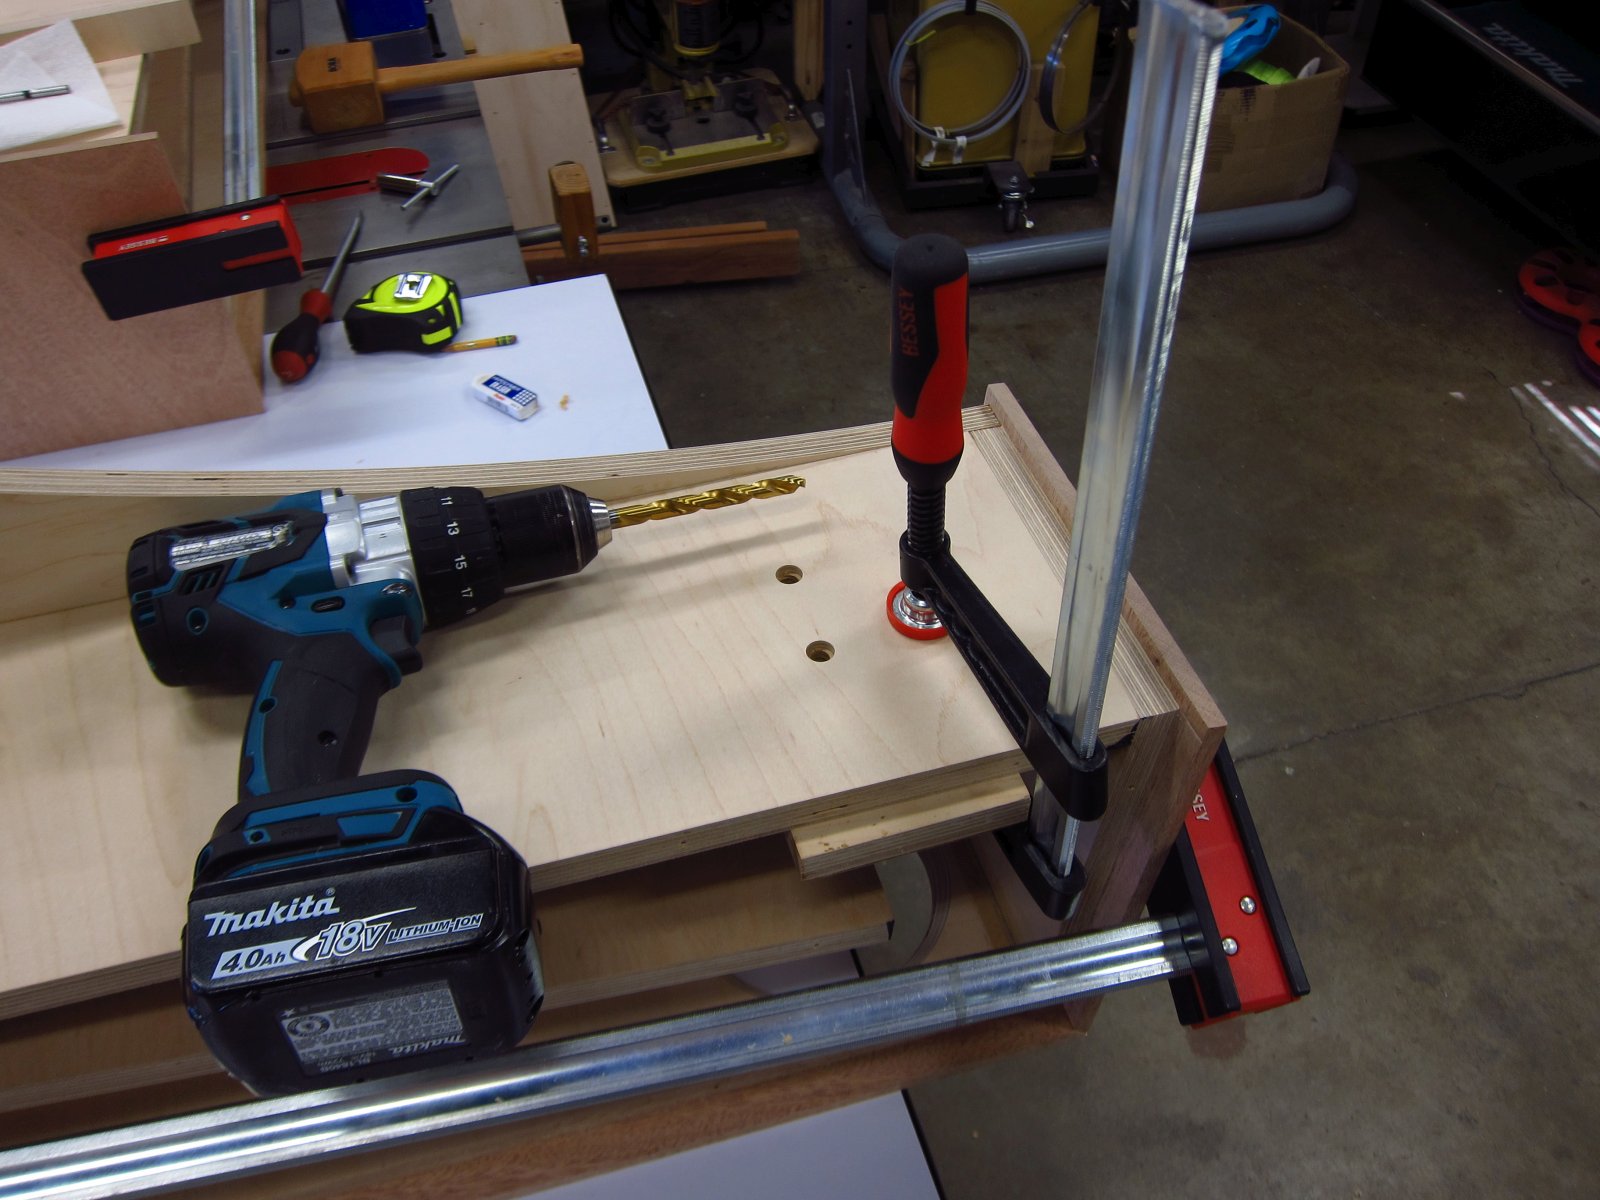
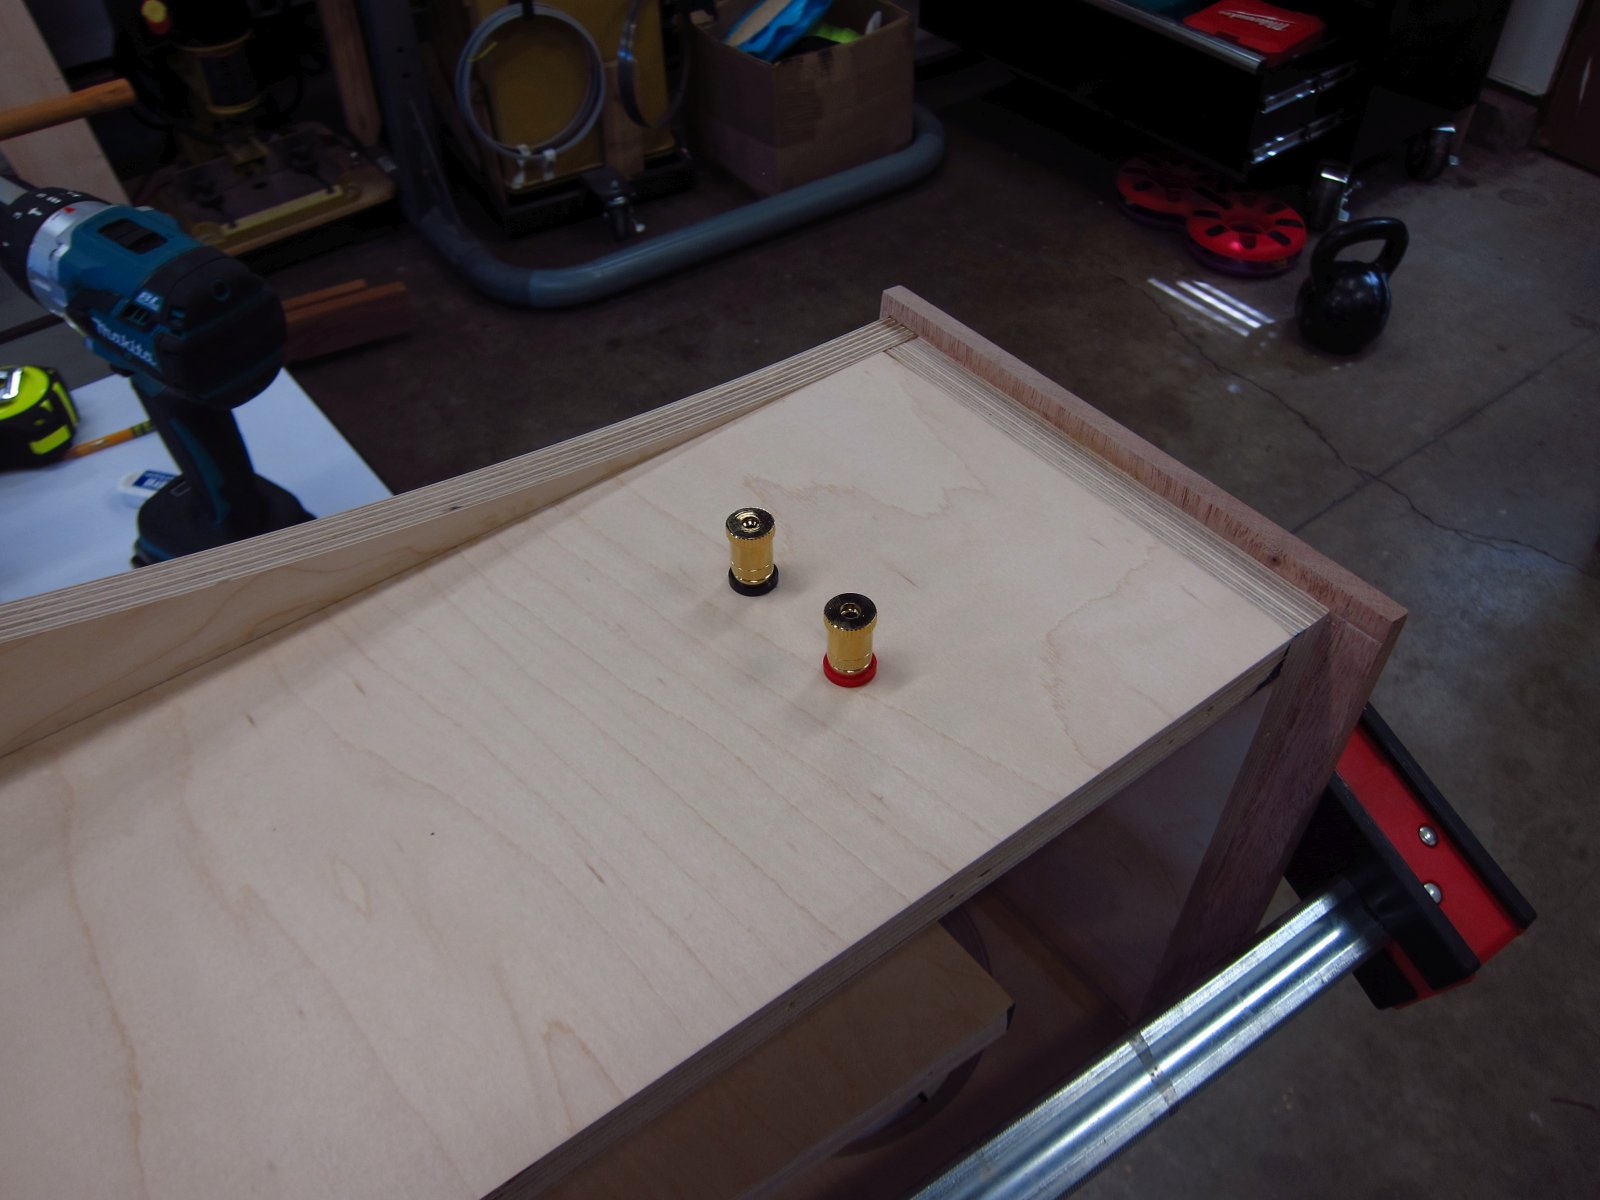
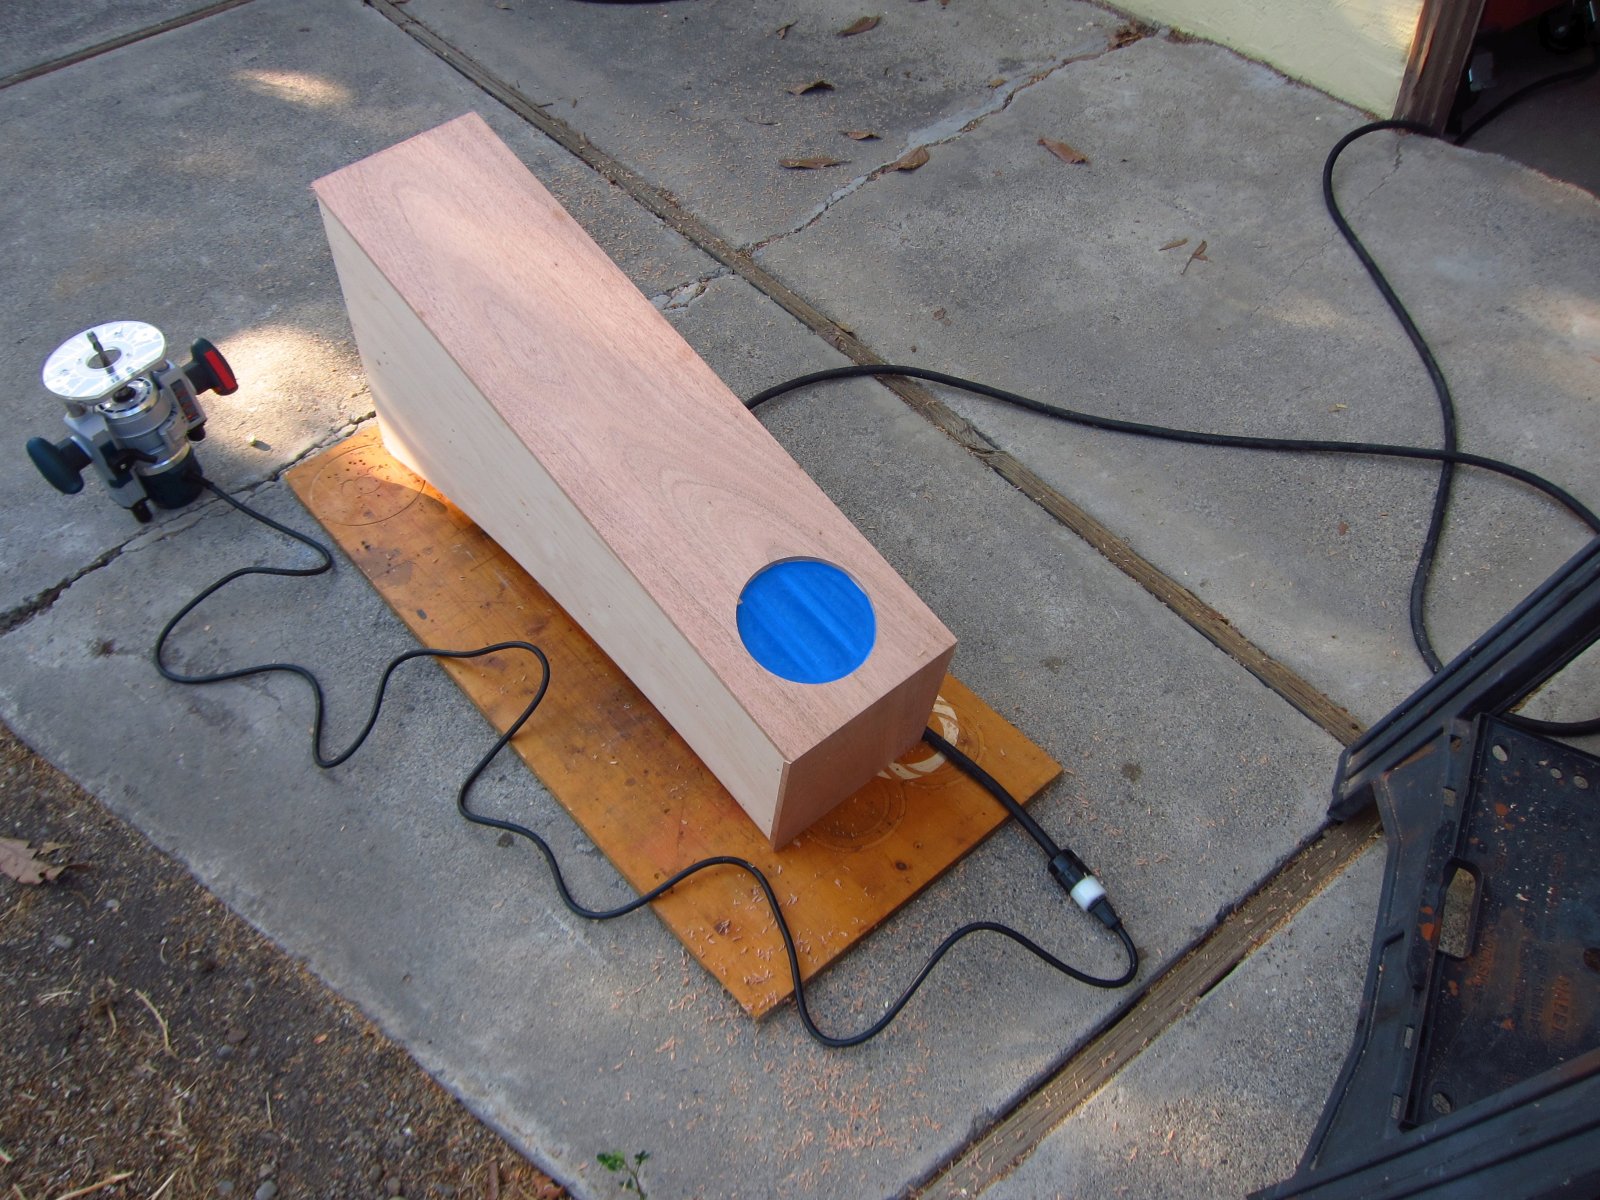
Today saw a great deal of progress. There were a number of things that I wanted to do prior to gluing on the second side panel to each enclosure. First, I ran little fillets along the side-to-side joints using the extra construction adhesive I had left over. Next, I bored the holes for my binding posts. The counterbore was made with a 1/2" forstner bit.
http://www.e30tuner.com/speakerbuilding/images/fhxl_2021/fhxl_069.jpg
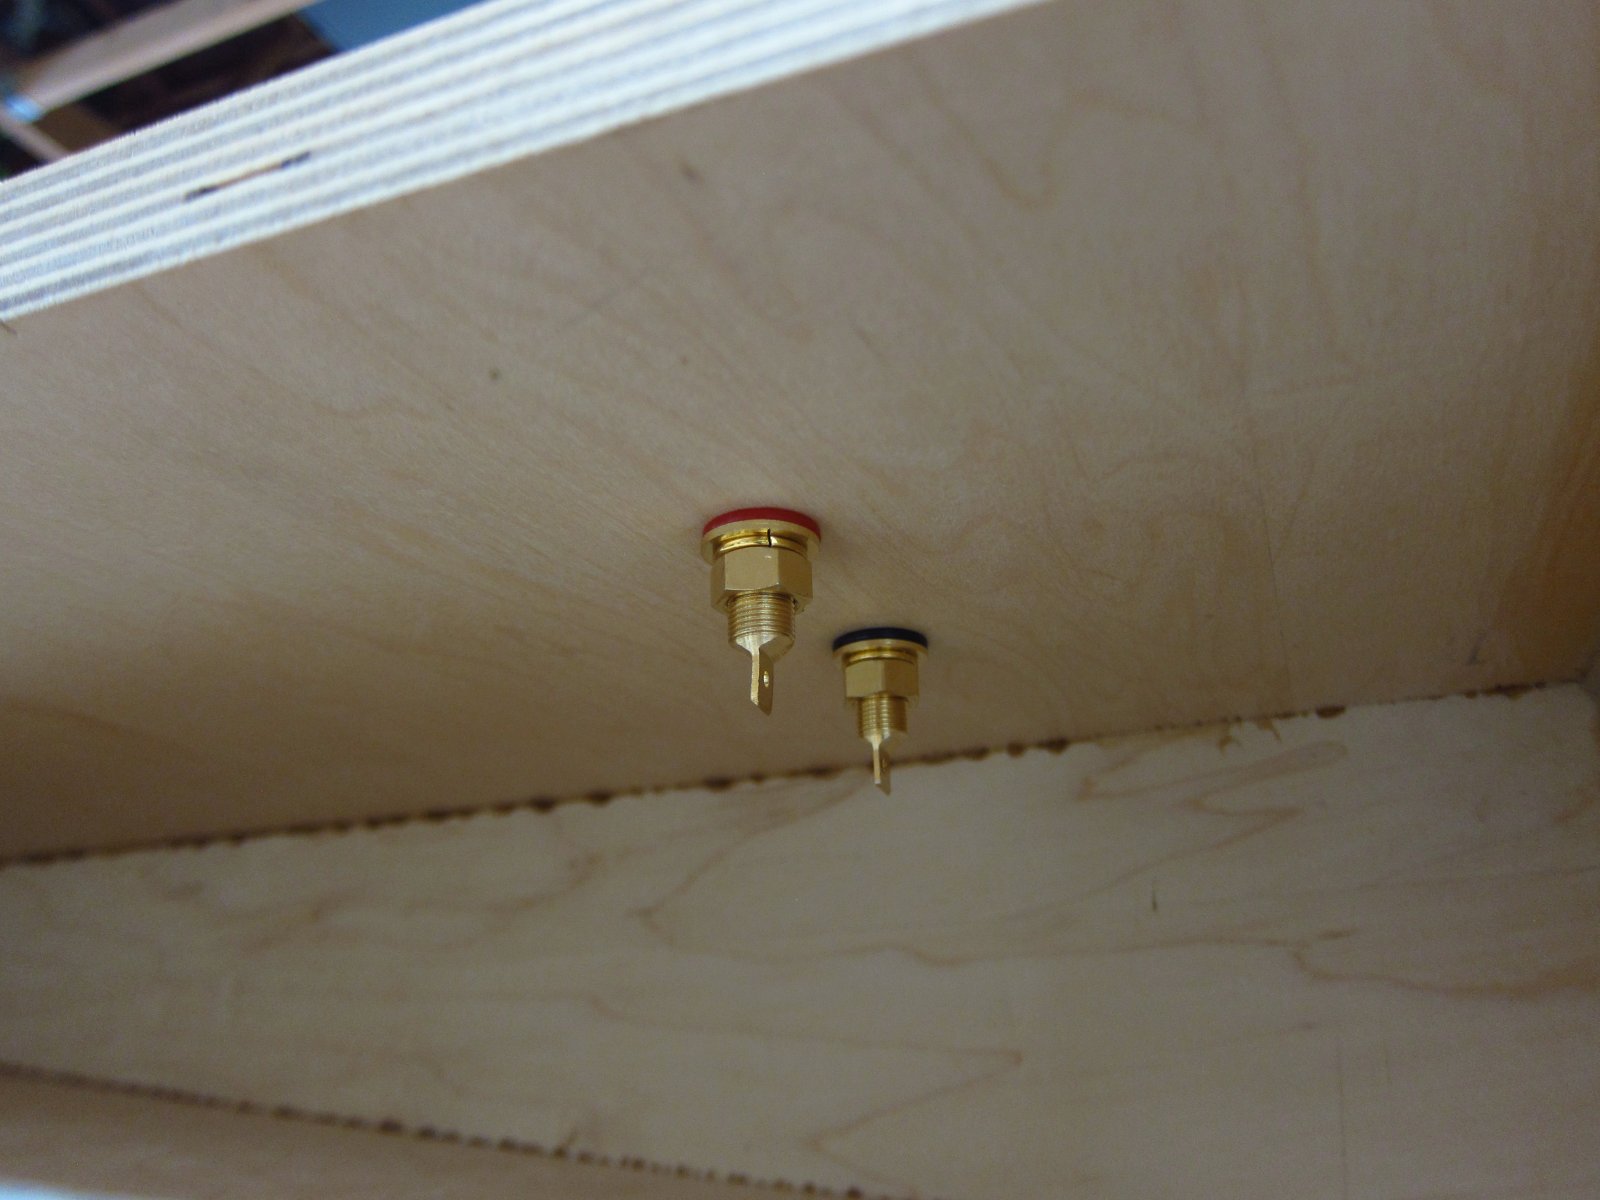
I then drilled the rest of the way through, clamping a scrap on the underside as backup. Doing it this way eliminates chip-out, which is otherwise a very common thing with twist drills.
http://www.e30tuner.com/speakerbuilding/images/fhxl_2021/fhxl_070.jpg
http://www.e30tuner.com/speakerbuilding/images/fhxl_2021/fhxl_071.jpg

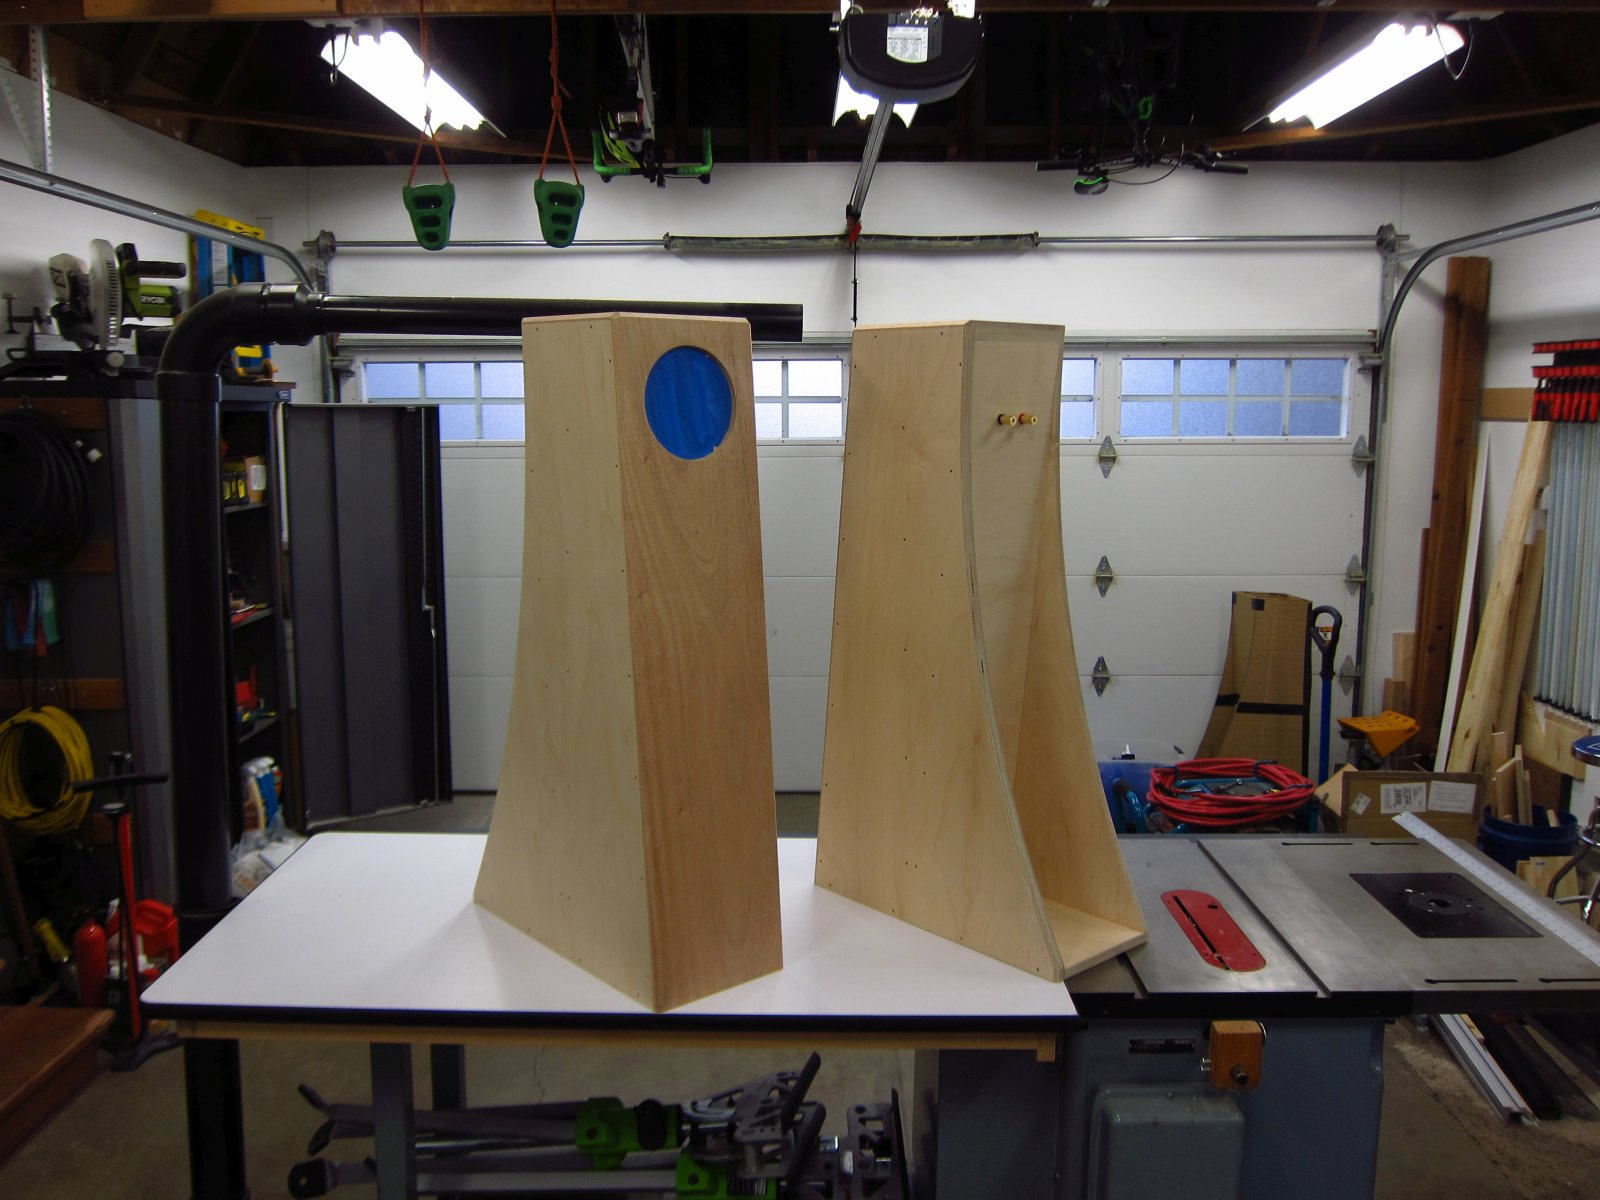
With that done, I installed the posts.
http://www.e30tuner.com/speakerbuilding/images/fhxl_2021/fhxl_072.jpg
http://www.e30tuner.com/speakerbuilding/images/fhxl_2021/fhxl_073.jpg
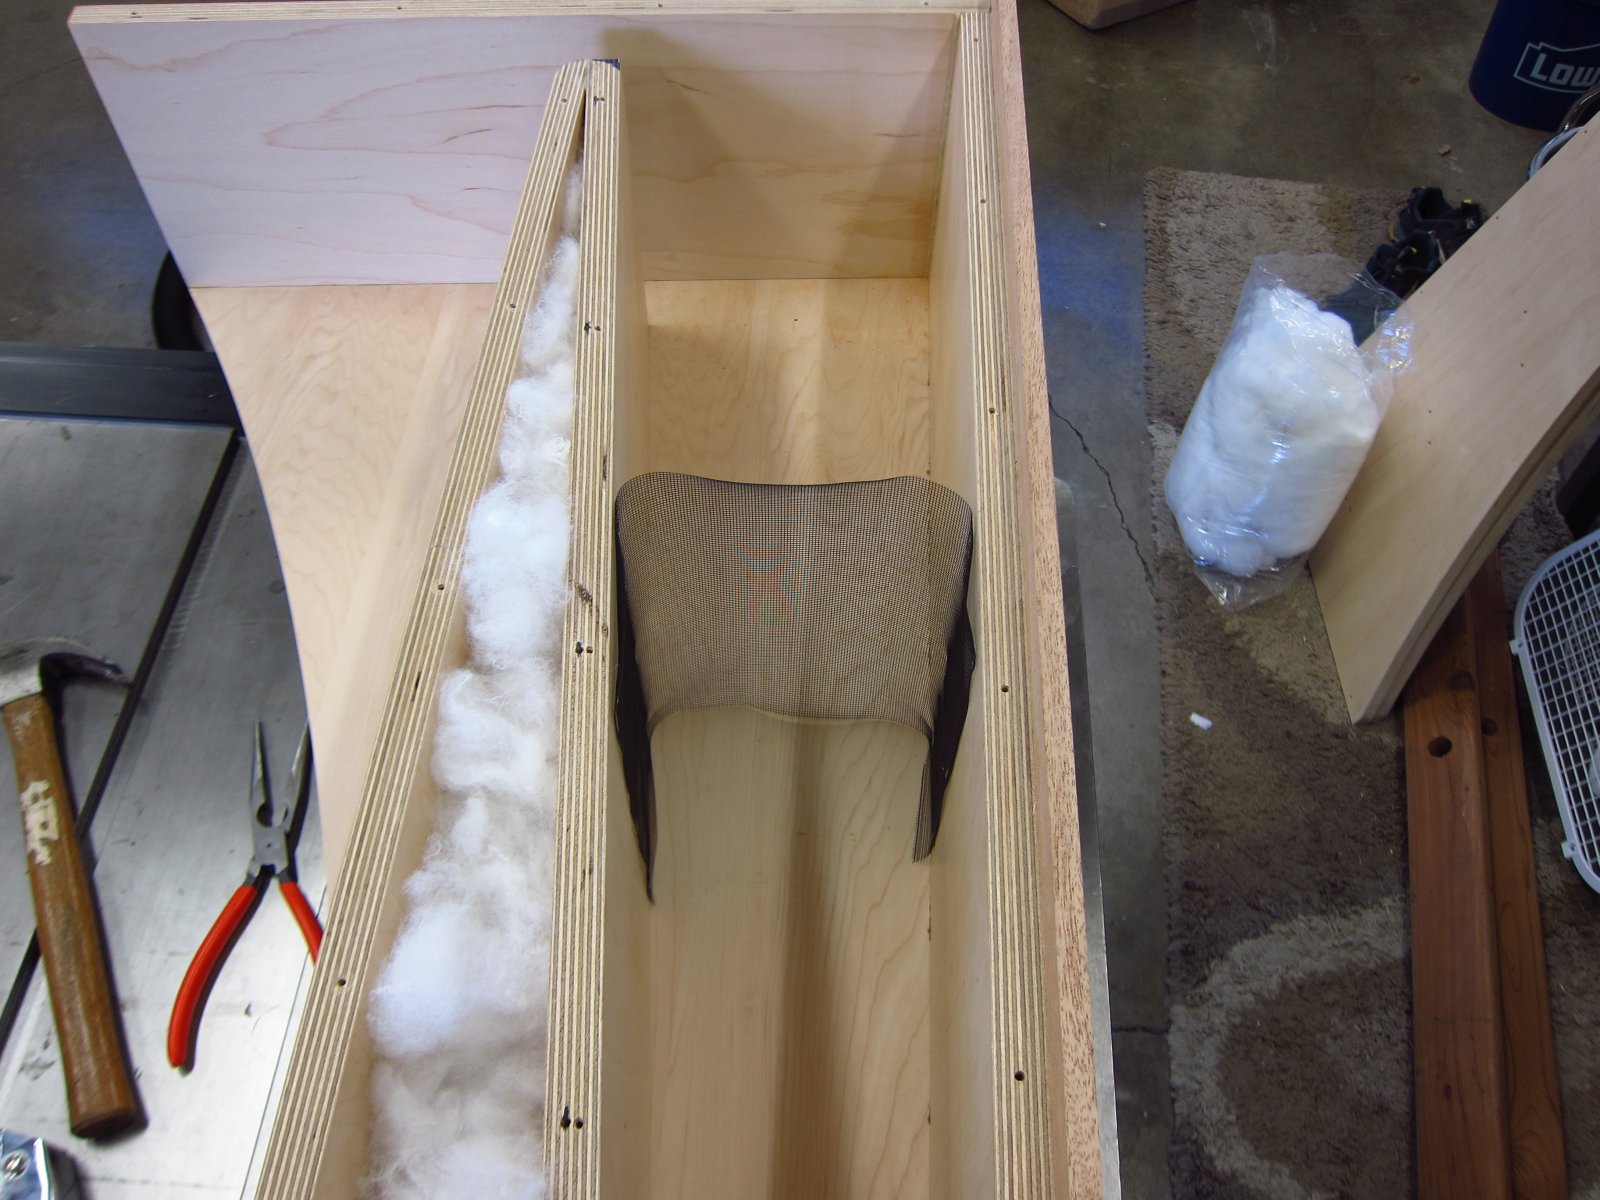
The next order of business was to get the 1/2" felt sheets into place. I applied a few coats of 3M high strength spray adhesive to the pieces, let it get tacky, and then placed the them. In addition to the adhesive, I also ran some heavy staples with my staple gun, just as backup near a couple of the edges. It compresses the material, which is undesirable, but I also don't ever want to have to mess around with them coming loose. The 3M spray adhesive is OK, but compared to stuff I used to use for car upholstery and whatnot, it is not all that strong. I think that the stuff that I used to use got banned...it definitely smelled like dead brain cells, but hot damn it worked well.
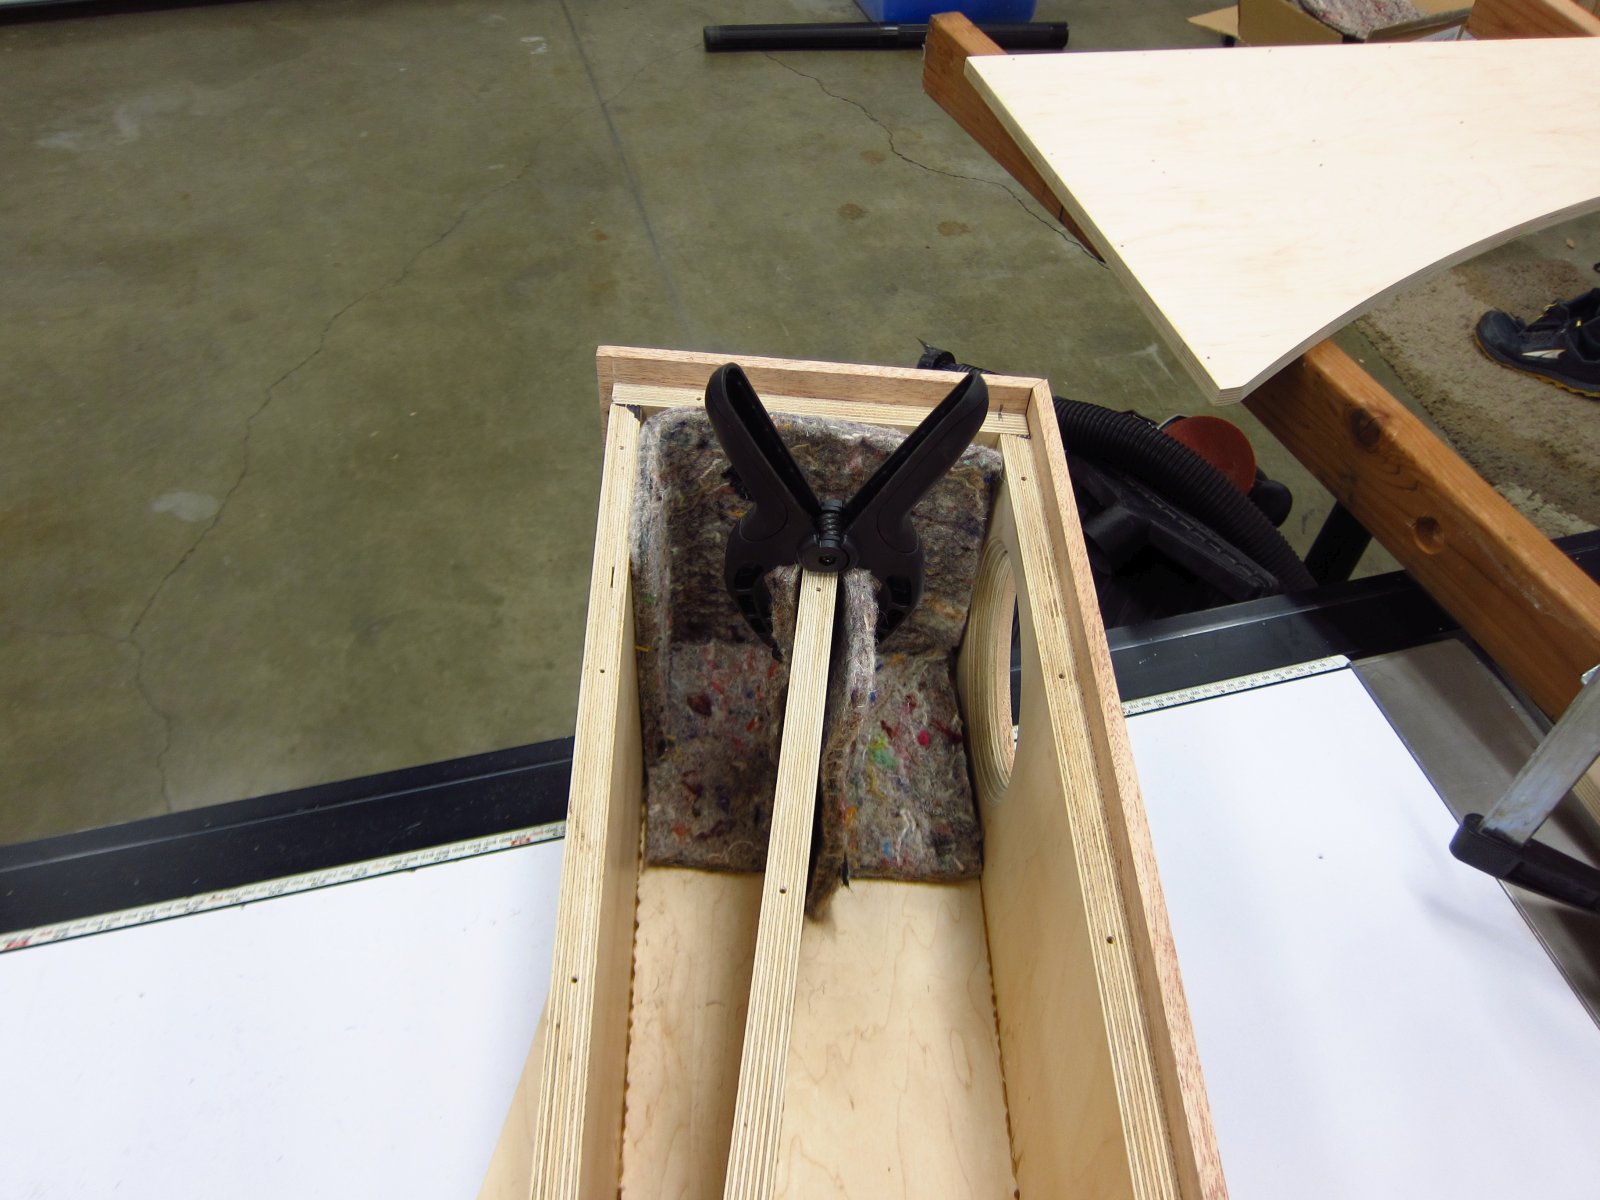
The only tricky piece was the one that wrapped around the middle. I used some scraps and little hand clamps to help set up the bond.
http://www.e30tuner.com/speakerbuilding/images/fhxl_2021/fhxl_074.jpg
For the felt piece that was to go onto the as-yet-unglued side, I sprayed it and set it loosely inside the enclosure, letting friction hold it up. I then placed the side and reached in through the driver opening to press it up into place. Nice and simple.
http://www.e30tuner.com/speakerbuilding/images/fhxl_2021/fhxl_075.jpg
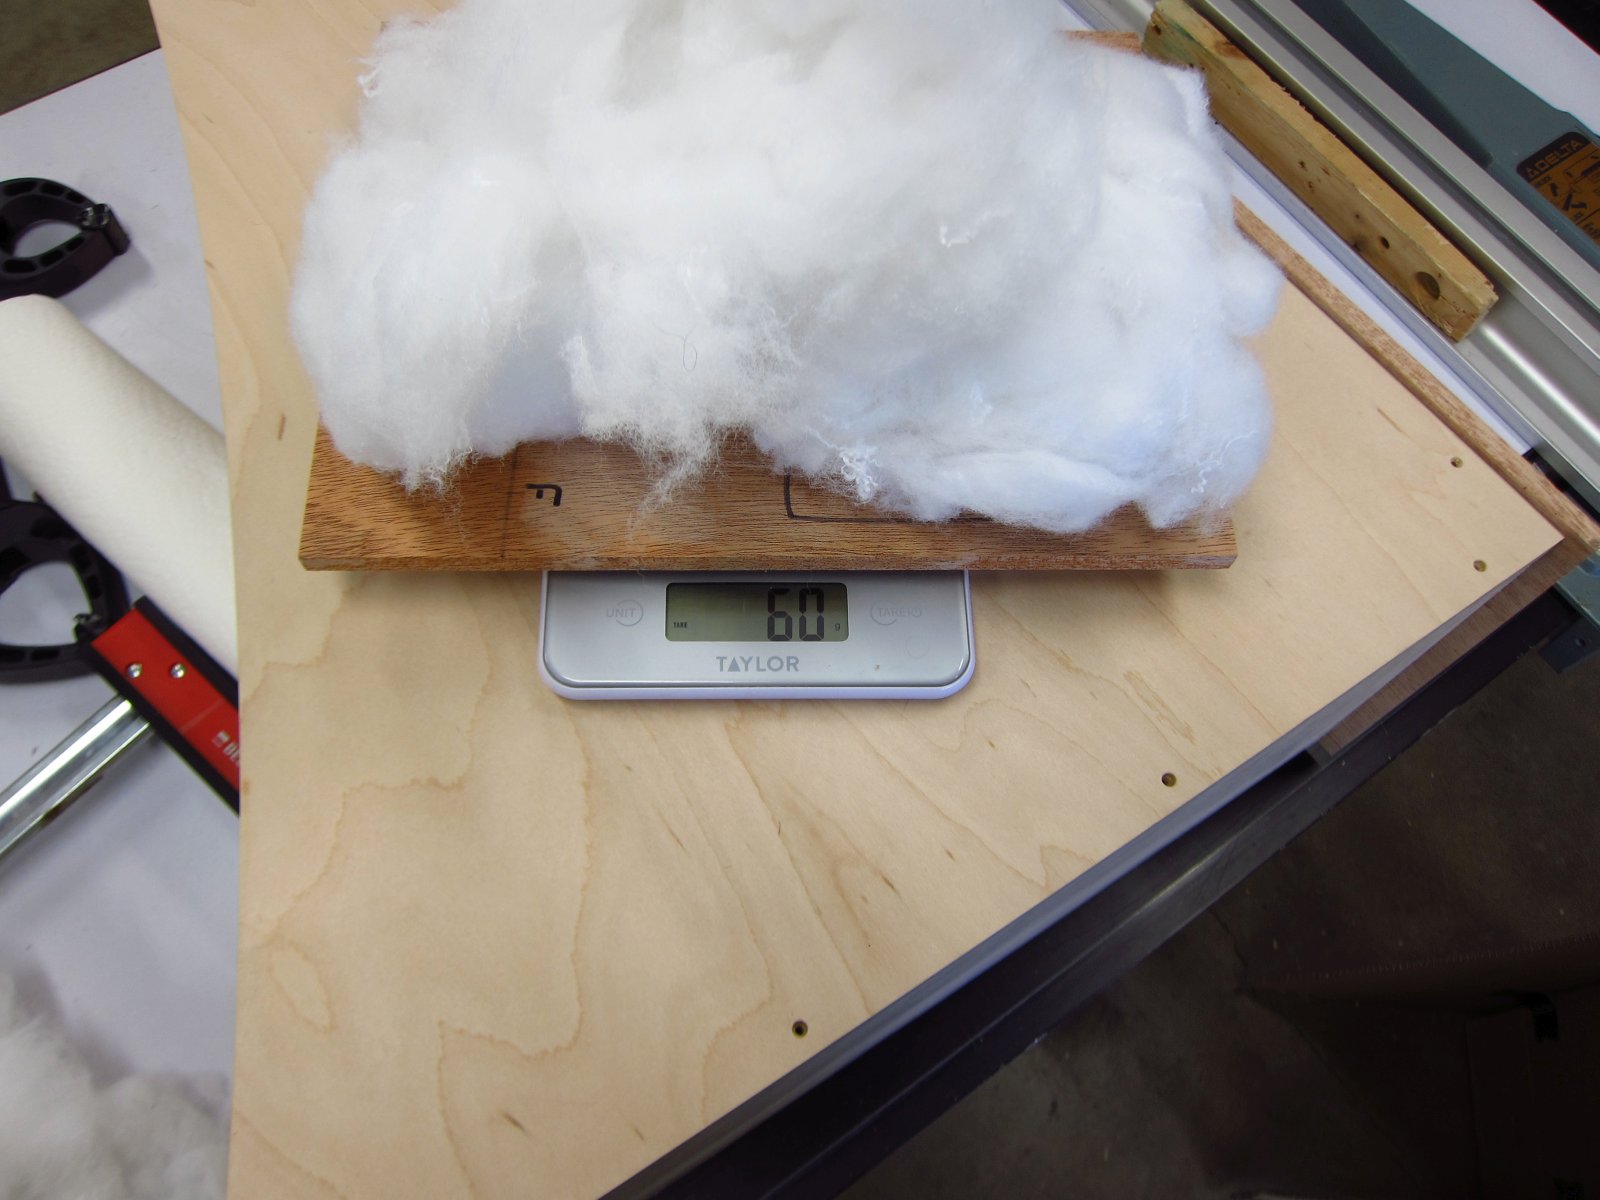
The next task was to get the initial quantities of poly-stuff measured and prepared. I put 60g into the throat (rear wedge) and 40g into the section below the driver.
http://www.e30tuner.com/speakerbuilding/images/fhxl_2021/fhxl_076.jpg
I spent a few minutes "fluffing" the stuffing and then placed it, but in the back of my mind I knew that I had not put in the proper amount of effort to prep the stuffing.
http://www.e30tuner.com/speakerbuilding/images/fhxl_2021/fhxl_077.jpg
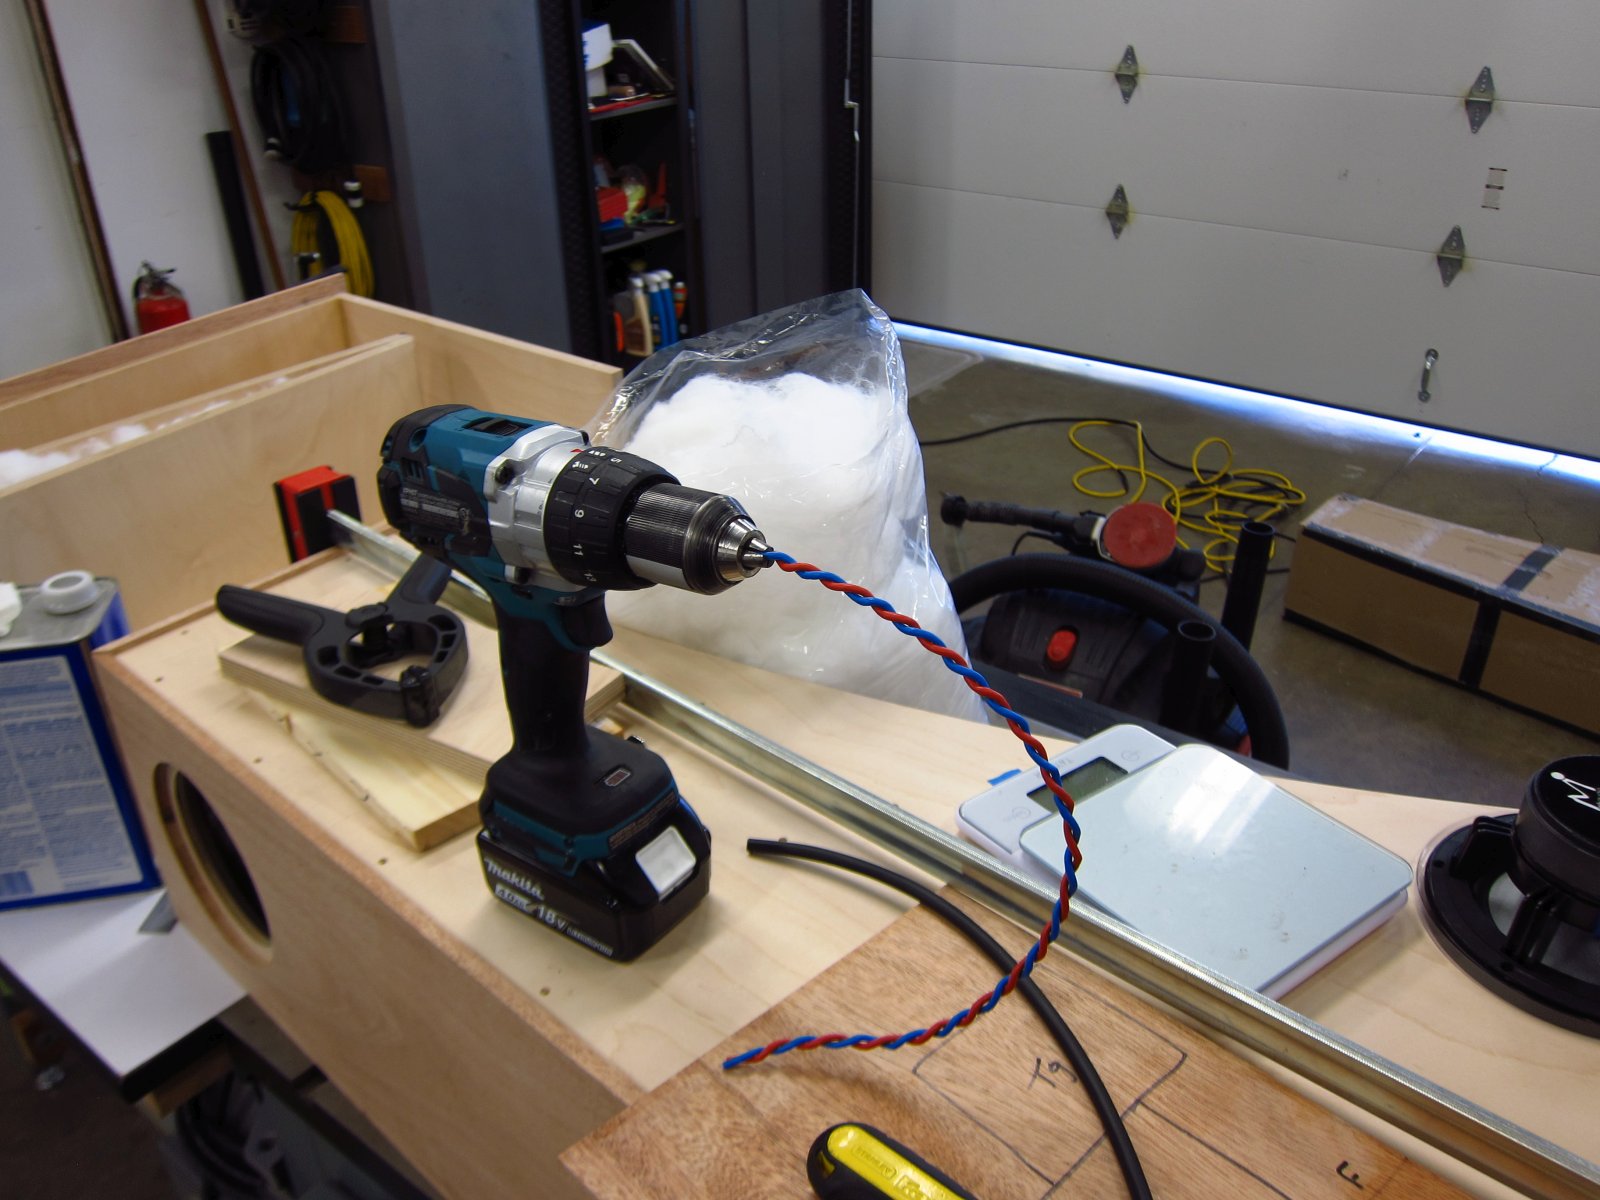
I also prepped the internal wires that will connect the driver to the binding posts. I stripped the sheath off of 18" of the speaker cable that I will be using to connect these to the amplifier and used my drill to twist them together. This is a little trick that I have been using for a very long time and it works pretty well for just about any length of wire. The speaker wire conductors are 2.5mm^2.
http://www.e30tuner.com/speakerbuilding/images/fhxl_2021/fhxl_080.jpg

http://www.e30tuner.com/speakerbuilding/images/fhxl_2021/fhxl_081.jpg
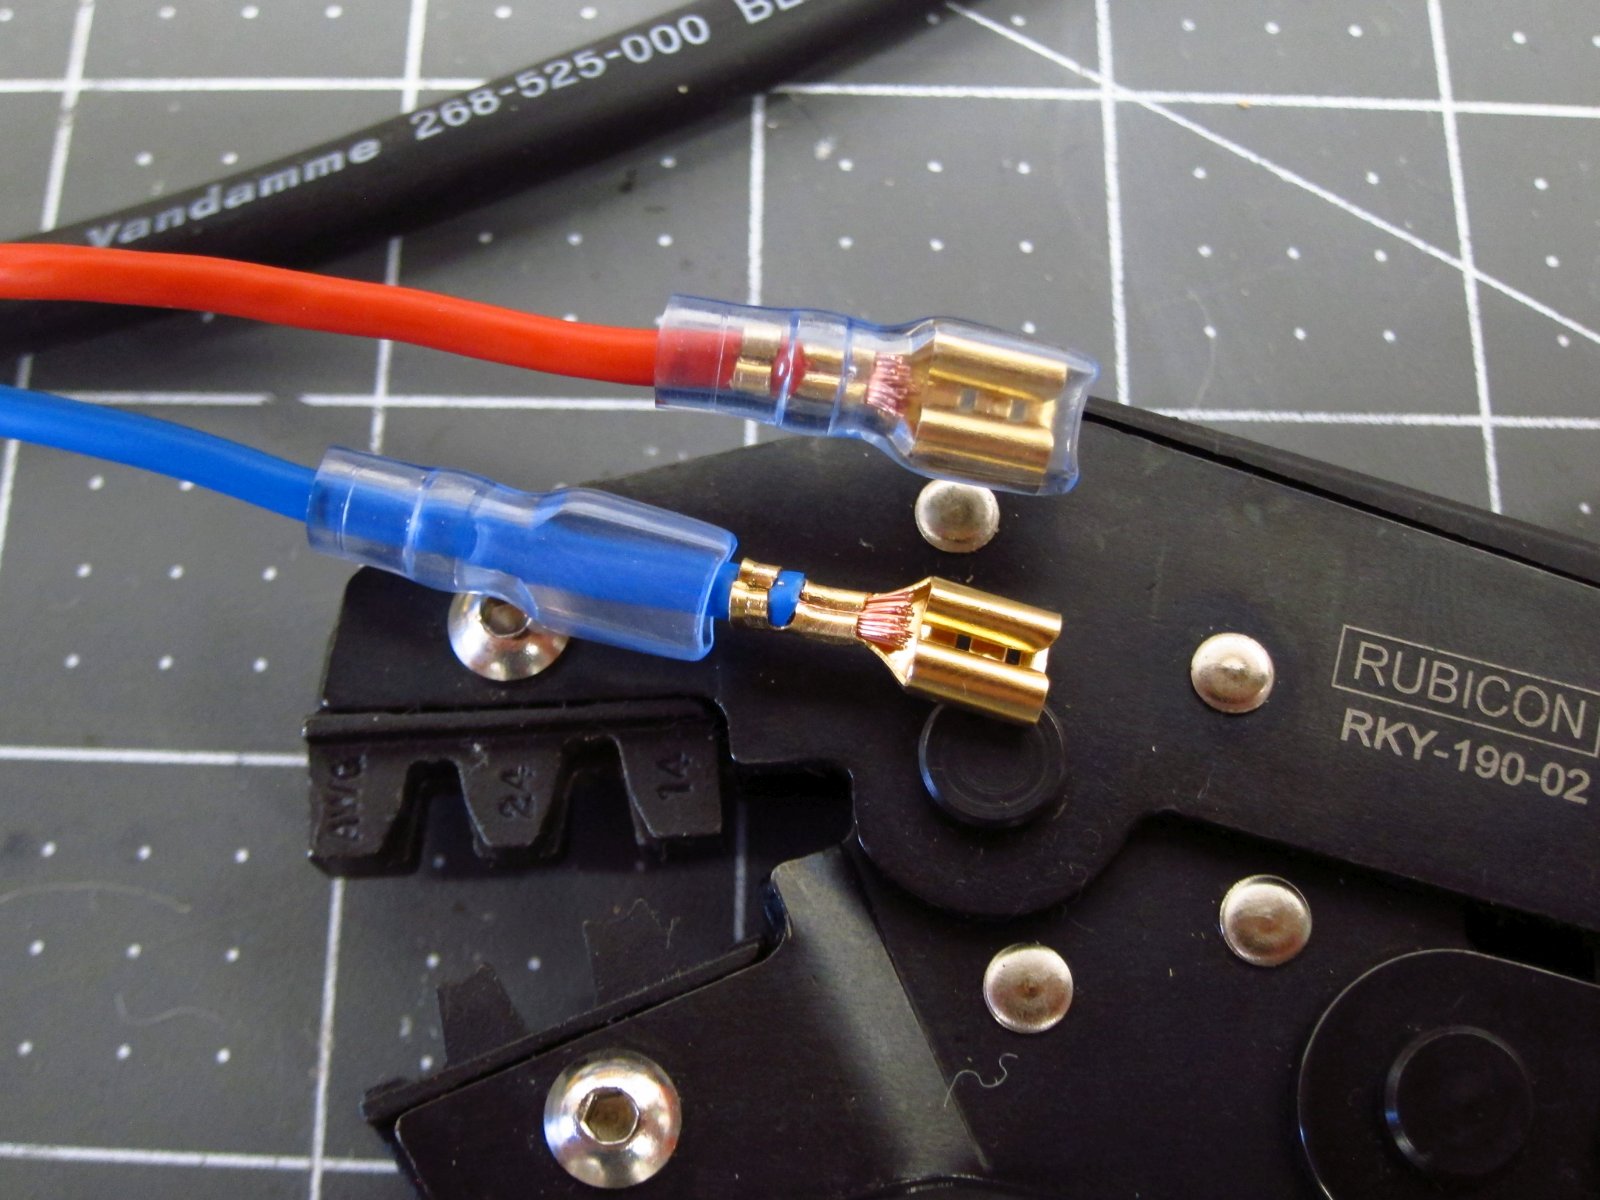
Next, I used my ratcheting open barrel terminal crimpers to set the spade receptacles onto the ends. I've done a lot of automotive wire harness work over the last decade (engine harnesses, chassis harnesses, audio systems, etc.) so thankfully I have the proper tools for this type of terminal.
http://www.e30tuner.com/speakerbuilding/images/fhxl_2021/fhxl_078.jpg
http://www.e30tuner.com/speakerbuilding/images/fhxl_2021/fhxl_079.jpg
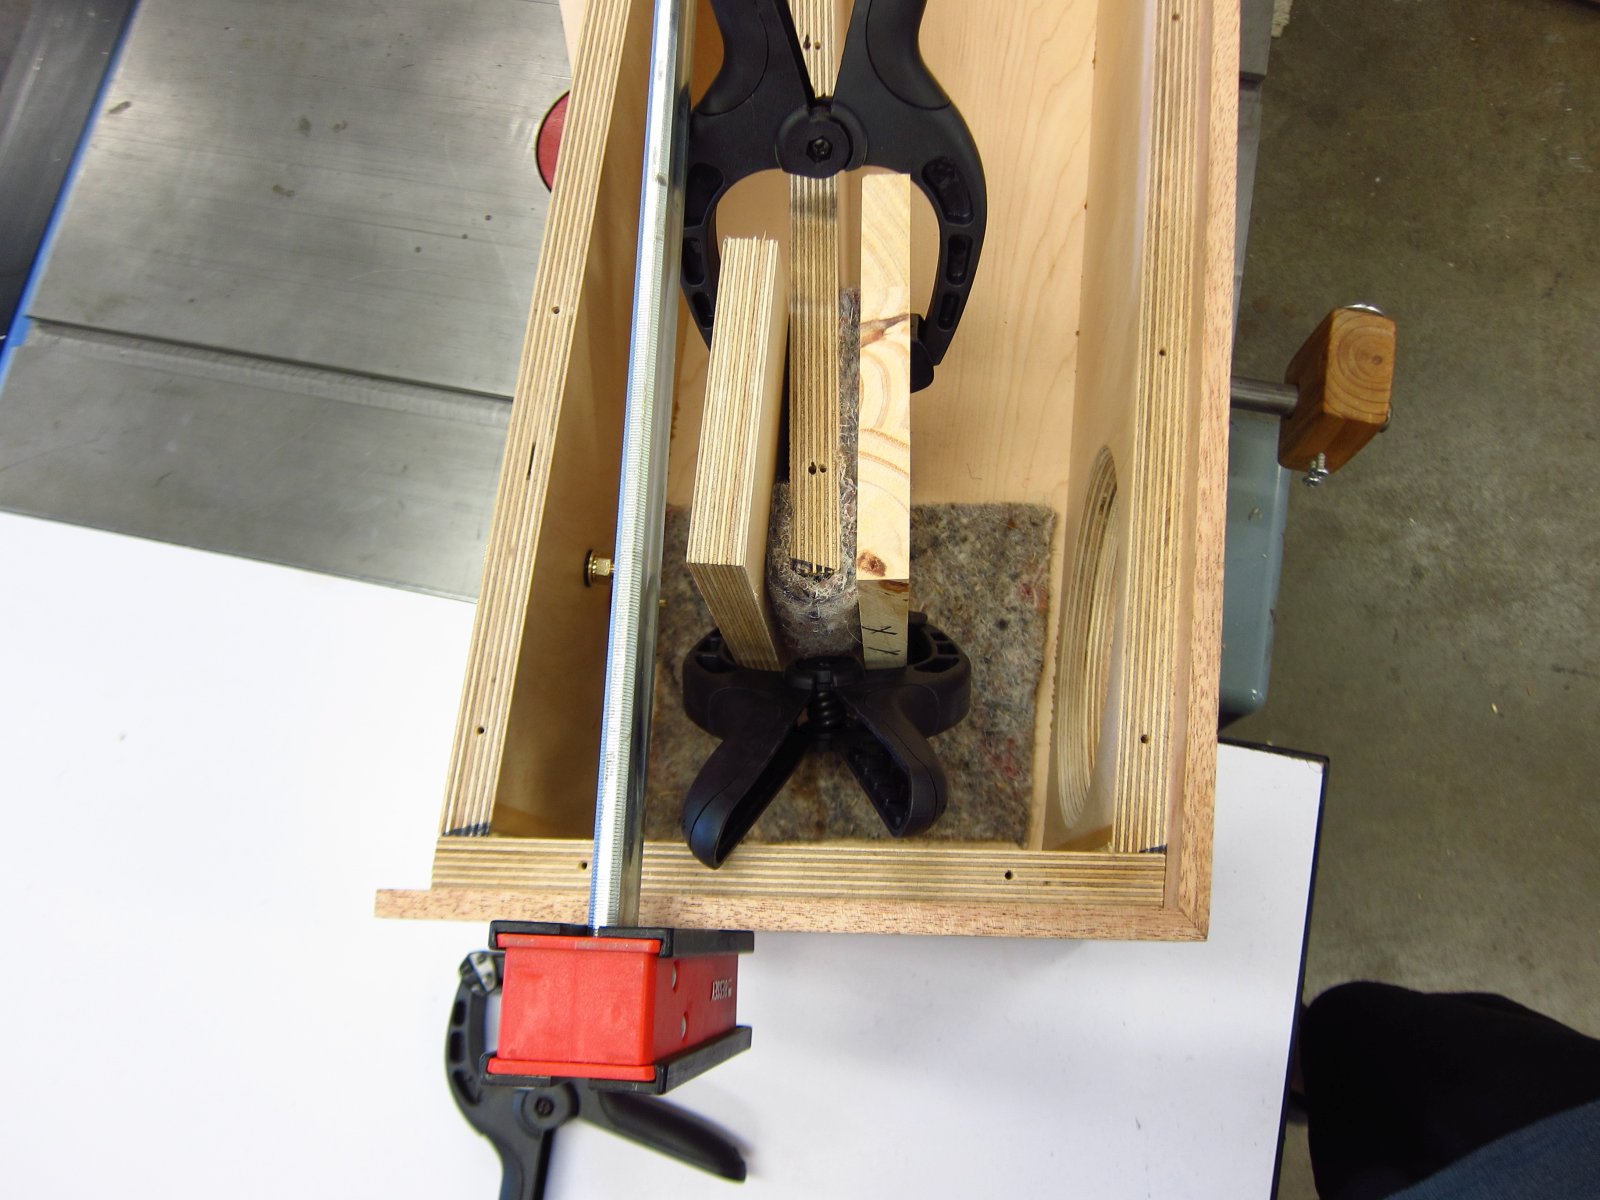
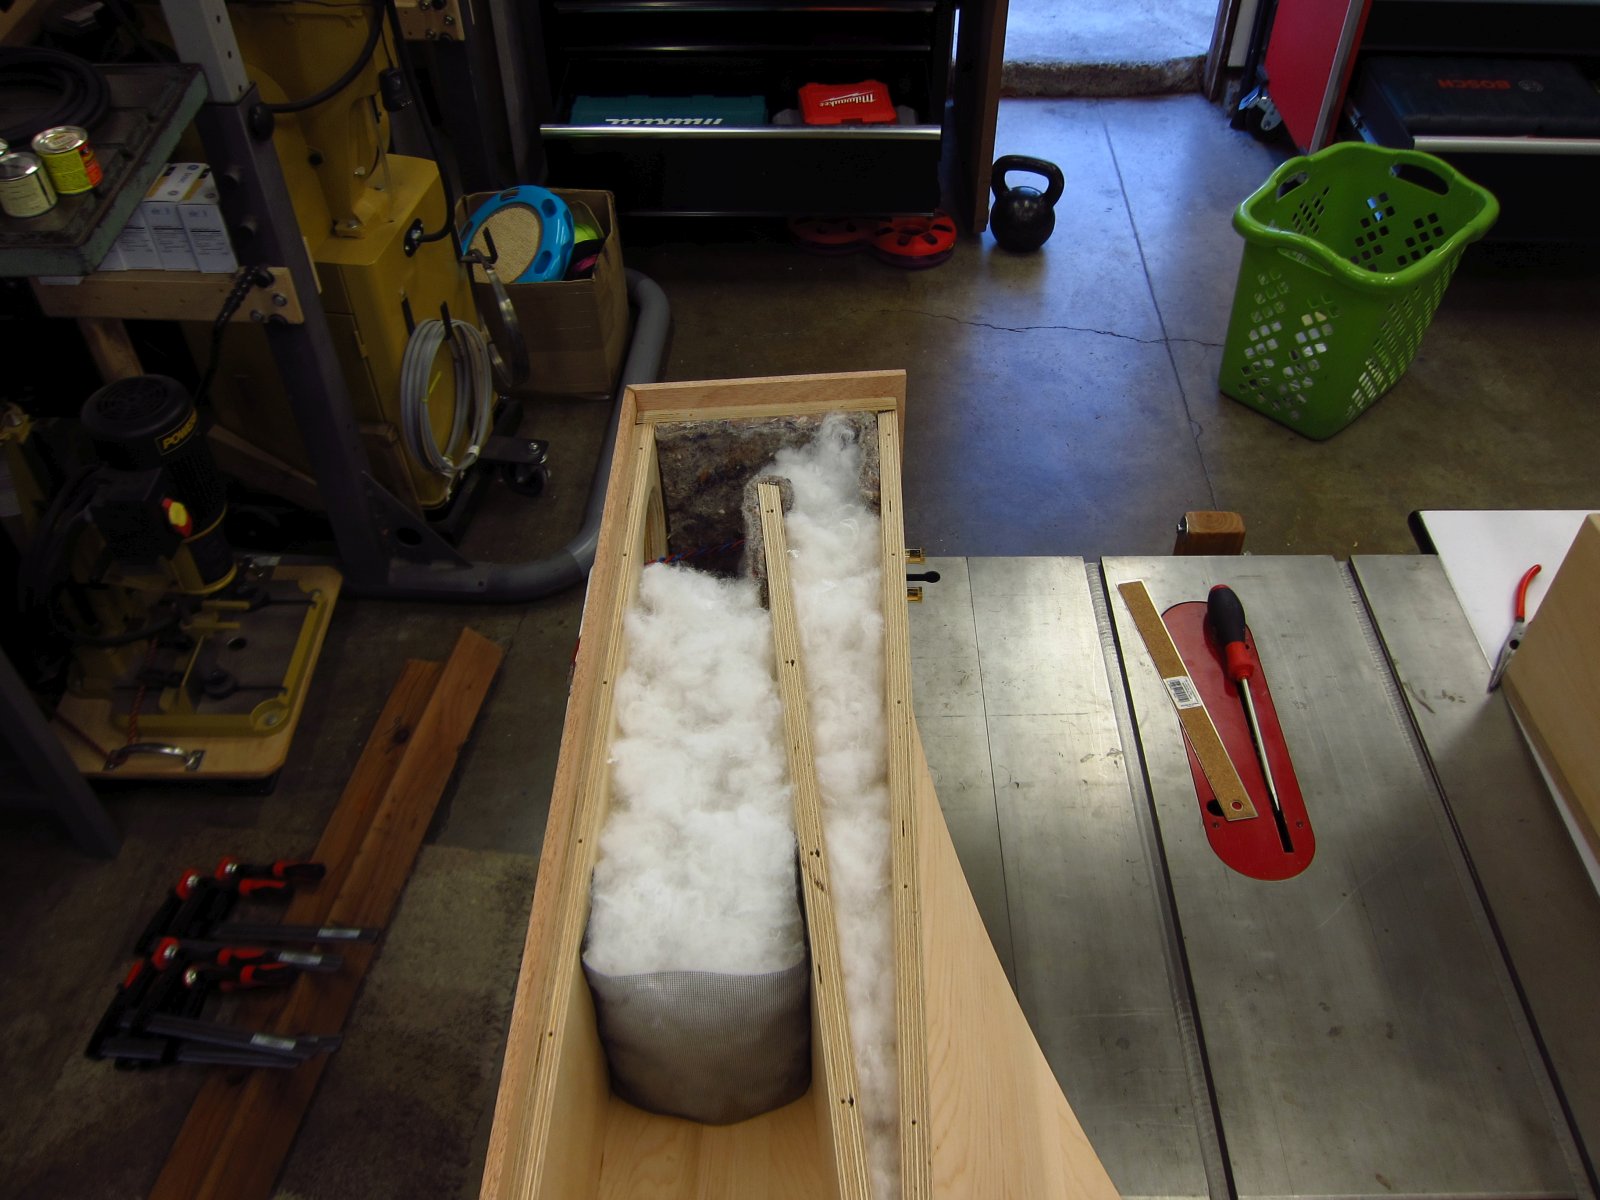
For the poly-stuff that goes below the driver, I needed a way to keep it from falling down. Some extra screen door mesh was exactly the right thing!
http://www.e30tuner.com/speakerbuilding/images/fhxl_2021/fhxl_082.jpg
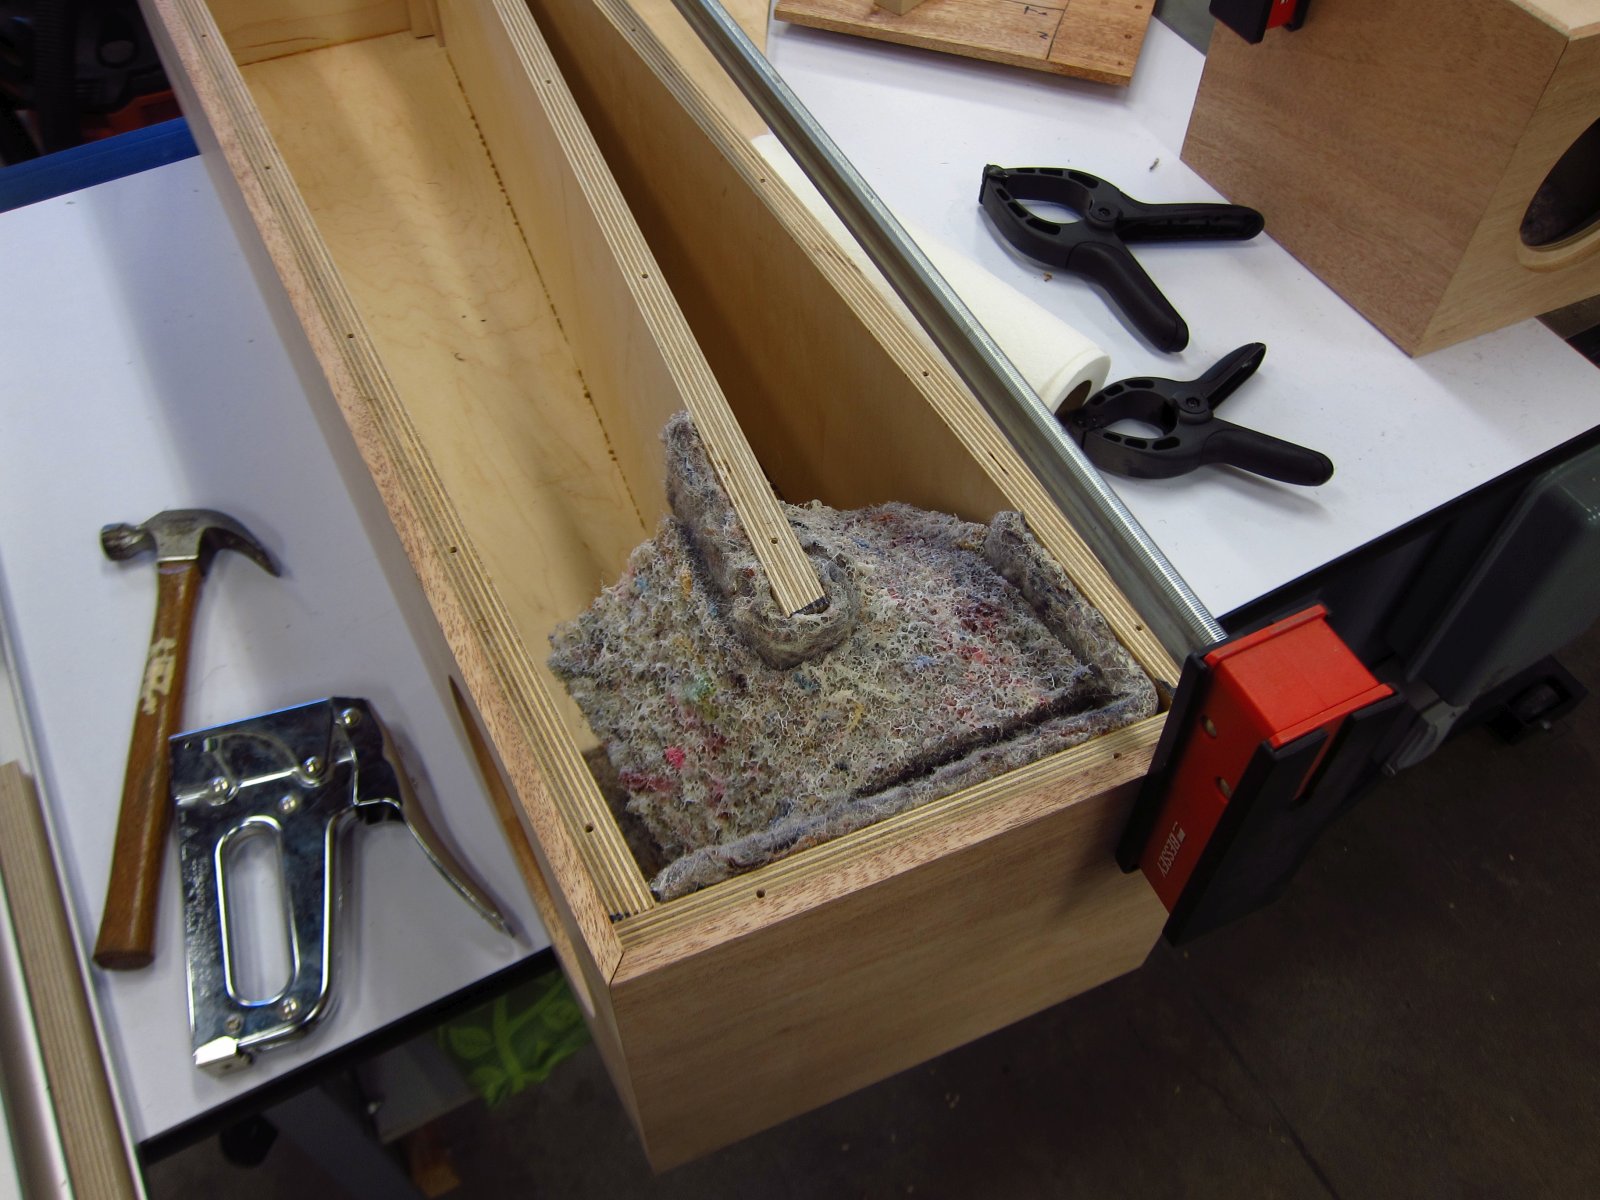
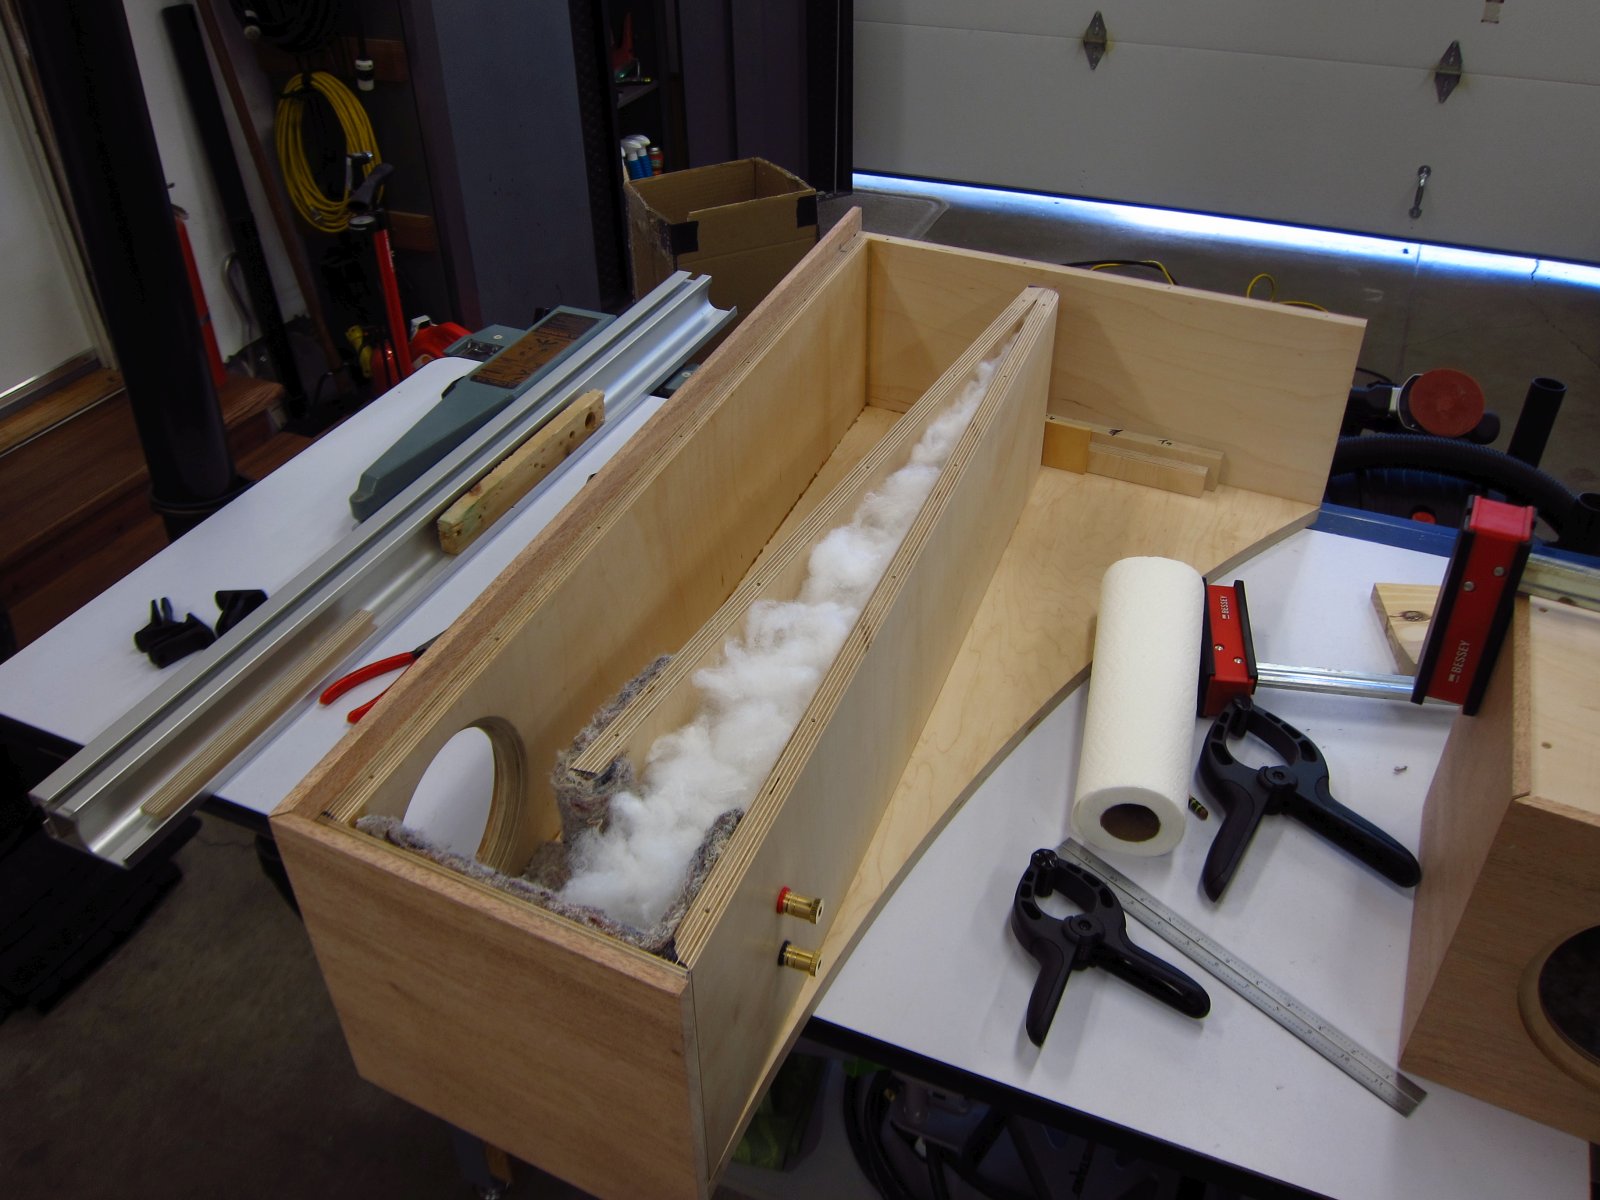
It was at this point that I knew that I was in for some punishment. 200g of stuffing needed to be teased apart into a more even / less clumpy mass. My thumbs and forefingers hurt as I type this. It took me about 2 hours of non-stop teasing to get it into a somewhat better state of fluff-uniformity. I recall Dave saying in the main FHXL thread that making the stuffing into as homogeneous of a density as possible is the goal, and that it is a lot of tedious work. Well, I am not an expert at handling this stuff, and I am sure that it is far from perfect, but I think that the result is better than just yanking it out of the bag and smashing it in.
For the throat, I distributed the fluffed stuffing in a uniform line along the back, and then stuffed it in on a one-to-one basis. This resulted in maximum density at the point of the wedge, and minimum density up behind the driver. Below the driver, I put it in uniformly.
http://www.e30tuner.com/speakerbuilding/images/fhxl_2021/fhxl_083.jpg

http://www.e30tuner.com/speakerbuilding/images/fhxl_2021/fhxl_084.jpg
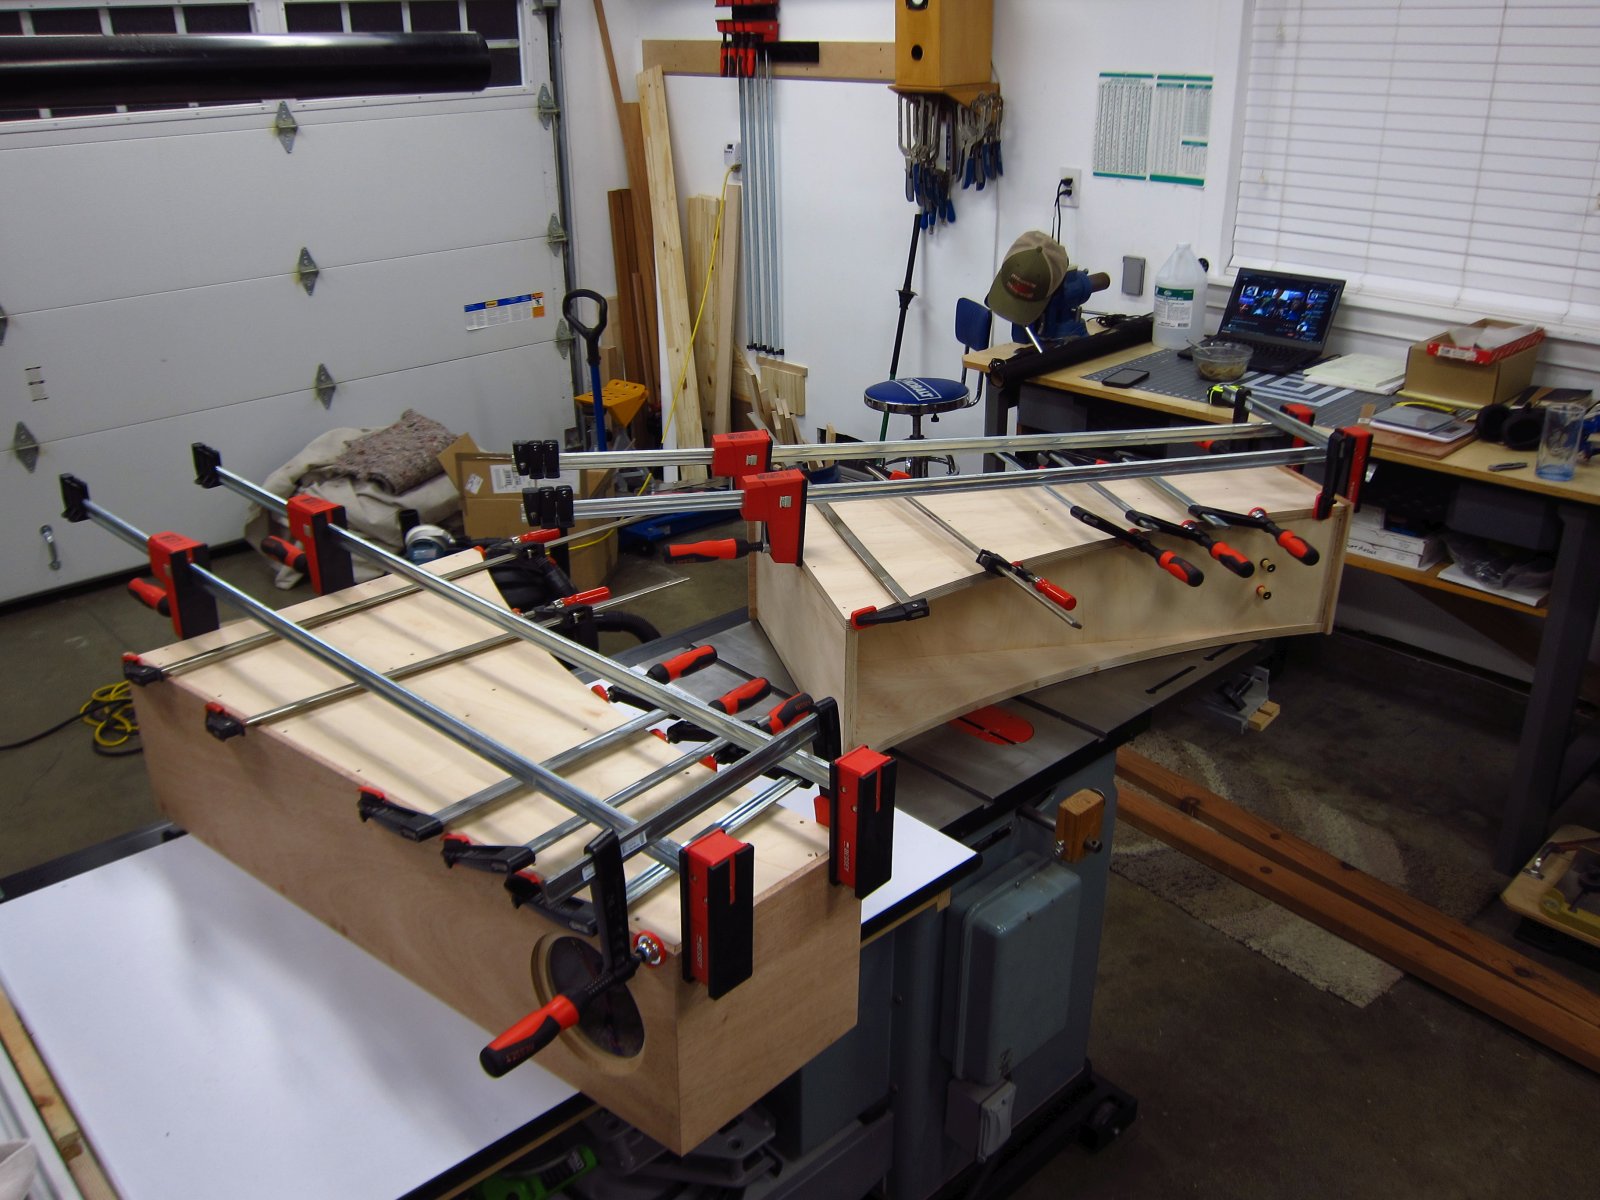
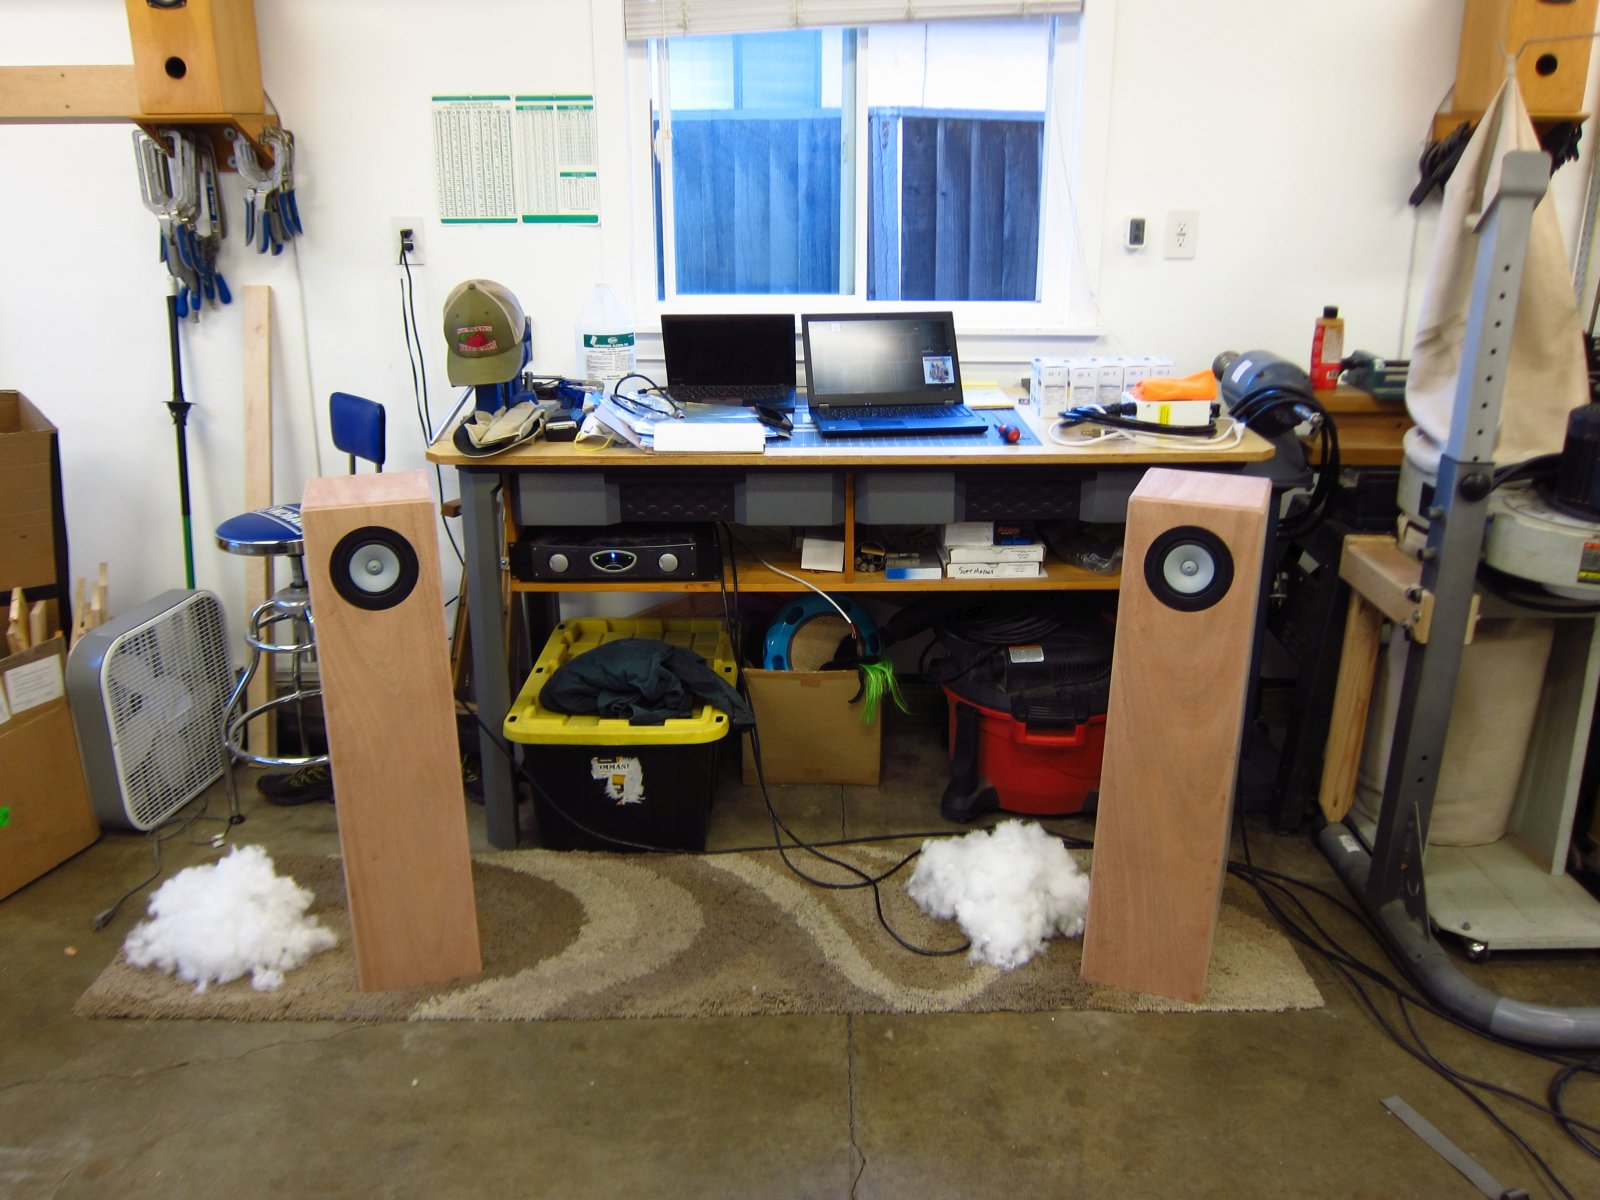
After that, I took a little break and prepared to glue both of the remaining sides on. That all went smoothly, and much faster than the two before them. Both enclosures will be sitting as shown until tomorrow afternoon, at which point I can get out the router and start flush-trimming the mahogany panels, sanding little misalignments in joints and drilling the mount holes for the 10p's.
http://www.e30tuner.com/speakerbuilding/images/fhxl_2021/fhxl_085.jpg
I have some maple wood scraps from past projects, and I will be making a trip to the woodworker's supply store tomorrow to get some tapered plug cutters. At this point, with all of the work that has gone into making these look nice, I owe it to myself and these enclosures to fill the screw holes with maple plugs to hide things as best I can. Compared to the ordeal with the poly-stuff, dealing with 96 screw holes will be a breeze!
http://www.e30tuner.com/speakerbuilding/images/fhxl_2021/fhxl_069.jpg
I then drilled the rest of the way through, clamping a scrap on the underside as backup. Doing it this way eliminates chip-out, which is otherwise a very common thing with twist drills.
http://www.e30tuner.com/speakerbuilding/images/fhxl_2021/fhxl_070.jpg
http://www.e30tuner.com/speakerbuilding/images/fhxl_2021/fhxl_071.jpg
With that done, I installed the posts.
http://www.e30tuner.com/speakerbuilding/images/fhxl_2021/fhxl_072.jpg
http://www.e30tuner.com/speakerbuilding/images/fhxl_2021/fhxl_073.jpg
The next order of business was to get the 1/2" felt sheets into place. I applied a few coats of 3M high strength spray adhesive to the pieces, let it get tacky, and then placed the them. In addition to the adhesive, I also ran some heavy staples with my staple gun, just as backup near a couple of the edges. It compresses the material, which is undesirable, but I also don't ever want to have to mess around with them coming loose. The 3M spray adhesive is OK, but compared to stuff I used to use for car upholstery and whatnot, it is not all that strong. I think that the stuff that I used to use got banned...it definitely smelled like dead brain cells, but hot damn it worked well.
The only tricky piece was the one that wrapped around the middle. I used some scraps and little hand clamps to help set up the bond.
http://www.e30tuner.com/speakerbuilding/images/fhxl_2021/fhxl_074.jpg
For the felt piece that was to go onto the as-yet-unglued side, I sprayed it and set it loosely inside the enclosure, letting friction hold it up. I then placed the side and reached in through the driver opening to press it up into place. Nice and simple.
http://www.e30tuner.com/speakerbuilding/images/fhxl_2021/fhxl_075.jpg
The next task was to get the initial quantities of poly-stuff measured and prepared. I put 60g into the throat (rear wedge) and 40g into the section below the driver.
http://www.e30tuner.com/speakerbuilding/images/fhxl_2021/fhxl_076.jpg
I spent a few minutes "fluffing" the stuffing and then placed it, but in the back of my mind I knew that I had not put in the proper amount of effort to prep the stuffing.
http://www.e30tuner.com/speakerbuilding/images/fhxl_2021/fhxl_077.jpg
I also prepped the internal wires that will connect the driver to the binding posts. I stripped the sheath off of 18" of the speaker cable that I will be using to connect these to the amplifier and used my drill to twist them together. This is a little trick that I have been using for a very long time and it works pretty well for just about any length of wire. The speaker wire conductors are 2.5mm^2.
http://www.e30tuner.com/speakerbuilding/images/fhxl_2021/fhxl_080.jpg
http://www.e30tuner.com/speakerbuilding/images/fhxl_2021/fhxl_081.jpg
Next, I used my ratcheting open barrel terminal crimpers to set the spade receptacles onto the ends. I've done a lot of automotive wire harness work over the last decade (engine harnesses, chassis harnesses, audio systems, etc.) so thankfully I have the proper tools for this type of terminal.
http://www.e30tuner.com/speakerbuilding/images/fhxl_2021/fhxl_078.jpg
http://www.e30tuner.com/speakerbuilding/images/fhxl_2021/fhxl_079.jpg
For the poly-stuff that goes below the driver, I needed a way to keep it from falling down. Some extra screen door mesh was exactly the right thing!
http://www.e30tuner.com/speakerbuilding/images/fhxl_2021/fhxl_082.jpg
It was at this point that I knew that I was in for some punishment. 200g of stuffing needed to be teased apart into a more even / less clumpy mass. My thumbs and forefingers hurt as I type this. It took me about 2 hours of non-stop teasing to get it into a somewhat better state of fluff-uniformity. I recall Dave saying in the main FHXL thread that making the stuffing into as homogeneous of a density as possible is the goal, and that it is a lot of tedious work. Well, I am not an expert at handling this stuff, and I am sure that it is far from perfect, but I think that the result is better than just yanking it out of the bag and smashing it in.
For the throat, I distributed the fluffed stuffing in a uniform line along the back, and then stuffed it in on a one-to-one basis. This resulted in maximum density at the point of the wedge, and minimum density up behind the driver. Below the driver, I put it in uniformly.
http://www.e30tuner.com/speakerbuilding/images/fhxl_2021/fhxl_083.jpg
http://www.e30tuner.com/speakerbuilding/images/fhxl_2021/fhxl_084.jpg
After that, I took a little break and prepared to glue both of the remaining sides on. That all went smoothly, and much faster than the two before them. Both enclosures will be sitting as shown until tomorrow afternoon, at which point I can get out the router and start flush-trimming the mahogany panels, sanding little misalignments in joints and drilling the mount holes for the 10p's.
http://www.e30tuner.com/speakerbuilding/images/fhxl_2021/fhxl_085.jpg
I have some maple wood scraps from past projects, and I will be making a trip to the woodworker's supply store tomorrow to get some tapered plug cutters. At this point, with all of the work that has gone into making these look nice, I owe it to myself and these enclosures to fill the screw holes with maple plugs to hide things as best I can. Compared to the ordeal with the poly-stuff, dealing with 96 screw holes will be a breeze!
That damping needs to come out and get properly teased. You can probably triple the loose volume.
dave
dave
Pull it out, start a movie, give your GF half and start testing. ABiut halfway thru thr movie you will be done.
Just keep pulling it apart until it is a uniform mass.
This is about the amount you will need for the front. Notice that you can sqeeze it int a sandwich bag.
dave
Just keep pulling it apart until it is a uniform mass.
This is about the amount you will need for the front. Notice that you can sqeeze it int a sandwich bag.
dave
Thanks for the images.
For reference, I pulled it out once and spent almost 2 hours hand teasing the stuffing. The photos above are a mix of the initial state of the material and the later result after working it. If the 2nd and 3rd from last pictures still look grossly inadequate, then I guess my technique is pretty poor lol! I would estimate that I got it to a little over 2X its initial volume.
I am thinking up some ideas for an attachment for my pedestal grinder to really get the stuffing opened up. Presumably I want to expand it, but avoid a situation where the fibers are all aligned? It seems like the more "tangled" the individual fibers are, the more effective the overall mass will be at damping without "blocking" the wavefront.
In my experience and observation with other diyers,
1. Don't beef up yet the fiber material behind the driver. Hear first the quality of the mids and highs as you break-in the drivers. In my case, I started with a light volume and ended up with with very little.
2. The fiber material stuffing at the throat or below the driver will affect the quality and amount of bass. If you want optimum bass output, you may not need to have high density of the fiber material. You just need to eliminate resonance in the throat. As I can see in your photo, I see it as high density and may provide you with tight bass but less extension. You will have to experiment which density suits you taste. In my case, I ended with low density, highly teased fiber material in the throat resulting in well defined bass with optimum extension. And I can say that in most music material, I do not need a subwoofer.
That is why I love the FHXL design
Hope the above helps.

In my experience and observation with other diyers,
1. Don't beef up yet the fiber material behind the driver. Hear first the quality of the mids and highs as you break-in the drivers. In my case, I started with a light volume and ended up with with very little.
2. The fiber material stuffing at the throat or below the driver will affect the quality and amount of bass. If you want optimum bass output, you may not need to have high density of the fiber material. You just need to eliminate resonance in the throat. As I can see in your photo, I see it as high density and may provide you with tight bass but less extension. You will have to experiment which density suits you taste. In my case, I ended with low density, highly teased fiber material in the throat resulting in well defined bass with optimum extension. And I can say that in most music material, I do not need a subwoofer.
That is why I love the FHXL design
Hope the above helps.
Thank you for sharing your experience, it is nice to have some other reference points!
[friday night humor]
With all of this recent talk about filling and/or plugging the screw holes in the maple veneer on my ply, and from looking at where many of my audio compatriots in this thread are posting from, it occurs to me that my more civilized neighbors to the north might be experiencing distress at the thought of someone simply puttying some nice maple.
How dare you question the pureness of Maple, the source of the greatest drink on earth, Maple Syrup!
Using McDonald's french fries sure sounds creative though hehe.
I'm looking forward to seeing how it will look once the holes are capped!
How dare you question the pureness of Maple, the source of the greatest drink on earth, Maple Syrup!
Using McDonald's french fries sure sounds creative though hehe.
I'm looking forward to seeing how it will look once the holes are capped!
Funny enough, maple might be my least favorite species of wood for woodworking, while also being one of my favorites in terms of aesthetics. It seems to have a real propensity for burning and sticking, even on "scary sharp" tools. I don't have a lot of experience working with it, as I mostly deal with walnut, various oaks, mahogany/meranti and ash. I think that a big thing that I need to do with maple is slow down the cutter speeds and feed rates.
I got a lot more work done on the speakers in the last couple of evenings, and have pictures, but no time to upload yet. So far I have been experimenting heavily with the plugs and finishing techniques. So far, it seems to be that I will be plugging the screw holes after counterboring them, but I will not be using maple plugs. This is for a couple of reasons:
- The hardwood maple pieces I have are just a little different color-wise than the veneer (different tree, etc). So, while they do blend in better than any of the putties, it still looks like "trying to hide stuff unsuccessfully"
- Oil finish...the exposed end grain around the perimeter of the veneer and plugs soaks up more of the finish and creates a darkened ring. Again, it looks to me like "trying to hide stuff unsuccessfully"
I tried a couple of test pieces using plugs cut from the mahogany, and I think that I like the look better. Instead of "trying to hide stuff unsuccessfully" it gives much more of a "yes, I meant to do this" vibe. There is still a bit of the dark ring issue, although it is less pronounced since the mahogany is a lot darker. The next thing that I will test out is applying a little glue to the plugs. MAYBE it will help to seal off the end grain and prevent as much finish from wicking in.
Lastly, the plug cutters I bought are being returned. While they are of decent sharpness, they are not properly made. All of the plugs produced come out up to 0.25mm larger on the "small" end than the nominal counterbore diameter. For example, the plugs for 9.5mm (0.375") bores are actually 9.78mm (0.385") in diameter at the small end of the taper. Aside from being very difficult to get started into the hole, they also drag the veneer down in with them, creating a small annular depression and sites for the finish to wick in unevenly. The 6.35mm plugs fit a little better, and in that case I think that I was hammering them in too far, also creating an annular depression and grain damage.
I still need to decide between 6.35mm and 9.5mm counterbores and plugs. The holes for the screw heads are ~5mm in diameter, so getting the 6.35mm cutter properly aligned will be a chore. That, and things might look nicer with the larger 9.5mm plugs anyway.
Lastly, I am deciding between plugs cut from mahogany, and plugs from black walnut. "3 is a crowd" is how I usually feel about multi-species woodwork, but the darker walnut plugs may also help a lot if I can't find a way to manage the dark annular rings during the finishing step.
Oh, an item that I a will also need to sort out, which is audio-related, is amplification. The two contenders that I am strongly considering building:
- FirstWatt F6 clone
- Quad 405 clone
What are people's thoughts on these amplifiers being used to drive FHXLs with Alpair 10p drivers? It sounds like the 10p is a driver that won't really live up to its potential if used with amplifiers that lack some degree of current feedback (if I have read other posts correctly).
Last edited:
If it were me ....
1. for solid state - I would go for Class A amplification. The F5 or F6 would suffice
2. for solid state - I would go for SET amplification. My current FXHL with the MAOP 10 is running with 4 watts of EL84 tubes. Since the 10p has a higher sensitivity, I expect that it will work well with SET tube amps.
I tried a couple of test pieces using plugs cut from the mahogany, and I think that I like the look better. Instead of "trying to hide stuff unsuccessfully" it gives much more of a "yes, I meant to do this" vibe.
I think that's a good alternative, it is impossible to hide them anyway, better assume it and incorporate it in the design.

My experience with Nelson’s amps is that they are VERY good, even the super cheap ACA. The only one’s you have to be a bit more careful about were F1 & F2. THose require a speaker design that dosen’t mind a high Rout amplifier.
dave
dave
OK party people, it's been a while since my last update, but lots of work has been finished. Time to select photos, upload them and type this post has been in short supply!
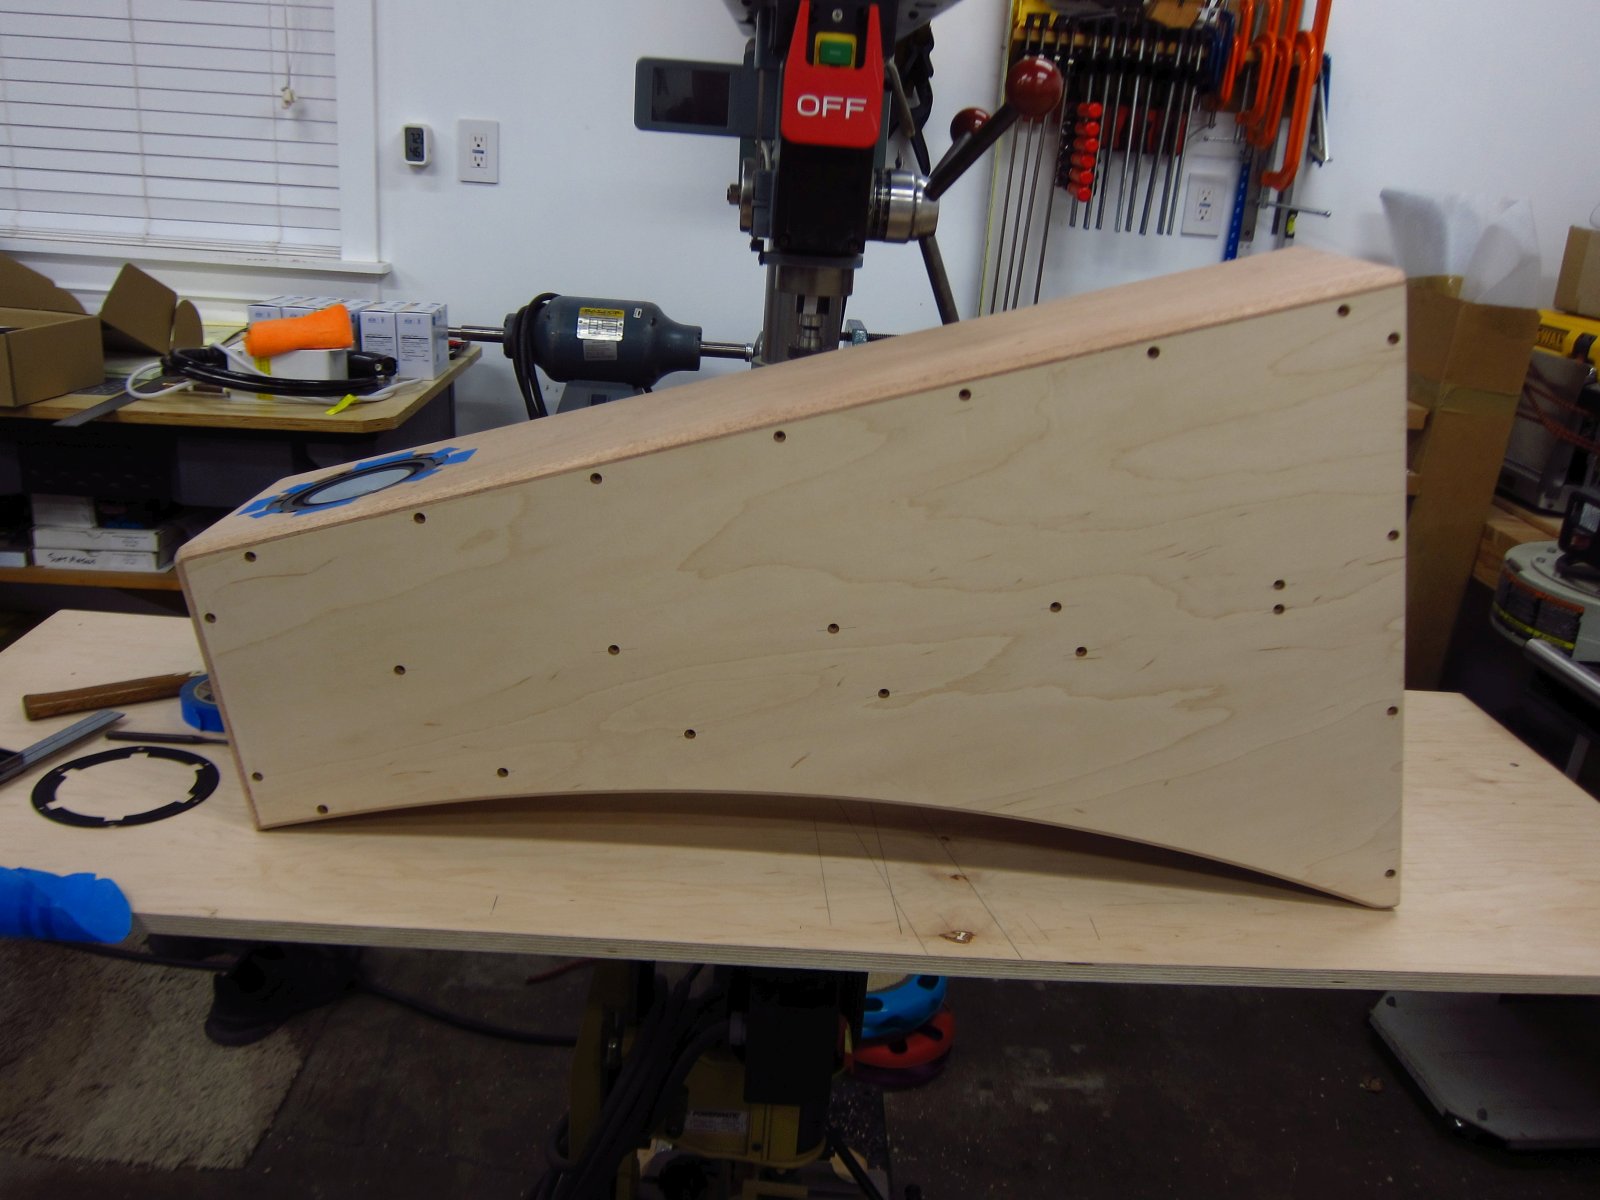
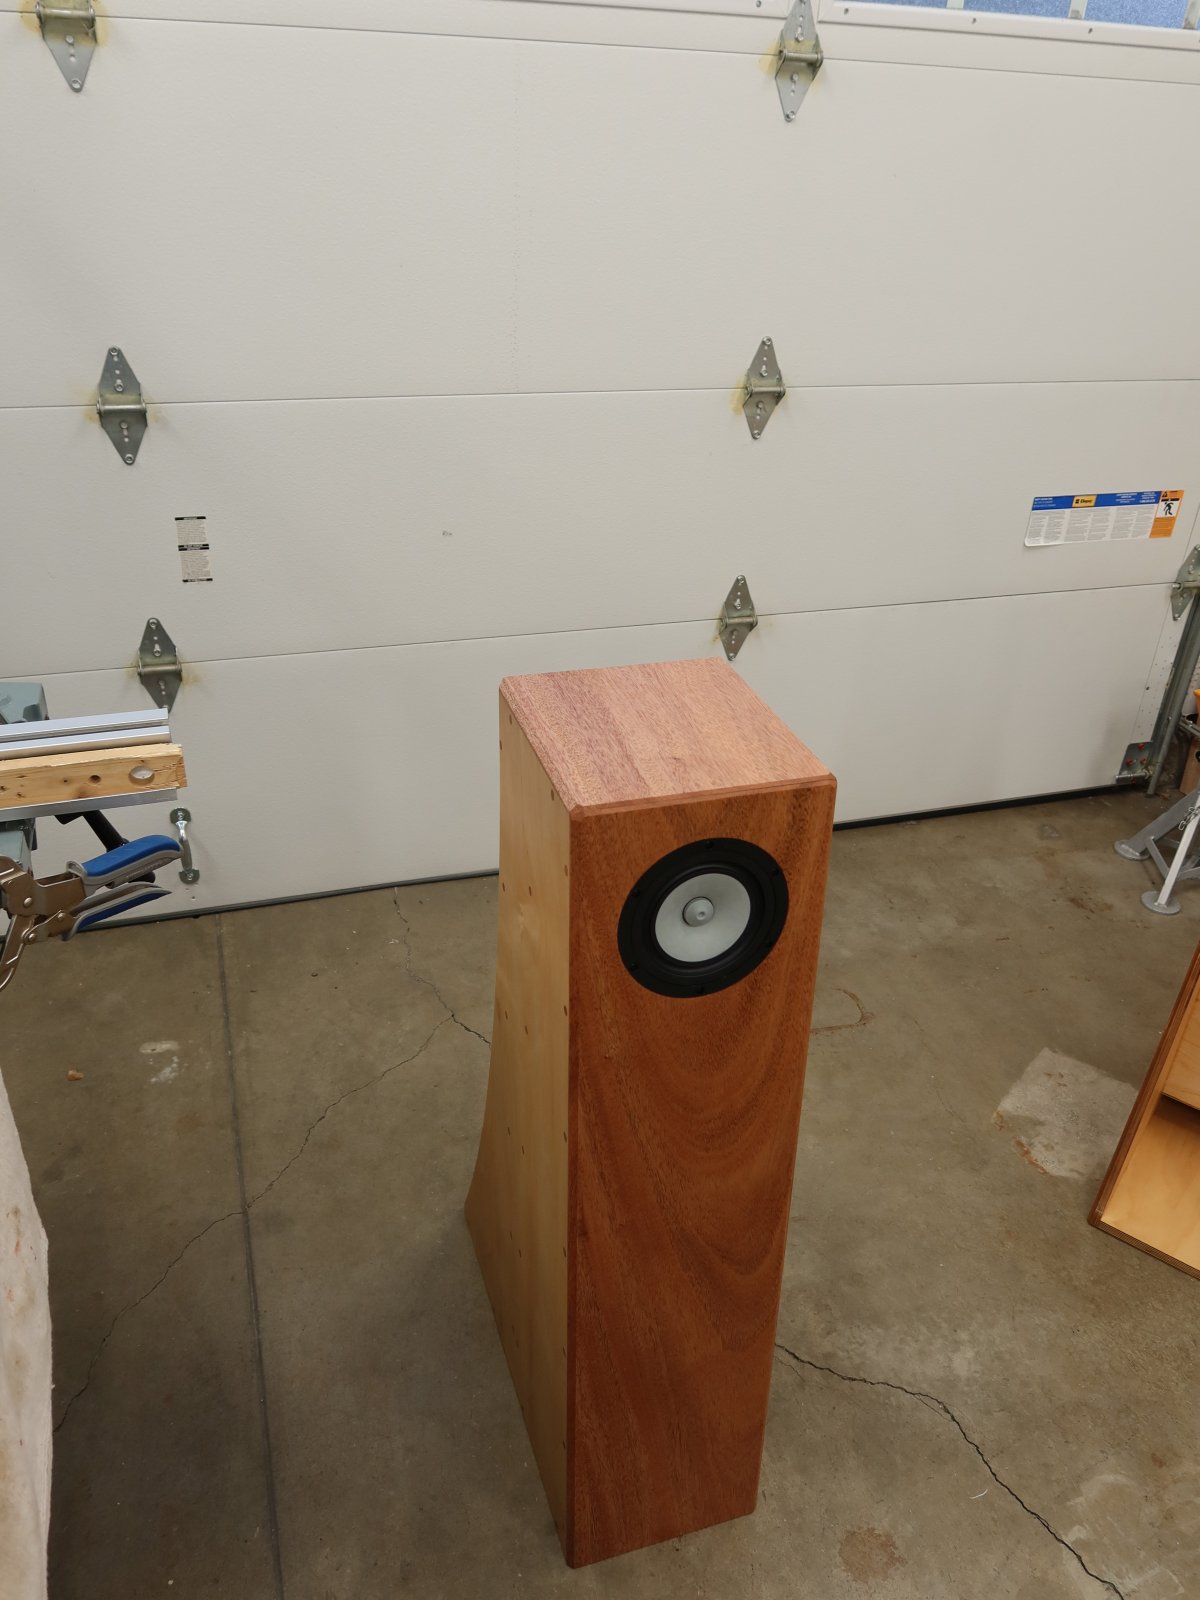
As of the last update, I had everything all glued together. The next step was to trim the mahogany panels to be flush with all of their surrounding surfaces. For the lower-front and rear-top edges, where the adjoining panels were at 5°, I made a little fixture from scraps to incline the router so that it would make a co-planar trimmed surface.
Trimming went smoothly, mostly. I had originally desired sharp edges all around (aesthetics were to supersede acoustics there), but a couple of unplanned occurrences led me to add a 6.5mm chamfer around all front edges. First, the mahogany experienced some nasty tear-out in a couple of places. Second, and probably anyone who has done any amount of flush-trimming with a router knows this, the router is going to want to tilt/rock if it starts building up any sort of friction with the surface it is sliding on. Sadly, I did get a little section on one side edge where the bit ate-into it as the router tilted. It's one of those "only I will ever notice" things, although I also know that anyone who does any woodworking would find it. The 6.5mm chamfer worked well to entirely hide/remove the oopses in terms of them being visible from the front-profiles. Anyway, such is life. The tilt-oops sanded out well enough, and despite getting through the veneer, that speaker is in a corner of the living room where nobody really ever goes.
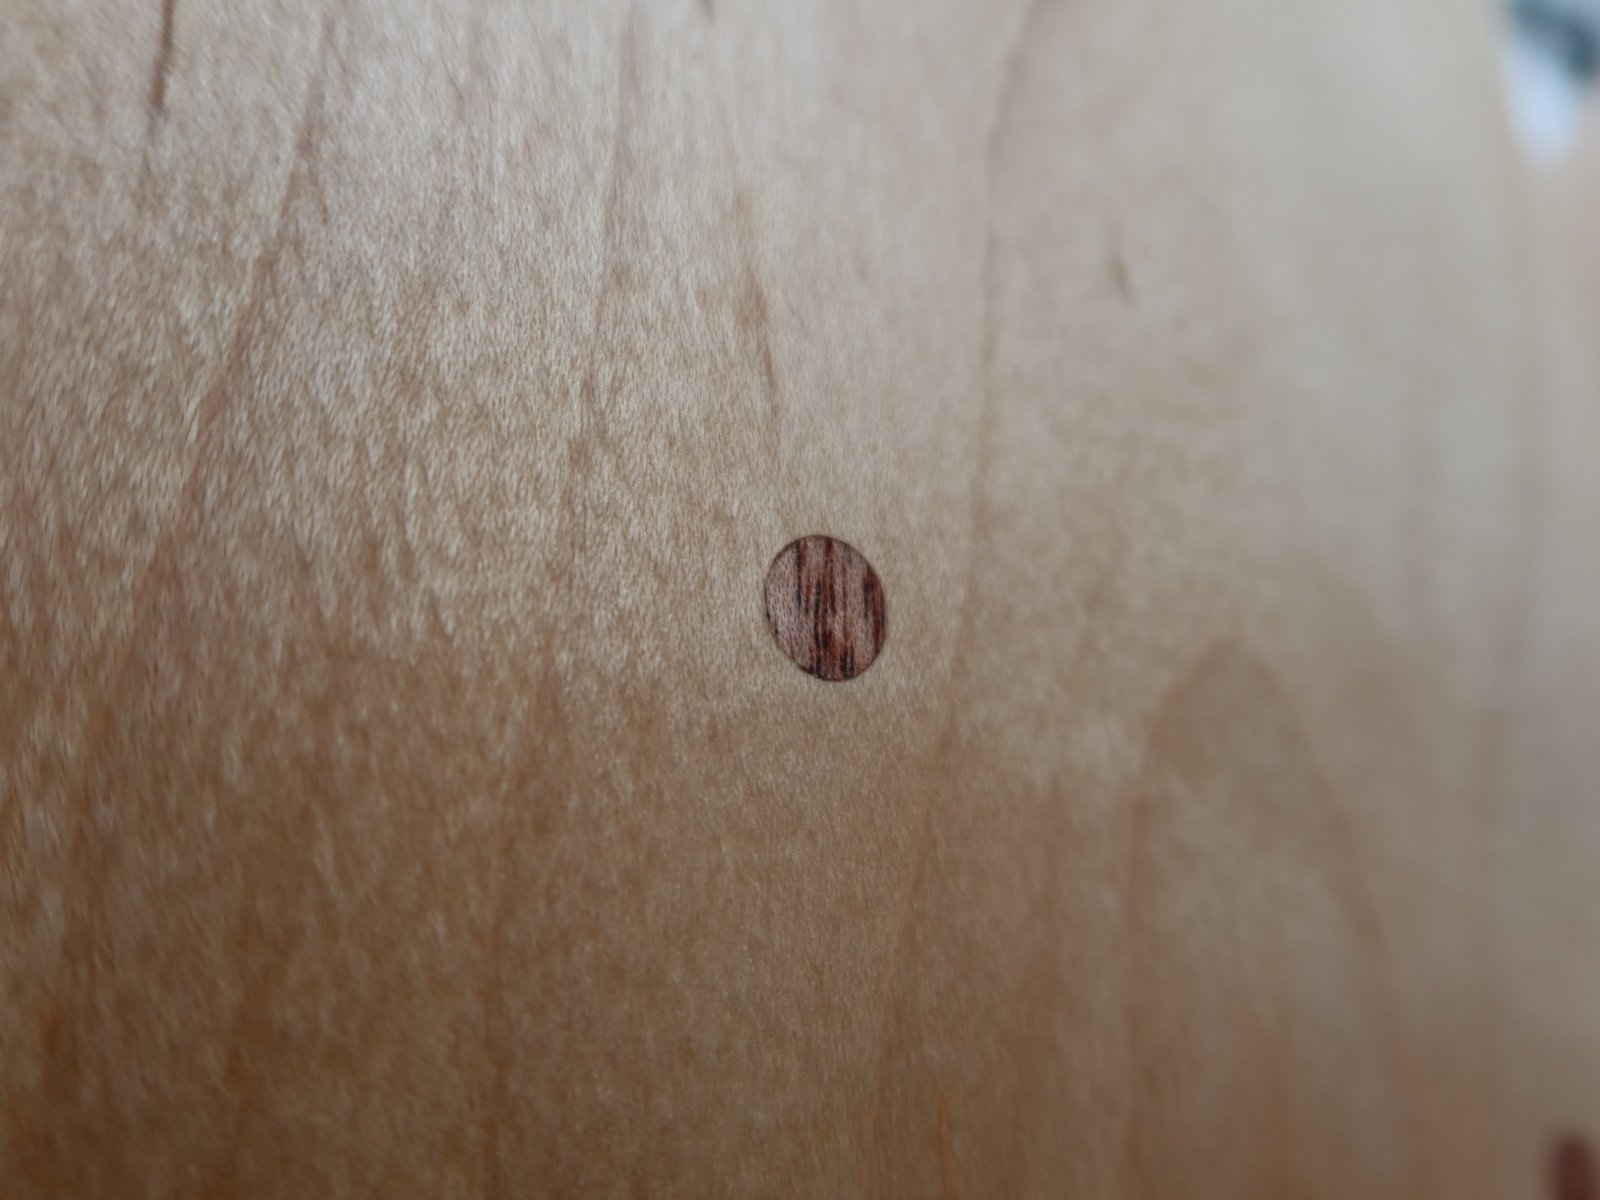
I ran a ton of experiments with plugs for the screw holes. Ultimately, mahogany plugs were chosen as the final solution.
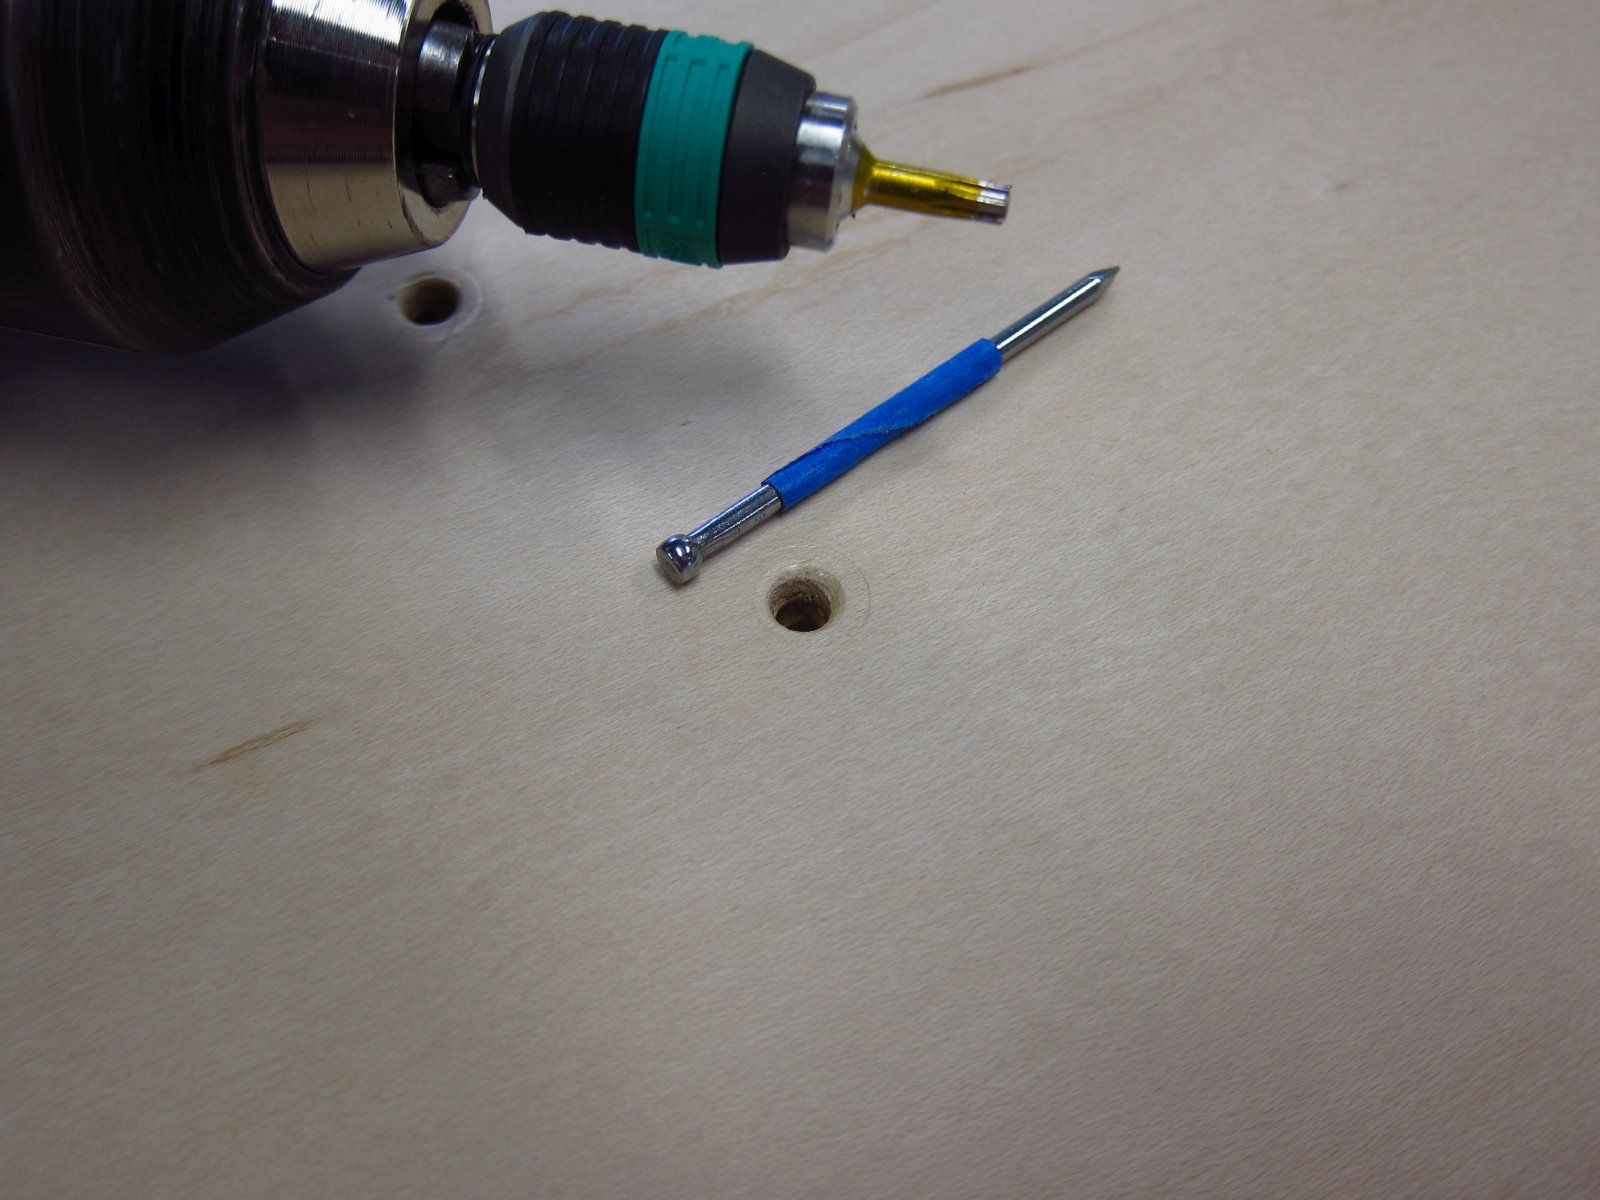
With that decision made, I needed to counterbore all 96 screw holes. I started by driving all of the screws further in so that their heads were 9.5mm sub-flush. The taped-nail was a go/no-go depth gauge for double-checking the heads' depths. Removing them was the other option, but there was some indication that the heads would upset the veneer on their way out. So they remained in there, and these speakers will remain nicely over-built.
I made a large work surface on my drill press from ply scrap to support the enclosures and keep them level while counterboring.
It was slow going at first, but after making pencil marks with long rulers to help align the centers, things started to speed up. In all, I spent maybe an hour to do all of the holes.
After that, I placed the Alpair 10p's, marked the screw hole locations, drilled, and drove the screws in/out a few times to set the threads.
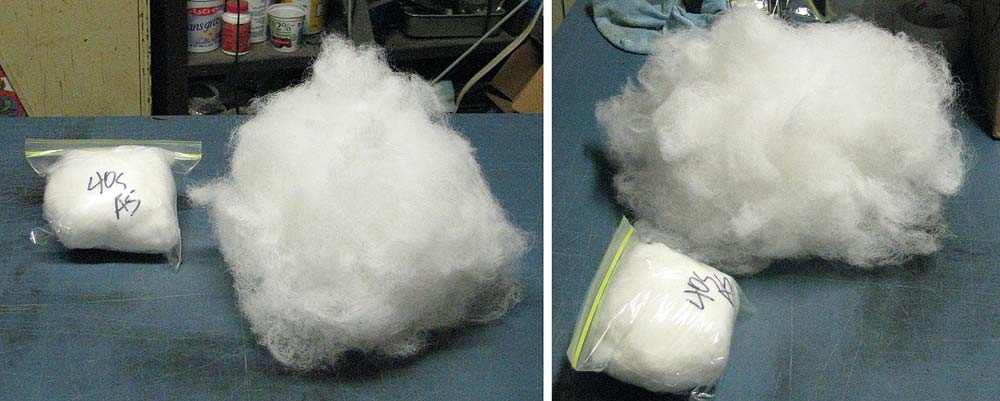
At this point, I really wanted to take a break from building and listen to them. The initial 40g of (not properly teased) stuffing was pulled out entirely so that I could start with an undamped reference. I immediately understood why the damping is important. Bass "increased" but it had a boomy, resonant sound.
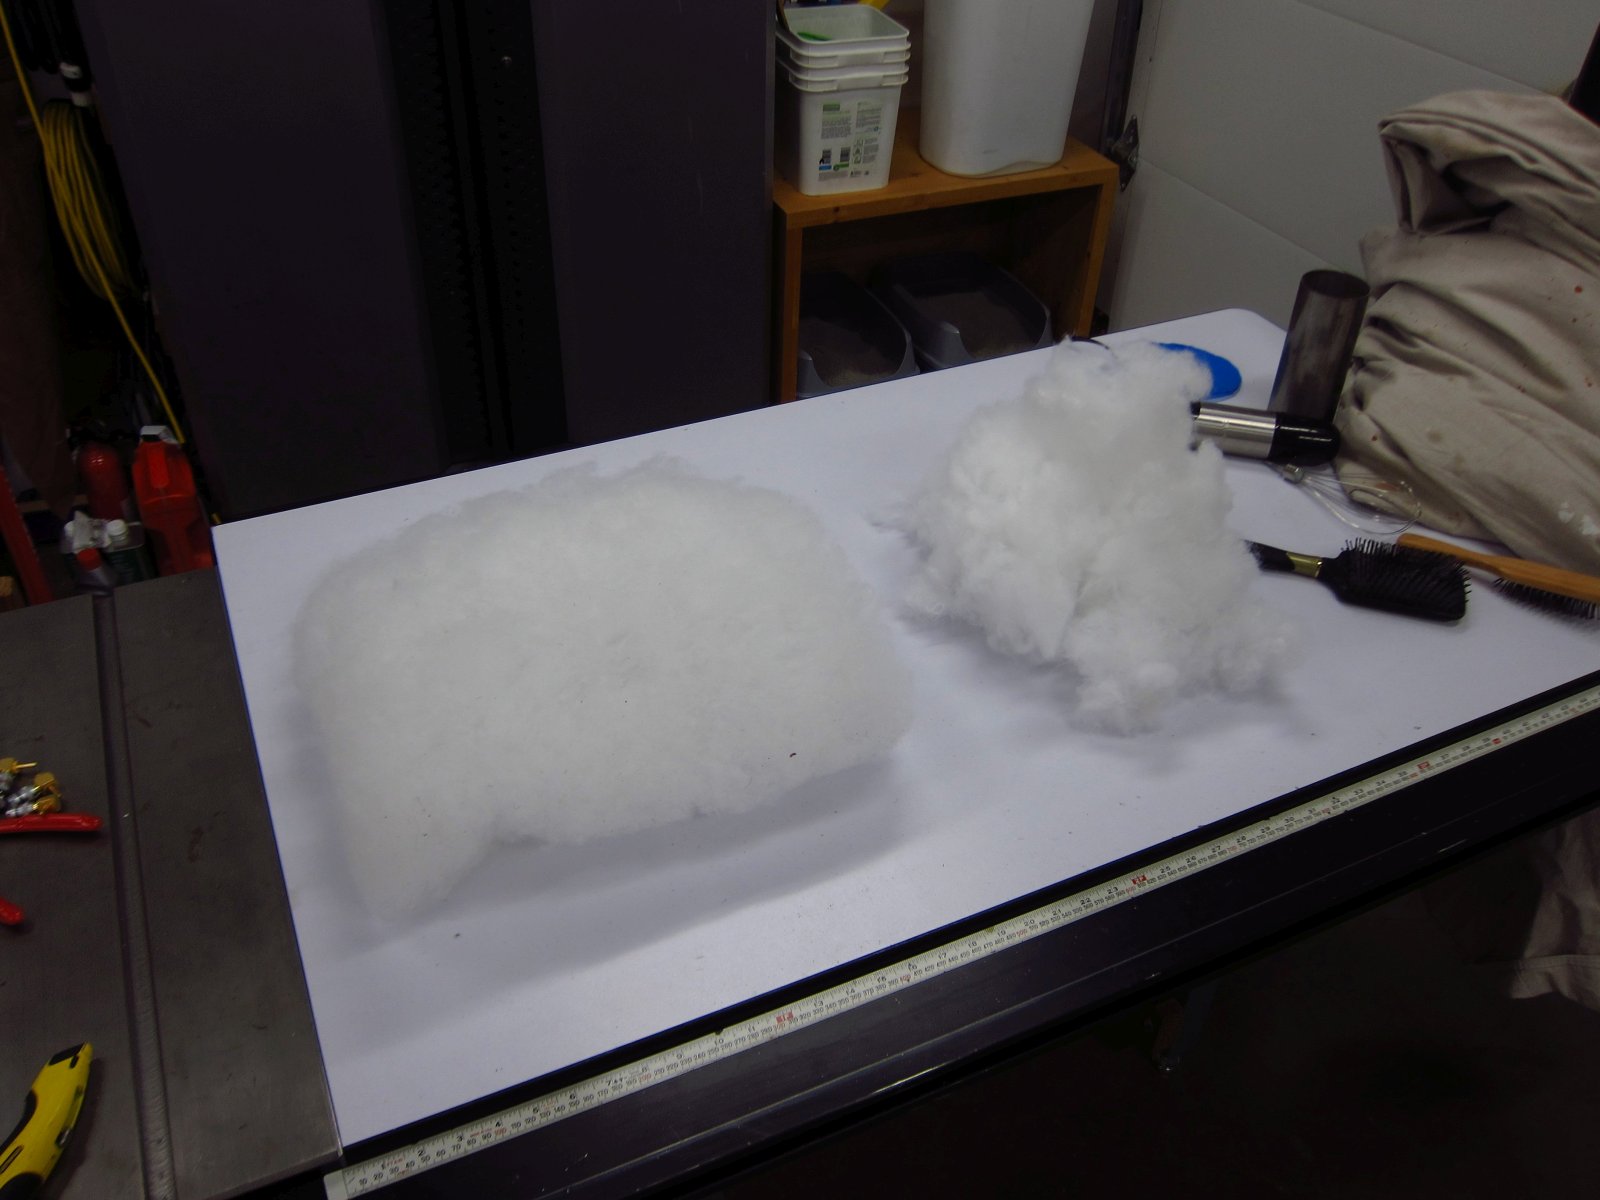
I then proceeded to tease out 40g of stuffing VERY thoroughly. It took 3 hours. The picture shows 2 piles of 40g of stuffing...the left was my 3 hour project, and the right was the stuff that Dave said was not proper. At that point, I was d.o.n.e. teasing stuffing, and put 20g into the fronts of each speaker. This cleaned up the bass noticeably. At some point, I will need to fetch out the combined 120g of stuffing from the rear/throat of each and properly tease it, but even a week later I am not in the mood for more of that task.
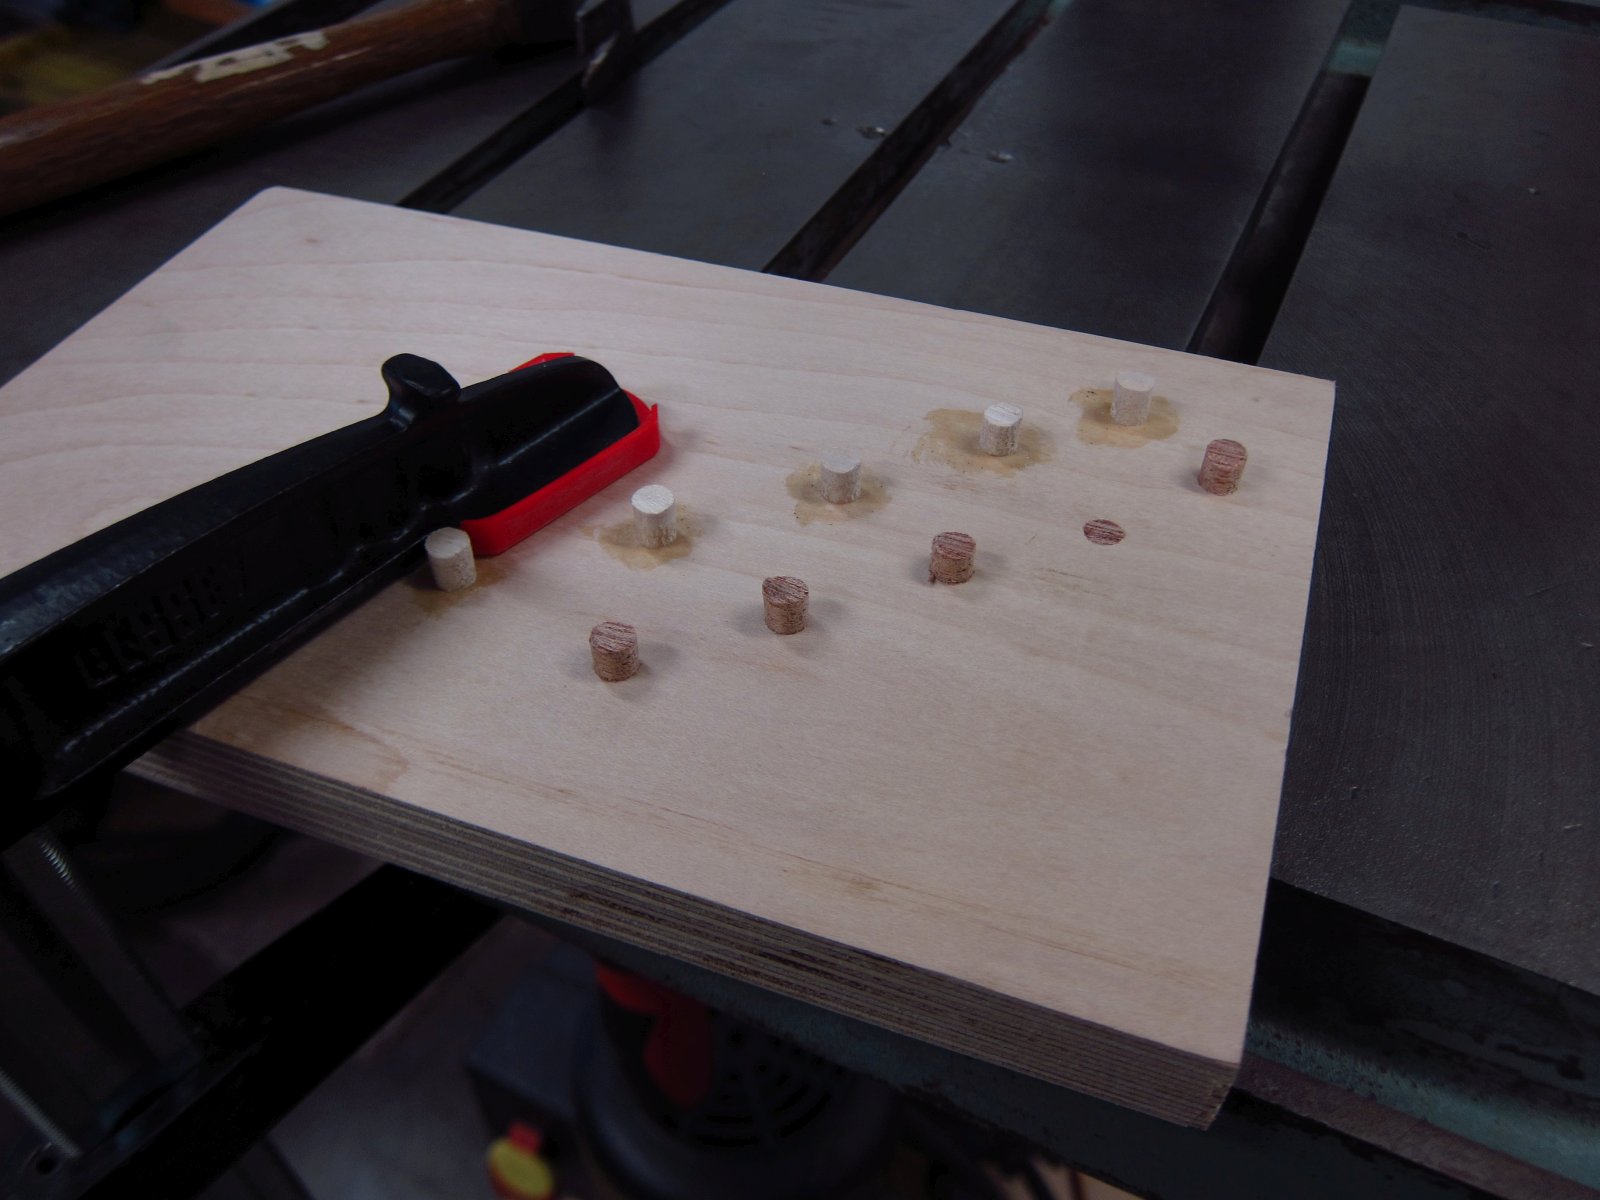
I got set up to make some tapered plugs from mahogany scraps and pretty quickly had 100 of them.

The plugging technique which I settled on was as follows. I used a wooden chopstick to wipe a small amount of wood glue around the inner perimeter of a counterbored hole, started a tapered plug by hand and then hammered it down until it stopped 6mm in at the bottom of the counterbore. The glue was mainly to seal the end grain to minimize dark rings with the wood finish since the tapered plugs do not really need glue to stay permanently in place. Also, when dry the plugs would start in easily. The water from the glue almost instantly started swelling the wood a tiny amount, making it harder to get the plugs going. So, do one hole at a time and don't dawdle between applying glue and inserting a plug!
After 24 hours, I used my Japanese flush trim saw to...trim the plugs flush. It does a very nice job and is a pretty inexpensive tool.
Thereafter, I applied two coats of Tung Oil over the span of two days. It really brought out the wood's grain and character. Overall, I am very happy with how these look.
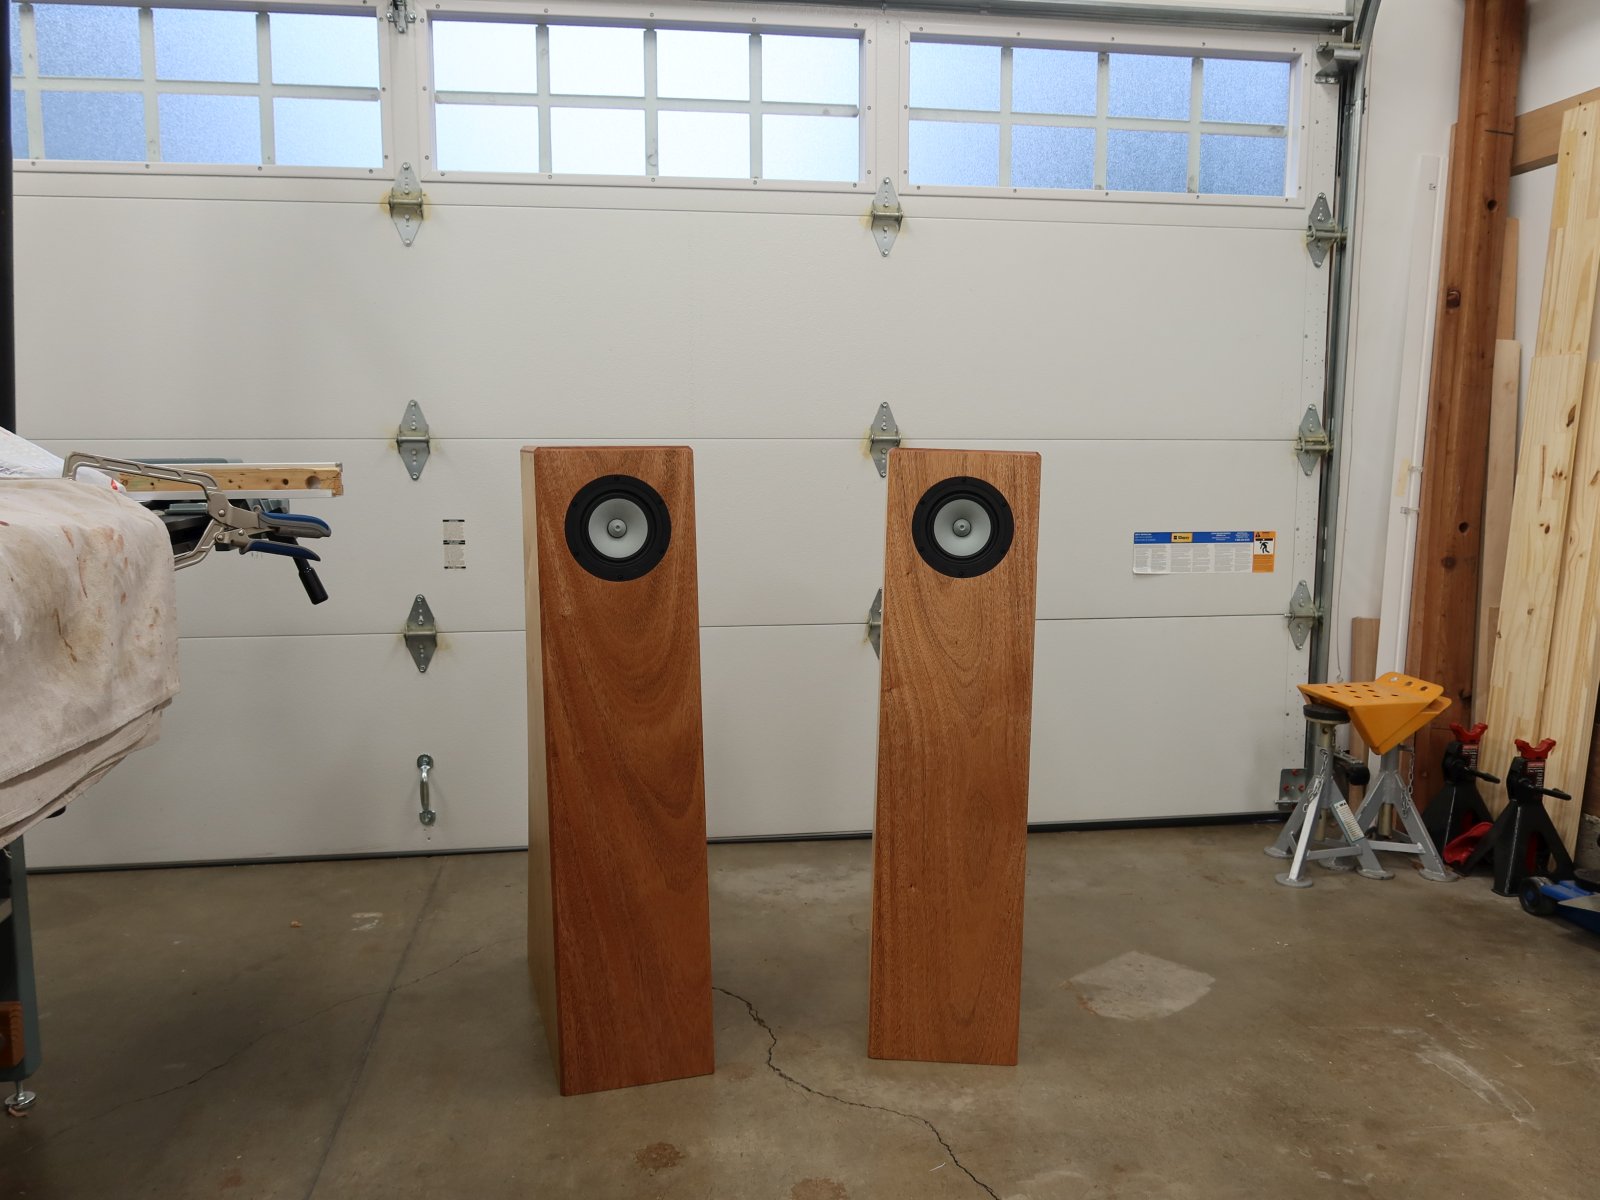
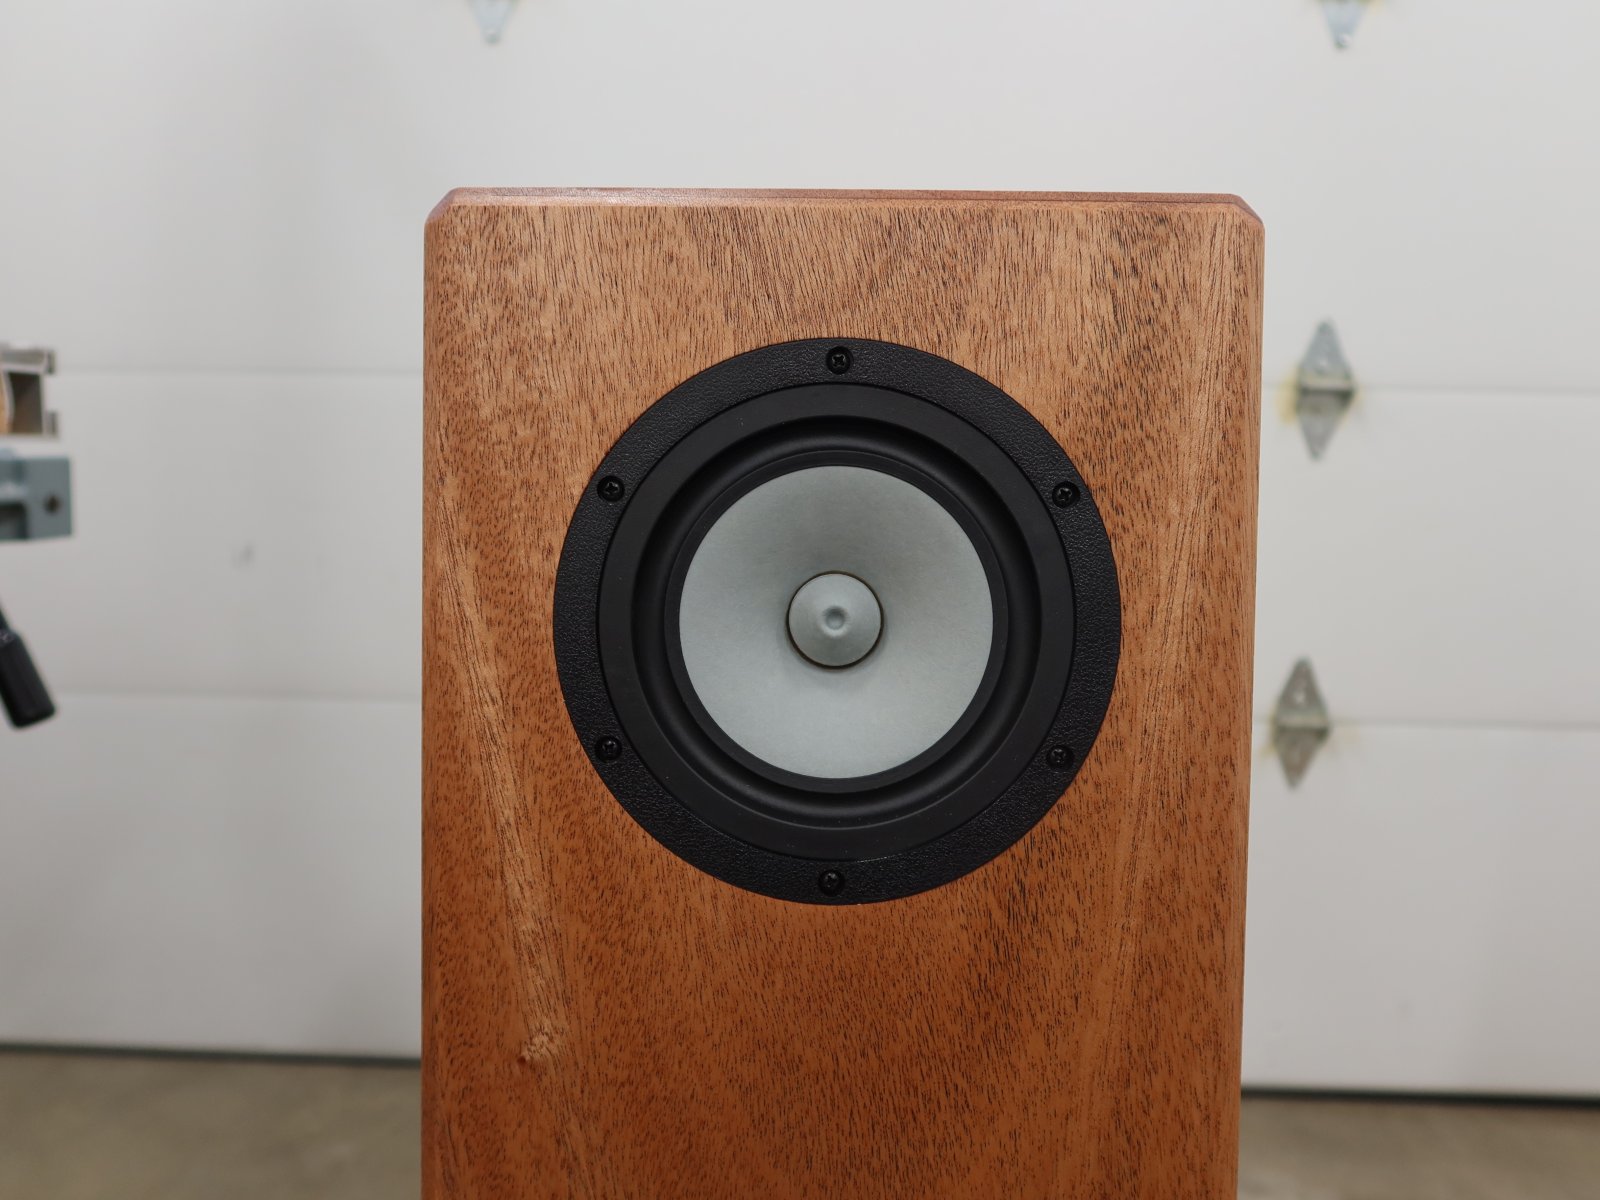
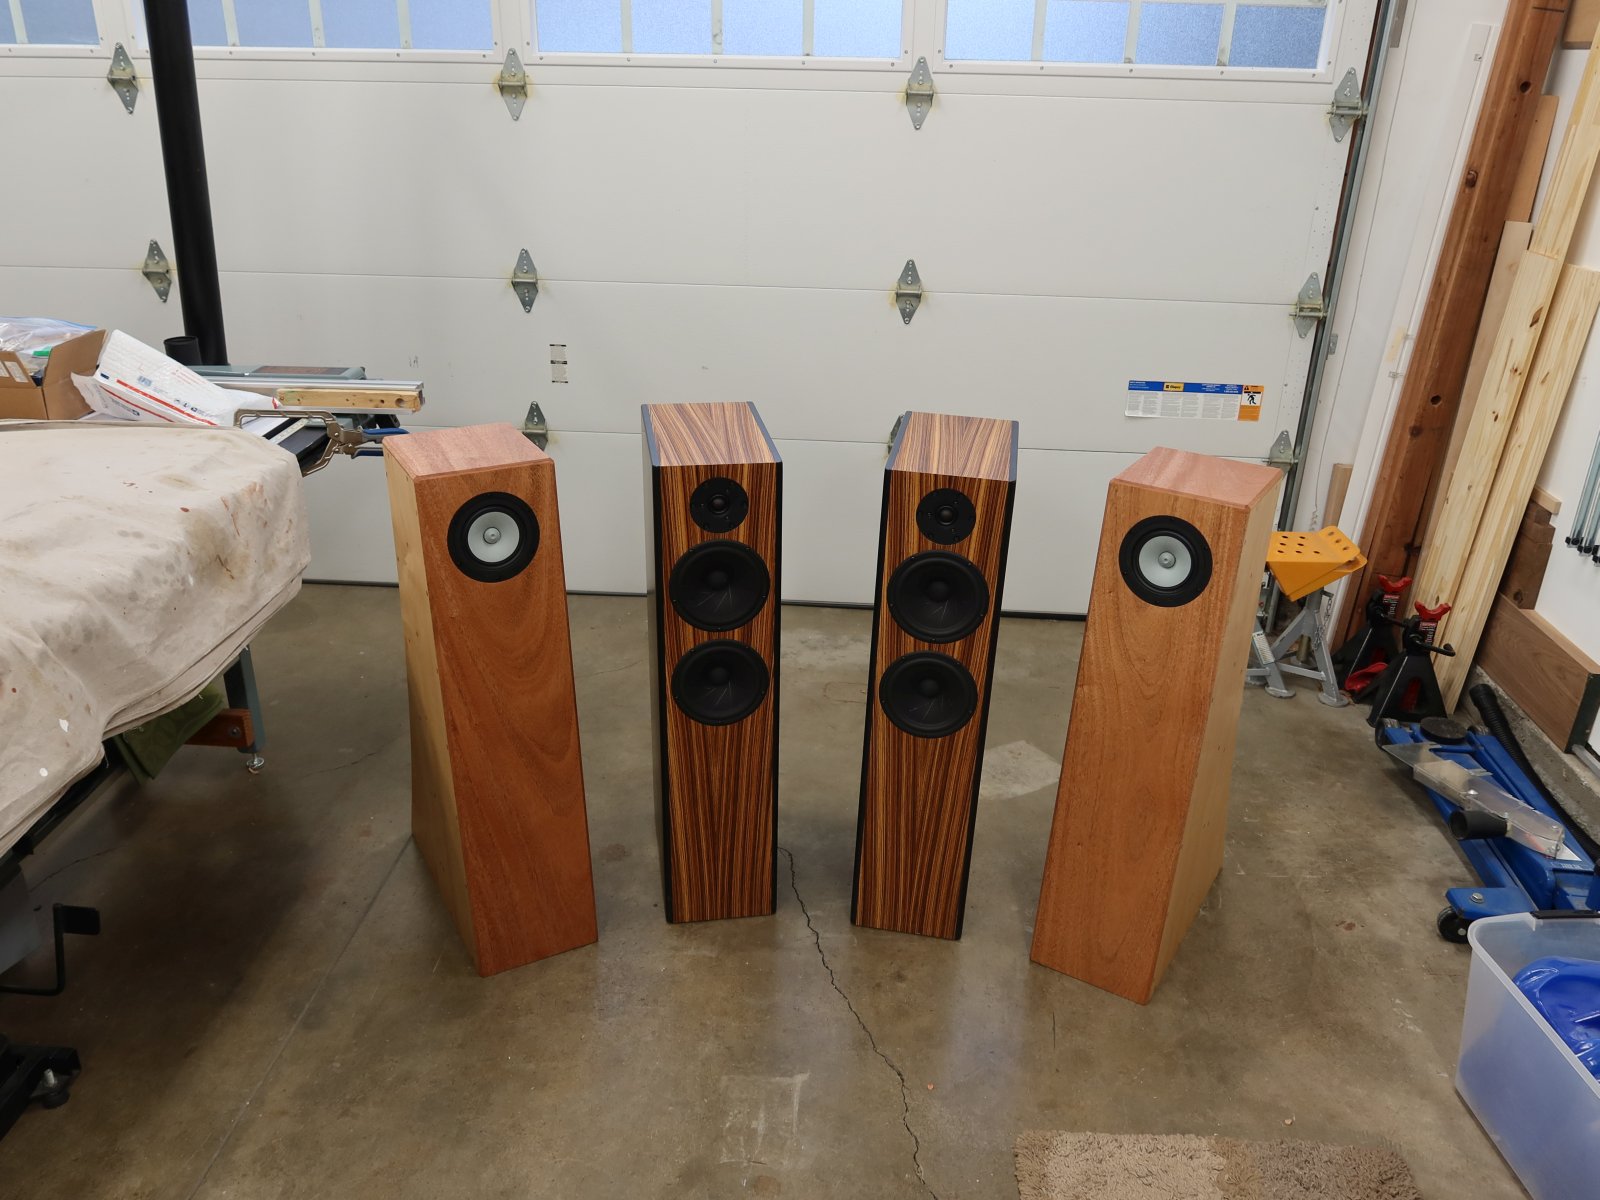
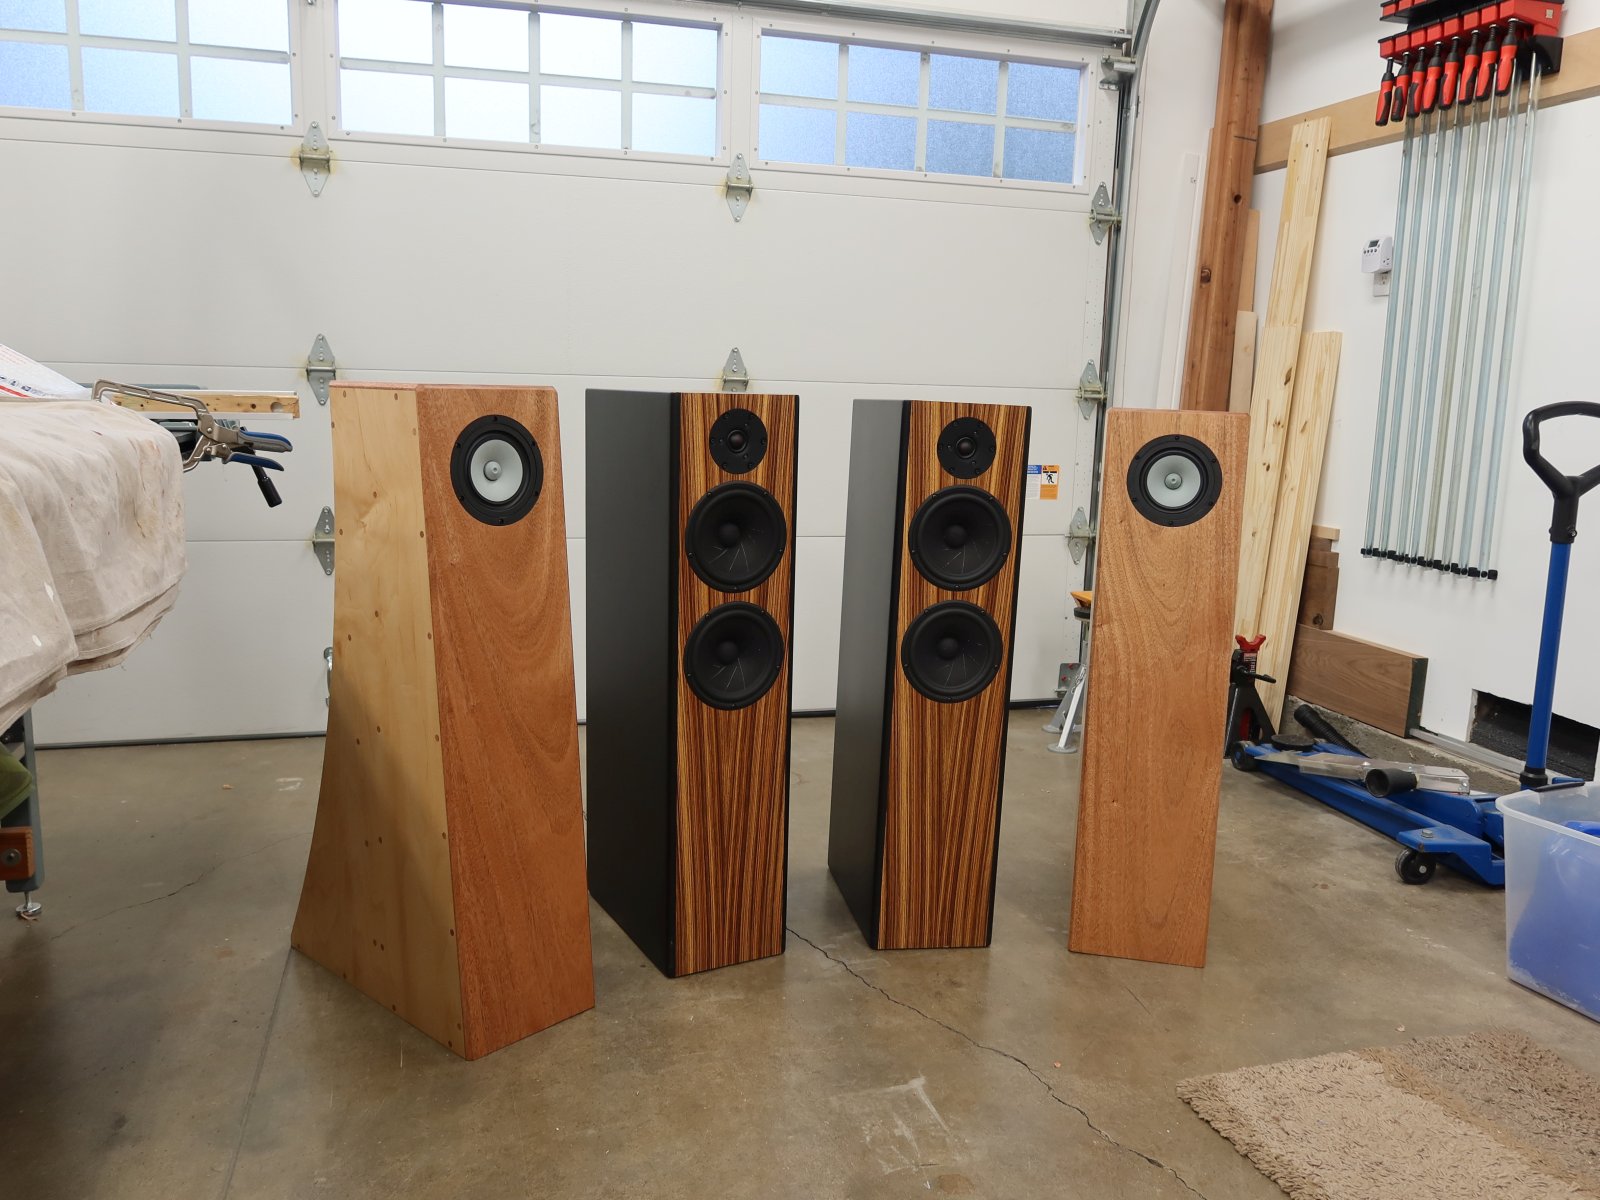
How do they sound?! Well, not withstanding the fact that I need to mess around with the stuffing more, I am VERY pleased and surprised with them. The bass output is crisp and potent, to a surprising degree considering that these are "small" drivers. The speakers are placed in corners in my living room, so bass reproduction benefits from that. I will say that the bass does not seem to go as low as the ported Zaph ZRT's (F3 35Hz) that I have been using for quite some time, but bass is noticeably cleaner as one would expect with a horn-loaded enclosure vs. ported. For now, I want to say that the mids and highs are also better with the FHXL, but that is totally subjective and may well be a result of the 10p's simply having greater response at those frequencies ("more treble"). Subjectively, I want to say that the soundstage is bigger and clearer with the FHXLs, but I sort of hate those kinds of descriptions, even if I feel like they are my honest experience.
Whatever the case, they sound fantastic and I am very happy with them. I have a loudspeaker test/measurement system on order from Parts-Express, and I will be doing a variety of measurements on the ZRTs and the FHXLs with various stuffing arrangements. Results will be posted in here as I get them.
For now, the speakers are driven with/from a DCX2496 and Crown XLi 1500 since that is what I have in my rack as part of a previous tri-amped system. The DCX2496 can probably be removed entirely now, although I may keep it in there to provide some output-limiting functionality to protect the FHXLs from the XLi 1500, and I may want to mess with some EQ functions once I get the measurement tools. As far as building an F6 amp or something like it, the global supply chain SNAFU means that I won't even start thinking about that until next year. I have an old German car to disassemble and repaint anyway, so that is going to keep me busy this winter.
As of the last update, I had everything all glued together. The next step was to trim the mahogany panels to be flush with all of their surrounding surfaces. For the lower-front and rear-top edges, where the adjoining panels were at 5°, I made a little fixture from scraps to incline the router so that it would make a co-planar trimmed surface.
Trimming went smoothly, mostly. I had originally desired sharp edges all around (aesthetics were to supersede acoustics there), but a couple of unplanned occurrences led me to add a 6.5mm chamfer around all front edges. First, the mahogany experienced some nasty tear-out in a couple of places. Second, and probably anyone who has done any amount of flush-trimming with a router knows this, the router is going to want to tilt/rock if it starts building up any sort of friction with the surface it is sliding on. Sadly, I did get a little section on one side edge where the bit ate-into it as the router tilted. It's one of those "only I will ever notice" things, although I also know that anyone who does any woodworking would find it. The 6.5mm chamfer worked well to entirely hide/remove the oopses in terms of them being visible from the front-profiles. Anyway, such is life. The tilt-oops sanded out well enough, and despite getting through the veneer, that speaker is in a corner of the living room where nobody really ever goes.
I ran a ton of experiments with plugs for the screw holes. Ultimately, mahogany plugs were chosen as the final solution.
With that decision made, I needed to counterbore all 96 screw holes. I started by driving all of the screws further in so that their heads were 9.5mm sub-flush. The taped-nail was a go/no-go depth gauge for double-checking the heads' depths. Removing them was the other option, but there was some indication that the heads would upset the veneer on their way out. So they remained in there, and these speakers will remain nicely over-built.
I made a large work surface on my drill press from ply scrap to support the enclosures and keep them level while counterboring.
It was slow going at first, but after making pencil marks with long rulers to help align the centers, things started to speed up. In all, I spent maybe an hour to do all of the holes.
After that, I placed the Alpair 10p's, marked the screw hole locations, drilled, and drove the screws in/out a few times to set the threads.
At this point, I really wanted to take a break from building and listen to them. The initial 40g of (not properly teased) stuffing was pulled out entirely so that I could start with an undamped reference. I immediately understood why the damping is important. Bass "increased" but it had a boomy, resonant sound.
I then proceeded to tease out 40g of stuffing VERY thoroughly. It took 3 hours. The picture shows 2 piles of 40g of stuffing...the left was my 3 hour project, and the right was the stuff that Dave said was not proper. At that point, I was d.o.n.e. teasing stuffing, and put 20g into the fronts of each speaker. This cleaned up the bass noticeably. At some point, I will need to fetch out the combined 120g of stuffing from the rear/throat of each and properly tease it, but even a week later I am not in the mood for more of that task.
I got set up to make some tapered plugs from mahogany scraps and pretty quickly had 100 of them.
The plugging technique which I settled on was as follows. I used a wooden chopstick to wipe a small amount of wood glue around the inner perimeter of a counterbored hole, started a tapered plug by hand and then hammered it down until it stopped 6mm in at the bottom of the counterbore. The glue was mainly to seal the end grain to minimize dark rings with the wood finish since the tapered plugs do not really need glue to stay permanently in place. Also, when dry the plugs would start in easily. The water from the glue almost instantly started swelling the wood a tiny amount, making it harder to get the plugs going. So, do one hole at a time and don't dawdle between applying glue and inserting a plug!
After 24 hours, I used my Japanese flush trim saw to...trim the plugs flush. It does a very nice job and is a pretty inexpensive tool.
Thereafter, I applied two coats of Tung Oil over the span of two days. It really brought out the wood's grain and character. Overall, I am very happy with how these look.
How do they sound?! Well, not withstanding the fact that I need to mess around with the stuffing more, I am VERY pleased and surprised with them. The bass output is crisp and potent, to a surprising degree considering that these are "small" drivers. The speakers are placed in corners in my living room, so bass reproduction benefits from that. I will say that the bass does not seem to go as low as the ported Zaph ZRT's (F3 35Hz) that I have been using for quite some time, but bass is noticeably cleaner as one would expect with a horn-loaded enclosure vs. ported. For now, I want to say that the mids and highs are also better with the FHXL, but that is totally subjective and may well be a result of the 10p's simply having greater response at those frequencies ("more treble"). Subjectively, I want to say that the soundstage is bigger and clearer with the FHXLs, but I sort of hate those kinds of descriptions, even if I feel like they are my honest experience.
Whatever the case, they sound fantastic and I am very happy with them. I have a loudspeaker test/measurement system on order from Parts-Express, and I will be doing a variety of measurements on the ZRTs and the FHXLs with various stuffing arrangements. Results will be posted in here as I get them.
For now, the speakers are driven with/from a DCX2496 and Crown XLi 1500 since that is what I have in my rack as part of a previous tri-amped system. The DCX2496 can probably be removed entirely now, although I may keep it in there to provide some output-limiting functionality to protect the FHXLs from the XLi 1500, and I may want to mess with some EQ functions once I get the measurement tools. As far as building an F6 amp or something like it, the global supply chain SNAFU means that I won't even start thinking about that until next year. I have an old German car to disassemble and repaint anyway, so that is going to keep me busy this winter.
Last edited:
bmwman91,
Congratulations on completing your build!
The end result is very nice. The mahogany front and top look great, and wooden plugs on the side have blended into the overall design motif.
The ZRT 2.5 way speakers are also beautiful.
Also good to know that you are liking the sound, though surprised that you are perceiving more treble with the Alpair 10P vs dedicated tweeter on the ZRT. The Alpair 10P mid-range is very good, and I would guess that is an area that the FHXL with the Alpair 10P would beat a lot of speakers. And yes, the low frequency output is impressive from a modest sized single driver (moreover one that is covering such a wide frequency range).
Enjoy the music and good luck with fixing up the "old German car" that needs your attention. If you don't mind, a few pics of that project would also be good. 😉
You mentioned part shortage and the F6 clone build - what parts are you falling short of? The F6 only uses a few parts altogether... the JFETs became scarce long time back before the recent parts shortage hit us. 😀
- Home
- Loudspeakers
- Full Range
- My FHXL Build Thread