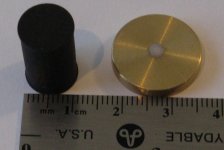


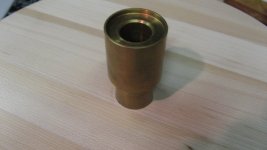
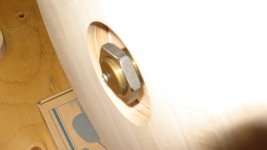
The bearing mounting hole fit and finish is so great that it fits like it was machined on a CNC lathe. The bearing will be perfectly held in place on the platform. Take note that the bearing is not installed yet on the picture. It is lifted to show the mounting hole.
Attachments
Very, very nice Sylvain! That will look wonderful when you put a finish on it. I am going to be doing the platter and plinth in aluminum due to the fact that I have access to the machine shop. I will try to clone the following:
An externally hosted image should be here but it was not working when we last tested it.
Algar emi:
You do know about the lead shot, right? Now is the time to do it, before you go any further!
Fran
You do know about the lead shot, right? Now is the time to do it, before you go any further!
Fran
Fran - would you care to elaborate on the theme ?
I've had a Teres in the makings for several years, but haven't got any further than making the bearing, - for a lot of reasons. Finally it seems logical to proceed, and making the plinth and platter. Laminated hardwoods are a fairly easy way of moving forward, so I too would be interested in the leadshot and chambering method. This supposedly serves two puposes, - to dampen resonances, and add mass, but is there a "system" behind this, or is it just arbitrarly milling the holes and filling them with leadshot?
There is another thread here about a new plinth for a SP-10, - layered plywood with alu sheets in between.... I've also been thinking about using a marble base, as I have good source not too far away .....
A new thread about plinth and platter materials and combinations would be very interesting, but I seriously doubt if it will be conclusive in any way, as there is an enourmous amount of "free thought" and heresay connected to this theme...
The lead shot dampens resonances as well as adding mass.
AFAIK the stuff to use is no. 9 lead shot, and for the plinth you need to shoot for between 40% and 60% of the mass of the plinth to be lead shot. So weigh the plinth and then you know how much you need to add. A mug full of lead shot I think weighs about 2kg if that helps give a visual fix. I think no 9 is about 1.5mm diameter. Gun reloading places will have it. I used about 20kgs in my TT, which weighs in total about 55-60kgs, so I'm slightly under the 40%.
I drilled 35mm holes in mine and basically drilled them all over whereever there wasn't going to be a mounting bolt. Having said that I did put more around the bearing mounting and under where the armboard mounts.
In my case I made my plinth from layered MDF and plywood. What I did was glue up all but the last layer, drill my holes, fill them and then add the last layer, glue up and then go back and finish the surface.
If you have a hardwood plinth already done, eg like algar-emi then what you need to do is make some plugs to seal in the lead shot.
AFAIK, the other thing is not to pack in the lead shot, but fill, tap the plinth so that it settles and then thats enough.
Fran
woodturner-fran said:The lead shot dampens resonances as well as adding mass.
AFAIK the stuff to use is no. 9 lead shot, and for the plinth you need to shoot for between 40% and 60% of the mass of the plinth to be lead shot. So weigh the plinth and then you know how much you need to add. A mug full of lead shot I think weighs about 2kg if that helps give a visual fix. I think no 9 is about 1.5mm diameter. Gun reloading places will have it. I used about 20kgs in my TT, which weighs in total about 55-60kgs, so I'm slightly under the 40%.
I drilled 35mm holes in mine and basically drilled them all over whereever there wasn't going to be a mounting bolt. Having said that I did put more around the bearing mounting and under where the armboard mounts.
In my case I made my plinth from layered MDF and plywood. What I did was glue up all but the last layer, drill my holes, fill them and then add the last layer, glue up and then go back and finish the surface.
If you have a hardwood plinth already done, eg like algar-emi then what you need to do is make some plugs to seal in the lead shot.
AFAIK, the other thing is not to pack in the lead shot, but fill, tap the plinth so that it settles and then thats enough.
Fran
The platter can not have random holes drilled for the lead shot. The platter must be balanced to prevent premature wear on the bearing. That means drilling holes in the platter equidistant around the perimeter and weighing a precise amount of shot for each hole. Mixing some silicone lubricant in with the shot will help damping also.
Kilowattski - you are right - I should have made that clear in my response above. My response above was for the plinth only - not the platter (seeing as the recent posts were about plinths rather than platters).
For the platter, yes, you must evenly space out the holes - 12 of them in mine IIRC and when you drill them drill each one to the same depth. You should be using a scales and filling each one to within 1g of each other. The silicone/oil/whatever is not really a good idea if you are making a wood platter as the oil will eventually seep through. Acrylic though you should be fine.
For the platter, yes, you must evenly space out the holes - 12 of them in mine IIRC and when you drill them drill each one to the same depth. You should be using a scales and filling each one to within 1g of each other. The silicone/oil/whatever is not really a good idea if you are making a wood platter as the oil will eventually seep through. Acrylic though you should be fine.
kilowattski, I think that woodturner-fran refered only to lead shot into the plinth not the platter.
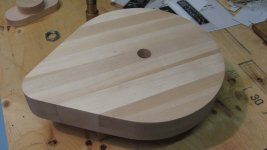
By the way kilowattski if you get something like in the picture it would be just gorgeous 😱
I may add lead shot. I got a friend that is a very good hunter. He'll know the spot where to buy it.
By the way kilowattski if you get something like in the picture it would be just gorgeous 😱
I may add lead shot. I got a friend that is a very good hunter. He'll know the spot where to buy it.
FWIW - Teres uses cocobolo as the timber for their turntables. It looks well, machines well and is pretty stable, although you would get that with say ebony, african blackwood as well.
If you are making a wood platter in particular you will need to be careful about both the timber selection and seasoning. You need something pretty dense and very even SG - otherwise you'll end up with an unbalanced platter. Construction would be best with several plys with alternating grain direction to aid stability. I would glue up the plys and then bring them inside to the house for a while, say maybe 6 weeks, then glue 'em up and bring em back inside again. Then machine roughly, bring them in again, then finally machine, put on a couple of coats of west epoxy or the like. That can be cut back to a matt surface and then a few coats of wiping varnish/danish oil etc to finish.
If you are machining this on a wood lathe, you need to drill out your centre hole and then make up a mandrel to mount on from this centre hole. That way gives you the best chance of having everything run true.
I know that sounds extreme, but believe me you do not want to see your platter changing shape 6 weeks after bringing it inside! binderedundat
Fran
If you are making a wood platter in particular you will need to be careful about both the timber selection and seasoning. You need something pretty dense and very even SG - otherwise you'll end up with an unbalanced platter. Construction would be best with several plys with alternating grain direction to aid stability. I would glue up the plys and then bring them inside to the house for a while, say maybe 6 weeks, then glue 'em up and bring em back inside again. Then machine roughly, bring them in again, then finally machine, put on a couple of coats of west epoxy or the like. That can be cut back to a matt surface and then a few coats of wiping varnish/danish oil etc to finish.
If you are machining this on a wood lathe, you need to drill out your centre hole and then make up a mandrel to mount on from this centre hole. That way gives you the best chance of having everything run true.
I know that sounds extreme, but believe me you do not want to see your platter changing shape 6 weeks after bringing it inside!
binderedundatFran
Hi, so I’m thinking that a 3” platter either acrylic or a wood/combo is the route I would like to go, is the Teres bearing probably the correct choice based on its availability and track record?
Are 3” acrylic and/or wood blanks available, is there someone who likes to machine these platters to adopt the bearing for those who need them for a fee of course???
Stan
Are 3” acrylic and/or wood blanks available, is there someone who likes to machine these platters to adopt the bearing for those who need them for a fee of course???
Stan
I used to work in a Motor Vehicle Test Center. We were buying 3" acrylic sheet to build a clear floor for the vehicle collision hall. Then we were able to film at high speed the car from under during collision.
Sad thing is, I think that 3" acrylic sheet were only available in 8'X4' sheet minimum, and by the way, they weight a TON 😱
Sad thing is, I think that 3" acrylic sheet were only available in 8'X4' sheet minimum, and by the way, they weight a TON 😱
I have a small amount of phonelic sheet in the shop. Interesting material. It machines cleanly and is ultra stable- and hard as rocks. I wonder if it's a material worth looking into??
http://www.mcmaster.com part no. 8560K921
This may work...comes in 12"x12"- so no mistakes! the next size is 24"x24" but almost 4x cost.
edit: bad link
This may work...comes in 12"x12"- so no mistakes! the next size is 24"x24" but almost 4x cost.
edit: bad link
- Status
- Not open for further replies.
- Home
- Source & Line
- Analogue Source
- My DIY Teres Turntable