Long time I haven't posted anything on diyaudio forum, but would like to share my latest build experience anybody who is /or would like to build similar compact setup for any purpose.
Last year, I had an urge to build small, compact system, that will be used mostly as party system for our private events , for up to 30-50 persons (birthdays, celebrations of any kind,etc.).
My goals were relatively specific:
As I am on this forum for 18 years (ufff, time really flies), I've collected quite a few ideas, that definitely helped to speed up choice of each component.
Before I start with further explanation, I would like to thank first to Mr. Martinsson, as his work on THAM-series was the main cause why I went with THAM 12 route.
Additionally, he also experimented with line array columns based on small fullrangers, which I wanted to explore as well.
So the building process went like this:
1.) Bass bin/ subwoofer choice:
As I wanted to have relatively compact system based on tapped horns, I was aware that I will have to sacrifice low end extension.
Initially I was aiming for THAM 15 or Jbell SS15, which have better extension, but then I settled down eventually on THAM12.
Considering that now this is 10 years old design, there are plenty of tested drivers that are suitable for this box.
2.) Line array column:
In last years, at home I mostly listen to fullrange speakers anyway (my home system is based on LX Mini speakers, with Hypex DSP & amps) , and I am pleasantly surprised by modern fullrange drivers.
As there was lot of good reviews on "FaitalPro" small fullrangers, I decided to go with that route => so my column line arrays will be based on 12 Faital Pro 3fe35 per each side.
3.) Plate amplifiers with DSP:
There were many combinations, from making my custom plate amps by combining amplifier kits & DSP kits, but in the end when all costs are calculated, the best solution was "Hypex" FA502 plate amp => one plate amp would be installed on back of each THAM12.
As each FA502 can produce 2x350W on 8 Ohm or 2x500W on 4 Ohm, this should be sufficient for my purposes, as I don't require 140dB+ SPL.
So Channel A would power THAM12, and Channel B would power column speaker.
In case that THAM's would require more power, I could simply rewire each FA502 to bridge mode and power each THAM 12 with 1200W , but would then require external amp & DSP for line array.
4.) Initial design:
THAM12 dimensions are already known, and I kept them original the only things that I have modified:
The fullrange column box design was a little bit more involved, as I didn't use completed plan, but checked various recommendations on 3FE35 boxes, and checked dimensions of various PA manufacturers which use similar small fullrange drivers, and in the end created custom design.
Of course, designing closed box alignment is much more forgiving, than designing TH, especially as I have DSP available, so I didn't worry too much about that.
The most important things that I wanted to implement:
Last year, I had an urge to build small, compact system, that will be used mostly as party system for our private events , for up to 30-50 persons (birthdays, celebrations of any kind,etc.).
My goals were relatively specific:
- To have fully active system , with integrated DSP,
- To have two smaller bass bins/subwoofers and two satellites,
- To have line array based on column of fullrange speakers,
- To have bass bin/subwoofer based on tapped horn design,
- To be able to produce up to 110dB SPL on 10 m distance,
- To use robust but affordable PA drivers,
- Most important, to have very good sound quality,
As I am on this forum for 18 years (ufff, time really flies), I've collected quite a few ideas, that definitely helped to speed up choice of each component.
Before I start with further explanation, I would like to thank first to Mr. Martinsson, as his work on THAM-series was the main cause why I went with THAM 12 route.
Additionally, he also experimented with line array columns based on small fullrangers, which I wanted to explore as well.
So the building process went like this:
1.) Bass bin/ subwoofer choice:
As I wanted to have relatively compact system based on tapped horns, I was aware that I will have to sacrifice low end extension.
Initially I was aiming for THAM 15 or Jbell SS15, which have better extension, but then I settled down eventually on THAM12.
Considering that now this is 10 years old design, there are plenty of tested drivers that are suitable for this box.
2.) Line array column:
In last years, at home I mostly listen to fullrange speakers anyway (my home system is based on LX Mini speakers, with Hypex DSP & amps) , and I am pleasantly surprised by modern fullrange drivers.
As there was lot of good reviews on "FaitalPro" small fullrangers, I decided to go with that route => so my column line arrays will be based on 12 Faital Pro 3fe35 per each side.
3.) Plate amplifiers with DSP:
There were many combinations, from making my custom plate amps by combining amplifier kits & DSP kits, but in the end when all costs are calculated, the best solution was "Hypex" FA502 plate amp => one plate amp would be installed on back of each THAM12.
As each FA502 can produce 2x350W on 8 Ohm or 2x500W on 4 Ohm, this should be sufficient for my purposes, as I don't require 140dB+ SPL.
So Channel A would power THAM12, and Channel B would power column speaker.
In case that THAM's would require more power, I could simply rewire each FA502 to bridge mode and power each THAM 12 with 1200W , but would then require external amp & DSP for line array.
4.) Initial design:
THAM12 dimensions are already known, and I kept them original the only things that I have modified:
- Adding additional isolated space on rear side of the speaker for mounting FA502 plate amp,
- Adding aditional speakon connector plates,
- Adding M20 mount on top of the speaker (for pole mounting).
The fullrange column box design was a little bit more involved, as I didn't use completed plan, but checked various recommendations on 3FE35 boxes, and checked dimensions of various PA manufacturers which use similar small fullrange drivers, and in the end created custom design.
Of course, designing closed box alignment is much more forgiving, than designing TH, especially as I have DSP available, so I didn't worry too much about that.
The most important things that I wanted to implement:
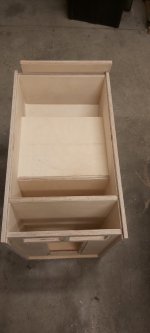
- Dividing whole volume of cabinet in three closed spaces, to minimize vibrations,
- To mount edge of the drivers as close each other as possible,
- To have around 6 Ohm impedance (suitable for almost any amplifier),
- To have rear panel removable (in case I would like to change something internally).
5.) Actual fabrication:
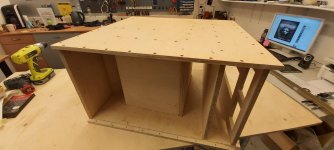
When I completed sketches of the final layout for both boxes, I've created 3D drawings, in order to check clearances and eventual interferences.
My intention was to build both boxes from 15mm birch plywood, and due fact that I have access to CNC router, complete 3D design was optimized for CNC machining.


In order to create strong glue joint between side panels & internal panels on Tham, and to simplify assembly, I've used two things:
a) Created 3mm deep x 15.25mm wide slots, that will be routed on CNC machine on internal side of left & right panels - these slots follow the horn path, so all internal panels should fit tightly inside these slots.
(NOTE: logically, due these slots on both side, I had to enlarge all internal panels to keep same internal dimensions).
b) Created 3mm through holes on both left & right panels - these holes are located exactly on the central line of internal panels, and will serve for locating wood screws later during assembly. Drilling will be done by CNC drill bit, as the first CNC operation.
When I completed sketches of the final layout for both boxes, I've created 3D drawings, in order to check clearances and eventual interferences.
My intention was to build both boxes from 15mm birch plywood, and due fact that I have access to CNC router, complete 3D design was optimized for CNC machining.
In order to create strong glue joint between side panels & internal panels on Tham, and to simplify assembly, I've used two things:
a) Created 3mm deep x 15.25mm wide slots, that will be routed on CNC machine on internal side of left & right panels - these slots follow the horn path, so all internal panels should fit tightly inside these slots.
(NOTE: logically, due these slots on both side, I had to enlarge all internal panels to keep same internal dimensions).
b) Created 3mm through holes on both left & right panels - these holes are located exactly on the central line of internal panels, and will serve for locating wood screws later during assembly. Drilling will be done by CNC drill bit, as the first CNC operation.
Once when 3D design was completed, I've compared dimensions of all finished panels, and tried to optimize layout of panels on standard 15mm birch plywood sheets, in order to minimize waste.
Due fact that our CNC machine has 1200x1200mm cutting area, and standard 15mm birch sheet was 1250mm x 2500mm, my idea was first to cut complete sheet to three pieces, so each piece is 1250mm x 830mm.
These dimensions fit perfectly on our CNC router, and would extract maximum from each sheet.
Calculated quantity for all four speaker boxes is 3 full sheets, and lumber shop cut them to 9 identical pieces.
When I knew the working dimensions of each sheet, it was relatively easy to place each panel in CAM software, and to optimize layout.
The only dilemma was how to create all 45° cuts on internal panels => I could do it in traditional way (by angled circular table saw), but considering that everything else will be cut on CNC, I decided to go with more complicated route use 90° V- router bit, and to cut all 45° cuts with this bit.
This required little bit calculation and/or creating testing pieces, in order to get precise finished dimensions.
Last edited:
After cutting all panels on CNC, I've cleaned the edges, and check panels for fitment.
Baffle panel had slight 3° cut on the front side, and this was the only cut that had to be done manually - for that I created simple jig like on picture down below:

Once when baffle panel was secured on waste piece of plywood like on pic above, I simply took belt sander and took material until front edges of baffle panel and waste piece were on same plane.
From this point , assembly went relatively straightforward => first, I've decided to assembly one THAM 12 , as it is more complicated than line array column.
This is short description of assembly procedure:
a) I've position one pre-drilled side panel on the working table,
b) then I've took one internal panel and add wood glue on the edge which will be glued,
c) Then carefully position glued edge inside 3mm deep slot, and adjust exact position of the panel,
d) After that, I push manually internal panel to squeeze glue as much as possible from the slot, and then carefully rotate both panels so that I have clear access to pre-drilled holes,
e) Then I've used drill bit 3mm, and drill through one of existing hole to about 25mm depth,
f) After that, I've used 3x20mm wood screw and tighten the screw,
g) Now when the panel is secured from movement, I simply drill all other holes for that panel, and tighten all screws.
After that I check all joints, wipe excessive glue with finger from both sides, and go to next internal panel.


Baffle panel had slight 3° cut on the front side, and this was the only cut that had to be done manually - for that I created simple jig like on picture down below:
Once when baffle panel was secured on waste piece of plywood like on pic above, I simply took belt sander and took material until front edges of baffle panel and waste piece were on same plane.
From this point , assembly went relatively straightforward => first, I've decided to assembly one THAM 12 , as it is more complicated than line array column.
This is short description of assembly procedure:
a) I've position one pre-drilled side panel on the working table,
b) then I've took one internal panel and add wood glue on the edge which will be glued,
c) Then carefully position glued edge inside 3mm deep slot, and adjust exact position of the panel,
d) After that, I push manually internal panel to squeeze glue as much as possible from the slot, and then carefully rotate both panels so that I have clear access to pre-drilled holes,
e) Then I've used drill bit 3mm, and drill through one of existing hole to about 25mm depth,
f) After that, I've used 3x20mm wood screw and tighten the screw,
g) Now when the panel is secured from movement, I simply drill all other holes for that panel, and tighten all screws.
After that I check all joints, wipe excessive glue with finger from both sides, and go to next internal panel.
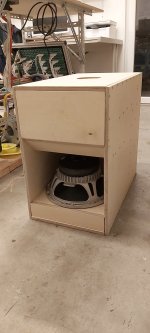
I've decided to go with "Oberton" B450 drivers for THAM12 - the price was good and it models OK in Hornresp.
Here are couple of pics with testing fitment with driver itself:


The line array column was much quicker to assembly, as I didn't used wood screws - when all parts were cut, it was just matter of gluing & clamping:


Here are couple of pics with testing fitment with driver itself:
The line array column was much quicker to assembly, as I didn't used wood screws - when all parts were cut, it was just matter of gluing & clamping:
Attachments
Before I started line column assembly, I've already soldered all 24 "Faital Pro" 3FE35 fullrange drivers. Then, when I completed assembly of line arrays, I've checked fitment of "Faital Pro" 3FE35 drivers - unfortunately, I realized that I've made holes on front baffles just a little bit too small, so I couldn't install the driver with cables already soldered (!).
The problem is with the 3FE35 ferrite magnets - they are huge when compared with the total driver size, and are basically almost same diameter as speaker cutout. So when you add thickness of the cables, it is basically impossible to install them unless you damage something.
I've measured how much I need to enlarge each hole, and it seems that I have to enlarge each hole at least 1.5mm larger - to be on safe side, I've decided to enlarge 2mm total.
To remove precisely such small amount of material on all 24 holes, I've decided to use hand-held router, with precise jig created on CNC machine.
So I found out waste piece of 19mm particle board, quickly designed jig with 12 holes that will fit tightly on the speaker baffle, so that all holes are co-centric.
With this jig, enlarging all holes went quite quickly, and finally all drivers can be installed on baffle (though fitment is tight):
After all boxes were completely finished, it was time to start preparation on final finish: I've decided to go with black "Tuff Cab" coating.
To prepare properly all boxes, I've used following method:
a) First, all critical areas with biggest imperfections were flatten with belt sander (40 and 80 grit).
b) Then, I've used orbital sander with 80, and 120 grit,
c) After that, I've used standard wood putty, and covered all countersunk screws, and all small crevices.
d) Then all surfaces were sanded with orbital sander once more, and second layer of wood putty was applied to areas where required,
e) Checked all surfaces with hand, just to see if there is requirement to fill extra wood putty, but it seemed OK for final coating.


Then I've used "Tuff Cab" coating to apply first layer - I actually never used, but it is indeed straightforward:
a) I've used standard foam roller, and simply took coating and spread it as much even as possible,
The surface would look mat black, without any structure on the surface,
b) Then I've applied second layer with standard roller, and after that, I've simply took dry structured roller ,and went through fresh layer of coating to create
structure effect,
c) Same method was used until approx. fourth layer - each layer would look more structural, and more aesthetically pleasing.
After all layers were applied, I've left all boxes few hours on sun to dry, and then put them in workshop to completely dry until tomorrow:


To prepare properly all boxes, I've used following method:
a) First, all critical areas with biggest imperfections were flatten with belt sander (40 and 80 grit).
b) Then, I've used orbital sander with 80, and 120 grit,
c) After that, I've used standard wood putty, and covered all countersunk screws, and all small crevices.
d) Then all surfaces were sanded with orbital sander once more, and second layer of wood putty was applied to areas where required,
e) Checked all surfaces with hand, just to see if there is requirement to fill extra wood putty, but it seemed OK for final coating.
Then I've used "Tuff Cab" coating to apply first layer - I actually never used, but it is indeed straightforward:
a) I've used standard foam roller, and simply took coating and spread it as much even as possible,
The surface would look mat black, without any structure on the surface,
b) Then I've applied second layer with standard roller, and after that, I've simply took dry structured roller ,and went through fresh layer of coating to create
structure effect,
c) Same method was used until approx. fourth layer - each layer would look more structural, and more aesthetically pleasing.
After all layers were applied, I've left all boxes few hours on sun to dry, and then put them in workshop to completely dry until tomorrow:
6.) Wiring:
After all external coats were fully dried, I painted internal visible area of the THAM's => I've didn't used structural roller, but just ordinary paint brush, and spread couple of thin layers.
Also, rear THAM panel, where plate amplifier will be installed was also painted with paint brush.
While paint was drying on THAMs, I've started to install 24 "FaitalPro" fullrange drivers => this took quite long time, because it is quite easy to damage speaker cone or suspension when you tighten 96 small wood screws")
Fortunately, my screwdriver didn't slipped, so all drivers were intact:


Regarding "Faital Pro" 3fe35 wiring arrangement:
a) Before driver installation, I already soldered 0.75mm2 wires to all drivers, and put heatshrink on all soldered connections,
As I wrote before, this is essential, as once after driver is attached to baffle, there is almost no space from behind to solder or desolder wires to speaker terminal due large ferrite magnet.
b) When all drivers were attached to front baffle, I rotated box to have clear access from behind.
As I purchased 8 ohm speaker drivers, I've decided to connect 4 speakers in parallel, to create 3 groups, and then I connected each group in series.
This would effectively create 6 Ohms impedance (4 drivers in parallel=2Ohm; 2Ohm + 2 Ohm + 2Ohm =6 Ohm)
c) To simplify wire connections, I've decided to use "Wago" connectors =>once after connections were completed, I wrapped isolation PVC tape around "Wago" connectors, just to avoid accidental releasing/loosening of connection.
d) After all "Wago" connectors were secured, I wrapped all "Wago" connectors with foam => this was done to avoid possibility of knocking/vibrating inside cabinet.
I've designed rear panel to be removable, so I had to find a way to properly seal rear panel.
If I used thick gasket, rear panel would protrude too much, so I've used different method:
a) First I've installed rear panel, and drill holes that will be later used for wood screws,
b) Then I remove rear panel completely,
c) I took polyurethane sealant, and spread it carefully on the rear sealing area of the box,
I've tried to create uniform and relatively thin layer as much as possible, and then left it to partially cure,
d) After some time, I've check with my finger if the surface is not sticky, then I took rear panel, and spread some grease on the sealing edges (to avoid that polyurethane sealant attach to panel),
e) Then I carefully installed rear panel, and attached few wood screws to put pressure on the sealant, and to shape it according to rear panel,
f) After that, I removed rear panel, and left that sealant fully cure.


After all external coats were fully dried, I painted internal visible area of the THAM's => I've didn't used structural roller, but just ordinary paint brush, and spread couple of thin layers.
Also, rear THAM panel, where plate amplifier will be installed was also painted with paint brush.
While paint was drying on THAMs, I've started to install 24 "FaitalPro" fullrange drivers => this took quite long time, because it is quite easy to damage speaker cone or suspension when you tighten 96 small wood screws
Fortunately, my screwdriver didn't slipped, so all drivers were intact:
Regarding "Faital Pro" 3fe35 wiring arrangement:
a) Before driver installation, I already soldered 0.75mm2 wires to all drivers, and put heatshrink on all soldered connections,
As I wrote before, this is essential, as once after driver is attached to baffle, there is almost no space from behind to solder or desolder wires to speaker terminal due large ferrite magnet.
b) When all drivers were attached to front baffle, I rotated box to have clear access from behind.
As I purchased 8 ohm speaker drivers, I've decided to connect 4 speakers in parallel, to create 3 groups, and then I connected each group in series.
This would effectively create 6 Ohms impedance (4 drivers in parallel=2Ohm; 2Ohm + 2 Ohm + 2Ohm =6 Ohm)
c) To simplify wire connections, I've decided to use "Wago" connectors =>once after connections were completed, I wrapped isolation PVC tape around "Wago" connectors, just to avoid accidental releasing/loosening of connection.
d) After all "Wago" connectors were secured, I wrapped all "Wago" connectors with foam => this was done to avoid possibility of knocking/vibrating inside cabinet.
I've designed rear panel to be removable, so I had to find a way to properly seal rear panel.
If I used thick gasket, rear panel would protrude too much, so I've used different method:
a) First I've installed rear panel, and drill holes that will be later used for wood screws,
b) Then I remove rear panel completely,
c) I took polyurethane sealant, and spread it carefully on the rear sealing area of the box,
I've tried to create uniform and relatively thin layer as much as possible, and then left it to partially cure,
d) After some time, I've check with my finger if the surface is not sticky, then I took rear panel, and spread some grease on the sealing edges (to avoid that polyurethane sealant attach to panel),
e) Then I carefully installed rear panel, and attached few wood screws to put pressure on the sealant, and to shape it according to rear panel,
f) After that, I removed rear panel, and left that sealant fully cure.
After completing both line array boxes, I was anxious to hear them, even before I installed "Hypex" plate amps in THAMs - so I temporarily placed each line array box on dedicated THAM 12, and connected quickly both speakers to my old LM3886-based amplifier, that I used mostly for testing purposes.
Even though this amplifier provides around 45W per channel (8 ohm), it was more than sufficient to drive these columns very loud indoors - but this is not surprising considering that sensitivity of each speaker should be slightly higher than 100dB/W.
But even more surprising was clear & well defined sound, which seems to me definitely more hi-fi than typical PA, even without any DSP corrections.
Low frequency extension is of course limited by closed box design and small driver diameter, and I would say that it drops sharply above 100-something Hz, but high frequency extension is much better than expected.

Now with line arrays providing background music & running-in, I've played with "Hypex" FA502 plate amp installation.
First I had to check if mechanically everything can be installed - to my relief, the cut-out for plate amps was correctly machined so "Hypex" FA502 fit perfectly and flush with THAM rear end.
Depth of the internal space reserved for plate amps is also OK, so plate amp has sufficient clearance from all sides.
The cut-outs for two Speakon plates was a little too tight for my taste, but it is not so critical.
Somebody will probably ask: "Why I installed two plates, with four Speakon connectors total?"
My idea is following:
a) First speakon plate will have:
b) Second speakon plate will have:
- Left & right connector in parallel with CH #2 amp output.
This would enable various combinations, for example:
a) Default setup (minimum power) =>each plate amp powering one THAM 12 & one line array:
b) Bridge setup #1 => one plate amp in bridge powering two THAM 12 in parallel, second plate amp powering two line arrays
c) Bridge setup #2 => each plate amp is in bridge mode, and powering only one THAM 12 (external amp required for line arrays).


Even though this amplifier provides around 45W per channel (8 ohm), it was more than sufficient to drive these columns very loud indoors - but this is not surprising considering that sensitivity of each speaker should be slightly higher than 100dB/W.
But even more surprising was clear & well defined sound, which seems to me definitely more hi-fi than typical PA, even without any DSP corrections.
Low frequency extension is of course limited by closed box design and small driver diameter, and I would say that it drops sharply above 100-something Hz, but high frequency extension is much better than expected.
Now with line arrays providing background music & running-in, I've played with "Hypex" FA502 plate amp installation.
First I had to check if mechanically everything can be installed - to my relief, the cut-out for plate amps was correctly machined so "Hypex" FA502 fit perfectly and flush with THAM rear end.
Depth of the internal space reserved for plate amps is also OK, so plate amp has sufficient clearance from all sides.
The cut-outs for two Speakon plates was a little too tight for my taste, but it is not so critical.
Somebody will probably ask: "Why I installed two plates, with four Speakon connectors total?"
My idea is following:
a) First speakon plate will have:
- Left connector for CH#1 amp output,
- Right connector for THAM 12 driver.
b) Second speakon plate will have:
- Left & right connector in parallel with CH #2 amp output.
This would enable various combinations, for example:
a) Default setup (minimum power) =>each plate amp powering one THAM 12 & one line array:
b) Bridge setup #1 => one plate amp in bridge powering two THAM 12 in parallel, second plate amp powering two line arrays
c) Bridge setup #2 => each plate amp is in bridge mode, and powering only one THAM 12 (external amp required for line arrays).
Attachments
When both plate amps were internally wired, and installed in position, then it was finally time for initial testing:
(NOTE: unfortunately, I still didn't had suitable pole with M20 thread that can raise line arrays 500-600mm cca. so temporarily line arrays are simply threaded to M20 flanges)


The good thing is that I've manage to arrange visit of local owner of pro sound shop, which has suitable measurement equipment that can help me with DSP adjustments.
- As at that particular time I didn't had measuring mic and/or equipment, that could give me exact frequency response, I've simply created "crude" LP & HP filters in "Hypex" DSP software for both channels, without any PEQ or time alignment applied,
- For THAMs I've used HP at 38Hz, with 24dB LR and LP around 130Hz, with 24dB LR,
- And for line arrays, I've used HP at 130Hz, with 24dB LR, and didn't used HP.
- Even without any EQ,, sound was very, very good, though it was obvious that some boost cut should be applied after 130Hz on certain sharp peaks on THAMs, and that some small corrections should be done on line array midrange as well, and eventually small boost on highest frequencies, but nothing outrageous,
(NOTE: unfortunately, I still didn't had suitable pole with M20 thread that can raise line arrays 500-600mm cca. so temporarily line arrays are simply threaded to M20 flanges)
The good thing is that I've manage to arrange visit of local owner of pro sound shop, which has suitable measurement equipment that can help me with DSP adjustments.
And now some video clips, of the "raw" setup (still without any DSP correction applied)
When I was searching for THAM 12 sound tests, there is no many video materials on the web actually, and I am pretty sure that many people would like to hear them at least through PC/laptop.
Also, there was lot of discussion about benefits and drawbacks of line array columns with small diameter full range speakers, and I never found good video clips.
I personally always like to hear some video clips of speakers/systems that interest me, though I am well aware that typical cell phone mic can't capture sound faithfully.
Therefore, I created four separate video clips, that are recorded from various distances, so you can get at least approximate idea how the system sounds.
(NOTE: please note that due fact that my testing was done during normal working week, in close proximity of residential houses, sound levels had to be limited, and choice of my test tracks was limited to audiophile vocal tracks or jazzy/easy listening songs, in order not to upset neighbours with bass.
Nevertheless, after couple of hours I started some tests with some EDM tracks, just to satisfy my curiosity and then one neighbor threaten to call police if we don't stop immediately...
1.) Video #1:
Near field listening, around 3-4 meters from speakers:
(Song: Track no.5; Audiophile Hi-Res System Test CD)
2.) Video #2 & Video #3:
Listening from 30m distance, and moving closer:
(Songs: Livingston Taylor-Baker Street; The World's Greatest Audiophile Vocal Recordings Vol II)
Casey Abrams-Have You Ever Seen The Rain; The World's Greatest Audiophile Vocal Recordings Vol II.)
3.) Video #4:
Listening from around 90m (!) distance, and slowly moving closer near speakers:
(Song: Valerie Joyce-That's What Friends Are For; The World's Greatest Audiophile Vocal Recordings Vol II CD)
Attachments
In order to tune properly DSP, I've managed to get assistance from local PA equipment distributor - the owner was interested to check my setup, so he brought measurement equipment, and spent half day with me in order to get good results.

The area where testing will be done is not ideal, as it has continuous background noise/hiss (from car traffic), and this specific day was quite windy.
Nevertheless, we used 5 measuring mics, each on approx,. 1m height. , and all mics were positioned in slight bow, with 2m distance between each mic,
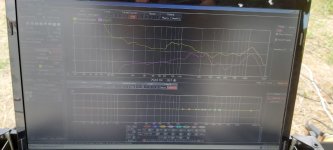
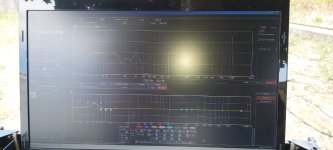
First, we checked unfiltered/unequalized , raw response from one THAM 12.
The frequency response followed quite closely freq. response from Hornresp simulation, except three things:
a) The low end response was little bit higher than in simulation (-3dB around 60Hz, instead 55Hz),
b) Two peaks after usable freq. range were considerably lower in SPL than on Hornresp simulation (this fact is already confirmed numerous times).
c) There was small peak around 82 Hz, but nothing extreme.
At that moment, it was decided to correct two things with DSP:
a) Adding small gain around 52Hz (to bring -3dB point on 50Hz),
b) Reducing some gain around 82Hz (to reduce slight peak).
This small corrections created relatively flat & usable are from 50Hz to 135Hz, which can be seen from screenshot down below:

The area where testing will be done is not ideal, as it has continuous background noise/hiss (from car traffic), and this specific day was quite windy.
Nevertheless, we used 5 measuring mics, each on approx,. 1m height. , and all mics were positioned in slight bow, with 2m distance between each mic,
First, we checked unfiltered/unequalized , raw response from one THAM 12.
The frequency response followed quite closely freq. response from Hornresp simulation, except three things:
a) The low end response was little bit higher than in simulation (-3dB around 60Hz, instead 55Hz),
b) Two peaks after usable freq. range were considerably lower in SPL than on Hornresp simulation (this fact is already confirmed numerous times).
c) There was small peak around 82 Hz, but nothing extreme.
At that moment, it was decided to correct two things with DSP:
a) Adding small gain around 52Hz (to bring -3dB point on 50Hz),
b) Reducing some gain around 82Hz (to reduce slight peak).
This small corrections created relatively flat & usable are from 50Hz to 135Hz, which can be seen from screenshot down below:
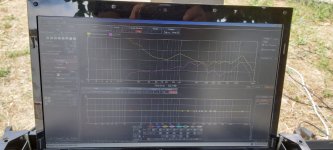
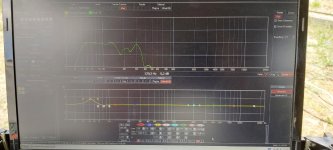
After adjusting THAM 12 "Hypex" DSP, we moved to line array "Hypex" DSP adjustment - we used same equipment (Easera SysTune with 5 mics and pink noise).
The PEQ curve can found on following pic:

After final DSP adjustment on line arrays, I've had to make some protection grills for them , as these small fullrange membranes could be easily damaged.
So, I've found some old steel grills (from some old, 3-way PA speakers) and checked if they will have sufficient area to create new grills for two line arrays.
As these grills were little bit on a short side, I've created 2-part grills: one part is covering top 6 speakers, and another part is covering lower 6 speakers.
The most challenging part was final shaping/bending side edges, so that all sides are nice & rectangular and height from driver is equal on all four corners - therefore, I had to cut one plywood jig that served for final shaping with hammer, hydraulic press and angle grinder:


The PEQ curve can found on following pic:
After final DSP adjustment on line arrays, I've had to make some protection grills for them , as these small fullrange membranes could be easily damaged.
So, I've found some old steel grills (from some old, 3-way PA speakers) and checked if they will have sufficient area to create new grills for two line arrays.
As these grills were little bit on a short side, I've created 2-part grills: one part is covering top 6 speakers, and another part is covering lower 6 speakers.
The most challenging part was final shaping/bending side edges, so that all sides are nice & rectangular and height from driver is equal on all four corners - therefore, I had to cut one plywood jig that served for final shaping with hammer, hydraulic press and angle grinder:
Attachments
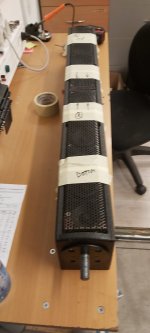
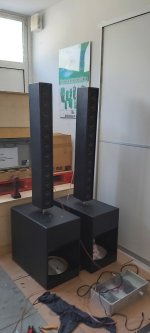
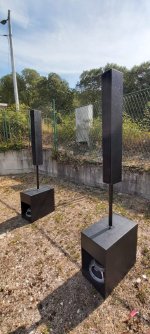
Here are some pics of completed line arrays, attached to active THAM 12's with steel distance poles (M20 thread, 600mm length) - they increase height so that center of line arrays is around 1,8 m from ground.
This height is much more suitable for good acoustical covering of the standing crowd, especially for the higher frequencies:


This height is much more suitable for good acoustical covering of the standing crowd, especially for the higher frequencies:
Attachments
Bubba,2.) Line array column:
- To be able to produce up to 110dB SPL on 10 m distance,
As there was lot of good reviews on "FaitalPro" small fullrangers, I decided to go with that route => so my column line arrays will be based on 12 Faital Pro 3fe35 per each side.
The fullrange column box design was a little bit more involved, as I didn't use completed plan, but checked various recommendations on 3FE35 boxes, and checked dimensions of various PA manufacturers which use similar small fullrange drivers, and in the end created custom design.
Great work and documentation of the project, looks like a nice, compact system!
110dB at 10 meters would require 130 dB at 1meter, within what a pair of Tham's could do at at your crossover frequency of 130Hz.
Took me a while to figure you were using 3FE25 (Faital Pro does not make a 3FE35
)Reaching Xmax at 130Hz, the 3FE25 would be about 14 dB short of 110dB at 10 meters, even if a full +6dB coupling between the two separate column cabinets could be achieved down the center.
Considering your use as party speakers, probably plenty loud, but as you posted in the Live Sound PA section, where guitar amps and drums often hit well over 120dB at one meter, a little on the light side to get vocals above the stage level.
Cheers,
Art
¸Dear Art,Bubba,
Great work and documentation of the project, looks like a nice, compact system!
110dB at 10 meters would require 130 dB at 1meter, within what a pair of Tham's could do at at your crossover frequency of 130Hz.
Took me a while to figure you were using 3FE25 (Faital Pro does not make a 3FE35
Reaching Xmax at 130Hz, the 3FE25 would be about 14 dB short of 110dB at 10 meters, even if a full +6dB coupling between the two separate column cabinets could be achieved down the center.
View attachment 1218765
Considering your use as party speakers, probably plenty loud, but as you posted in the Live Sound PA section, where guitar amps and drums often hit well over 120dB at one meter, a little on the light side to get vocals above the stage level.
Cheers,
Art
Thanks, I really appreciate that you like this small system. I must admit that I follow your posts for quite long time, and enjoy reading them, especially the Keystone Sub thread , which is why I recently have to build my Keystone Sub (with 18" Beyma driver), that is intended to be used as support to THAM 12's for lowest octave
Anyway, I'll add pics, text & REW measurements related to Keystone Sub in this thread later but now just to answer you:
- Yes, I accidentally wrote 3FE35 , but I am actually using 3FE25 as you noticed
- I believe that you used this Xmax calculator for SPL calculator:
Now when you mentioned 110dB/10m I see that maybe I didn't clearly explained frequency range of desired SPL:
- THAMs are around 100dB/1W, so as you correctly stated both THAM's with sufficient power could achieve 130dB/1m => this corresponds roughly to 110dB on 10 m distance, and that was the number I was actually aiming for (110dB/10m distance on bass frequencies)
Things are getting interesting with line arrays, things are even more interesting: their measured sensitivity is around 101dB/1W/1m, so basically same as THAMs.
- As most of the listeners prefer some kind of loudness curve, my idea was to create 3 different settings on FA502:
a) Line array channel reduced volume -6dB compared to THAM channel,
b) Line array channel reduced volume -9dB compared to THAM channel,
c) Line array channel reduced volume -12dB compared to THAM channel,
- So if we have line arrays 101dB/1W sensitivity, with 256W (purely theoretically, not accounting for Xmax!) , we should have 124dB/1m.
If I use FA502 settings with -6dB reduced output, we have 124dB -6dB =118 dB/1m.
But considering that line arrays output drops only 3dB per doubling distance, I should still get around 109dB per 8m, per speaker which is not far away from goal, even with -6dB reduced output on FA502.
I was skeptical regarding this calculations and had concerns regarding Xmax even before I started my built, so I searched through internet in order to find if some manufacturer used 3Fe25 for PA purposes in line array arrangement 8column speakers) and found this:
https://www.manualowl.com/m/Carvin/TRX3903/Manual/452054
According to spec sheet, this column has 100dB sensitivity (with 9 drivers) and has 128dB/1m peak output capability, and according to some sources it uses 3fe25 drivers.
If we reduce peak output for standard 6 dB, this should be 122dB/1m nominal output, which should still give more than 110dB on 10m distance.
Do you think that these specs can't be reached without exceeding Xmax, even with reduced crossover frequency of 160 Hz ?
Even with raising the crossover frequency to 160 Hz, Carvin's column will fall around 20dB short of 110dB at 10 meters.
The idea that line arrays drop only 3dB per doubling of distance is only valid in the near field, and is because at close range the high frequencies are lost due to destructive interference.
There is only loss, not gain in the near field compared to a point source.
So if we have a line array of 101dB/1W sensitivity, with 256W, we should hope for 124dB/1m in the high frequency, but because of interference, we actually have far less. Measure in the far field and work backwards at -6dB per distance halving and you'll get near the prediction number.
From:
https://www.prosoundtraining.com/2010/03/17/line-array-limitations/
"The near field distance can be defined by the following relationship:
D=1.57 L squared/λ
where

D is the distance to the far field transition
L is the physical length of the line source
λ = the wavelength of the frequency in question (all lengths in identical units).
Beyond this distance the listener is in the far field and there is 6 dB drop in level per doubling of distance. The transition distance can be quite long at short wavelengths, that is, high frequencies, but it is shorter at low frequencies. For each octave lower in frequency, the transition distance is cut in half."
So if we have a line array of 101dB/1W sensitivity, with 256W, we should have 124dB/1m in the high frequency, but because of interference, we actually have far less.
A line array the length of yours (assuming 4 feet, or 1.23 meters) will be in the far field at a crossover of 130Hz at less than 1 meter.
Raising the crossover to 160Hz would put the destructive interference region just over a meter.
At 160Hz you would want the low cabinets elevated above head height to avoid losses from audience absorption, as well as hearing damage.
At low frequencies, the excursion limitations come into play, but are ignored in specifications like Carvin’s that quote peak output with no frequency reference- the 128dB peak at 1meter achievable in the mid-range would be reduced to about 111 dB (clean) at 160Hz, about 91dB at 10 meters.
The EQ needed to flatten the response of a mini line will also vary with distance.
When you are doing REW measurements related to the Keystone Sub, you could also verify all the above for your line array speakers.
I built some mini columns a few years back using the 3.5" Tymphany TC9FD-18-08, they have a bit more Xmax, so have close to the same LF output as yours with 6 drivers:


With a pipe between the top and bottom pole mounts can make a longer line:

The grills frames have a 45 degree angle inside to reduce diffraction/reflection.
I don't consider the output capabilities of these anywhere near the ballpark of the Tham or Keystone for PA use, but they sound pretty good within limits, and were a cheap easy build.
Art
The idea that line arrays drop only 3dB per doubling of distance is only valid in the near field, and is because at close range the high frequencies are lost due to destructive interference.
There is only loss, not gain in the near field compared to a point source.
So if we have a line array of 101dB/1W sensitivity, with 256W, we should hope for 124dB/1m in the high frequency, but because of interference, we actually have far less. Measure in the far field and work backwards at -6dB per distance halving and you'll get near the prediction number.
From:
https://www.prosoundtraining.com/2010/03/17/line-array-limitations/
"The near field distance can be defined by the following relationship:
D=1.57 L squared/λ
where
D is the distance to the far field transition
L is the physical length of the line source
λ = the wavelength of the frequency in question (all lengths in identical units).
Beyond this distance the listener is in the far field and there is 6 dB drop in level per doubling of distance. The transition distance can be quite long at short wavelengths, that is, high frequencies, but it is shorter at low frequencies. For each octave lower in frequency, the transition distance is cut in half."
So if we have a line array of 101dB/1W sensitivity, with 256W, we should have 124dB/1m in the high frequency, but because of interference, we actually have far less.
A line array the length of yours (assuming 4 feet, or 1.23 meters) will be in the far field at a crossover of 130Hz at less than 1 meter.
Raising the crossover to 160Hz would put the destructive interference region just over a meter.
At 160Hz you would want the low cabinets elevated above head height to avoid losses from audience absorption, as well as hearing damage.
At low frequencies, the excursion limitations come into play, but are ignored in specifications like Carvin’s that quote peak output with no frequency reference- the 128dB peak at 1meter achievable in the mid-range would be reduced to about 111 dB (clean) at 160Hz, about 91dB at 10 meters.
The EQ needed to flatten the response of a mini line will also vary with distance.
When you are doing REW measurements related to the Keystone Sub, you could also verify all the above for your line array speakers.
I built some mini columns a few years back using the 3.5" Tymphany TC9FD-18-08, they have a bit more Xmax, so have close to the same LF output as yours with 6 drivers:
With a pipe between the top and bottom pole mounts can make a longer line:
The grills frames have a 45 degree angle inside to reduce diffraction/reflection.
I don't consider the output capabilities of these anywhere near the ballpark of the Tham or Keystone for PA use, but they sound pretty good within limits, and were a cheap easy build.
Art
Last edited:
Thanks!Wow, nice build!
Have you weighed the entire system?
Looks like a great compact, yet effective setup.
Only thing I would add would be corner protectors for the cabinets, and to chamfer the backside of the baffle for the 3FE25s.
If you are referring if already tuned & measured the whole system - answer is yes, even though I still like to take the whole system outside and perform some tweaking.
All above pics were taken around July 2022 (last year), so the system mechanically completed last summer, and was used on each occasion I could think of.
This summer, I've decided to add Keystone sub with 18" driver, just to have something for lowest octave if required =>Keystone build and Keystone integration with THAMs & line arrays will be further described in this thread.
Your advices are spot on => I've already added corner protectors, for both line arrays and THAMs, but unfortunately I forgot to chamfer backside of the baffle. This would be very hard to do now as front baffle is glued, but could be done on next box revision
- Home
- Live Sound
- PA Systems
- My compact party setup - Active THAM12 & 4" fullrange line array