DcibeL,
Haha. The freebird looks lost in there!
It's not so ugly, how many VA is your tranny?
Michael
Haha. The freebird looks lost in there!
It's not so ugly, how many VA is your tranny?
Michael
Member
Joined 2003
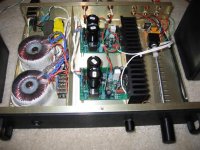
You know I'm really not sure. It came from a set of Logitech Z-560 speakers. This was a 160W RMS system that used 6 TDA7293 IC's. 4 IC's drove the sattelite speakers (TangBand 15W RMS), and 2 IC's were bridged to drive the 100W RMS tangband subwoofer.
I'd say it is at least 250VA, but honestly I don't know. It's 48VCT and that was good enough for me so I didn't need to spend $80 on a transformer for this project. After I play music as loud as I ever need to the transformer warms up to room tempurature, while the big 700VA EI transformer on my subwoofer amp is noticeably warm at idle. The smaller transformer for the preamp is 10VA.
The heatsink was cut from the Z-560 amp as well. Talk about recycling a broken set of speakers 🙂. One day I will make some ELF1.5's from the satellite drivers as well as they are a pretty nice speaker.
Small change to the BOM
Hi everyone-
I have made a small, late in the game change to the BOM for the RevC kits.
Not to worry... In addition to the stuff listed on the site, I will be including standoffs with screws, male pin headers, and matching plugs and pins.
I will also be posting pics of the kits in the coming week. I will also, hopefully, be building up a couple boards and taking pics to make a build guide PDF.
Happy amping...
DcibeL,
Heck man, thats not half as ugly as a some of my amps. 😉 Thanks for you input on the Freebird. 😀 Its cool to see it actually working. 🙂
How is it working for you?
I think the front panel is cool.
Cheers!
Russ
Heck man, thats not half as ugly as a some of my amps. 😉 Thanks for you input on the Freebird. 😀 Its cool to see it actually working. 🙂
How is it working for you?
I think the front panel is cool.
Cheers!
Russ
SOP - Glad to hear that your GF is banished to the land of plastic. I would banish mine to the land of tarmac though - ie hit the road. Excellent work though. Did you run the metalwork yourself? Can you give us a description of the process?
DcibeL - also good work - certainly not as ugly as som of my amps in 15 year old computer chassis 🙂. The chassis looks like it is made from stainless steel?
DcibeL - also good work - certainly not as ugly as som of my amps in 15 year old computer chassis 🙂. The chassis looks like it is made from stainless steel?
The making of ...
Nice to know you like it 🙂
It seems to look much more complicated than it is. On the third / fourth pic you see the basic construction: Alumimun 90° profiles screwed, some of them glued (2 component stuff, once hard you need a hammer to loosen parts) on heatsinks.
Heatsinks fixed with four screws (screwholes treated with thread-cutting tap)
on the bottom plate.
The copper plate carrying the amps is screwed on the two level profiles.
Front panel is held by two upright profiles glued on it, the power switch is flanged with two u-shaped profiles also glued on front panel. Back panel screwed on upright profiles.
The tricky part is to make the front and top, you need a router. My router is an el cheapo one for ~ $ 50,00, serving me for three years now. The cutter heads (specified for woodwork, and yes, they are still usable !) I used are also the cheapest I could get. You got to operate the router on top speed and move it slowly, very slowly. I guess this only works with raw aluminum, hard coated (chromated) stuff would kill your tool.
The front is made of 5 mm raw aluminum pane, the edges are shaped with a 45° cutter head.
The 3 mm top panel was the hardest piece to make. The cuttings are made with a hand-driven fretsaw in a way that the cuttings were a bit smaller than in the end. The final shape was made with a flush cutter (and here it becomes hard to explain when you´re not a native english speaker), guided by an open box which inner measures are corresponding to the ones of the final cutting, fixed on the underside of the raw cut panel. The perforated aluminum sheet is glued to the underside.
Hope this is clear somehow, I don´t know if I named the tools right. Otherwise I could make a "photo story" of it.
Byrd said:Did you run the metalwork yourself? Can you give us a description of the process?
Nice to know you like it 🙂
It seems to look much more complicated than it is. On the third / fourth pic you see the basic construction: Alumimun 90° profiles screwed, some of them glued (2 component stuff, once hard you need a hammer to loosen parts) on heatsinks.
Heatsinks fixed with four screws (screwholes treated with thread-cutting tap)
on the bottom plate.
The copper plate carrying the amps is screwed on the two level profiles.
Front panel is held by two upright profiles glued on it, the power switch is flanged with two u-shaped profiles also glued on front panel. Back panel screwed on upright profiles.
The tricky part is to make the front and top, you need a router. My router is an el cheapo one for ~ $ 50,00, serving me for three years now. The cutter heads (specified for woodwork, and yes, they are still usable !) I used are also the cheapest I could get. You got to operate the router on top speed and move it slowly, very slowly. I guess this only works with raw aluminum, hard coated (chromated) stuff would kill your tool.
The front is made of 5 mm raw aluminum pane, the edges are shaped with a 45° cutter head.
The 3 mm top panel was the hardest piece to make. The cuttings are made with a hand-driven fretsaw in a way that the cuttings were a bit smaller than in the end. The final shape was made with a flush cutter (and here it becomes hard to explain when you´re not a native english speaker), guided by an open box which inner measures are corresponding to the ones of the final cutting, fixed on the underside of the raw cut panel. The perforated aluminum sheet is glued to the underside.
Hope this is clear somehow, I don´t know if I named the tools right. Otherwise I could make a "photo story" of it.
Fine work
and a fine explanation....
Thanks for the inspiration.
Regards,
and a fine explanation....
...we call that a template. Don't forget the eye & ear protectionguided by an open box which inner measures are corresponding to the ones of the final cutting,
Thanks for the inspiration.
Regards,
Thanks SOP. That front plate looks way thicker than 5mm somehow. Must be perspective.
One note though - I was always under the impression that router should be on lowest speed. That is the way I have done it, but it was quite a nerve wracking experience with all the warnings of lost limbs etc 😀.
One note though - I was always under the impression that router should be on lowest speed. That is the way I have done it, but it was quite a nerve wracking experience with all the warnings of lost limbs etc 😀.
Member
Joined 2003
Thanks for your comments. The Freebird works like a charm. I'm absolutely loving it.Russ White said:Thanks for you input on the Freebird. 😀 Its cool to see it actually working. 🙂
How is it working for you?
I think the front panel is cool.
Thanks. The chassis is actually an aluminum chassis that I bought used on ebay (Digikey part# 377-1031-ND). I used a sponge sander (for drywall) to remove all the scratches on it, or at least make all the scratches in one direction for a brushed metal look. Then, some liquid metal polish was applied for the extra bit of shine. It actually has a lot more shine to it then what you see in the picture.Byrd said:DcibeL - also good work - certainly not as ugly as som of my amps in 15 year old computer chassis 🙂. The chassis looks like it is made from stainless steel?
Byrd said:That front plate looks way thicker than 5mm somehow. Must be perspective.
One note though - I was always under the impression that router should be on lowest speed. That is the way I have done it, but it was quite a nerve wracking experience with all the warnings of lost limbs etc 😀.
Well, that´s the trick - the 45° edge is ~ 7 mm, naturally looking thicker than 5 mm. The thing with the top speed is as simple too: The faster it runs, the more "cuts" per mm are done. It´s different when working with plastic, at 30000 rpm it may tend to melt. I think getting seriously hurt by a router only can happen when you´re bladdered. Buzz saws are the tools that make me nervous; count the fingers on an old carpenter´s hands ...
Hi.
My RevA is playing up a bit, I think that the relay is faulty. I think I mentioned it had taken a whack in shipping, and the casing was pushed in a bit at one end...
Anyway, when we power up the amp, the relay doesn't click in on it's own. If you go and wind the volume up and down it suddenly kicks in. It's as if the extra current is pulling the contacts in or something.
If I just turn it on and leave it, it will still be silent minutes later. the 'ready for action' LED remains off until it kicks in with the vol control fiddling.
Any clues? I think I'll leave it on until I can get to it, I'm about to go to a meeting interstate.
Michael
I can send you another relay, no problem. Let's get some opinions on whether I shoudl send you anything else first. Quick, to the schematic....
Hi Michael-
Could you try three things for me (all simple)?
First power it up with the volume all the way down, same problem?
Second, with the volume all the way up.
Lastly, if it's the same situation with both of these, try powering it up, but instead of twisting the volume, try tapping the relay with a pencil (or something).
Trying to isolate a component fault or a bad relay.
Oh, one other thing. If it's possible to disconnect your sources completely from the amp, try that, and disconnect your speakers. It's possible that the protection is actually doing what it's supposed to do.
Brian,
Will do these tests, but before you start feeling responsible, this amp was built from my own parts... I missed out on your RevA kits.
I've got another relay here, right pins, marked "FRM1-2C2" DC24V 10A 30VDC 220VAC I think it might be a drop in.
Regards,
Michael
Will do these tests, but before you start feeling responsible, this amp was built from my own parts... I missed out on your RevA kits.
I've got another relay here, right pins, marked "FRM1-2C2" DC24V 10A 30VDC 220VAC I think it might be a drop in.
Regards,
Michael
Hi All-
Well I finished my Rev C beta and am debugging my input selector brd.
First let me apologize to Russ and Brian. Half way through this project I realized that the meaning of beta is to test operation and not complete a product. I'm sorry, and next time I will just assemble and test in a "rough" enclosure.
I did an integrated amp using 3 relays as input switchers and a Noble 50K pot for volume feeding the Rev C's.
The amp section "APPEARS" to work fine but my relay section is not functioning correctly and needs investigation. If I turn on a source and crank the volume all the way up I can hear very slight music bleed over through the relays which is amplified. The room has to be VERY quiet to hear it, and it is with test speakers on each side of the amp and me sitting 1-2 feet away.
I hope to take a picture tonight. I may even by-pass the pre amp section and make it a dedicated amp to test since this is suppose to be a beta.
PS, when I first turned it on the relays clicked and it scared the bajeesus out of me. Bajeesus = slang for crap!
The PSU is built into each board. The parts kits include all PSU components except the trafo.
No doubt the kit has all the nice stuff, sadly with exchange rates... those won't come easy... might be able to sqeeze a board in every other month or so though....
- Home
- Amplifiers
- Chip Amps
- My "audiophile" LM3886 approach