My apologies Tom. I didnt realize it was you commenting the whole time until i reread the thread just now, somehow it didnt click that you were THE Tom the first go round. Too many things floating around in my head...
Savage - we are trying to help you. Tom designed and made those PCBs - if anyone knows what is required, it is Tom.
You agreed to get another meanwell smps like the one you have - good deal. Hook them up like the drawing I showed.
With a voltmeter, from Middle Ground to positive side you get around +29.4vdc, perfect.
From same ground to the neg side you get around -29.4vdc, you are all set.
Make sure your voltmeter ground is on the ground on smps, and other (red) is on the pos or neg side when you measure.
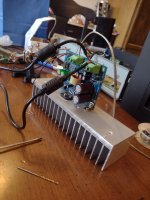
Im still waiting on the second power supply, but i got one board completed and decided to set up a test station. I have a pile of these 15v laptop chargers, so i went ahead and hooked 2 together. Im listening to it right now 🙂. It sounds nice at low volumes so far. Even with this terrible rigged cable setup there is little to no discernable noise floor. Fantastic! Now im itching to have the rest of the parts i need to put this together
Attachments
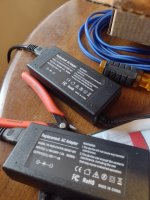
Yup, I have many of those laptop power supplies for the same reasons. Works great to throw together a dual rail power supply in a pinch...but always be sure the ground on DC outlet and the ground at AC mains plug are not connected, as you will likely short and destroy one of your power supplies.
Usually one power supply just goes into current-limiting hiccup mode. Not surprisingly this results in some rather rude noises emitted from the speaker (and could probably damage the speaker).[...]but always be sure the ground on DC outlet and the ground at AC mains plug are not connected, as you will likely short and destroy one of your power supplies.
I'm glad it worked in this case. Note, however, that ±15 V is below the required minimum for the Modulus-86 (±20 V). No harm done. You're just browning out the on-board regulators so you're not getting the full performance yet.
Tom
Good to know about keeping the grounds separate. And yes, on the +-15v supply i started getting distortion at around .6v of music input. Sounded nice until that point. Its also worth noting that without even shorting the input one of the modules dc output didnt even register on my multimeter. These things are clean.
Ive also found a really nice article on benchmarks website about why damping factor and good speaker wire are important which has persuaded me that my 16 gauge lamp cord needs to go. Thanks to the modulus 86 high damping factor, i should be able to achieve sub +-.1db freq response on my particular speakers with nothing more than 12 gauge wire. Benchmarks own ah2b would require 10 gauge wire to provide the same performance. Just another testament to the quality of engineering youve done here Tom. Im excited to hear these things in their full glory
Ive also found a really nice article on benchmarks website about why damping factor and good speaker wire are important which has persuaded me that my 16 gauge lamp cord needs to go. Thanks to the modulus 86 high damping factor, i should be able to achieve sub +-.1db freq response on my particular speakers with nothing more than 12 gauge wire. Benchmarks own ah2b would require 10 gauge wire to provide the same performance. Just another testament to the quality of engineering youve done here Tom. Im excited to hear these things in their full glory
Modulas-86 & cheap?! You're using one of the best integrated amplifier in the whole univers. It's diy world, you can use enclosure of your old receiver.

Good news and bad news.
The Second power supply came in today, and i got the boards cleaned up and everything wired in. Some of the wiring is temporary until the rest of the wire i ordered comes in. The second power supply wouldnt stay stable at max voltage, so i backed down the power supplies to +-28v where they are both happy. Both amp channels test at the exact same output voltage playing a test tone. I let them both play under 1w for a while, to make sure they were both stable and power supply voltages were stable. Everything was good. Then i went ahead and upped the volume to about .8v of max input, or approx 15w of max output. Thats where the issues started. First I noticed the right channel starting to distort after a couple of songs. I touched the transistor chips and the right channel was hotter than the left. I verified the screws holding to the heatsink were snug, but it seems like they arent really transferring much heat to the heatsinks. I used the thermal tape offered on neurochromes website, but no thermal paste. Am I supposed to run those in conjunction with thermal paste? Or is there potentially another issue at play here? The sound quality was fine until they started to get hot.
The Second power supply came in today, and i got the boards cleaned up and everything wired in. Some of the wiring is temporary until the rest of the wire i ordered comes in. The second power supply wouldnt stay stable at max voltage, so i backed down the power supplies to +-28v where they are both happy. Both amp channels test at the exact same output voltage playing a test tone. I let them both play under 1w for a while, to make sure they were both stable and power supply voltages were stable. Everything was good. Then i went ahead and upped the volume to about .8v of max input, or approx 15w of max output. Thats where the issues started. First I noticed the right channel starting to distort after a couple of songs. I touched the transistor chips and the right channel was hotter than the left. I verified the screws holding to the heatsink were snug, but it seems like they arent really transferring much heat to the heatsinks. I used the thermal tape offered on neurochromes website, but no thermal paste. Am I supposed to run those in conjunction with thermal paste? Or is there potentially another issue at play here? The sound quality was fine until they started to get hot.
I loosened all the mounting screws for each amp board, then snugged down the screws on the chips until right where the lock washer is fully compressed, and then retightened the other mounting screws. That seems to have helped quite a bit, we will see if they can stay thermally stable now
If, by 'thermal tape', you mean the Keratherm insulators, then you DON'T want to use thermal paste. Traditionally people used Belleville washers chosen for the amount of force to be placed on the IC/heatsink interface based on the needs of the thermal interface device. The other appropriate washer is a standard split ring washer. Star washers are not appropriate. It does sound like your initial attempt did not provide compressive force.
Yes, its keratherm tape, and split washers on the fasteners. After readjusting the amp seemed stable enough to button up and install in the main system. So far ive had it cranked for an hour or so this morning with no issues.
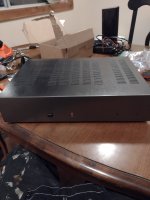
Heres what it looks like all said and done. Im very happy with how well the paint turned out. The krylon crinkle and metallic paints are both quite nice. This isnt a very handsome amp, so i wanted to stay neutral with the colors and let it just disappear. I also went ahead and removed the power led from one of the lrs's and soldered in the red one on the case. It lights up pretty dimly, which is perfect for me. You can just barely tell the amp is on.
So far I havent done any a/b sound testing, however i was pretty familiar with the way my system sounded with the niles si-275. To be honest, im actually surprised at how much difference i hear with the modulus amplifier. The sibilance issues i had in some songs (think joan jett) are gone. Another thing i noticed is that while sometimes the speakers would disappear (jbl a130) before, with this amp theyre just gone. Youre listening to instruments floating in space. Poor recordings also stand out even more now than they did before. Heathens, by simply three is a good example. I love that song, but the noise floor really stands out when your background is pitch black.
I also think this amp will do well with hard to drive speakers. I have a junk pair of onkyo surround speakers from a thrift store that i use for amplifier testing, discharging caps, whatever i need a load for. They sound like absolute junk on cheap amps, and i was surprised at the sound that came out of them during the initial bench testing.
I was slightly concerned that the modulus 86 could be low on power, but it is plenty for a single pair of bookshelf speakers. Im at about 1/4 power and that is plenty for what I like. I think it would even run a pair of towers just fine.
Overall, first impressions say the modulus 86 is an impressive product. Im probably 40 hours into this whole project and dont feel like it was a waste at all.
Attachments
My guess is most of the audible difference between the two amps stems from the modulus' high damping factor. I measured my niles at about 20. That means frequency response will vary by about 1 db with the jbls, vs variance of .1 with the modulus. The jbls also have high resistance right around where they are elevated at 1-2khz, which means perceptually that will be reinforced while response drops off on either side due to lower impedance with a "loose" amp. I conjecture that that was the source of the sibilance i would hear on some tracks. I came to that conclusion when i hooked them up to a really cheap class d amp and the sibilance went from slightly noticeable to ever present. The jbls seem to be fairly sensitive to amplification
I should be more careful while reading....I used the thermal tape offered on neurochromes website, but no thermal paste. Am I supposed to run those in conjunction with thermal paste?.....
Sorry :-( Anyway, modern thermal insulators are very good, I may say better than mica which i normally use(very fragile though).
Yeah. Don't use thermal paste with the silicone based thermal pads.
However, you're using the insulated version of the LM3886 (the LM3886TF). That's intended for use with thermal paste. You can use the Keratherm pads instead. They're certainly less messy than the thermal goop.
Did you mount the boards to the heat sink and then solder the LM3886? Or did you mount the LM3886 to the board first and then mounted the boards onto the heat sink? If the latter you could have the LM3886 mounted at a slight angle. In that case it might not make good thermal contact across the entire back of the IC.
Tom
UPDATE.
To answer your question Tom, yes, i mounted the board and chip to the heatsink before soldering. I think the problem arose somewhere during final reassembly. I didnt pay close enough attention to making sure the chip was mounted flat.
Ive got the overheating issue sorted out now, and Ive been abusing this amp pretty hard since then. On one occasion in particular I really let it loose, about 1v input volume and let it play hard rock for several hours while I did work around the house. The heatsinks got nice and warm, this amp seems to put out a fair bit of heat. however, it was rock solid the entire time. Not a single hint of SPIKE kicking in. Im very pleased with the performance of this amplifier.
The only issue I have, which is really a nitpick, is the fact that there is a slightly audible noise floor in one channel. And I mean at full gain you have to have your ear touching the speaker to hear it. Likely this is due to the recycled input jacks and signal cable, which I plan to replace when I open it up for version 1.2, which will include gold plated rca jacks, 18 awg shielded microphone cable for inputs, and higher quality speaker terminals.
Another note, I have no regrets about the amp I gutted for this project. The sonamp 260 is about as good a setup as I could ask for for the modulus. Heatsinks seem to be big enough, and I like the fact that the boards are able to be placed so far from the power supply. If you dont have an input source that will feed the full 1.6v needed to reach maximum output you could even change the resistors in the gain control circuit and implement them into the modulus boards.
Heres an approximate cost breakdown as well for anybody interested in copying this build
Sonamp 260: $70
Modulus boards, inductors, keratherm pads: $200
Board components: $120
LRS 24-350 power supplies, open box: $50
KnuKonceptz 14 awg, 10ft: $10
Grounded power cord: free
Krylon hammer tone and metallic paints: $20
Total: $470
There are a couple of things that can be scavenged from the old amp, such as shielded input cables, bits of power cord to use for AC supply, power switch, all connectors, power leds, AC fuse, and possibly the torroidal transformer, although I didnt try to go that route. However, if anybody is interested I would be willing to measure output voltage of the coil to see if it could be used to lower costs even more
Last edited:
- Home
- Amplifiers
- Chip Amps
- Modulus 86 CHEAP build