😉
I have got a NAD 302 from a friend. He has implicitly asked me to give this device a helping hand;-) I plugged it in and: I was shocked at HOW bad the sound of this device is - completely washed out, gray, flat, small, completely unclear, powerless, not a single tone but just a bunch of "phase errors" (thought I had connected an LS wrong - I haven't listened to Buy HiFi for many years;-) But it's not defective or anything, but this sound is a consequence of the construction: the unnecessarily many circuits and components and running paths! And this sound is exemplary for analog consumer hi-fi - by the way: the big pre-end combis sound even worse!
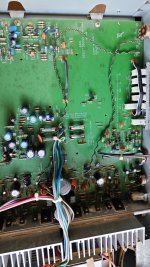
So here's a quick and easy guide to getting a few classes better: I first bridged the entire preamp junk: i.e. from the potentiometer to the power amplifiers. To avoid having to remove the circuit board, I simply disconnected the coupling capacitors C 301 (L) and C 302 (R), directly at the potentiometer, at the capacitor body and used the remaining stubs as solder sockets to connect a thin wire to each of the input capacitors C 401 (L) and C 402 (R). Because I can reach the underside of the circuit board at the output stage, I removed R 401 and R 402 and routed the cables through the circuit board and soldered them. I simply cut the PCB paths to these power stage inputs here too.
Any cable used here will sound much better than all the bridged junk.
How does it sound? Just do and listen;-)
This should also be done with all the other NADs;-)
I have got a NAD 302 from a friend. He has implicitly asked me to give this device a helping hand;-) I plugged it in and: I was shocked at HOW bad the sound of this device is - completely washed out, gray, flat, small, completely unclear, powerless, not a single tone but just a bunch of "phase errors" (thought I had connected an LS wrong - I haven't listened to Buy HiFi for many years;-) But it's not defective or anything, but this sound is a consequence of the construction: the unnecessarily many circuits and components and running paths! And this sound is exemplary for analog consumer hi-fi - by the way: the big pre-end combis sound even worse!
So here's a quick and easy guide to getting a few classes better: I first bridged the entire preamp junk: i.e. from the potentiometer to the power amplifiers. To avoid having to remove the circuit board, I simply disconnected the coupling capacitors C 301 (L) and C 302 (R), directly at the potentiometer, at the capacitor body and used the remaining stubs as solder sockets to connect a thin wire to each of the input capacitors C 401 (L) and C 402 (R). Because I can reach the underside of the circuit board at the output stage, I removed R 401 and R 402 and routed the cables through the circuit board and soldered them. I simply cut the PCB paths to these power stage inputs here too.
Any cable used here will sound much better than all the bridged junk.
How does it sound? Just do and listen;-)
This should also be done with all the other NADs;-)
Attachments
![DSCN0471[1].JPG](/community/data/attachments/1240/1240775-e76bcf584d259665f52169044d6dd62f.jpg?hash=52vPWE0llm)
![DSCN0469[1].JPG](/community/data/attachments/1240/1240776-aa5e1482064e731d56914251ed8df8c1.jpg?hash=ql4UggZOcx)
![DSCN0470[1].JPG](/community/data/attachments/1240/1240777-fc7d850b21df5ab5255d34e31069448f.jpg?hash=_H2FCyHfWr)
![DSCN0472[1].JPG](/community/data/attachments/1240/1240778-03eea967b2281dd8c18f3d38ae828b8a.jpg?hash=A-6pZ7IoHd)
![DSCN0473[1].JPG](/community/data/attachments/1240/1240779-2c849c9e8a0cdf3ea50d35f9edd05596.jpg?hash=LIScnooM3z)

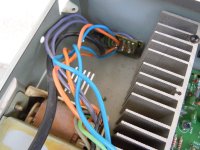
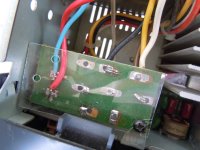
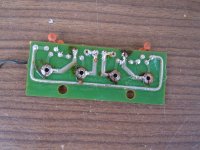
On with the homework:
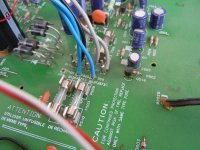
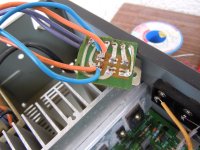
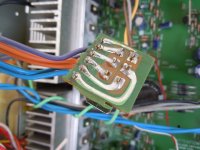
On this 302, the power amp output runs via the headphone socket and is routed to the LS connections via a plug-in switch. If you don't listen to headphones, connect the power amplifier output directly to the speaker terminals. And here too: remove unnecessary connections: Here is this board at the sockets. And another recommendation - for later, if you want to have a high-end somewhere: combine the ground connections, which usually run separately for each channel, or more precisely: only one strip. Here you can see the connection between the speaker terminals and the ground center (between the electrolytic capacitors).
This little efforts improves the sound enormously: I can at last hear a few words and syllables from Sade. Before it was just indistinct mumbling. So it's getting better, step by step;-)
... and: just do and listen;-)
Attachments
![DSCN0478[1].JPG](/community/data/attachments/1241/1241146-3ba2799dab7f3f407a6529e175842f25.jpg?hash=O6J5nat_P0)
![DSCN0477[1].JPG](/community/data/attachments/1241/1241145-285b7a52942df099862ab4bf2f10ca67.jpg?hash=KFt6UpQt8J)
![DSCN0476[1].JPG](/community/data/attachments/1241/1241144-9101073907efb17dff2038c0edc4aeea.jpg?hash=kQEHOQfvsX)
![DSCN0474[1].JPG](/community/data/attachments/1241/1241142-4ee4809641ab098a24e51b7fd8c6a1b7.jpg?hash=TuSAlkGrCY)
Here's a follow-up:
There is also work to be done on the mains switch: the direct connection of cables and switch and also the removal of unnecessary bridges and solder sockets.
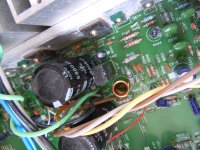
But the secondary windings can also be connected directly on their way to the circuit board: the 28/32 (2 x orange or 2 x violet to 2 x blue) volt switch can be bridged. This also further cleans up the sound.
Then there is the direct connection of the two blue wires to the circuit board: removing the solder sockets. And the ground connection, green here, can be connected directly to the ground center on the capacitors.
Then remove the small diode-bridging capacitors.
And remove the thick solder pads on the underside of the board in the area of the electrolytic capacitors.
Looking ahead:
The 302 effectively has two power supply units. I recommend using only one power supply, the power stage supply, here the blue cables (the gray ones can operate the green LED alone;-) and connecting both the power amp input and the SUPERB phono amplifier - its circuit is one of the best far and wide, the implementation could still be a little better - to this one.
And one advantage of these remaining two fuses: you can remove one and hear the much cleaner and finer sound that is achieved with just ONE secondary winding. But in order to experience this sound always as a benefit, a few things still need to be done to the 302;-)
There is also work to be done on the mains switch: the direct connection of cables and switch and also the removal of unnecessary bridges and solder sockets.
But the secondary windings can also be connected directly on their way to the circuit board: the 28/32 (2 x orange or 2 x violet to 2 x blue) volt switch can be bridged. This also further cleans up the sound.
Then there is the direct connection of the two blue wires to the circuit board: removing the solder sockets. And the ground connection, green here, can be connected directly to the ground center on the capacitors.
Then remove the small diode-bridging capacitors.
And remove the thick solder pads on the underside of the board in the area of the electrolytic capacitors.
Looking ahead:
The 302 effectively has two power supply units. I recommend using only one power supply, the power stage supply, here the blue cables (the gray ones can operate the green LED alone;-) and connecting both the power amp input and the SUPERB phono amplifier - its circuit is one of the best far and wide, the implementation could still be a little better - to this one.
And one advantage of these remaining two fuses: you can remove one and hear the much cleaner and finer sound that is achieved with just ONE secondary winding. But in order to experience this sound always as a benefit, a few things still need to be done to the 302;-)
Attachments
![DSCN0479[1].JPG](/community/data/attachments/1241/1241211-53e5bef4b87dc0625fb4485f9c65b03b.jpg?hash=U-W-9Lh9wG)
Continue the program;-)
TO-247 power transes replaced by any power TO-126 (me, here: BD441, BD442). Finally a tight, powerful and clear bass. And the rest of the sound is also more conormed and powerful, clearer. TO-247 can't do that. It is a belief that resilient power transistors also sound "powerful" or clean;-) NO CHANCE!
I do TO-126, but at least TO-220 you should use: almost every 220 sounds cleaner and tighter and crisper than almost every to 247.
... but there is still more to do;-)
Attachments
![DSCN0490[1].JPG](/community/data/attachments/1241/1241806-db844418f0c8af5be339cbcc78ed0e82.jpg?hash=24REGPDIr1)
![DSCN0491[1].JPG](/community/data/attachments/1241/1241807-c5c7ed69c72b4d9597abd18f34310b74.jpg?hash=xcftaccrTZ)
I have now connected the "line" section of the power amplifiers to the positive voltage of the power amplifier. So I disconnected the connections to the 38 volt psu and removed the capacitors C 429 and C 430 and replaced them with a wire as a bridge. It's about minimizing the audible modulations through different, many power supply units.
Q 401, Q 402 do run even with 1,1 V - later I would remove the whole current network and replace it with just one trimmer each. Because the whole component jungle also modulates the sound with noise.
E 401, E 401 replaced by wire. These needless do sound very dark and cloudy.
R 431, R432 removed!
C 409, C 410 REMOVED! Our NAD developers belong in jail for this nonsense circuit;-) Real sound preventer. Remove and howl with happiness. A rotten tooth;-)
C 429, C 430 replaced by 100 uF.
C 427, C 428 removed - just try what your ears tell you - let the ear decide;-)
Here too: just do and listen;-)
Listen after each single change so that the sound changes can also be categorized.
By the way: once you have caught the "sound" of a device, it doesn't take 30 seconds to fix the change in sound - to continue with the modifications;-)
Anyone who has followed this far will probably be sitting in front of his NAD crying and regretting every moment they have spent listening to this device. But there's more:
One small thing, for example, directly at the cinch inputs: replace the 1kOhm resistors with a wire and remove the 100 pF capacitor. A low-pass filter directly at the output stage input is sufficient.
C 405, C 406 removed. These are real stress and noise makers.
After listening for a while, I also removed C 407 and C 408. Could it be that it sounds a little more "open", more "breath", more real?
At least D 805 and D 806 remove. This nonsensical circuit (inactive by removing C 409 and C 410) doesn't have to suck on the psu. I have removed it completely: the "800" parts.
I currently have Q 401 and Q 402 connected via a 2 MOhm trimmer. I have also removed R 407 and R 408. Base ground about 120 kOhm. Now it sounds very seductive, almost magical;-)
I connected my 2 Watt SE again: clearer, more powerful, cleaner, tidier, much better tact, beat and tempo...-) But the NAD sounds pretty good;-)
Attachments
![DSCN0492[1].JPG](/community/data/attachments/1242/1242616-224960106dc016545fdaa7190ec3a020.jpg?hash=IklgEG3AFl)
![DSCN0493[1].JPG](/community/data/attachments/1242/1242617-d0a11e2ddb8db4b603a7781adce30fc2.jpg?hash=0KEeLduNtL)
Many people swear by small bridging capacitors to counteract the HF behavior of large electrolytic capacitors. My experience, however, is that the ear perceives such combinations as an image like a distorting mirror at a carnival. The same applies here: remove all the bridging caps and every tone and every contour comes together and the "breath" increases. So, for example, C 417, C 418, C 441 - C 444 remove.
C411, C 412 remove. These are the same sick story as C 405, C 406 mentioned above.
Since the original coupling electrolytic capacitors here sound rather mild and slightly noisy: really good small caps - among the best I know - are the Panasonic KA-A.
For the 2,200 F of the negative feedback I would currently recommend the KEMET PEG 124.
Since our bias control transistor also modulates the current with its current character, i.e. with its sound character, I have replaced these Q 409, Q 410, both BD 139, with BD 411.
I also replaced the "drivers" Q 411 - Q414, on this device 2SA1358 and 2SC3421, with BD 441, BD 442. Sounds very fluid and smooth now, but also a little "dark". Many need a little audible distortion, noise, and a little tempo break, which increases the orientation in the sound image. I'll have to listen for a while and swap back.
Here the usual industrial soldering can be removed and replaced.
How to solder audio pcb - the taught way makes the sound doughy and fat and indistinct.
Two things I want to try: the higher voltage of the power supply: 2 X 32 volts, and insert the bootstrap again. So far it has proved it was a stress maker.
After that I want to finish with the output stage. There's still a lot of small stuff to be fish, but that should be enough.
I'll only get to the phono amplifier when I remove the circuit board. This will also be re-soldered and fitted with other capacitors and transistors.
Then this NAD is finally finished;-)
Attachments
![DSCN0496[1].JPG](/community/data/attachments/1243/1243495-b4f193aebf7c962c14f868dc791bdca3.jpg?hash=tPGTrr98li)
![DSCN0495[1].JPG](/community/data/attachments/1243/1243494-8ec0fa2ca04b9e9623fcf29bc1d564ff.jpg?hash=jsD6LKBLnp)
The beginner's exercise here at the end: the strips from the transformer and loudspeaker connections. Simply swapped for solid core cheap hardware store, 0.6 mm2, and the curtain goes up. So all BD441/442 remain and the 2 x 28 volts remain.
I installed the bootstrap-C again, but it remains the same - as always: it draws a crackling, distorting, crashing curtain into the sound. It's not so noticeable with pop, but everything else becomes inaudible in comparison.
If you really want to get something out of it, you can bridge these fuses, i.e. connect the strips directly to the diodes. But beware, you do this at your own risk (!!!). I would do it for myself, because my small TO-126 power transistors would provide protection;-)
😉
Attachments
![DSCN0497[1].JPG](/community/data/attachments/1244/1244183-34b94b19c9f3c3cc10867fdf4e682487.jpg?hash=NLlLGcnzw8)
You are a troll, it is not possible to dare to show that and be proud of it.
You should be stopped from doing harm.
So yesterday I got this amp and started playing around with it. Here's my initial impressions I posted in another thread:
Now I did the first step described by @cumbb
The bass is tighter though as far as I can tell, but I don't remember how this NAD sounds.
Everything actually seems to be better and have more body, the only issue is that after turning on in a couple of seconds when LED turns on - I'm loosing like 15 dB.
You can find the thread here: https://www.diyaudio.com/community/...n-the-last-5-years.415030/page-6#post-7757363Got my hands on a NAD 302. This thing is light as hell. Unironically it also sounds light, there's not much power in low end at any volume level. But I do hear potential in general. Some weird high frequency pitch is present though it seems, I don't know, high frequencies sound weird, mids are pretty hollow too somehow. Female voices seem to be there, but lower voices disappear a bit. Everything is kind of in your throat and in your head while Tandberg was also in your chest and also had a good low end that was powerful even if not nearly as precise and quick and present as Class D. Strange little amp, but I'm not saying it doesn't have something to it. Since the lighthanded bass and mids it sounds bright. Also where bass is more intense it seems to start seriously messing up the mids and the rest... High female voices do sound interesting, but the upper treble is either rolled off or mushed. High frequencies in general sound very unconvincing, some more nuanced and quieter sounds or entire notes seem to be missing. As if the melody didn't contain them, but I know the song - they're there! In general I'd describe Tandberg as MUCH more rich pretty much in every frequency range. Got some Panasonic caps 220uF and 100 uF. And I ordered the TO-126 power transistors as well.
Now I did the first step described by @cumbb
I don't know if I did everything right, but the volume level is now much lower and gets much louder upon turning the amp on and off until the capacitors run out it continues playing at this louder/normal volume. Otherwise during normal operation when the power indicator LED is on - the amp is playing so silently that I put 1V from DAC and have the potentiometer turned all the way up on the amp and it's not screaming yet. I don't know if I'm stupid or what is the issue, but I don't think that was the intended result, was it?On with the homework:
On this 302, the power amp output runs via the headphone socket and is routed to the LS connections via a plug-in switch. If you don't listen to headphones, connect the power amplifier output directly to the speaker terminals. And here too: remove unnecessary connections: Here is this board at the sockets. And another recommendation - for later, if you want to have a high-end somewhere: combine the ground connections, which usually run separately for each channel, or more precisely: only one strip. Here you can see the connection between the speaker terminals and the ground center (between the electrolytic capacitors).
This little efforts improves the sound enormously: I can at last hear a few words and syllables from Sade. Before it was just indistinct mumbling. So it's getting better, step by step;-)
... and: just do and listen;-)
The bass is tighter though as far as I can tell, but I don't remember how this NAD sounds.
Everything actually seems to be better and have more body, the only issue is that after turning on in a couple of seconds when LED turns on - I'm loosing like 15 dB.
Attachments

Last edited:
On with the homework:
On this 302, the power amp output runs via the headphone socket and is routed to the LS connections via a plug-in switch. If you don't listen to headphones, connect the power amplifier output directly to the speaker terminals. And here too: remove unnecessary connections: Here is this board at the sockets. And another recommendation - for later, if you want to have a high-end somewhere: combine the ground connections, which usually run separately for each channel, or more precisely: only one strip. Here you can see the connection between the speaker terminals and the ground center (between the electrolytic capacitors).
This little efforts improves the sound enormously: I can at last hear a few words and syllables from Sade. Before it was just indistinct mumbling. So it's getting better, step by step;-)
... and: just do and listen;-)
As for rewiring the speaker terminals (the above step described), I don't know where the violet wire went. The brown and yellow come from the board next to the caps, seems straightforward, but the grey and violet seem to be connected at the board anyway, so what's the difference to make only one wire run to the speaker terminals instead of two. I'm sorry if I'm getting this all wrong, I'm new to this amp modification and stuff. Any help would be much appreciated.
I'll post pictures and impressions once I do it 🙂
My power supply caps seem to be a little inflated up top, probably would be best to replace them, with something new and maybe 10k instead of 6-7k uF.
Last edited:
Oh guys, I'm sorry I mixed up the quotes when I was talking about the first step.
Also I just now realized what I actually have bridged around. I no longer have a preamp in the loop. Now my DAC works as preamp, but it has limited voltage and I'm applying heavy DSP now due to temporary factors having to do with how I'm using my speakers. However, I must say I've started enjoying music from this amp after this change. I used a pretty good OCC silver plated copper cable from earphones that I had no use for. Haven't done critical listening and as I said I already forgot what it sounded like, but fact is I'm enjoying some female vocals and feeling in love.
Don't know why it plays so loudly upon turning off and on, but I can simply lower the volume if I know a turn off is imminent and avoid any damage to the tweeter (if I run it direct without a crossover).
Here's the correct quote for the first step
As for the second step, I'll just leave violet cable hanging unused I guess and follow the steps as best I can before asking questions. I'll probably only be able to return to this little project sometime Sunday or Monday and only briefly, but hopefully I'll make some progress. It takes a bit for me to figure out what is required of me, so please bare with me.
Also I just now realized what I actually have bridged around. I no longer have a preamp in the loop. Now my DAC works as preamp, but it has limited voltage and I'm applying heavy DSP now due to temporary factors having to do with how I'm using my speakers. However, I must say I've started enjoying music from this amp after this change. I used a pretty good OCC silver plated copper cable from earphones that I had no use for. Haven't done critical listening and as I said I already forgot what it sounded like, but fact is I'm enjoying some female vocals and feeling in love.
Don't know why it plays so loudly upon turning off and on, but I can simply lower the volume if I know a turn off is imminent and avoid any damage to the tweeter (if I run it direct without a crossover).
Here's the correct quote for the first step
So here's a quick and easy guide to getting a few classes better: I first bridged the entire preamp junk: i.e. from the potentiometer to the power amplifiers. To avoid having to remove the circuit board, I simply disconnected the coupling capacitors C 301 (L) and C 302 (R), directly at the potentiometer, at the capacitor body and used the remaining stubs as solder sockets to connect a thin wire to each of the input capacitors C 401 (L) and C 402 (R). Because I can reach the underside of the circuit board at the output stage, I removed R 401 and R 402 and routed the cables through the circuit board and soldered them. I simply cut the PCB paths to these power stage inputs here too.
Any cable used here will sound much better than all the bridged junk.
How does it sound? Just do and listen;-)
As for the second step, I'll just leave violet cable hanging unused I guess and follow the steps as best I can before asking questions. I'll probably only be able to return to this little project sometime Sunday or Monday and only briefly, but hopefully I'll make some progress. It takes a bit for me to figure out what is required of me, so please bare with me.
Last edited:
Quiet listening at night proves that it already sounds better than Tandberg in many respects. Tandberg was inherently veiled despite how Hi-Fi it sounded it always had that veil, this is more present. The higher treble of NAD is rolled off or lost somewhere - definitely not as airy or sparkly or present in comparison and of course the bass is not there yet although much tighter than before and it still sounds heady rather than full bodied, but in many ways this already is preferable for low level night time listening to my Tandberg. Kinda glad that it burned, for I would have had no idea something so cheap can come anywhere close. I better not say how much I paid for the NAD. Very excited to hear where this thing can be improved further. This is much better than how I first heard it, I can't believe the engineers decided this was a good preamp to put into it. In general I've always been avoiding preamps, because even in 1-2k euro range they all seem to just mess things up...
Anyway, this small modification definitely gave this amp another life. Amazing!
Anyway, this small modification definitely gave this amp another life. Amazing!
Last edited:
Regarding the speaker terminal: the two inner connections are the return conductors that go to ground. Replace these two cables with just one cable. This makes a small difference to the sound. But I would remove the entire plate, with all the small capacities and solder points. You don't need them, they just add up to some undefined behavior that we don't want;-)
If you have a record player and connect its pickup unbalanced (the majority), then use only one cable for ground from pickup to amplifier. And in the same way, use only one ground connection between your devices - connect only one cinch-ground of both cinch-cables. Not only the summation of cross-sections leads to an imprecisely defined current, signal, but also the minimally different lengths "distort" the current, the signal.
If you have a record player and connect its pickup unbalanced (the majority), then use only one cable for ground from pickup to amplifier. And in the same way, use only one ground connection between your devices - connect only one cinch-ground of both cinch-cables. Not only the summation of cross-sections leads to an imprecisely defined current, signal, but also the minimally different lengths "distort" the current, the signal.
Attachments
I see that you've made a stroke of luck that could open more doors: You used twisted-pair cables. The next time you're surfing through the night with the NAD, just cut one wire each and keep listening. I'm curious to see if it's audible;-) And so that it doesn't get boring, another step: the two cables have different lengths depending on the channel. Make both cables the same length (i.e. shorten one of them). I'm curious to see if and how this is audible;-)
Attachments
One cable might be already too short unfortunately, but I'll see what I can do. I still have some more of this cable, but the paths are gonna be different lengths on the circuit board anyway and well.. I'll see what I can do.
My power transistors arrived, so I could in theory pick them up on Tuesday. However the measuring rig is coming from china, so it may take a little bit for it to get here. I'd like to make more improvements before listening more. I really hope this thing can sing.
My power transistors arrived, so I could in theory pick them up on Tuesday. However the measuring rig is coming from china, so it may take a little bit for it to get here. I'd like to make more improvements before listening more. I really hope this thing can sing.
- Home
- Amplifiers
- Solid State
- Modifying a NAD 302