Hi ThorstenLFolks,
You are by far not through and extreme enough.
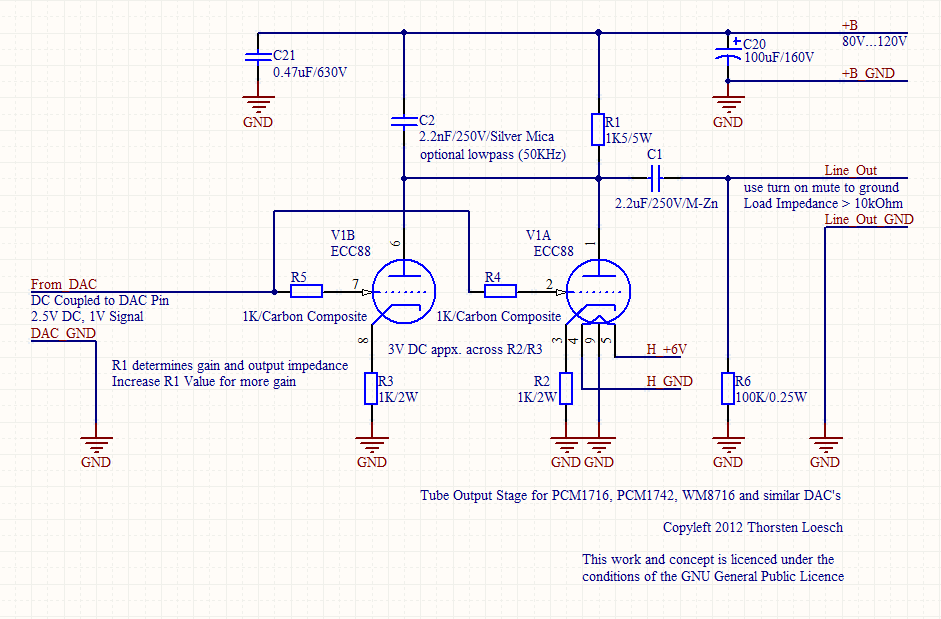
First, connect the output from the DAC directly to the gridstopper (1K carbon composite will be nice) of the gain tube. Connect the second halve in parallel with it's own gridstopper.
I would suggest 1KOhm cathode R per section and a 1.5K common anode resistor for the gain-stage.
This gives a gain of a little over 2, just right for a little over 2V RMS output. Output Impedance is a little on the high side, at 1.5KOhm, but it is a "real" output impedance (see BAT's white paper on their "unistage" or whatever design for more) and sounds great. It gets rid of the cathode follower and of unnecessary gain and attenuation.
You cannot get more direct. Signal to grid, straight out from the anode.
Using good quality resistors in at least 2W (better 5W) is recommended.
For the coupling Cap use the best you can get. My take would be 2.2uF/250V as either diyhifisupply Obbligato Tinfoil & Polyprop Film or the Mundorf M-Cap ZN or Audyn KPSN. If you really have too much money get Audio Note Copper Foil or Silver Foil.
Ciao T
PS, I would keep the Tube Rectifier, but replace the resistors with chokes, this reduces noise and brings up the voltage too.
Sounds interesting...
I have done all Koifarms wonderful mods - and I now a very,very well playing cd. A 1000 thanks to Koifarm.
But I'm also curious and cannot help getting interested in your mod. I just cant total understand your explanation - is it possible for you to make a small "scheme"?
Best regards -Torben
The passive mod is half done, you need to bypass all circuitry from DAC output to coupling caps. Koifarm mod leaves series of resistors between DAC output (that already has op-amp stage) and coupling caps leading to tubes. Just solder two bypass wires from DAC output to C7 C8, remove the opamp and leave the rest of the circuitry intact.
Hi,
Here you go.
Ciao T
I just cant total understand your explanation - is it possible for you to make a small "scheme"?
Here you go.
Ciao T
Attachments
ThorstenL,
The schematic you draw completly changes the sound of the MHZS player. I think people bought the player because of his sound. I do not say with will sound better. Because this is very personal. But if people want to rebuild the entire tubestage, why buy the player at all?
Is modification not about changing the design to improve the sound without changing his characteristic properties.
Ronny
An externally hosted image should be here but it was not working when we last tested it.
Here's my simple solution:
1. Remove opamp
2. Remove two coupling electrolytic caps that are closest to the DAC
3. Run two signal wires from the DAC output to the big coupling caps
4. Change 33k to 22k as per Koifarm instructions (gain compensation)
Hi,
Until you actually build, you don't actually know that... 😀
I think many people bought it unheard and because it was cheap, had tubes and looked like a decent platform to experiment, without splurging too much.
I agree however, if anyone bought the MHZS Player because they liked the sound as it was stock, do not modify it.
To me modifying is about getting what I want from what I got or can get. So very extreme modifications are "fair game" for me. But to each his own style.
Ciao T
The schematic you draw completly changes the sound of the MHZS player.
Until you actually build, you don't actually know that... 😀
I think people bought the player because of his sound.
I think many people bought it unheard and because it was cheap, had tubes and looked like a decent platform to experiment, without splurging too much.
I agree however, if anyone bought the MHZS Player because they liked the sound as it was stock, do not modify it.
Is modification not about changing the design to improve the sound without changing his characteristic properties.
To me modifying is about getting what I want from what I got or can get. So very extreme modifications are "fair game" for me. But to each his own style.
Ciao T
Chef chef, i hope you did also the mod on the Voltagestabeliser for the DAC. Because these things oscillate like hell. After a while they will quit working and destroy the DAC.
The mod you have done looks good.
Ronny
The mod you have done looks good.
Ronny
Last edited:
What is the voltage stabilizer mod you're talking about?Chef chef, i hope you did also the mod on the Voltage stabeliser for the DAC. Because these things oscillate like hell. After a while they will quit working and destroy the DAC.
The mod you have done looks good.
Ronny
This two regulators oscilate like hell because the people of MHZS have forgotten to place the decopplingcaps of 100nf.
Just place 4 x 100nf capacitors as near as possible to the voltage stabilizors.
An externally hosted image should be here but it was not working when we last tested it.
Just place 4 x 100nf capacitors as near as possible to the voltage stabilizors.
An externally hosted image should be here but it was not working when we last tested it.
Just connect them as on the picture.
The lower one is a 7805 and the one above is a lm317.
There for the connections are different.
Ronny
The lower one is a 7805 and the one above is a lm317.
There for the connections are different.
Ronny
Excellent point, Koifarm.
After removing OpAmp, is there a un-used voltage regulator sitting on the PCB?
After removing OpAmp, is there a un-used voltage regulator sitting on the PCB?
Yes, the two supply's for the opamp. Just follow the traces from opamp to the out of work regulators.
Hi ThorstenLHi,
Here you go.
Ciao T
Thanks for the schematic - looking very much forward to try this.
Still curious & experimental - and trying to learn.
Best regards from baek47
Here's my mod of the DAC board:
OpAmp removed, DAC output directly to coupling caps via two signal wires, coupling caps - .47uf auricaps, output caps - 6.8uf ERO MKT1813, filtering cap replaced with Rubycon 220uf 200v, 33k resistor to 22k for gain compensation.
Everything sounds excellent.
I was considering running output caps directly from output tube to RCA bypassing mute relay, hope current solution of mounting them vertically is mechanically stable enough. Everything looks clean now.
Oh, and the blue leds under the tubes are gone.
An externally hosted image should be here but it was not working when we last tested it.
Last edited:
Chefchef, i use often thermal glue to stabelize the capacitors on the board.
There is no sound improvement if you bypass the mute relais. It shorts the output. If the relais is open it does not influence the signalpath.
If you bypass the mute relais you got ugly noises when changing track or hitting play or mute.
Ronny
There is no sound improvement if you bypass the mute relais. It shorts the output. If the relais is open it does not influence the signalpath.
If you bypass the mute relais you got ugly noises when changing track or hitting play or mute.
Ronny
Ronny - I usually use some kind of silicon or other inert glue to stabilize the components. The problem in this case is that there are some resistors sitting underneath those caps 🙂
The leads of those output caps are thick enough to stabilize it, but still id like some kind of bracing there.
Relais there is fine, it's just that the clicking noise is just as annoying as the digital track changing "squeal", and there are 3 of those relays.
Don
The leads of those output caps are thick enough to stabilize it, but still id like some kind of bracing there.
Relais there is fine, it's just that the clicking noise is just as annoying as the digital track changing "squeal", and there are 3 of those relays.
Don
Question: what would happen if we removed the cathode follower completely and routed the signal from the first tube to the output via the cap?
After some listening I noticed some distortion on high level signals coming out from CD player. I checked the values of the transistors in the tube stage. The values of the plate resistors on my player are 47k (not 68k as in Koifarm schematics). I suspect changing the 33k resistor to 22k messed up tube cathode bias(?) and it started clipping, changing it back to 33k restored everything back to "normal". Once I do the +100 power supply I will have to re-check for proper bias and resistor values. I am also doing all this tweaking "blind" since my scope is away at the moment.
One other thing. The mute relay is muting not just digital noise but also quite a bit of hum, just wondering if filament power supply could use some more "regulation".
EDIT: Funny, it appears that one of my bass-heavy distortion test CDs I was listening to had hum recorded on it (oh, those DJ's), other CD's don't seem to suffer from this problem. I am listening to Jordi Saval recording, and on this player with the mods I've already done it sounds just fantastic - the amount of detail and overall clarity is something I have not heard before.
Last edited:
I would like to share my results and observations after a LOT of experimentation, tweaking and changes to the circuit to my MHZS CD66F. During tweaking I listened to the player after each change and compared it to several other players I have. Here are the things that were done:
After getting my hands on the CD66F the first thing I did was replace all signal caps to audiophile grade ones: coupling caps - .47uf 400v auricaps, output caps 6.8uf 250v ERO MKT1813 (grounding resistors changed from 47k stock to 470k), DAC to OpAmp couplers replaced with Elna Silmic II 3.3uf 50v. Power supply cap was changed to 220uf 200v Rubycon, bypass cap to Russian PIO 0.1uf 400v.
The sound quality improved dramatically (no surprise there really). Using quality components resulted in considerable improvement in sound.
Next I decided to eliminate OpAmp from the signal path. Everything was done according to Koifarm instructions here: bypass signal caps DAC to OpAmp, bypass OpAmp cirquitry and remove OpAmp. Result: Output level dropped, significant roll-off in the HF range. Changing cathode resistor from 47k to 22k raised the output level but messed up tube bias and introduced clipping distortion on higher level signals.
I reversed everything back to the previous state (OpAmp + signal caps from DAC to OpAmp) - back to normal.
Changed filtering caps in power supply unit and changed zener diode to 100v 5w, B+ supply now is 100v - again, audible improvement in sound.
Since it took me only 3 days and nights to do all this experimenting I have a short list or recommendations: unless you're properly equipped with theoretical knowledge, testing gear, scopes, generators, etc. I would stick to basic component upgrades and tube rolling. Chances of messing up already decent product are high. All of those that have their fingers burned with soldering iron could tell you horror stories of PCB traces lifted, components burned and cracked, that could happen with repeated component changes at those late night soldering sessions.
I have "built" several dozen Sony PS-1 CD players with upgraded PS and custom output stages of various parameters of various components. I used one of those for comparison during CD66 tweaking stage. At some point PS-1 started sounding better than MHZS machine, which sort of scared me back to the stock design...
So Bon Chance to all the tweakers!
- Home
- Source & Line
- Digital Source
- Modification of MHZS CD players