Can I drop a brief suggestion here. Please forgive the brevity, I've not had any sleep and a long day ahead.
If you're wanting something less hi-fi oriented, or possibly more diffuse (not necessarily diametrically opposed) and don't have time / funds to do something about it, try ye olde Hafler circuit. In its simplest incarnation, Brian Eno's is the most straightforward with a single extra speaker. Get a spare small speaker and stick it somewhere behind you. Wire the two terminals on the speaker to the two positive posts on the amplifier (note: do not attempt with class D or class T amps; but it's generally fine for most class A / AB / B types providing they can handle the impedance load). The rear speaker will produce the stereo difference signal i.e. everything not common to both channels. Gives decent stereo pretty much anywhere in the room. Not as accurate, but it opens things up / enhances ambience. A twin rear-speaker version runs the additional rear speakers wired in series: positive terminal on each speaker wired to the corresponding positive on the amplifier, and the negative posts on each speaker wired together. The two rear speakers produce the same output but have greater OA dispersion / efficiency which may be useful in some cases.
You may like the effect. You may not. If you've a spare speaker and some wire lying around, and your amplifier can handle it, it costs nothing except a few minutes to try.
Last edited:
In college we would spend time in the periodical room reading "Audio Amateur" magazine. The projects were awesome but out of my scope at the time. Until I read about "Eno Ambiance" . I had the stuff to do that. It was so surprising. The effect was very pleasing to me and seemed to create confusion with visitors. The sound field became more expansive than the distance between the speakers and seemed pulled up the side walls. Both were unusual for college room stereo systems at the time.
I used a spare tweeter from my main speakers so it was able to blend in well. Try it, you may be surprised.
I used a spare tweeter from my main speakers so it was able to blend in well. Try it, you may be surprised.
I've still a lot of time for ambiophonics. I don't regularly use it (haven't for years), and it's not necessarily 'accurate' in the conventional sense, but especially on live concert recordings, ambient and relatively extreme studio material it can be an interesting approach to experiment with. And if nothing else, it forces you to reappraise what it is you're doing or looking for, and why.
That's a blast from the past, Scott! I recall trying this with my father's stereo system back in the 80s or early 90s. The fronts were Kenwood KL-777 (102dB 1w/1m !!!) and the rears were KL-220 (I think). Driven by a 70's era Kenwood receiver, of course.
I remember being a bit wary of trying it because I didn't understand how it worked and I didn't want to fry my dad's system*. Curiosity got the best of me in the end and I tried it. I recall it sounding interesting - but borderline distracting. I really should try it again for turds n' giggles.
*Later, in the 90's, my dad downsized his system and let me take the KL-777s and receiver to university. One particularly crazy night, someone decided to turn the dial to "11" (this system was painfully loud at "4" and most certainly responsible for my tinnitus) and poof, fried one of the drivers in the left speaker. They went to a landfill one day when I was in a rush to move out of that place. If I knew then what I know now...
Last edited:
That it is. But I'm a brontosaurus, so I quite like it. 😉
The rear speaker basically reproduce everything that isn't common to both channels. Anything that is, goes out of phase and gets cancelled out.
Generally, a simple Hafler implementation is best done with a small speaker or pair of small speakers; they don't need to be full-range as LF is generally not required for ambiophony (note, as distinct from ambisonics). In these cases, it's also usually best if they are a few dB down in relative output compared to the mains. The best way of tuning the rears in an ambiophonic setup is a bit like how you would a sub: you don't necessarily want to hear them as distinct sources as such. If you do, it's too loud. Ideal way is to get a cheap integrated & use that to drive the rears, so you have fine control over the volume; you can do that sans the extra amp by inserting a pot into the circuit, but it usually doesn't work as well as running them off their own. It also means you can turn it off completely as desired.
Plenty of other variations; I can talk Hafler / ambiophony all night so probably better not to get me started down that road... it was '70s era quadraphonics that kick-started my interest in audio 30-odd years ago, and I still love a lot of the much-derided technology that was actually rather interesting.
Addendum: as mentioned, but it's worth repeating -for the love of mike don't try this on most class D or class T amplifiers. They won't appreciate it. 😉
The rear speaker
Generally, a simple Hafler implementation is best done with a small speaker or pair of small speakers; they don't need to be full-range as LF is generally not required for ambiophony (note, as distinct from ambisonics). In these cases, it's also usually best if they are a few dB down in relative output compared to the mains. The best way of tuning the rears in an ambiophonic setup is a bit like how you would a sub: you don't necessarily want to hear them as distinct sources as such. If you do, it's too loud. Ideal way is to get a cheap integrated & use that to drive the rears, so you have fine control over the volume; you can do that sans the extra amp by inserting a pot into the circuit, but it usually doesn't work as well as running them off their own. It also means you can turn it off completely as desired.
Plenty of other variations; I can talk Hafler / ambiophony all night so probably better not to get me started down that road... it was '70s era quadraphonics that kick-started my interest in audio 30-odd years ago, and I still love a lot of the much-derided technology that was actually rather interesting.
Addendum: as mentioned, but it's worth repeating -for the love of mike don't try this on most class D or class T amplifiers. They won't appreciate it. 😉
Attachments

Last edited:
don't try this on most class D or class T amplifiers
Is not a more general warning that any bridged amplifier circuit (ie no ground speaker terminal) is not suitable?
dave
Yes indeed. Given the expansion of digital models I focused on them, but anything bridged isn't going to be a happy little amplifier.
For the rest -no real problem if it can handle the extra load.
For the rest -no real problem if it can handle the extra load.
Addendum: as mentioned, but it's worth repeating -for the love of mike don't try this on most class D or class T amplifiers. They won't appreciate it. 😉
Well if it is worth repeating then let's go for full resolution detail! 🙂
Is the warning about class D (T) / bridged amps specific to the "one amp" solution or does it also apply to the "two amp" solution that you have also described?
Basically don't use bridged amplifiers of any kind to power the rears. Regular non-bridged amps are fine, within the usual powerhandling / load restrictions etc.
On one of the Pink Floyd records, Animals maybe, I remember hearing sounds that kept causing me to turn my head. Really subtle but oh so real. Thanks Scott for bringing back those memories.
Pleasure. 😉
That's what some clever phase manipulation in the studio can do. The Alan Parson's quadraphonic mix of DSOTM is well worth seeking out as well (available in full discrete 4.0 in the Immersion box set, albeit at a price).
That's what some clever phase manipulation in the studio can do. The Alan Parson's quadraphonic mix of DSOTM is well worth seeking out as well (available in full discrete 4.0 in the Immersion box set, albeit at a price).
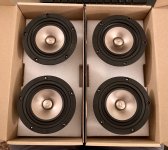
Had an exciting delivery this evening!
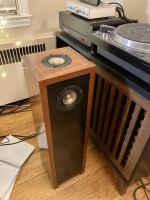
Just got one done. Can’t not do the other...
Just got one done. Can’t not do the other...
Attachments
Last edited:
Thanks! They really do look good. An ancillary bonus.
As for how they sound, my first impression is VERY positive. Thankfully I typically listen at lower levels, so they will be safety broken in. So far I really like what I’m hearing.
I’ll need to get some new screws to better fit, as the P7HD holes are just slightly smaller than those on the EL70s.
I think I got the gasket spacing correct because the bass is presumably close to the EL70s. I made cardboard rings like you described, cogitech. The P7HD box tops were the right thickness and I don’t think I have any air leaks.
It’s going to be a great weekend of getting to know these new speakers!
The new screws are jammed into the side of the foam base the drivers were shipped in. Pull the foam out of the box and you'll find them. 🙂
Hopefully you didn't drill the new holes to fit the old EL70 screws, because the new screws are a smaller size and they won't want to stay in the larger holes very well.
If this is the case, you can always rotate the drivers 180 degrees and drill new holes. The drivers will end up "upside down" but nobody will notice or care. Mine are upside down because it was the only choice I had - long story.
Last edited:
Haha! Oh well. I totally missed the screws in the box. It was late. 😀
I’ll try to find other screws. If that fails, I’ll rotate and drill even more holes for the oem screws.
I’ll try to find other screws. If that fails, I’ll rotate and drill even more holes for the oem screws.
Those drivers look very nice. It’ll be interesting to hear your review. The bar is set high... the el70s sounded fantastic in those cabinets. Do be careful to drill a large enough hole for the self tapping wood screws. The sepele is fairly dense... don’t want to break any screws off.
Thanks, Evan. Yes, the bar is set very high, but I am already pretty convinced these are even better now.
Just a few hours in and they seem to be improving. They sound absolutely amazing near-field. Hoping that with break-in, the top-to-bottom resolution will extend farther away.
I was successful in drilling 4 new holes per driver. Reused the 12 o’clock holes as a starting point and also for sizing the right drill bit. I am hopeful I can switch out the EL70 screws for those with slightly smaller socket caps. I don’t want to press my luck with drilling into these cabinets any more. And who doesn’t love an excuse to shop at McMaster Carr?
Von Ah,
Based on my experience, you will get what you are hoping for.
Mine started out treble-heavy with tight (but good) bass. I was hyper-focused on the treble because that was mostly the point of me upgrading from the EL70s. After the full break-in period I can honestly report that the complete range from top to bottom is fantastic, even from 25 feet away. Very balanced, fluid and detailed.
Give them 10 hours of gentle break-in and then start to stretch them out progressively. You'll see. 🙂
- Home
- Loudspeakers
- Full Range
- microTower Revisited