I'm in the process of building the Aleph J (my first big build), but excited about the prospect of being able to try out other First Watt amps that use the same power supply (F4, in particular). For those of you that have experience using one chassis and PSU with various First Watt amp boards, I'm curious to know if you have any build tips that would facilitate the swapping out of boards, i.e., solutions that would minimize having to desolder and re-solder connections and that kind of thing.
Use connectors on the wires and the PC boards, for the power supply and the input/output wiring.
Last edited:
I’ve just finished up a bit of this kind of optimization for my chassis. I think the biggest thing would be to use quick connect tabs or wire terminals (I’ve had better luck with former) for the PSU connections. I’d also utilize quick connects for your binding posts if they have that option. For me, it’s been easier to solder dedicated power, source and speaker wires to each board. Then when it’s time to swap, it’s just a matter of disconnecting a few connections, unscrewing boards, and swapping in the new pair.
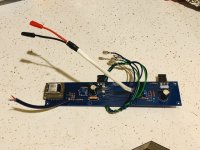
Use spade connectors for power, ground and output if possible.
https://www.digikey.ca/product-deta...amp-connectors/1217861-1/A100452CT-ND/2233479
If you only have 1 hole, I clip one of the legs off and do with 1 pin but with alot of solder to give it more contact area.
Flip your amp inside out and get bonus points for laziness


An externally hosted image should be here but it was not working when we last tested it.
https://www.digikey.ca/product-deta...amp-connectors/1217861-1/A100452CT-ND/2233479
If you only have 1 hole, I clip one of the legs off and do with 1 pin but with alot of solder to give it more contact area.
Flip your amp inside out and get bonus points for laziness
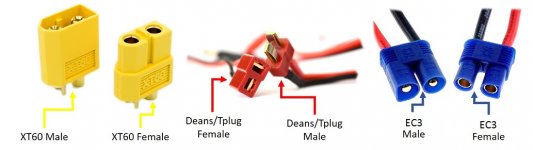
Another option is to put splice connectors in the wires instead of at the board. I have done that using radio control model battery connectors. They are designed to handle high current, are polarized and also come in male/female couplers to minimize mistakes in connections.
Attachments
Another option I considered was picking up an extra set of heatsinks for my chassis from Modushop (if you’re using a case from the diya store). Kinda pricey way to do it, but it allows you to keep your boards mounted and protected.
DIYDX-HS-4U300
DIYDX-HS-4U300
Thanks for all these suggestions, everyone! Super helpful. I already have some spade connectors on hand, so may go that route, although I like the splice connector idea as it seems like that would put the least amount of stress on PCB solder connections...
Hi Dennis,
I flew rc planes and helicopters for a while until the feds enacted very restrictive rules to stop the dangerous antics of some reckless "drone" operators.
Another connector is the bullet wire connector. That can be used for the ground connection in conjunction with a rc battery connector in a bipolar power supply. The smaller gauge connectors can also be used for low level signal wires.
Ben
Attachments
Another option is to put splice connectors in the wires instead of at the board. I have done that using radio control model battery connectors. They are designed to handle high current, are polarized and also come in male/female couplers to minimize mistakes in connections.
This is my approach also.
I much prefer the quality of Deans plugs over spades.
These make life easier than reapplying goop and take the worry out of holes in Keratherm or Mica etc.
4180G Aavid | Mouser
4180G Aavid | Mouser
These make life easier than reapplying goop and take the worry out of holes in Keratherm or Mica etc.
4180G Aavid | Mouser
This is a great point - I’ve noticed that my Keratherm doesn’t always remove as easily, tears, or leaves some residue. They usually come off in one piece, but it worries me to reuse them. I’ve been using a cheaper alternative (BER177-ND), but like this idea a lot.
These make life easier than reapplying goop and take the worry out of holes in Keratherm or Mica etc.
4180G Aavid | Mouser
Interesting. So is the idea that this thermal interface replaces Keratherm, or does it go between the mosfet and the Keratherm?
Replaces
Edited to add - I actually use very thin coating of goop with them, but some have said it's not necessary.
2nd Edit - If you're replacing Keratherm on an existing build, you'll likely want to reflow the output devices. These are thicker.
Edited to add - I actually use very thin coating of goop with them, but some have said it's not necessary.
2nd Edit - If you're replacing Keratherm on an existing build, you'll likely want to reflow the output devices. These are thicker.
Last edited:
- Home
- Amplifiers
- Pass Labs
- Looking for build tips to facilitate swapping of Pass amp circuits