I took a "make your own kitchen cabinets" course at a collage many years ago. All of the tools were profesional shop grade and made to last years. When demenstrating router use the instructer used a hammer to tighten the collett a bit more. Sure enough a few weeks later one of the students said "you don't have to use a hammer to tighten" and he ruined a nice counter top. I always use a hammer to tighten a bit a bit more and no problems yet. Yes I did make all the kitchen cabinets when we redid our kitchen.
OK, I will share an important secret to tightening a collet or even a chuck. After you think you have it tight move the wrench around to the other side and see if you can tighten a bit more. Don't tell me in theory it makes no difference until you try it and see the wrench move.
Hint round is a theoretical concept!
Hint round is a theoretical concept!
OK, I will share an important secret to tightening a collet or even a chuck. After you think you have it tight move the wrench around to the other side and see if you can tighten a bit more. Don't tell me in theory it makes no difference until you try it and see the wrench move.
Hint round is a theoretical concept!
I'll tell you then. In theory, it makes NO difference.😉
In practice, I always tighten a three jaw chuck the exact same way, incrementally, putting the key in all three locations. The exact same thing with the 3 jaw on my unimat lathe, and the 3 and 6 jaw units at work.
I've had a bit loosen in my router, but never considered going to the other side. I'll give it a try next time I'm running the pin router.
ss4927: You dropped only the bit?? Pfft, piker..
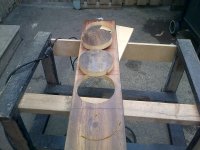
I circle routed a 20 inch diameter circle out of a 24 by 48 sheet of melamine coated 3/4 inch MDF panel supported at each end on sawhorses, using a 3/4 dia bit.
Kinda like a scene outta the road runner, where wiley cuts a circle in the floor, while standing in it.
Luckily, the bit hit the driveway and not my foot.😱
jn
JN
Just for you... It is very important to remove the chuck key before starting the tool!
Also if you use a cord to keep the key from being lost, never use a cord that is strong enough to wrap around and amputate your fingers, when you forget to remove it before power on!
Just for you... It is very important to remove the chuck key before starting the tool!
Also if you use a cord to keep the key from being lost, never use a cord that is strong enough to wrap around and amputate your fingers, when you forget to remove it before power on!
Tie the chuck key to the plug end of the cord...you have to remove the key to even plug the tool in.
For a stationary tool you can cover the on button with a piece of wood that has a hole just big enough for the chuck key to fit through. You then need the key to turn the tool on.
JN
Just for you... It is very important to remove the chuck key before starting the tool!
Also if you use a cord to keep the key from being lost, never use a cord that is strong enough to wrap around and amputate your fingers, when you forget to remove it before power on!
You vill pay for your insolence.😉
edit: btw, is that your excuse for typing slowly? My excuse is I left a hammer at the top of the extension ladder.😱
jn
Last edited:
Tie the chuck key to the plug end of the cord...you have to remove the key to even plug the tool in.
Ah, but then some electrical engineer will figure out that an extension cord can bypass that..
jn
I used to know a guy that had an envelope of RCH; would pull it out for measurements. He claimed they were calibrated to a NIST standard; something about a woman locked in a vault in Switzerland, but we all know there are no redheads in Switzerland.
I always thought chucks were designed with three keyholes for the lazy diy-er unwilling to turn it around 😛 Actually Ive always tighted them in increments.
I don't think porter and cable is sold at a retail outlets here, at least I've not seen the brand anywhere.
As Cal mentioned, Home Depot carries it here. I bought mine online from CPO Outlets. Amazon has them too.
~Tom
As Cal mentioned, Home Depot carries it here. I bought mine online from CPO Outlets. Amazon has them too.
~Tom
I didnt notice them last time I was there but then I wasnt looking for those specifically, thanks cal and tom.
I have things ready to go Im just missing my circles at this point its putting my project on hold. If my belt sander was designed to mount on a 90 I could use my jigsaw to cut some out and true them up with that, no help there. Unless someone knows a trick way to do that?
Hint round is a theoretical concept!
Reminded me of an old cartoon joke----
Charlie: "Lucy, take this paper and pencil and draw a round circle"
Lucy: "What other kind is there?"
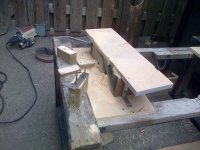
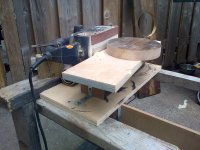
I rarely use my belt sander cause its not mountable..I found some good ideas through search http://www.rockler.com/how-to/sanding-jig-belt-sander-benchtop-tool/
I always thought chucks were designed with three keyholes for the lazy diy-er unwilling to turn it around 😛 Actually Ive always tighted them in increments.
I was quite surprised by the actual effect incremental tightening had. I bought a used unimat with a ruined 3 jaw. I ground the grips back down to 30 degree, chucked a 1/4 round in, and worked the tips using 600 grit emery to get runout below 250 microinches. It surprised me that the tightening of the jaws had about a 2 mil effect on runout of the piece.
jn
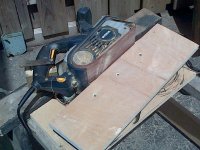
Ok back to saw talk 😀 the reciprocatiting kind that is. I thought it would be much of a pain to cut it this way due to excessive blade flex cutting this thicker material but it turned out pretty good with new decent quality blades. Thats the stuff that killed the toy router and I originally wanted to use. The blade flexed a little, but away from the stalk that Ill be using. And I left about a 16th all the way around both perimeters so I can clean them up with the belt. Im happy bout that cause a router didnt make the list this week. I think all that end grain showing will stain very well and have a nicer finished look if I dont decide to black it out.
Attachments
Last edited:
Were going out for dinner a celebration is in order. I should of suggested a grill house because I could really go for some of that tonight.
Mounting the belt sander is pretty trick, great idea in the link back there. It took me about an hour and some fense and decking scraps to mount it and I had have a 90 degree platform to finish them off.
Attachments
- Status
- Not open for further replies.
- Home
- Design & Build
- Equipment & Tools
- lefty loosey goosey or righty tighty?