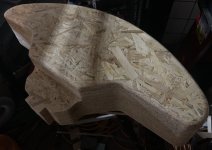
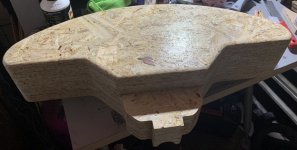
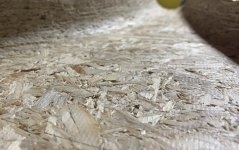
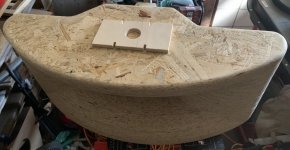
I wanted to try out OSB since it was the cheapest pre-cut material that would fit into my car. I could use particle board and MDF with similar results. The high end version will be made (if it will be made) out of solid wood boards of whatever thickness available. It could be made from a number of 80x30x1.8 cm and 80x40x1.8 planks, but that would cost at least 3 - 4 times more than OSB. I did not spend the money before I know what I am doing. For example, I forgot to add some roughing clearance. If I did that, I could have had less sanding. Also, I learned a few things during the process and the next one will be made more efficiently.

Would you mind describing your idea?If I ever make the second one, I already have an idea how to machine all the slices fully in place with the 6 mm end mill only, it would only require a bit more CAM work.
It is pretty simple - I will need to slice my model into more slices and do three separate operations on each. The 3D machined part is only on a smaller area, so I would just need to make sure I have holding tabs where the 3D machining is not. Then it would be 3D roughing, 3D finish and as the last part, cutout with tabs. If I am correct, for the convex shape, there is really no need to use a ball end bit. It would save a little machining time due to larger diameter bit, but it would definitely save some time while switching the parts.
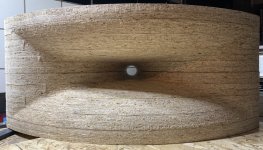
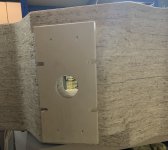
All parts (except the plywood flange) are machined and both halves glued together. Based on the few problems I met, it is definitely worthwhile to have an opportunity to mount the pieces repeatedly to a certain defined location. Now I consider the optimum workflow as follows:
1) cutout and roughing of the 3D area. Two indexing holes for pins
2) stack and glue 3-4 roughed pieces and finish at once. Index on steel pins at the waste board
3) run second finishing pass perpendicular to the first one
This should result in a smooth surface and minimum sanding with better wood and also the thin parts will be machined after gluing to the part below.
Tomorrow, I hope to sand them down and maybe first layer of lacquer. It looks like the finish will not be perfectly smooth, but still looking good.
Sanded and lacquered. I also routed a 1/2" round over to the top/bottom. The surface is sanded pretty smooth, but there are small bumps from the missing particles. I think if it will measure and sound good, I will not fill them, it does not look too bad. Pictures of the front (showing the surface structure) will come later.
Attachments
Great project !!! Should sound fine and you can always use a little wood filler and good paint. Horns are very difficult to beat, sound wise, when done right.
Best of luck,
Joe
Best of luck,
Joe
So the horn is completely glued together. Getting an accu brad nailer was a good move. Now I need to work on the throat a bit and some other areas that did not have a perfect fit, then sanding and two more layers of lacquer. I am pretty happy with the looks, and therefore I hope for great sound as well🙂
Attachments
Cool project.
Just curious, .. which 1.4" driver do you intend to use and what crossover point slope are you looking at?
IME, my Faital FE146HF drivers sound best crossed over at about 650-700 Hz (or higher)
Just curious, .. which 1.4" driver do you intend to use and what crossover point slope are you looking at?
IME, my Faital FE146HF drivers sound best crossed over at about 650-700 Hz (or higher)
I recommend the Beyma CP755ND over the CP755Ti both of which feature a titanium diaphragm. While I haven't heard the CP755Ti, I know the ND version is their premier driver.
Methinks you might be better served with a 2" driver (rather than 1.5" drivers) for a horn such as this with a cutoff frequency that I guestimate at about 200 Hz (based on mouth size and assuming 2pi loading).Beyma CP755Ti and maybe BC DE82. This build is experimental - I wanted to build a large radial horn - the application will be decided when it gets measured.
Given the cost of 2" drivers, another alternative, given that this is an experiment, would be to experiment with 1.5" full range drivers (with a rising frequency response, if possible). They should give you an idea of what this design is capable of.
Best of luck
I have a pair of JBL2445 drivers, which are fine, but I do not like the top end. I liked it in the printed multicell horn, it covered easily 400 - 4000 Hz, but of course, a tweeter was necessary.
Even if I could not use the potential fully, the loading, directivity control and looks are still worth it. Maybe some of the vintage compression drivers would work as well.
Even if I could not use the potential fully, the loading, directivity control and looks are still worth it. Maybe some of the vintage compression drivers would work as well.
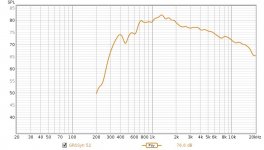
Some first measurements. At the first glance, recommended 800 Hz crossover should be easy. 700 might be possible. So there is actually no need for such a large horn, but it was really fun building it. The top end is exceptionally flat (Psy smoothing) and well behaved rising DI - as expected from an ES horn and this driver. So I think I will have a look at the ES-600 sized horn and make a pair in hard wood. I wonder if there is actualy a 1.4" exit (or smaller) driver, that could fully use the low end potential of this horn to use it for midrange.
Attachments

The horn looks great!
You could try a cone driver:
https://www.diyaudio.com/community/...y-unity-horn-of-spherical-proportions.297620/
You could try a cone driver:
https://www.diyaudio.com/community/...y-unity-horn-of-spherical-proportions.297620/
- Home
- Loudspeakers
- Multi-Way
- Large ES-horn prototype