


😀
That is my outdoor setup. Me like 'em big...go boom boom.
Little iddy biddy speakers just for fun.
That is my outdoor setup. Me like 'em big...go boom boom.
Little iddy biddy speakers just for fun.
Cal Weldon said:I don't plan to recess the drivers.
I have 2 pieces of 445x260x10mm wool felt pulled for you.
dave
If we're lucky it won't hint at rain for this summer's VI diyFest III (early August this year so that Terry Olsen can come) and Cal can bring a subset -- i'm sure we can find a couple good 1 or 2 W tube amps to make it sing 🙂
dave
dave
What about renting Nat Baily stadium for a Dark side of the moon session.
I am sure Cal can dig a kilowatt or two of sand power to drive them puppies.
Go big or go home Ata boy Cal
live large
I am sure Cal can dig a kilowatt or two of sand power to drive them puppies.
Go big or go home Ata boy Cal
live large
Member
Joined 2002
planet10 said:If we're lucky it won't hint at rain for this summer's VI diyFest III (early August this year so that Terry Olsen can come) and Cal can bring a subset -- i'm sure we can find a couple good 1 or 2 W tube amps to make it sing 🙂
dave
Do you have a date for this event ? I REALLY REALLY hope to bring my own pair of speakers and amps / cables I have been going to these events to hear every ones gear but to show any of mine.
I hope to see this happent at this next event.
doorman said:is the extention ladder to place the tweeters?
The beer fridge is at the top, it's faster than the stairs. 😉
In the last couple of days, I have sanded, filled, sanded, filled, sanded, filled and sanded. All this time using the straight edge and whatever else to keep things under control.
Then I painted, sanded, painted, sanded, painted. Things were going well.
Then I made the mistake of bringing them into the shop, under the lights where I could see the finish in there rather than under natural light.
Uh, oh...
Now I see why you want to put a piece of 1/8" over the curve. 🙄
Good lesson for the big set.
I think you can get fish scale mac tack.
Or perhaps wall paper will give you the look you are after. I have seen some really nice textured velvet wall paper with nice thick depth to it.
Another option is to change th light bulbs in your listening room. I have found that 40 watt lights make things look pretty darned good.
I hope this helps
Good luck
Cal Weldon said:
Then I made the mistake of bringing them into the shop, under the lights where I could see the finish in there rather than under natural light.
I was wondering when you would discover that all that edge grain has its problems. I was going to say something earlier, but decided to let you find out for yourself.
I had similar problems with "Stacks", I tried a smooth finish on them, and no matter how many layers of car body filler I used, you could still see the layers underneath once the gloss went on.
They are now finished in a hammered metal paint that does the job beautifully. This sort of finish is one option you could consider.
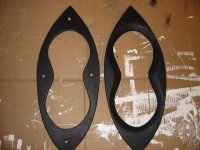
Have you considered a veneer, or very bendy ply? Those curves are going to have issues if you try to put on a layer of 1/8"ply.
Attachments
Three more coats of paint and I'm getting closer Andy. Them there edges are starting to disappear. 🙂
I think by the time I'm done it'll be close to two litres of paint on these puppies. I noticed they're quite a bit heavier now. 😀
The finish I will use is called Stone something or other and is a just a boutique version of truck bed liner. I've used it on the last few sets and it's good. It helps look after my woodworking skills. Only problem is it takes about two weeks to dry.
I will strongly consider a cover piece for the edges on the next set.
I remember seeing that picture of Cal's stereo in the project description or something thinking.... this guy's got issues... and it's awesome!
The entertainment industry has three grades of luaun available. plain, primed and paper faced. The plain has the interesting rotary sawn grain which might be interesting in a project. The primed was neither here nor there in price or performance. The paper faced, a thin sheet of paper laminated on the good side, though more expensive, required the least prep getting into paint. I also have had end grain showing through finish coats. I'll have to do an experiment with paper laminate and get back to you all...
Without lots of gap filling glue, any laminate rigid enough to not follow every peak and valley the belt sander carefully laid down will be sitting on the peaks bridging the valleys. Though acceptable in built ins and some furniture, I would think these to be the worst form of voids possible in a speaker. This isn't an indictment of laminate or veneer. Just an observation that laminate or veneer shouldn't alter the contours of the substrate.
A large diameter dowel with a cut fine beltsander belt glued to it (cut on the pesky seam in the belt), or two half sheets of fine paper glued on, should make a sander long enough not to dig in and still follow the curvature. The sander should reach front edge to back edge of the speaker. Okay, we're hand sanding here, but you can here the music as you work...
Of course Cal could probably hear the music over a screaming belt sander while wearing oysters on his ears with that obscene (beautiful, but obscene...) display of horns in his driveway.
I can picture where to place the sawhorses...
It's all hand sanding after the first roughing out with the belt sander.
Two more coats today. Dammit I'm going to win this battle!
Funny, the paint will end up costing more than the wood. 😀
Two more coats today. Dammit I'm going to win this battle!
Funny, the paint will end up costing more than the wood. 😀
ToE said:A large diameter dowel with a cut fine beltsander belt glued to it
Hey, finally a use for that baking roller ")
dave
You guys really need to try epoxy sometime for gluing & sealing your wood, mdf, whartever. It only seems like it costs more.
😉
😉
Poobah,
I love epoxy but I didn't think I needed it. I painted on the glue with a brush so it kind of acted as a filler for the rough plywood. Worked like a charm and oozed everywhere. The two cabinets used almost two litres of the stuff. I just didn't think with all the glue and screws used to laminate it that I would have to worry about strength of the bond.
I think I would use epoxy for high strength stuff like good wholesome Canadian made canoes. 😀 (right Scott?)
All sanding is now complete. Two texture coats applied this afternoon. Grilles have been clothed. Will post pics later.
- Status
- Not open for further replies.
- Home
- Loudspeakers
- Multi-Way
- Laminating cabinets