I was making a tws bluetooth speakers for my travels with Tectonic TEBM36S12-4/A rectangular bmr driver and JBL charge 5 oval driver.
I noticed that the bmr sounds really good crossed over at 300hz and i mean they sound incredibly good so why not make a bigger speaker using the same bmr?
I had some reckhorn d 165i 6,5" sub drivers still in their package and I was pleasantly surprised that the sensitivities match.
While I could build fully passive set of speakers from these drivers, I rather make an active pair to give out as a xmas present.
I chose arylic plate amp to make these an active setup.
It's a two channel amp, but it has dsp. aux, bluetooth, wifi connectivity for spotify connect airplay and multi room capabilities so it might be super handy.
Power output is a bit low at 40w@4ohm, but I can suffer -3db reduction on the max spl.
Project goals:
45-20000 frequency range with max +/-2 db deviance between 100-10k
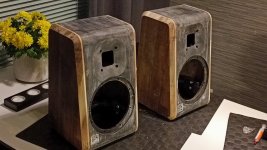
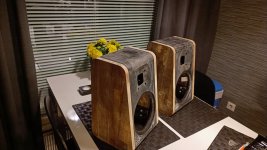
Enclosure shall be 3d printed with wooden side panels
Passive crossover
Edge difraction compensation and other eq handled by the plate amp to minimize xo cost
Project cost to stay under 500€ total
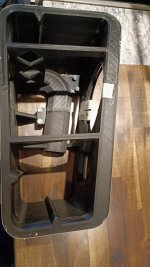
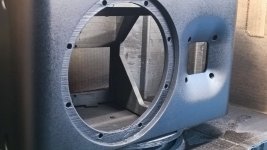
I'm currently testing the drivers in a repurposed enclosure from an old kit speaker. I just printed an adapter for the reckhorn subs and a waveguide for the bmr.
Wait a waveguide on bmr? Why?
Well it's mostly cosmetic, but it also evens out the dip at 5-7k and I tried to model it in hornresp so that the increase in sensitivity is right in the middle of the bsc correction. Also it raises the +10k region quite a lot while the driver itself has -7db slope from 10k to 20k.
Currently I have passive xo at 330hz, but I feel it's too close to the driver fs that is around 200hz when enclosed so I ordered more components to make another xo @ 500hz.

Simulated response at 330hz 12bd/o

Measured response in the repurposed enclosure.
Only passive xo and bsc as an active filter. Notice how the previously attenuated top end is now +7db emphasized. The bass boost is a characteristic of my living room acoustics.
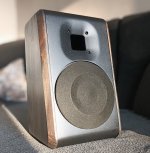
The response is great for unfinished product! The sound is also really pleasing. It's not harsh and analytic like in gennies, but soft and pleasing. Even the reflected sound is much cleaner than on conventional speakers and that is mostly thanks to the waveguided bmr.

Render of the enclosure.
Parts used:
Tectonic TEBM36s12-4/A
Reckhorn d165i Subwoofer
Arylic up2Stream Plate amp
Coils from intertechnic
Caps from mundorf
Tools used:
Hornresp for wg and enclosure design
Vituixcad for xo design
Ender 3v2 dd modded 3d printer
XTLW Climber 8 IDEX printer
minidsp umik-1 with rew for measuring
Dayton Dats v3 for ts parameters, impedance inductance and capasitance sweeps
Handheld router for wood panel work
I will finish the cad work tomorrow and start printing these out. Hopefully they'll be ready before 25th 😀
Will keep you posted!
I noticed that the bmr sounds really good crossed over at 300hz and i mean they sound incredibly good so why not make a bigger speaker using the same bmr?
I had some reckhorn d 165i 6,5" sub drivers still in their package and I was pleasantly surprised that the sensitivities match.
While I could build fully passive set of speakers from these drivers, I rather make an active pair to give out as a xmas present.
I chose arylic plate amp to make these an active setup.
It's a two channel amp, but it has dsp. aux, bluetooth, wifi connectivity for spotify connect airplay and multi room capabilities so it might be super handy.
Power output is a bit low at 40w@4ohm, but I can suffer -3db reduction on the max spl.
Project goals:
45-20000 frequency range with max +/-2 db deviance between 100-10k
Enclosure shall be 3d printed with wooden side panels
Passive crossover
Edge difraction compensation and other eq handled by the plate amp to minimize xo cost
Project cost to stay under 500€ total
I'm currently testing the drivers in a repurposed enclosure from an old kit speaker. I just printed an adapter for the reckhorn subs and a waveguide for the bmr.
Wait a waveguide on bmr? Why?
Well it's mostly cosmetic, but it also evens out the dip at 5-7k and I tried to model it in hornresp so that the increase in sensitivity is right in the middle of the bsc correction. Also it raises the +10k region quite a lot while the driver itself has -7db slope from 10k to 20k.
Currently I have passive xo at 330hz, but I feel it's too close to the driver fs that is around 200hz when enclosed so I ordered more components to make another xo @ 500hz.
Simulated response at 330hz 12bd/o
Measured response in the repurposed enclosure.
Only passive xo and bsc as an active filter. Notice how the previously attenuated top end is now +7db emphasized. The bass boost is a characteristic of my living room acoustics.
The response is great for unfinished product! The sound is also really pleasing. It's not harsh and analytic like in gennies, but soft and pleasing. Even the reflected sound is much cleaner than on conventional speakers and that is mostly thanks to the waveguided bmr.
Render of the enclosure.
Parts used:
Tectonic TEBM36s12-4/A
Reckhorn d165i Subwoofer
Arylic up2Stream Plate amp
Coils from intertechnic
Caps from mundorf
Tools used:
Hornresp for wg and enclosure design
Vituixcad for xo design
Ender 3v2 dd modded 3d printer
XTLW Climber 8 IDEX printer
minidsp umik-1 with rew for measuring
Dayton Dats v3 for ts parameters, impedance inductance and capasitance sweeps
Handheld router for wood panel work
I will finish the cad work tomorrow and start printing these out. Hopefully they'll be ready before 25th 😀
Will keep you posted!
Last edited:

That driver has a Rms of only 0.5 NS/m and a 0.63 Qts - thats impressive. Many of these smaller drivers have high Qts, making them hard to use for accurate listening. This would be a great driver for small wall surface mounted arrays. Being the driver is only just over an inch thick, it would only need a few inches of depth to sound good with proper dampening. Of course it would be perfect for portable use.
I'd like to do an array as well.That driver has a Rms of only 0.5 NS/m and a 0.63 Qts - thats impressive. Many of these smaller drivers have high Qts, making them hard to use for accurate listening. This would be a great driver for small wall surface mounted arrays. Being the driver is only just over an inch thick, it would only need a few inches of depth to sound good with proper dampening. Of course it would be perfect for portable use.
These were quite cheap at the purchase moment. I only paid around 12€ a pop. I wish I had ordered a lot more 😀
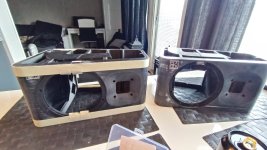
Printing of the middle enclosures done. Not without fails so I had to buy one more roll of filament. The first 3 were printed with filament from anycubic which prints great and the last bottom part with clasohlson stuff that prints like a turd. Well I have to apply a metric ton of elbow grease next week.

Wow, that's a great printing job! The jobs I've had done don't turn out anything like that.
Should look sharp with wood sides. And I'm interested in your thoughts on the Arylic plate amp, I was thinking of going that route for my shop speakers.
David
Should look sharp with wood sides. And I'm interested in your thoughts on the Arylic plate amp, I was thinking of going that route for my shop speakers.
David
Thanks for the compliments, but they are far from perfect.Wow, that's a great printing job! The jobs I've had done don't turn out anything like that.
Should look sharp with wood sides. And I'm interested in your thoughts on the Arylic plate amp, I was thinking of going that route for my shop speakers.
David
What comes to the plate amp, I will review the amplifier unit as soon as it arrives. Meanwhile I have good time to do all the post processing. There's a lot...
Dry fitting the components.
The amp came today so I have officially ran out of excuses to postpone the postprocessing of printed parts. So it wet sanding time. With the lack of workshop I'll be doing the sanding in comfort of our bathroom 😅
I wet sanded the cabinets to 240 grit.
Next up is applying 2 coats of spray filler to get rid of the last layer lines and then wet sanding to 800 grit.

Next up is applying 2 coats of spray filler to get rid of the last layer lines and then wet sanding to 800 grit.
Yet again project has been postponed due to tight work schedules .
Delivery times haven't been favourable either.
At least I went out and purchased wood for the side panels and some wax to finnish it with. Too bad that I do not have a chamfer bit large enough and there was none available to purchase in the city I live in nor in the neighbouring bigger city. So I'll have to source it on ebay etc and wait another week or two
At least I finally got the fans for my diy paintbox so I can at least finnish that and start painting the middle portions.
The large router chamfer bits arrived so it was time to whip out wood working gear.
First i cut out the panels to approximate size with a jigsaw, then I mounted them to the middle parts using custom mounts that fasten the panels to the enclosure from the inside.
First I put on 5 layers of masking tape on the enclosure to give me some extra material for sanding.
Then I used a bearing guided flush trim bit to make them exact. I
Then I routed the chamfers using that huge chamfer bit.
Attachments

Nope not yet. I only have 4 drivers so sample size might be too small for me to say anything about consistency. I was only thinking of breaking them in and matching a pair as good as I can.
I've measured two drivers before being broken in and they were within 2% so I'm hopefull.
I've measured two drivers before being broken in and they were within 2% so I'm hopefull.
Testing out the grille consept. I have some issues with glueing in the fabric, but I think it can be solved with pre stretching the fabric on to a frame and applying spray contact cement on to both plastic and fabric and applying thefabric on to grill whilst it is in that aforementioned pre streching rig.
Attachments

Nice work! That's a really cool project. It's amazing what avenues 3D printing has opened up.
Yes it helps a lot when you have a desktop sized machine and some cad skills. On the other hand the size of the machine and limitations of the tech constrain the design process quite a bit, but maybe I'll try my skills on building a printer that's more speaker size. Maybe really wide idex or even tridex printer so I can print enclosures in fewer parts.Nice work! That's a really cool project. It's amazing what avenues 3D printing has opened up.
One more route that is still pretty much left unexplored is to use 3d printing as an asset to manufacture something that would otherwise be too complicated to make with any other means.
Looking great! Can you walk us through how you shaped the fabric like that?Testing out the grille consept. I have some issues with glueing in the fabric, but I think it can be solved with pre stretching the fabric on to a frame and applying spray contact cement on to both plastic and fabric and applying thefabric on to grill whilst it is in that aforementioned pre streching rig.
- Home
- Loudspeakers
- Multi-Way
- Kamu M1 powered speaker