Now I don’t feel so bad
hope that also applies for your neck-troubles

I’m back to physical therapy after two weeks of flu knocking me on my a$$. I managed to not backslide too much by continuing with stretches etc as best I could.
Currently staring at goats…Logic PSU and other various critters. Trying to figure how it will all connect, what I should mount leads to and where things will mount in the case.

I’m using (2) Antek AN-0115 for Pumpkin boards and (1) Antek AN-0112 for Logic supply.
Any image/examples of this seperate Logic PSU in a build out there?
Currently staring at goats…Logic PSU and other various critters. Trying to figure how it will all connect, what I should mount leads to and where things will mount in the case.
I’m using (2) Antek AN-0115 for Pumpkin boards and (1) Antek AN-0112 for Logic supply.
Any image/examples of this seperate Logic PSU in a build out there?
Schematic for Iron Pumpkin SE mono PCB's?
it's here, or in that other Iron Pumpkin thread
as I said, will post more these days
frankly, all tech details posted here, main purpose is that someone (willing) is going to learn something
posting more than moderately is not so in DIY spirit, considering that entire package is more than complex (so not so easy to replicate in entirety) and being actually my commercial article.
Okay I will search 2,000 post and see if I can locate it.it's here, or in that other Iron Pumpkin thread
That is exactly why I inquire about this schematic "willing to learn"rankly, all tech details posted here, main purpose is that someone (willing) is going to learn something
Okay I will search 2,000 post and see if I can locate it.
start from post #1 here, and you'll not search for long
I don't have any intentions to replicate, I simply would like to better understand your method and looking at the schematic will answer that questionentire package is more than complex (so not so easy to replicate in entirety) and being actually my commercial article.
I don't know why it took me so long to post my project, but it was posted on my French forum for quite some time.
I recently redone the front panel using Modushop services as well as the volume knob and volume ring I believe were PCBWay CNC services. The front panel was designed using FPE but remodeled by my friend in Fusion360 because of some elements not supported under FPE. I've also added Vunce's momentary switch driver/power module and voilà! 🙂
Rear Panel was designed on FPE and will add the finished picture later on as the one added was during initial build, but need to unplug the Turtle for this. I also did a mistake on my rear panel of instead AVC I put in TVC... Shame on me... 🙁
You can find my build here:
https://quebecdiy.forumactif.com/t60-preamplificateur-iron-turtle-balance-de-zen-mod-diyaudio
Best!
Do
Attachments
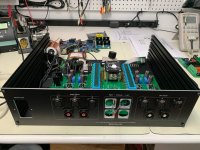


In between staring at goats and trying to figure how everything will fit in 3U/280 case I decided to finish stuffing the little Logic PSU board.
Sorting through caps from baggy I found what I have left after matching up others is a 1000uF/10V for C6…instead of 1000uF/16V as noted in circuit diagram.
Is the 1000uF/10V sufficient?
I found some 1000uF/16V floating around my bins…but footprint is a little too big for the board.
I can dig more and try to find something else…not sure if I will.

mica and goop for IC1, only goop for IC2
plastic bushings for common screw
I’d rather be the dummy that asks
now you know why..... ZM Omniasker

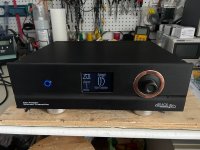
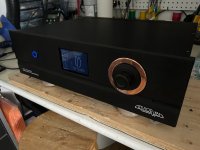
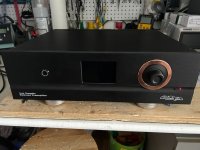
I’ve been working on mounting the rotary control, display etc on the front panel so I can get a clear picture of the space available in the front of my case.
Trying to get the lexan window to seat in the front panel was a real chore.
I ended up having to very carefully chamfer the edges of the machined opening in the faceplate and also the edges of the lexan window with a de-burring tool and then work it in place with quite a bit of pressure using rubber gloves.
I had noticed some faint marks on the lexan when I took it out if its bag. I tried gently wiping it with a micro-fiber cloth and some rubbing alcohol to see if they would come off…no dice. It actually looked like it was just forming some more very tiny marks.
I’m wondering if these marks are going to be illuminated once they are backlit by the display?
I'm getting them from my CNC guy separately packed, first wrapped in soft paper tissue then in ziplock baggie
Pulling it from packing to check it's clear as whistle, then putting back.
Now size - I know that CNC files for perspex and front plate are defining clearance of, say, 0.2mm between them
In any case, if there are scratches you can't get rid of ( whatever caused them), I'll simply send a replacement
btw. micro fiber cloth ........ there are micro fiber and then micro fiber ........ I learned that in bad way ....... 
Pulling it from packing to check it's clear as whistle, then putting back.
Now size - I know that CNC files for perspex and front plate are defining clearance of, say, 0.2mm between them
In any case, if there are scratches you can't get rid of ( whatever caused them), I'll simply send a replacement
btw. micro fiber cloth ........ there are micro fiber and then micro fiber ........ I learned that in bad way .......
- Home
- Amplifiers
- Pass Labs
- Iron Pumpkin(s) and other smaller vegetable animals