Hi guys, could someone of you give me suitable parts numbers to build the ribbon cable?
Thanks,
Gaetano.
Thanks,
Gaetano.

@ghitus - If they are available in your area, I'd buy a pre-assembled one. Just look for 14-pin IDC Female to Female in the length you prefer.
Example -
https://www.amazon.com/uxcell-Connector-Ribbon-Female-Length/dp/B07FKKP2TK/ref=sr_1_3?keywords=14+pin+ribbon+cable&qid=1697399950&sr=8-3&th=1
I can provide links for the cable, the terminations, and a proper tool... but is that what you really want?
Example -
https://www.amazon.com/uxcell-Connector-Ribbon-Female-Length/dp/B07FKKP2TK/ref=sr_1_3?keywords=14+pin+ribbon+cable&qid=1697399950&sr=8-3&th=1
I can provide links for the cable, the terminations, and a proper tool... but is that what you really want?
Last edited:

small bench vice is proper tool for 14pin cable assembly
I bought special crimp-pliers when I needed to assemble 50pin cables
yeah, still simpler buying ready-made cable, if you need to cover just one build
I bought special crimp-pliers when I needed to assemble 50pin cables
yeah, still simpler buying ready-made cable, if you need to cover just one build
^ No argument from me... this will do.
https://www.uline.com/Product/Detai...pobLyZshgXMRw1hGcVcO0lWyKCHSvWqwaAiIXEALw_wcB

https://www.uline.com/Product/Detai...pobLyZshgXMRw1hGcVcO0lWyKCHSvWqwaAiIXEALw_wcB
Hello Gaetano,
if you are willed to order in Germany:
https://www.reichelt.de/pfostenbuch...-p14572.html?&nbc=1&trstct=lsbght_sldr::22819
https://www.reichelt.de/flachbandka...awg-28-14g-3m-p47638.html?&trstct=pol_5&nbc=1
a complete set:
https://www.reichelt.de/awg-28-set-...et-awg28-14b-p208109.html?&trstct=pol_1&nbc=1
https://www.conrad.de/de/p/bkl-elec...VXDgGAB1zxAmZEAQYAyABEgLWX_D_BwE&refresh=true
I think the postal charges will be much higher from Germany to Italy?
There are many other suppliers offering this. I am pretty sure, that you can also get a 14-pole ribbon cable in Italy.
Cheers
Dirk 😉
Hello,
I built the balanced Iron Pre with both XLR inputs and RCA inputs. My DAC puts out 2 volts on the RCA outputs and 4 volts on the XLR outputs. When I compare volume levels between the RCA inputs and XLR inputs on the Iron Pre, they are the same volume - no 6 dB difference. Is this normal or did I wire up my XLR inputs incorrectly?
Thanks!
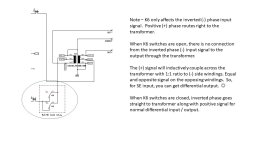
I am using XLR output, into rhthatcher's Aleph 2 boards set up for XLR inputs (and what a nice combo it is). Phase is inverted from the iron pre input to output.
XLR pinout is always:
1 GND
2 +
3 -
Iron Pre balanced is - as explained several times in these 2 threads, having 6db of gain nominally , details here:
- input Bal 2V , output SE 2V, output Bal 4V
- input SE 2V , output SE 4V, output Bal 8V
if you take a look at schematic, understanding that "SE" is 50% of "Bal" voltage-wise, everything is clear
maybe even clearer if details written as this:
- input Bal 2V , output SE 2V, output Bal 4V
- input SE 1V , output SE 2V, output Bal 4V
...... and even clearer, all for Iron Pre Balanced preamp:
- Bal In to Bal Out, gain is 2V/V = 6db; if you're taking SE out, that's one phase of Bal, so 50% of Bal voltage ....... live with that
-SE In to SE Out, gain is 2V/V = 6db; SE Out is also Bal positive phase ......... and then you have also (as addition) Bal negative phase for free!!! .......... live with that
Good Gemini is good
but ........... you know that best construction of stage is when you have everything needed in one bundle
as we all were doing it numerous times - plethora of small pcbs tossed together in one case, with short wires in between, and from/to connectors
but - when starting from scratch - whatever stage is warming your heart ( AD797 or something else) - it's really best having everything on one pcb, solving several problems in one go
shunt regs - same as any other type - really best scenario is when reg and its load ( stage) are closest possible
all in all - physical arrangement is of same importance as circuitry itself
bunch of mediocre amps/preamps of this world are having pristine or even divine schematics, while ruined with physical arrangement as produced
Last edited:
so, Iron Pre SE - How to wire AVC instead of [regular attenuator and output autoformer]
(Patrick, you can put link to in post #1)
Many many thanks for this sketch. I'm just trying to make sure I'm understanding it right before I do anything stupid. For each channel:
One tap from the Slagle goes directly to the E5 pad (Slagle tap selection sets gain as clearly depicted in the graphic).
Jumpers installed across CW and WIP volume pot pads to bypass resistive pot.
(Here's where I'm a little unsure) -- The AVC controls volume after the Iron. So the output wiring from the Iron board goes to the signal inputs of the AVC attenuator. Then the preamp output RCAs are connected to the AVC attenuator outputs.
So, basically, the final AVC volume control wiring is the same in this configuration as it would be if we weren't using the AVC for gain (such as using the Cinemags instead)?
So, basically, the final AVC volume control wiring is the same in this configuration as it would be if we weren't using the AVC for gain (such as using the Cinemags instead)?
exactly
step 1 - short resistive attenuator Volume pot pads
step 2 - wire Autoformer Volume instead of (original intended) Autoformer
easypeasy
now, how I did show wiring on that sketch - wiring of AVC instead of originally intended Autoformer is in such way that you're taking preamp outputs in original way - from output pads on pcb
what I forgot to note - in case of using Slagle AVC (or any made in similar fashion) - arrange stacking of EI lams "all alternating", resulting in highest inductance; that's making buffer's life more leisure
sketch re-linked here:
Last edited:
are there good AVCs at a reasonable price?
in alternative I would go with relays to select 0, 6 or 12dB gain and fine tune the volume via the dac digital attenuator (in my case squeezebox touch with ir remote control)
in alternative I would go with relays to select 0, 6 or 12dB gain and fine tune the volume via the dac digital attenuator (in my case squeezebox touch with ir remote control)
exactly
step 1 - short resistive attenuator Volume pot pads
step 2 - wire Autoformer Volume instead of (original intended) Autoformer
easypeasy
now, how I did show wiring on that sketch - wiring of AVC instead of originally intended Autoformer is in such way that you're taking preamp outputs in original way - from output pads on pcb
what I forgot to note - in case of using Slagle AVC (or any made in similar fashion) - arrange stacking of EI lams "all alternating", resulting in highest inductance; that's making buffer's life more leisure
sketch re-linked here:


Has anyone restacked the $300 Slagle to a 1x1 configuration? Curious how difficult it is since it requires bending back metal braces, rather than the screw bracing as depicted in the Slagle instructions:
https://web.archive.org/web/20190703040936/https://intactaudio.com/avc_stacking.html
- Home
- Amplifiers
- Pass Labs
- Iron Pre Essentials Kits For The DIYA Store - Register Your Interest