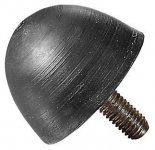
I've used dampened car engine mounts as feet on heavy amps. Really solid and felt absolutely no vibration on the lid of the amp, the threads where long enough to get extra height and improve the airflow from underneath the amp.
They where silly cheap compared to build quality.
They where silly cheap compared to build quality.
Last edited:
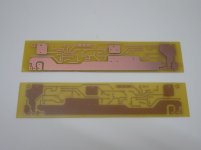
Making your own PCBs is an inexpensive thing for audio.
Ive never had much luck with this - tried a few different ways - various methods of heat transfer, different papers, different etching reagents.
Do you have a secret recipe for success?
Use a laser printer with A4 paper.
Temperature regulation is most important with this one as the reagent will only work at a specific temperature. When you are ready to pull the wet paper off the pcb make sure first that you can push the paper off with your finger, the paper itself needs to be very moist to the point that it is ready to fall apart, that is when it is ready.
When you are designing your pcb in software make the traces larger than needed to make sure that the toner will protect the pcb copper properly.
I use copper sulphate.
I too have gotten mixed results but I have also had some success. in the number of PCBs that I bought I must've burned through 5 of them to get 1 good print transfer that had little to no defects. The defining factor was the amount of reagent that I used and the temperature.
If there is a secret to my success it would have to be determination. Once you reach that perfect temperature and the right amount of reagent you will get stunning results that can have excellent fine detail on small traces.
Also, use lots of reagent, more the better, think from memory I used 4 teaspoons per 250mL.
Last edited:
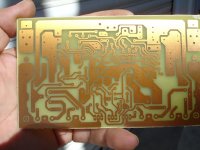
For my home etched pcbs I use a method similar to this YouTube
I print the layout on semi transparent paper and expose it to a UV lamp and it takes exactly 2 min, no more no less. But there are many methods as can be found on the internet. One has to practise a little for the needed exposure time and then the results will be perfect. The UV film can be removed but I prefer to leave it. It forms a permanent and stable mask to prevent copper oxidation while allows soldering.
http://www.youtube.com/watch?v=tWnfnt2rNO0
Attachments

I used to etch my own boards but now its so much easier (not to mention cheaper and faster) to send gerber files and order from overseas pc houses. I last used a place named something like 'pcb way' (?). I'd have to do a lot of board designs before I could do it anywhere remotely as low in cost.
I've used dampened car engine mounts as feet on heavy amps. Really solid and felt absolutely no vibration on the lid of the amp, the threads where long enough to get extra height and improve the airflow from underneath the amp.
I
They where silly cheap compared to build quality.
I like that idea, bo you have pictures? Also, do Toyota mounts sound different from Volvo mounts? 🙂. Sorry, couldn't resist. I really do like the idea.
Yes, exactly the same procedure, but instead of leds I use a lamp box I built 25 years ago- that was the option back then... It is a lamp for street lighting! It's forbidden to stair at it directly. It works fine so I never looked for something else. Always successful results and I can have just the one prototype I need every time so it's a very cheap method.My favorite method is here.Dx Blame ST together Dx Super A
Attachments
Ive never had much luck with this - tried a few different ways - various methods of heat transfer, different papers, different etching reagents.
Do you have a secret recipe for success?
I found using fresh toner in the printer gave the best result.
Member
Joined 2009
Paid Member
Lots of 'old' HT receivers and other items can be recovered from the e-waste or bought cheaply and re-used to house your latest project, perhaps providing a few useful parts at the same time
ctrix, That is probably an old Mercury Vapor lamp. They changed to Sodium Vapor lamps about 20 years ago and the sodium vapor lamps won't do.
I use a mercury vapor lamp I bought off ebay.
I use a mercury vapor lamp I bought off ebay.
Making your own PCBs is an inexpensive thing for audio.
With the onset of dozens of cheap Chinese pcb makers so is buying them in.
I pay $5 for 10 off 10cm by 10cm pcb's. Shipping is $30 so about £25 in GBP.
For that I get pro made pcb's which look very professional.
At that price even if the pcb isn't quite right I can usually hack it to work then buy a new set.
Then I use unused pcb's as coasters or sell them on ebay as coasters.
I found using fresh toner in the printer gave the best result.
Or at least give the old cartridge a good shake.
Kimwipes for removing flux
An externally hosted image should be here but it was not working when we last tested it.
It is legal as long as you use a double switch to cut both live and neutral. Personaly I like IEC very much but back in the days I wasn't familiar with them I did it your way. I just did a knot to the wire inside the box so that it couldn't pull out. Now in case I can't use IEC I do it as in the pic
Edit; This was the response to a post that now is missing (?)
Edit; This was the response to a post that now is missing (?)
Attachments

Last edited:
This isn't exactly bargain-basement, but a good measurement mic can be had for a fraction of the price they used to fetch. Here's just one example:
miniDSP UMIK-1
I don't work for them, I just use their products; and this one has done more than any other inexpensive tweak I can think of, to take my system to the next level. This, and clean ears. 🙂
miniDSP UMIK-1
I don't work for them, I just use their products; and this one has done more than any other inexpensive tweak I can think of, to take my system to the next level. This, and clean ears. 🙂
I like that idea, bo you have pictures? Also, do Toyota mounts sound different from Volvo mounts? 🙂. Sorry, couldn't resist. I really do like the idea.
It was something similar to this, there are several types to choose from, but only found a picture of this type.
Edit:
Regarding sonic difference between the various different car makes, it is highly unlikely as odds are most are manufactured on the same factory and sold through different channels to the car manufacturers. But maybe you could make a poll with some recorded audio?
I am sure the best audio results would be from the brand with the biggest advertising budget, just make some calls to the various participants and ask who will contribute to the test.
Attachments
Last edited:
Not really sure if this fits the OP's idea but it is cheap and potentially useful..
I have been buying "Motor start" or "Motor run" capacitors from a local mail order firm that sells "surplus" electronic components. They are obviously NOT "audio grade" caps but on the other hand they do have many qualities usually valued by "diyers".
(i) They are all polypropylene
(ii) 5% tolerance
(iii) 400plus WV
(iv) sizes vary between 1.5uF up to about 55uF.
And they are brand new and very cheap per uF. They can be used in a variety of places but lower frequency cross-overs points and smoothing caps for Valve amp' power supplies are the obvious ones. I have no idea what the situation is like elsewhere but they have been regularly offered here in Australia for many years now.
Cheers, Jonathan
Last edited:
- Status
- Not open for further replies.
- Home
- Member Areas
- The Lounge
- Inexpensive things for audio that work