Hi Team, looking for some advise. I made the pre-amp (D Self design) and now need to find a way to get the button/switch info onto the front panel. What is the experience to get a quality transfer of the info? What method is available for reasonable monies? Thanks, René
Hi,
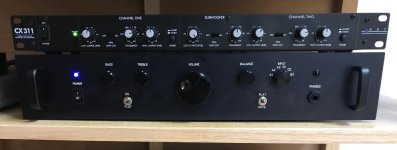
Like this ?
I did it with Schaeffer's Front Panel Designer. It took a while to achieve proper design and placement though.
The construction album is here https://photos.app.goo.gl/uokQftXSwhSfjHik6

Like this ?
I did it with Schaeffer's Front Panel Designer. It took a while to achieve proper design and placement though.
The construction album is here https://photos.app.goo.gl/uokQftXSwhSfjHik6

Hi, yes, like that. Regretfully there is no information how you actually transferred it onto the metal work. Paint, sticker, milled/router or different. I have no issue making a design but need to know how to best get it onto the panel. Yours looks nice BTW. Cheers, Rene
Easy : download the software (https://www.schaeffer-ag.de/en/front-panel-designer/?lang=en) and once completed, send them your project for fabrication. You can even send them your own material for them to process it, which is what I did.
https://www.schaeffer-ag.de/en/front-panel-designer#functions
I kept the file for this project, if it fits your requirements I can email it to you.
https://www.schaeffer-ag.de/en/front-panel-designer#functions
I kept the file for this project, if it fits your requirements I can email it to you.
Hey, hfxrzw, are you looking for a solution you can do at home or one you send out to a shop like Thmartin did?
Hi, depend on the monies and possibilities. I live in Australia, so sending to Germany would probably be prohibitively expensive....
There is also Front Panel Express in the USA, if that helps.
https://www.frontpanelexpress.com
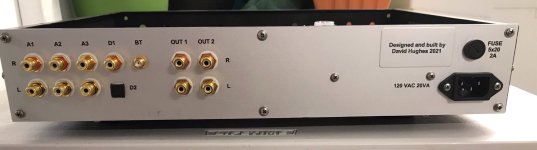
I used them for the front of this project. The lettering is engraved and then filled with ink of your color choice, so it's very durable.
Quality was good and price was reasonable.
The back panel I did myself with the toner transfer method, which frankly is a bit tricky to get right.
https://www.frontpanelexpress.com
I used them for the front of this project. The lettering is engraved and then filled with ink of your color choice, so it's very durable.
Quality was good and price was reasonable.
The back panel I did myself with the toner transfer method, which frankly is a bit tricky to get right.
Attachments
I found a cheap vevor tools desktop CNC router and took the laser module upgrade option for just over AU$200 delivered during an Ali sale from AU warehouse. Now I dont have to outsource many things for many projectsHi, depend on the monies and possibilities. I live in Australia, so sending to Germany would probably be prohibitively expensive....
Your living in Australia is same as me living in Argentina: many thousands of km away from usually suggested places.
You might learn a new skill, silkscreening.
Results are PRO, what all Factories use, learning is not difficult at all and investment is modest.
A few samples:


Plan B: find a friendly local T Shirt silkscreener, he already has 90% of the skills and equipment, you will only have to buy for him an extra wooden frame (cheap) with fine mesh silk to have definition in small lettering and thin lines , a small can of a printing-on- metal suitable ink/paint (best is 2 component Epoxy, old style is oil/synthetic type) and of course your artwork, laser printed on transparency or Vellum (architect's translucent drawing paper).
Very doable.
You might learn a new skill, silkscreening.
Results are PRO, what all Factories use, learning is not difficult at all and investment is modest.
A few samples:
Plan B: find a friendly local T Shirt silkscreener, he already has 90% of the skills and equipment, you will only have to buy for him an extra wooden frame (cheap) with fine mesh silk to have definition in small lettering and thin lines , a small can of a printing-on- metal suitable ink/paint (best is 2 component Epoxy, old style is oil/synthetic type) and of course your artwork, laser printed on transparency or Vellum (architect's translucent drawing paper).
Very doable.
Just remembered. For a very high-end look, try inlays. Engrave into alloy or wood panels and fill with casting resin in gold or black. Wet sand and buff
🙂 now imagine those markings 3mm deep and filled in with resin of various coloursSilkscreening Guitar Pedals, same thing:
Will definitely look nice 😄
You need a CNC machine and the proper very fine drill of course.
Done for decades by HiWatt amplifiers of Pink Floyd, The Who and other Guitar Gods fame 😄
They didn't use CNC (not yet invented) but mechanical Pantograph engravers, then filled carved lettering with paint or coloured wax crayons.

They also used "sandwich" type acrylic: a white core with a thin black layer laminated on top.
Engraving exposes the white below; very tasty.
You need a CNC machine and the proper very fine drill of course.
Done for decades by HiWatt amplifiers of Pink Floyd, The Who and other Guitar Gods fame 😄
They didn't use CNC (not yet invented) but mechanical Pantograph engravers, then filled carved lettering with paint or coloured wax crayons.
They also used "sandwich" type acrylic: a white core with a thin black layer laminated on top.
Engraving exposes the white below; very tasty.
The main thing here limiting you is your budget tbh. I don't know how much equipment you already have access to. I use my sister's cricut cutter thingy to cut out vinyl and put the designs on guitar pedals. It's very unique, dimensional and durable. Don't forget about some sort of topcoat to protect your graphics. Polyurethane, resin, whatever. A lot of older equipment has just very thin silk screening on bare metal, which makes cleaning them properly an absolute nightmare.
The silk screening looks very cool. But how do you make the "silk" template with whatever your pattern is made into it?
They also used "sandwich" type acrylic: a white core with a thin black layer laminated on top.
Engraving exposes the white below; very tasty.
You can get engraved door signs like that cheaply. We've used them here at the university for many years.
https://www.zazzle.com/professional_modern_black_gold_office_name_title_door_sign-256046243090202801
Lots of YT videos but as a free sample:The silk screening looks very cool. But how do you make the "silk" template with whatever your pattern is made into it?
Or if available, ask a silkscreen suppliers shop to burn the screen for you.
You need to buy frame and screen from somebody anyway so why not get it ready to use?
You will need to supply artwork of course.
Which you can draw using front panel creator, Corel Draw (what I use), Inkscape, in general any 2 D Cad software.
Even Photoshop.
If text only, even Word or similar, as long as you can place desired words on a sheet of paper.
No need to actually print them, just send the graphic or PDF file to the shop.
Will definitely look nice 😄
You need a CNC machine and the proper very fine drill of course.
Done for decades by HiWatt amplifiers of Pink Floyd, The Who and other Guitar Gods fame 😄
They didn't use CNC (not yet invented) but mechanical Pantograph engravers, then filled carved lettering with paint or coloured wax crayons.
View attachment 1270010
They also used "sandwich" type acrylic: a white core with a thin black layer laminated on top.
Engraving exposes the white below; very tasty.
I am still making my control panels and nameplates the exact same way, using the same Lamacoid material and my old Scott Signgraver pantograph.
The material is still available in a multitude of colour combinations, although it's a lot more expensive now.
I worked in a printing shop after school when I was a kid, and I was well instructed in the operation of that machine. When I began building custom industrial electronics, this was one of the first tools I purchased. I'm still pretty quick on set-ups, haha.
Interweb pic, but I use the same model machine:
- Home
- Design & Build
- Construction Tips
- How to transfer a front panel print/design onto an aluminum front panel