What method do you use to build an enclosure so that everything is "square" and "plumb"? My little enclosure is a little out-of-kilter.
Proper tools and checking your measurements.
A table saw with a loose or misaligned fence and guide is sure to throw things off. Use of a free hand circular saw for for long straight cuts is a big no no as well.
Skill helps as well (not the name brand 😉 ).
A table saw with a loose or misaligned fence and guide is sure to throw things off. Use of a free hand circular saw for for long straight cuts is a big no no as well.
Skill helps as well (not the name brand 😉 ).
There's all manner of ways, but maybe these basics will help:
http://www.cabinetmaking.co.uk/new_page_4.htm
http://sawdustmaking.com/Keeping it Square/keeping_it_square.htm
http://www.cabinetmaking.co.uk/new_page_4.htm
http://sawdustmaking.com/Keeping it Square/keeping_it_square.htm
johngalt47 said:What method do you use to build an enclosure so that everything is "square" and "plumb"?
I give the drawings to Chris and wait (usually not long) 🙂
I can make a square box, but usually not pretty so i am not allowed anymore.
dave
One key tip is to never move the fence until ALL panels requiring to be cut to the same width are passed through the saw. Saves time as well.
First of all John, let me say, I feel your pain. 🙂
I make enough boxes that I finally broke down and built a fixture just for making two edges square. It works very nicely for that, but it can also be used for making any number of pieces the exact same length by clamping a piece of stock along the first reference edge (where the clamps are). If you can make the reference edge and the router guide close enough to square, it will also let you make two ends parallel as well.
I had access to a CNC mill, so I was able to cut the two edges square within .001 over 26 inches - close enough. 🙂
There are only two requirements for this to work - two STRAIGHT edges and those edges have to be SQUARE. How straight and how square depends on how much you're disturbed by things not lining up when it comes time to glue. Personally, I'm pathologically anal about it. 😀
My life has been alot less stressfull since making this fixture. I'm going to build a router table shortly that does nothing other than cut two sides parallel. Nice thing about a router table for parallel cuts is that the fence only needs to have a straight edge. Since you're cutter is effectively a point rather than a blade, anywhere you clamp a straight edge is always parallel to the cutter. Hard to mess that up. 😀
I make enough boxes that I finally broke down and built a fixture just for making two edges square. It works very nicely for that, but it can also be used for making any number of pieces the exact same length by clamping a piece of stock along the first reference edge (where the clamps are). If you can make the reference edge and the router guide close enough to square, it will also let you make two ends parallel as well.
I had access to a CNC mill, so I was able to cut the two edges square within .001 over 26 inches - close enough. 🙂
There are only two requirements for this to work - two STRAIGHT edges and those edges have to be SQUARE. How straight and how square depends on how much you're disturbed by things not lining up when it comes time to glue. Personally, I'm pathologically anal about it. 😀
An externally hosted image should be here but it was not working when we last tested it.
An externally hosted image should be here but it was not working when we last tested it.
An externally hosted image should be here but it was not working when we last tested it.
My life has been alot less stressfull since making this fixture. I'm going to build a router table shortly that does nothing other than cut two sides parallel. Nice thing about a router table for parallel cuts is that the fence only needs to have a straight edge. Since you're cutter is effectively a point rather than a blade, anywhere you clamp a straight edge is always parallel to the cutter. Hard to mess that up. 😀
theAnonymous1 said:
Use of a free hand circular saw for for long straight cuts is a big no no as well.
Hi, it is do-able as long as a straight clamped guide is always used, 🙂/sreten.
sreten said:
Hi, it is do-able as long as a straight clamped guide is always used, 🙂/sreten.
Yes, I have done it that way many times. You can get a pretty straight cut it just takes some time and effort to setup the straight edge.
What I meant was trying to make a straight cut using a circular saw without any sort of guide is sure to be a disaster.

I will actually be using the clamped straight edge method soon to build some line arrays and dipole subs. I don't have a proper workshop so a table saw is not an option. I do have some nice new lithium ion powered tools to help the project along though. 😀
An externally hosted image should be here but it was not working when we last tested it.
You'll be tearing your hair out if you try to cut all panels perfect before attaching them. It never works IME.What method do you use to build an enclosure so that everything is "square" and "plumb"? My little enclosure is a little out-of-kilter.
Assuming you can cut panels straight (table saw/router + guide etc) then you should simply over size most of the panels and just flush trim for perfect finish.
Walkthrough and pics here: http://www.vikash.info/audio/W3-871S/build.asp
Vikash
Hi.
After some (a lot.. ) of trials my conclusion is:
1.Measure
2.Adjust STABLE "cutting fence" (= straight edge)
2.Measure
3.Measure
4.Use BIG circular saw (mine is a Skill 1400W, Ø190mm blade)
5.Done
This will get very close to square.
Instead of a small carpenters angle I use a big piece of ply/MDF/whatever that I know to be square.
The big saw will have better "steering" and more "umpff" that will make for a cleaner cut. Cleaner cut gives a better surface and PVA-glue works best when the surface is perfect and pressure is applied over a large surface.
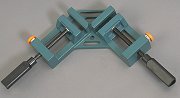
I don't know what the tool (in the attached picture) is called but it makes it a lot easier to hold to pieces together when gluing (with nails or screws if you like.)
BTW: Nice idea AJ. A router-table will ensure perfect parallel sides and repeatability (two routed pieces will be exactly the same with). I haven't build one yet, but probably will next time the MDF-bug gets me...
I Hope my ramblings make sense. Hard to explain this kind of stuff in a foreign language.
Regards TroelsM
After some (a lot.. ) of trials my conclusion is:
1.Measure
2.Adjust STABLE "cutting fence" (= straight edge)
2.Measure
3.Measure
4.Use BIG circular saw (mine is a Skill 1400W, Ø190mm blade)
5.Done
This will get very close to square.
Instead of a small carpenters angle I use a big piece of ply/MDF/whatever that I know to be square.
The big saw will have better "steering" and more "umpff" that will make for a cleaner cut. Cleaner cut gives a better surface and PVA-glue works best when the surface is perfect and pressure is applied over a large surface.
I don't know what the tool (in the attached picture) is called but it makes it a lot easier to hold to pieces together when gluing (with nails or screws if you like.)
BTW: Nice idea AJ. A router-table will ensure perfect parallel sides and repeatability (two routed pieces will be exactly the same with). I haven't build one yet, but probably will next time the MDF-bug gets me...
I Hope my ramblings make sense. Hard to explain this kind of stuff in a foreign language.
Regards TroelsM
Attachments
Greets!
I imagine it is and you did a fine job of it. It's a picture framing jig, but my experience using them for squaring up speaker cabs hasn't been all that great. This works much better: http://www.woodzone.com/tips/frame_jig.htm
GM
I imagine it is and you did a fine job of it. It's a picture framing jig, but my experience using them for squaring up speaker cabs hasn't been all that great. This works much better: http://www.woodzone.com/tips/frame_jig.htm
GM
The key is having the proper jigs for your tools. For a table saw a sliding table is a lifesaver. One can be built from scrap wood in an evening. If you are cutting miters it is a requirement that you clamp your work. the angle of the blade with the wood will try to pull the wood into the blade and no amount of holding strength will prevent this. I have several sliding tables. One for 90 degree cuts, and one each for left hand and right hand 45 degree cuts. They are invaluable for working on a table saw.
I also make "goop" to fill any small cracks. Goop is a mixture of wood glue and sawdust. if you mix it in the proper ratio after drying and sanding it will match the color of your wood. Too much glue and it will be too dark and hard to sand. Too little glue and it won't stay together.
I also make "goop" to fill any small cracks. Goop is a mixture of wood glue and sawdust. if you mix it in the proper ratio after drying and sanding it will match the color of your wood. Too much glue and it will be too dark and hard to sand. Too little glue and it won't stay together.
sreten said:Hi, it is do-able as long as a straight clamped guide is always used, 🙂/sreten.
Like a sawboard.
http://members.aol.com/woodmiser1/sawbd.htm
Practice, practice, practice.
And a dash of patience helps too. Go slow, don't be in a hurry.
Oh, and practice. 😎
And a dash of patience helps too. Go slow, don't be in a hurry.
Oh, and practice. 😎
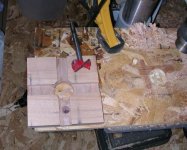
In order to align butted joints I made about 2 dozen small jigs. I set the fence for 5 inches, and cut a strip of plywood. I used the chop saw to cut this strip into manageable portions. THEN I cut them into squares using the fence at the same setting as ripping the strip to make squares. Now, set up either a dado cutter with the width of your material (mdf, plywood, bb, whatever) or a straight cut router bit, and cut dados in the center of each square. Turn the square 90 degrees and cut a cross dado. Once done with all the jigs, put a large forstner bit (I used 35mm) in your drill press and drill a hole in the center to allow glue drainage. I had tearout from the forstner, so it may be better to drill the hole first.
To use: put these on each corner of the long piece of wood to be glued and butt the shorter piece up to them... aligning the longer piece in each jig. Remove the short piece, apply glue to appropriate areas then reinsert short piece, making sure they're aligned, and clamp. I also use a cross clamp to make sure the jigs don't fall off.
This is used to align the tops/bottoms/backs/fronts. I've cut the sides oversize and just glue them on, then use a trim bit to trim the sides to a perfect fit.
Here is an example, with pictures, showing how I used them. NOTE: a LOT of glue wound up in the glue hole, and some of them got glued anyway 🙂 Next time I propped the jigs up with strips of cutoffs, and solved that problem.
Tom.
Attachments
I place a plastic bag between my work and the wood clamps/jigs. PVA hardens wothout exposure to the air and doesn't stick at all to the plastic.
I (finally) got some new blades for my table saw - high quality ones. I won't go back now. For fine cutting, a high quality, sharp blade with more rather than less teeth makes a huge difference to the quality of the cut. Especially veneered MDF - it cuts like butter now.
The other part is setting up your cuts meticulously. Measure and remeasure. I do test cuts just to check. And I do as many cuts of the same size before moving the fense/jig.
The other part is setting up your cuts meticulously. Measure and remeasure. I do test cuts just to check. And I do as many cuts of the same size before moving the fense/jig.
- Status
- Not open for further replies.
- Home
- Loudspeakers
- Multi-Way
- How to make a "square" enclosure