Who knows about this?
I have a used pair of JBL 2451J drivers on my floor and a new pair of factory aquaplas coated diaphragms ready to install.
There is a small card in the diaphragm container that says the diaphragm is not self aligning and that the warranty is void if you install it by yourself. I have seen this same disclaimer card in all the other factory JBL diaphragm boxes I have looked into (6 or 8 or so)
The JBL 2451 specification sheet says “The JBL manufacturing process permits the use of rim centered diaphragms for instant interchangeability and ease of field service.”
Does not sound like anything special is needed to me.
I do not care about the warranty. I have installed several factory diaphragms in JBL compression drivers; they all look to have no possible adjustment, they all look to be rim centered by design.
Nothing odd shows up on the APx Rub and Buzz sweep.
So what is it? Why the printed caution in the diaphragm box.
Is it just a caution to protect the employment of JBL techs and to protect the warranty from some unfortunate person slipping with a screwdriver?
Thanks DT
try youtube for example: JBL Speaker Repair Replacement Diaphragm JBL 2418H Installation by Simply Speakers - YouTube
Hello All,
Anyone else ever seen any possible adjustments for the centering of a JBL Compression Driver diaphragm?
Thanks DT
The primary focus is the large 4 inch diaphragms.
Anyone else ever seen any possible adjustments for the centering of a JBL Compression Driver diaphragm?
Thanks DT
The primary focus is the large 4 inch diaphragms.
Pictures would help.. 😀 My experience is limited to 2420, 2440 and 2441. No adjustments are possible on these - the diaphragms are locked in place by a pair of asymmetric pins.
Alignment pins or rings on the JBL diaphragms generally will center the diaphragm adequately to prevent rubbing and buzzing, but they do not guarantee it.Anyone else ever seen any possible adjustments for the centering of a JBL Compression Driver diaphragm?
A narrow frequency band, sometimes only a few Hz wide, may trigger the “buzz” distortion. For that reason, misalignment distortion may not be at all evident except with certain musical passages, making music, pink noise, or even specifically spaced sine wave tones near useless for alignment.
In most cases, low frequencies of several octaves below the usual pass band will make the harmonic distortion most audible. After determining a reasonable mid pass band output level, slowly sweep from 200 Hz up, listening for "buzz". Most times the range between 200 Hz to 800 Hz will reveal the "buzzing", but I have found a few diaphragms that only buzzed when driven at anywhere from 800 Hz to 5kHz or so.
The horn, or even the long throats of "old school" drivers like Altec, JBL, or TAD makes the diaphragm output much louder, which masks the dragging voice coil distortion component. Removing the driver from the horn, or stuffing the horn with rags, or laying it mouth down on a rug or carpet makes the buzz easier to hear.
Next, remove the diaphragm, fully clean the magnetic gap with tape, check that the gap is symmetrical with a depth gauge which can be made from paper card stock, if not symmetrical it must be made so.
To align the diaphragm, re-install the diaphragm with it's screws just loose enough to not rattle, but tight enough to allow one to tap a portion of the screw ring in the direction that eliminates the buzz, then re-sweep to determine this did not cause a buzz at a different frequency, then tighten the screws fully, and test again.
Art
Radian compression drivers give you plenty of room to screw things up.....one of my drivers had a big dip at 2khz that went away at high levels.
Had to carefully align the diaphragm and tighten the back cover as evenly as possible to get the best high frequency response and ensure no sticking.
Fun stuff.
Had to carefully align the diaphragm and tighten the back cover as evenly as possible to get the best high frequency response and ensure no sticking.
Fun stuff.
I followed the same procedure recommended by Art with my JBL 2440 and was not able to get satisfactory results with two different sets of OEM diaphrams. Nothing I did was fully satisfactory, so I gave up and bought some new drivers..
The 2451 is a much more modern design (I believe) and you should be able to get good results following the procedure Art has outlined. (There really isn't much more you can do.)
The 2451 is a much more modern design (I believe) and you should be able to get good results following the procedure Art has outlined. (There really isn't much more you can do.)
Hello All,
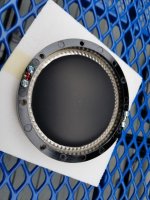
Okay a couple of photos. Plus 1 more out on my walk a couple of days ago. When I do the JBL 2451 aquaplas diaphragms I will take photos of the install in the compression driver
I have only done a few of these and I have no sad stories to tell. I have done 2425 drivers, 2445 drivers,2450 drivers and now about to do a pair of 2451 drivers. The aquaplas coated diaphragms in the 2450 really smoothed out the breakup above 10kHz.
The diaphragms I have seen have the rigid plastic rim with screw wholes around the perimeter. By the time all the screws are started in place not even snug there is little to no room to move just a little bit.
For the next pair I will take a closer look to see if there is any movement with a little tap tap nudge nudge.
I do a test sweep with the Audio Precision APx500 Rub and Buzz software, and have not needed to take things apart to start over. Lucky.
Thanks DT
Attachments


Hi DT,
Other than the diaphragm materials and what appears to be an improved VC (much thinner I think) the diaphragms in key design details are pretty similar to the 2440s I am most familiar with.
The buzz and rub software should help. I did find it helpful to drive with oscillator and fiddle with tightening order to optimize performance. You may need to hunt for the frequency where this is most obvious - in my 2440 this seemed be around 300Hz.
Nice area to walk! I've attached a photo of one of my local spots. (I live in a medium sized city just south of Boston, and this is a reasonably short walk from my house. It's a tidal estuary.)
Attachments

Hello kevinkr,
Looking at the youtube videos you see people tighten the screws snug plus a ¼ turn and you see others use an impact battery drill. I do not know.
I have considered a calibrated for government work inch/pound screwdriver for tightening the fasteners on transistors to heat sinks I will think about it.
I will do something even if it wrong and see how it works out.
Thanks DT
Or like installing your first wall hung water closet. Tighten it down until you hear porcelain pop and then back off on the next one.
Hey Rob,
Thanks that does help.
I have never had the occasion to need to tap tap nudge nudge with a small mallet.
I have tapped around with a screwdriver handle looking for loose screws and I have used a cardboard digger wrapped with masking tape. I suppose that the cardboard digger also served as a gap gauge.
The frequency sweep is also a good tool.
Your provided instructions from JBL filled the gap of missing information.
Thanks DT
Hello,
If you zoom in on the photo the diaphragm has a 2018 date on it. I bought it 3 years ago, it has been on the shelf since then.
Just recently I was unable to find anything but a pair of 8Ohms.
A trick I discovered in the JBL M2 and modified to match the 8Ohm diaphragm is to place an 8Ohm resistor in parallel with the 8Ohm voice coil and a 4Ohm resistor in series with that. All that makes a hardwired L-Pad that attenuates the Compression driver by 6dB’s. 6DB attenuation lets the amplifier operate up in its lower distortion power output range and reduces hiss out of the horn.
Thanks DT
- Home
- Loudspeakers
- Multi-Way
- How to install a new JBL2451H SL Compression Driver diaphragm?