Please excuse me if this is in the wrong section - Just joined the forums and am finding my way around.
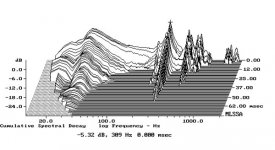
I am working on a bunch of modifications to my KEF Q350s, including fully active crossover via DSP. One of the main issues with these speakers is two chassis resonances at 700hz and 1.2khz that I don't think I can fix with DSP as shown by this waterfall:

I have very little experience in dealing with such resonances physically - is there any "easy" way to reduce them, perhaps via polyfill or another damping material?
Thanks 🙂
I am working on a bunch of modifications to my KEF Q350s, including fully active crossover via DSP. One of the main issues with these speakers is two chassis resonances at 700hz and 1.2khz that I don't think I can fix with DSP as shown by this waterfall:
I have very little experience in dealing with such resonances physically - is there any "easy" way to reduce them, perhaps via polyfill or another damping material?
Thanks 🙂
Attachments

Welcome to the forum, Aubey!
I'm not an expert in this area, but will give your thread a nudge by including the Stereophile measurements for comparison.
KEF Q350 loudspeaker Measurements | Stereophile.com
I'm not an expert in this area, but will give your thread a nudge by including the Stereophile measurements for comparison.
KEF Q350 loudspeaker Measurements | Stereophile.com
Attachments
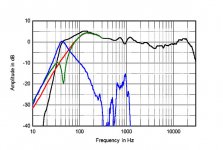
Attached image of a measurement from mentioned stereophile review shows in blue a ~ 1 khz resonance from the basreflex port that even shows up in the system frequency response.
If thats the cause of the largest resonance your measurement shows, cabinet damping wont help.
If thats the cause of the largest resonance your measurement shows, cabinet damping wont help.
Attachments
DSP might be more helpful than you’re anticipating. Do the peaks show up ~equally at all angles (on-axis, off-axis vertically, off-axis horizontally)? If so, equalization might be very helpful.
Few
Few
Attached image of a measurement from mentioned stereophile review shows in blue a ~ 1 khz resonance from the basreflex port that even shows up in the system frequency response.
If thats the cause of the largest resonance your measurement shows, cabinet damping wont help.
Yeah that would do it
The Z axis of the plot shows ringing after the signal has stopped.
Its very apparent that a lot of ringing happens 300 Hz and down.
Highly likely to be enclosure panel resonance from bass frequencies.
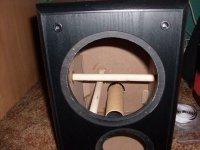
Bracing will reduce panel resonance
Just add a few side to side and
Front to back Dowel braces.
You can use round or square dowels.
I fine square easier.
Because you can also glue the braces together
where they cross.
I have attached a picture for example of simple round dowels.
It can be improved as mentioned.
Also possibly the plastic port is not mounted well
or if its a long tube with no end support.
The plastic itself is resonant.
Just wrap it with mass, like rubber sound damping material sheets.
from the waterfall its obvious that a lot of ringing is below 300Hz
more likely panel resonance.
Bracing will reduce vibration at low frequency.
The resonate frequency will be raised.
Something misunderstood about bracing.
Add more polyfill or stuffing if any is present.
The walls should be lined for a ported / reflex cabinet.

Its very apparent that a lot of ringing happens 300 Hz and down.
Highly likely to be enclosure panel resonance from bass frequencies.
Bracing will reduce panel resonance
Just add a few side to side and
Front to back Dowel braces.
You can use round or square dowels.
I fine square easier.
Because you can also glue the braces together
where they cross.
I have attached a picture for example of simple round dowels.
It can be improved as mentioned.
Also possibly the plastic port is not mounted well
or if its a long tube with no end support.
The plastic itself is resonant.
Just wrap it with mass, like rubber sound damping material sheets.
from the waterfall its obvious that a lot of ringing is below 300Hz
more likely panel resonance.
Bracing will reduce vibration at low frequency.
The resonate frequency will be raised.
Something misunderstood about bracing.
Add more polyfill or stuffing if any is present.
The walls should be lined for a ported / reflex cabinet.
Attachments
Last edited:
If the measurement is in room and from long distance the resonance can be caused from room.
Also this can be cone resonances as filter of Q350 is low order.
But enclosure is relatively empty, it can reflect back and cause resonances.

Also this can be cone resonances as filter of Q350 is low order.
But enclosure is relatively empty, it can reflect back and cause resonances.
I would also add bracing. You can also add mass (like bitumen sheets) to the walls of the cabinet, but for this that will not do much but bring the resonance down in frequency. Bracing will do the most about this. Adding polyfill can help also but won't resolve it that much.
Thats your typical cheap mdf bookshelf behaving as expected with lots of midrange cabinet hash. Seen lots of them Ie. Polk, Boston Acoustics, Klipsch, etc.
A butt load of dynamat type of dampening will get it under reasonable levels along with some threaded rod sections clamped in place, secured with epoxy on the jam nuts that sit against the walls. Moving the threaded rod sections around, testing before epoxying, will yield the best possible results without having to commit to glued wood bracing and guessing.
A butt load of dynamat type of dampening will get it under reasonable levels along with some threaded rod sections clamped in place, secured with epoxy on the jam nuts that sit against the walls. Moving the threaded rod sections around, testing before epoxying, will yield the best possible results without having to commit to glued wood bracing and guessing.
I often question myself why the big name manufacture such as Kef in this case omit the important of cab construction (damping) or it could be from the driver. It's not a cheap cab by any mean. A lot of suggestions. To the OP what is has now inside the cab, a picture or two appreciated.
Wel, i would be tempted to rebuild this to be honest, probally in ply, with a lot more bracing and damping and more lining also. Keep the same front volumes and just make it a little bit deeper to make up for the space taking by the bracing would be what i do. This cabinet is very cheaply done, and the crossover is also a bit primitive (a coil, a cap and 2 resistors). They also don't measure that good, partly due to that. Someone made a way better crossover for that driver in that cabinet. It's a very good driver, but the rest is rubbish i think. The bettered crossover and measurements are found here (in German):
Pimp a KEF Q350 – oder: Gutes noch besser machen… – HiFi Alex
But i don't think the OP wants to go that far.
Pimp a KEF Q350 – oder: Gutes noch besser machen… – HiFi Alex
But i don't think the OP wants to go that far.
a ~ 1 khz resonance from the basreflex........If thats the cause
Then recommend the 'click' test [or impulse response if using software] to tone it down:
Click Test | GM210 | Flickr
DSP might be more helpful than you’re anticipating. Do the peaks show up ~equally at all angles (on-axis, off-axis vertically, off-axis horizontally)? If so, equalization might be very helpful.
Few
Google Colab
This has a really great on- and off-axis data visualization in both axis if you get it set up with the Q350 at the top. From what I'm seeing, the two peaks generally stick around until about 40 degrees off axis in both vertical and horizontal orientations.
Wel, i would be tempted to rebuild this to be honest... and the crossover is also a bit primitive (a coil, a cap and 2 resistors). They also don't measure that good, partly due to that. Someone made a way better crossover for that driver in that cabinet. It's a very good driver, but the rest is rubbish i think. The bettered crossover and measurements are found here (in German):
Pimp a KEF Q350 – oder: Gutes noch besser machen… – HiFi Alex
But i don't think the OP wants to go that far.
I'm definitely not going as far as a new cabinet at this point, but I am completely removing and replacing the crossover with a homebrew ADAU1467-based digital crossover with individual DAC and amplification channels for all drivers. Going to implement much, much steeper slopes and probably move the crossover frequency down a little bit. I have a feeling that the 1.2khz peak could be a crossover issue, as the kef R3 and Q300 have a very similar resonance and uses a similar crossover but a totally different chassis.
...threaded rod sections clamped in place, secured with epoxy on the jam nuts that sit against the walls. Moving the threaded rod sections around, testing before epoxying, will yield the best possible results without having to commit to glued wood bracing and guessing.
This is a really great idea. I'm going to see if I can get my hands on some threaded rod and nuts, thanks for the recommendation.
Thanks everyone 🙂
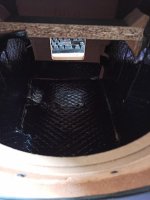
I have lined the insides of my Q350's with 2mm bitumen which really helped a lot.
Attachments
Last edited by a moderator:
I have no measurement equipment or anything. This is purely from what i hear and feel when i put my fingertips on the cabinet. I actually over dampened them at first. On top of the bitumen i put a 1 inch thick dense damping foam. This resulted in the sound becoming...dead, so i removed it. I later replaced the crossover with high quality parts. A Daytonaudio inductor and a Mundorf Supreme Aluminum oil Cap. The sound improvement is significant.

Get a tone generator and do some sweeps and listen for errors, when you have dailed in the frequencies then you can think of how to proceed
Hi guys, looking to upgrade my 350 crossover. I have added dampening and poly. So my question is in regards to the crossover posted by Spuddywuddy in the picture below. As the driver has 4 connections I didn't follow the new cross over connections. I am new to this so please no trolling. I have put in the connections as I see them. Can someone tell me what I am missing. Thanks a bunch in advance.
TD
TD
Attachments
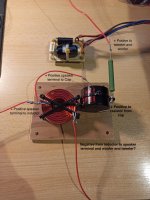
It looks to me like the original crossover had three parts in it, a resistor, a capacitor and a coil. I could be wrong, but It seems the guy bought three parts of identical values to the original crossover and just wired them exactly the same. If it were me I would have just swapped the parts directly on the existing circuit board one at a time and the job would be done. No rewiring required. Pull the resistor, put the new one in its place. Same for the coil and cap. I don't actually believe there will be any audible or measurable difference from these boutique parts if they are of the same value as the originals as the original parts were of high quality. Of course it's fun to do a project anyway. Hope that helps.Hi guys, looking to upgrade my 350 crossover. I have added dampening and poly. So my question is in regards to the crossover posted by Spuddywuddy in the picture below. As the driver has 4 connections I didn't follow the new cross over connections. I am new to this so please no trolling. I have put in the connections as I see them. Can someone tell me what I am missing. Thanks a bunch in advance.
TD

- Home
- Loudspeakers
- Multi-Way
- How to damp bookshelf enclosure resonance?