Hezz said:I think pisonics design is a plano concave that he intents to expand the horizontal image with. It would accomplish the same thing but to me it makes more sense to compress the vertical rather than expand the horizontal because then you gain resolution effective resolution.
Hm, are you sure about this. Say you have a 800x600 lcd your projecting to a 16'x9' screen, no matter which way you compress or expand it, those 800x600 pixels are still going to end up in the exact same spots on that 16x9 screen, assuming the geometry is correct. So how or why would you gain or lose effective resolution in either case?
Also I read in another thread about expanding the image with the 2 prism anamorphic lense design by putting it on its side and turning it around (http://www.diyaudio.com/forums/showthread.php?postid=110427#post110427). Someone stated that for this lens design this is actually better than compressing the image because of the way the light hits the prisms. This is what I'll probably end up doing, as it is very simple to build, and has already been tested and verified 🙂
Z2895,
It actually depends on the situation and if you are moving your projector to compensate for image reduction or enlargement. However, you are technically correct. If you have your projector situated so that it always projects wide screen at the desired size then it shouldn't matter. But there has been a lot of developement of that thread since I have read it last. If the prism method works better to expand then that may be the way to go. It's just that with OHP type setups the projector is already too close to the wall. Most of the guys on that thread are designing for OEM projectors that are 4:3 aspect ratio.
I will have to go over and read up on the newer developements. Thanks for the info.
Hezz
Hezz
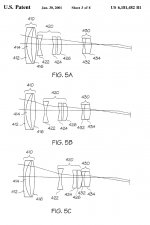
Your idea is actually a patent, you can go to US patent website to get the detail design. The patent number is 6,181,482, the date of the patent is Jan 30 2001. I have not seen any product for home theater equipment. Maybe they use this variable ratio anamorphic lens in professional and commercial products.
one of the drawing is attached
Attachments
Dual Prism Home Made Anamorphic Lens
Hello DIY,
After reading the other thread (all 40 pages) and now this thread, I would like to state that the dual prism anamorphic lens described in the other thread does indeed work well.
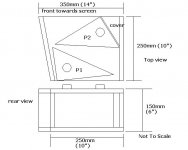
The key difference I made to mine was to create a horizontal expansion lens, not vertical compression lens. This is simply a case of laying the prisms of their sides. see attached diagram.
My prisms are made from 6mm Perspex. I made 2 jigs out of 16mm MDF and took them to a plastics engineering shop. He simply heated the Perspex with a strip heater at the bends to keep the main body flat. Each prism is made of just five parts, top and bottom, the main body (one piece) and the expansion chamber and threaded bung. He glued it all together for me using a special product that fuses the plastic together and they don't leak because he tapped a hole in the top of each expansion chamber for the plastic bung to screw into. It is made of some form of poly.
Now as stated here, "the bigger the better" and this is true, especially with short throw devices like my native 16:9 Sony HS-3.
My prisms are huge, and in the case, the lens is as big as the projector itself.
As I said, I read the other pages and did seek out glycerin. At present I am still using water, and it doesn't appear to be adding anything that might suggest color change due to having the same type of fluid in both with the same index.
There are some key points to aligning the prisms though.
What I have found is that the two prisms actually interact, where P1 is will expand the left side, will also compress the right (to a lesser degree) and the same goes for P2.
If the prisms are not positioned exactly right a couple of thing happens -
1. image not stretched enough
2. too much stretch. This also causes a patch of reflection in the centre that creates a visible spectrum, so the key is to stretch, but to the point where the spectrum is not visible.
3. horizontal panning if the lens may be needed to ensure symmetrical stretch.
4. tilt factor. This has a variety of effects including image clip, and a blue line (reflection from the prisms themselves?) and must be adjusted for.
5. The lens might also need to be slid from side to side. When the light passes to close to a bend, color abrasion will occur.
This attachment is of my lens in plan.
If you would to see better shots go to
http://www.avsforum.com/avs-vb/showthread.php?t=561280
and scroll down, I am on the end...
Cheers,
Mark
Hello DIY,
After reading the other thread (all 40 pages) and now this thread, I would like to state that the dual prism anamorphic lens described in the other thread does indeed work well.
The key difference I made to mine was to create a horizontal expansion lens, not vertical compression lens. This is simply a case of laying the prisms of their sides. see attached diagram.
My prisms are made from 6mm Perspex. I made 2 jigs out of 16mm MDF and took them to a plastics engineering shop. He simply heated the Perspex with a strip heater at the bends to keep the main body flat. Each prism is made of just five parts, top and bottom, the main body (one piece) and the expansion chamber and threaded bung. He glued it all together for me using a special product that fuses the plastic together and they don't leak because he tapped a hole in the top of each expansion chamber for the plastic bung to screw into. It is made of some form of poly.
Now as stated here, "the bigger the better" and this is true, especially with short throw devices like my native 16:9 Sony HS-3.
My prisms are huge, and in the case, the lens is as big as the projector itself.
As I said, I read the other pages and did seek out glycerin. At present I am still using water, and it doesn't appear to be adding anything that might suggest color change due to having the same type of fluid in both with the same index.
There are some key points to aligning the prisms though.
What I have found is that the two prisms actually interact, where P1 is will expand the left side, will also compress the right (to a lesser degree) and the same goes for P2.
If the prisms are not positioned exactly right a couple of thing happens -
1. image not stretched enough
2. too much stretch. This also causes a patch of reflection in the centre that creates a visible spectrum, so the key is to stretch, but to the point where the spectrum is not visible.
3. horizontal panning if the lens may be needed to ensure symmetrical stretch.
4. tilt factor. This has a variety of effects including image clip, and a blue line (reflection from the prisms themselves?) and must be adjusted for.
5. The lens might also need to be slid from side to side. When the light passes to close to a bend, color abrasion will occur.
This attachment is of my lens in plan.
If you would to see better shots go to
http://www.avsforum.com/avs-vb/showthread.php?t=561280
and scroll down, I am on the end...
Cheers,
Mark
Attachments
resurrected thread
Man.... before yours Mark it had been two years since we talked about this subject. Thank you for resurrecting it.
My DIY has never leaked, although my original design I wanted to make in as few parts as possible like you did... but bending the plastic/lexan created a blurry picture, so I went back to the glued pieces. If you use the right glue and you apply it generously leaking isn't a problem, at least for me.
I'm wondering if since your prisms are so large that bending the material is less of an issue. As the image gets closer to thsoe bend points it seems like it can't really be a perfectly flat surface. It sure wasn't for my original design.
Nowadays I'm wanting to put away the DIY and use an actual anamorphic projector lense that they used in theaters-- some of the newer DLP and LCD projectors coming out these days have a very small output lense. I have an anamorphic glass lense I got off ebay, I'd like to try it in front of one of the smaller projectors to see if it still crops the corners.
Thanks JudeBarnes,
Maybe I was just lucky or maybe I wanted this so bad I would just persist until I got it right. Nothing drives me harder than "no that won't work" and I got that told that alot during that last few years that I have been seeking a lens for a 2.35:1 setup.
Whilst I am a bit of late comer to this project, I actually discoved horizontal stretch back when I was just 12 in cinema the year Return Of The Jedi first hit the big screens.
I knew a projectionist, and helped him re-wind the film reela and load the projectors. The film came on seven reels and being very curious, I decided to sneak a peak at the film strip and found a very tall thin image. I asked the projectionist why, and he showed the anamorphic lens.
My problem was until just recently, I knew what it did, but had no idea how it or why it worked. I even bought a second hand 16mm lens to experiment with. Cinema Scope anamorphic lenses are 2:1 stretch, so squeezing with video might not work as well.
Then someone gave me alink to this site and so began hours of reading.
My prisms cost me just $82.20 and the casing (made from MDF) was only around $10/case. I have made several versions, only to return to my offset original design, as the others did not seem to allow the prisms enough movement in the right directions to proivide enough stretch. Go figure, when they are all built on the same area...
Your right about the bend of the perspex though, so I made mine wide to ensure that the lens surface would be flat. It seemed that most posters were using 4 x 3 native projectors with a few using 16:9, but most also were making vertical compression, and I specifically wanted horizontal expansion. Though I could not find a comment on widening the lens, I took the change anyway given that my projector is 16:9, so why not make the prisms at least 16:9 or maybe a little wider? Besided the "paper test" seemed to point in that direction.
And I did, and it has paid off. I am very happy with the results and for what this project has cost won't be removing it anytime soon, unless I can find a commercial equivelent that works better...
Thanks to all that have posted their results. This is a very interesting subject and I hope this thread goes on...
Mark
Attachments

These look pretty cool
http://prismasonic.com/english/index.shtml
variable, and they use all glass, they actually aren't too pricey considering that.
http://prismasonic.com/english/index.shtml
variable, and they use all glass, they actually aren't too pricey considering that.
anamorphic lens
The H serries of Prismasonic lens is what I based my design on. They provide varible stretch between 1:1 (no stretch or pass through, ideal for 4 x 3 and 16:9 native program) with optimial results at 1.33:1 (4 x 3 becomes 16:9 and 16:9 becomes 21:9).
The photo of a scene from LOTR I attached in the last post is my set up running in the 16:9 mode, not the 21:9 mode. That is DVD player is set to 16:9, but the projector (native 16:9) is running in "normal" which is the 4 x 3 mode. Without the lens, the image is tall and thin, then the lens optically strteches it out to restore the geometry.
This shot is dark, but if lightened, you would see that the image is actually window boxed with side pillars of non used screen on both sides, as well as black bars at the top and bottom.
To use the full screen, I simply go to the 4 x 3 zoom mode that I have preset on the projector and I then have full image height.
This 4 x 3 normal mode is handy for films presented in either 1.78:1 or 1.85:1 like Ice Age. You can see here the side pillars but the image is the full height with correct geometry and LOTR or any 2.35:1 film can also be watched at the same height, just much w i d e r ...
Mark
Attachments

A 4 prism lens...
It has been a while since I last posted, but I built a 4 prism lens and it works better than the two prism lens.
I also solved alot of problems that people seemed to mention such as light reflections. Take a look at this SW2 shot. The geometry is as perfect as DIY can be, I would think and there are NO bad reflections...
Mark
Attachments

- Status
- Not open for further replies.
- Home
- General Interest
- Everything Else
- The Moving Image
- DIY Projectors
- How many have had luck with DIY anamorphic?