Hi John,
I think marce answered this, I'll try as well.
It will make the ground plane more "noisy" (resistance is not zero).
A ground plane that contain less currents will of course carry less noise, low level ground nodes will then have less noise in between them. In addition, low magnetic fields in and around the circuit.
My suggestion: Star power ground to where speaker, smoothing caps, power decoupling caps, zobel and your low level signal ground plane connects. No speaker and/or supply current will now travel through small signal ground.
MJL21193 said:Do you think it will be a problem?
What are the adverse effects of this return current?
I think marce answered this, I'll try as well.
It will make the ground plane more "noisy" (resistance is not zero).
A ground plane that contain less currents will of course carry less noise, low level ground nodes will then have less noise in between them. In addition, low magnetic fields in and around the circuit.
My suggestion: Star power ground to where speaker, smoothing caps, power decoupling caps, zobel and your low level signal ground plane connects. No speaker and/or supply current will now travel through small signal ground.
marce said:I concur with 4fun, I would have the speaker return as near the caps as possible as this is the "star point".
Hi Marc,
I see the logic in getting the return as close to the caps as possible, where I couldn't see a good reason to have it close to the output devices.
Here is what I can do: On the board as it is, I can disconnect pin #1 on the speaker out terminal block from the ground plane. I can then run a wire from it over to the main ground pad near the caps, this way the speaker will be connected directly to the supply caps. This avoids another board revision
Or, I could just move terminal block and the other components which would have the speaker output (+) in a less than ideal location.
4fun said:
My suggestion: Star power ground to where speaker, smoothing caps, power decoupling caps, zobel and your low level signal ground plane connects. No speaker and/or supply current will now travel through small signal ground.
Hi 4fun,
Yes, this would be ideal, but it would mean splitting the ground plane again, something that I really wanted to avoid.
Re: VAS Protection
Hi Pete,
Remember way back, when you suggested I drive the amp into clipping at 20KHz? I saw massive current through the VAS and lots of DC at the base of the drivers (as I suppose, the VAS was saturated). The attempts at getting the clamp to work failed due to increased distortion. You, at some point, suggested that I raise VAS current to take advantage of the MJE15031's gain increase at higher current (unrelated to the clamp issue). After I did this, I noticed a clamp was no longer needed.
I'm attaching a shot below where the amp is drive into clipping at 20KHz. There is a voltmeter on the base of a driver showing DC and there is an ammeter attached to the VAS showing current through there.
The problem with the VAS protection schemes that have been recommended is that if I implement them, I won't see a difference.
PB2 said:
I can't see your simulation so it's hard to say what's going on. The strange HF clipping behavior was solved by the current limit resistor on the EF in front of the VAS.
Hi Pete,
Remember way back, when you suggested I drive the amp into clipping at 20KHz? I saw massive current through the VAS and lots of DC at the base of the drivers (as I suppose, the VAS was saturated). The attempts at getting the clamp to work failed due to increased distortion. You, at some point, suggested that I raise VAS current to take advantage of the MJE15031's gain increase at higher current (unrelated to the clamp issue). After I did this, I noticed a clamp was no longer needed.
I'm attaching a shot below where the amp is drive into clipping at 20KHz. There is a voltmeter on the base of a driver showing DC and there is an ammeter attached to the VAS showing current through there.
The problem with the VAS protection schemes that have been recommended is that if I implement them, I won't see a difference.
Attachments
MJL21193 said:
Hi 4fun,
but it would mean splitting the ground plane again, something that I really wanted to avoid.
Here it is split. Would this cause problems?
Attachments
MJL21193 said:
Here it is split. Would this cause problems?
Hi,
I think it would help. Narrowing the entry to the small signal ground would help further.
But I am to tired, 3 am in the morning here.
😴
4fun said:
Narrowing the entry to the small signal ground would help further.
How about this:
Attachments
MJL21193 said:
How about this:
Given your current layout I suggest something like this:
Attachments
Re: VAS Protection
What could the sim be seeing that shows distortion from the extra (inactive) protection transistor?
This fits with conventional VAS protection adopted by many designers.PB2 said:............ The strange HF clipping behavior was solved by the current limit resistor on the EF in front of the VAS.
When I run a modified sim to get more reasonable results into a short circuit, I get as high as 400 mA in the VAS. Note also that I lowered the base stoppers to 2 ohms since I might prefer that value, or 5 ohms depending on stability. Even with higher stoppers I got 200 mA which is excessive. I added a 2N5087 as a clamp right at the VAS using the 10 ohm emitter resistor as the sense, and it clamps at about 72 mA. This makes sense since one Vbe drop or .7V on 10 ohms is 70 mA.
It did not raise the distortion at all. All small signal transistors I tried worked fine, 2N3906 for low capacitance, it's not critical. The clamp transistor is not stressed at all, since the EF is current limited to about 10 mA, and the VAS Vbe junction limits the clamp Vce to under a few volts. The EF shields the diff pair from the added capacitance of the clamp.
This is a good fix, the EF and VAS are now protected.
What could the sim be seeing that shows distortion from the extra (inactive) protection transistor?
I spent some time last night listening to the prototype while I build a phono pre-amp. I connected it to a good speaker and let a couple CD play through. I must say that it sounds very good. For comparison, I switched back and forth between it and an old Pioneer amp that I have (SA-6800). I found better bass and much better highs with the patchwork amp. This could be chalked up to the age of the Pioneer (30+years).
I will be putting through an order to Digikey for the needed parts to complete a permanent version. I was going to do another perf board version, but I don't think anything would be gained by doing that.
I will order 2 sided boards to etch myself (my first time doing that). I will use the ground scheme posted above, with some changes. I'll post that next.
Hi John,
It’s nice to hear that you like the sound of your amp.
Yes, I think you are just a little dishonest to your old Pioneer 😉, 30+ years doesn't do the electrolytes any favour.
Perhaps you saw my little proposed "saviour" for the ground plane. I didn't say why but that's me, too quiet....
Well, I think some explaining should be in place. By narrowing the grounds meeting area there is less possibility for the ground(s) to have different potential when high current flows.
I would also connect the speaker return right in the pad that is placed where the ground meets.
By doing so you get separate speaker return close to caps and the central ground point.
In addition you get:
Separate combined zobel and power decoupling ground.
Separate low level ground, some decoupling here but currents will be low thanks to the RC's on the rails before low level stages.
4fun said:
Perhaps you saw my little proposed "saviour" for the ground plane. I didn't say why but that's me, too quiet....
I would also connect the speaker return right in the pad that is placed where the ground meets.
Hi 4fun,
Yes, the changes I mentioned are the ones you've proposed. I will wire the speaker return to the main ground point. Thanks for the recommendations.
The old Pioneer is pretty tired I think. Normally, I use it out in my garage, but took it in to use the phono preamp for a recently acquired turntable. Alas, the preamp is tired too, or at least the selector switch.
I have ordered parts from Digikey - $150.00 worth of parts. A 12" x 12" double sided 2 ounce copper board, the super matched pairs (LM394) and a few other odds and ends. Some parts for other projects also.
Hi,
You mentioned that you will make own dual layer PCB's, I'll guess that this means no through hole plating.
How to solder for example electrolytics on both sides when the cap covers one side?
Or do you plan to have some distance between the PCB and "covering" components?
You mentioned that you will make own dual layer PCB's, I'll guess that this means no through hole plating.
How to solder for example electrolytics on both sides when the cap covers one side?
Or do you plan to have some distance between the PCB and "covering" components?
4fun said:
How to solder for example electrolytics on both sides when the cap covers one side?
In such areas I will create a via and solder a solid wire from top layer to bottom. This would be tedious, but I don't have too many places on the board where I need to do this.
Just got an email from Digikey that parts are being shipped, should have them tomorrow or the day after.
I'm working on new layout now while listening to my new (old) turntable through my home-made phono preamp. The snow is coming down and I don't anywhere I need to go - life is sweet.
MJL21193 said:In such areas I will create a via and solder a solid wire from top layer to bottom. This would be tedious, but I don't have too many places on the board where I need to do this.
Ok, I see.
The snow is coming down and I don't anywhere I need to go - life is sweet.
Nice, here we are still awaiting some lasting snow. For some reason I like cold weather just as much as the warm summer, I guess the beauty lies in the changes....Of course, the winter season invites DIY 🙂
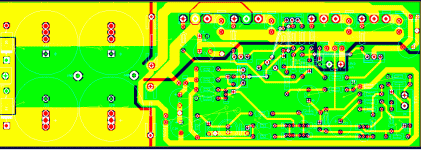
Here it is. Good thing you mentioned the through plating on double sided boards 4fun, as I'd not taken steps earlier to put these vias in. They are there now.
Like I said earlier, the speaker ground will go straight to the main board ground. The terminal block will be used only for positive out.
Snow! We've had more than 30cm ( that's 12" for you Yankee's) today and it's still coming. Maybe another day off tomorrow.🙂
Like I said earlier, the speaker ground will go straight to the main board ground. The terminal block will be used only for positive out.
Snow! We've had more than 30cm ( that's 12" for you Yankee's) today and it's still coming. Maybe another day off tomorrow.🙂
Attachments
My goodies arrived from Digikey today. 🙂
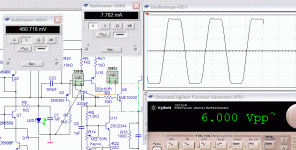
As I had another day off, I took the time to connect the oscilloscope to the prototype. I resisted doing this before as I was afraid of the outcome - the prototype doesn't have all of the compensation components. I used the squarewave output from the oscilloscopes calibration as the source. All in all, it didn't look too bad, better than it looks in the sim in the same state of completeness. One good thing: no sign of oscillation.
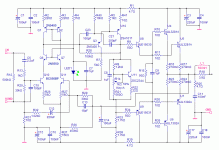
One thing I did learn is that it should run at a higher idle current. Originally I was going for 100mA but I have found that about 300mA works better. I've made some changes to the schematic to accomplish that, and to increase current through the VAS (now at 18mA).
Among the goodies from Digikey are the new 2.2uF caps for the input. I didn't realize I'd picked 300v ones. They are a little big, I'll need to made a change on the board to fit them (pin spacing 28mm).
I bought 2 PC boards, one 2 ounce and one 1 ounce. The one ounce is for smaller projects and to practice on. I'll be making a board for my phono preamp first, just to get the hang of it.
As I had another day off, I took the time to connect the oscilloscope to the prototype. I resisted doing this before as I was afraid of the outcome - the prototype doesn't have all of the compensation components. I used the squarewave output from the oscilloscopes calibration as the source. All in all, it didn't look too bad, better than it looks in the sim in the same state of completeness. One good thing: no sign of oscillation.
One thing I did learn is that it should run at a higher idle current. Originally I was going for 100mA but I have found that about 300mA works better. I've made some changes to the schematic to accomplish that, and to increase current through the VAS (now at 18mA).
Among the goodies from Digikey are the new 2.2uF caps for the input. I didn't realize I'd picked 300v ones. They are a little big, I'll need to made a change on the board to fit them (pin spacing 28mm).
I bought 2 PC boards, one 2 ounce and one 1 ounce. The one ounce is for smaller projects and to practice on. I'll be making a board for my phono preamp first, just to get the hang of it.
Attachments

Isn't t a little late in he game to be making schematic changes? Apparently not. Here's a few:
I elliminated the feedback path to the cascode. Removing it in the sim reduced distortion by .001%. It doesn't appear to serve any usefull purpose. Removing it from the prototype made no audible difference.
I added local feedback to the EF and VAS. This was something I was toying with earlier, but it got left by the wayside. This further reduced distortion by another .002%.
I increased current to the input stage and to the VAS, reducing distortion .001%.
I increased the idle current to 340mA which increased distortion by .004%.
So some gains and some losses. The biggest difference seems to be much better stability, or so the sim says.
In real life I'll know soon enough.
Now all I have to do is rework the layout.
Schematic update:
Attachments
Hi John,
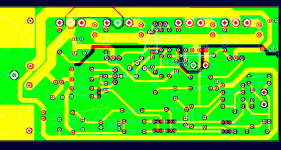
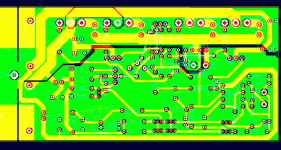
Kindly change the colours in your PCB layout if you can, the Cyan on the yellow is difficult to follow.
Nico
Kindly change the colours in your PCB layout if you can, the Cyan on the yellow is difficult to follow.
Nico
- Status
- Not open for further replies.
- Home
- Amplifiers
- Solid State
- Help with this amp? A patchwork product of simulation