I allready replaced some cap, like the one that goes to the source selector board (220uF), that's the grey one on the right of the elna's, because when you moved it buzzed alot. But that's not the main problem.
Mrfeedback:
the initial hum is about 400mV on the right side and 60mv on the left side.
after 5 mins the right hum stabilizes to 50mV on the right ch and 30mV on the other ch.
even with the big cans the hum doesnt disapear,
and when you blow air to the board the hum rises up to 200mV!
(i'm loving this task 😀)
Attachments
So I believe that psu caps might be ok. I'll try to blow directly into each cap to see the hum risin' up
I'll Say It Again.......
Pedro, remove the main caps and remove all traces of glue - I expect this is the problem.
Eric.
Pedro, remove the main caps and remove all traces of glue - I expect this is the problem.
Eric.
Mrfeedback
I allready replaced the grey medium cap near R302, but the glue might be it.
Just let me tell you what I found out.
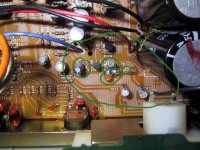
In the next picture I marked with a circle the spot where when I blow my own air with a tube, the hum increases. I suspect that is related with moisture also.
I replaced meanwhile the marked components and no big effect on the hum.
My next step will be to remove the big caps, remove the glue and clean the board.
I'll try then to see if anything changes.
(I think that with the help of you guys I might do it 😉)
seeya tomorrow (4:00 am round here 🙁)
I allready replaced the grey medium cap near R302, but the glue might be it.
Just let me tell you what I found out.
In the next picture I marked with a circle the spot where when I blow my own air with a tube, the hum increases. I suspect that is related with moisture also.
I replaced meanwhile the marked components and no big effect on the hum.
My next step will be to remove the big caps, remove the glue and clean the board.
I'll try then to see if anything changes.
(I think that with the help of you guys I might do it 😉)
seeya tomorrow (4:00 am round here 🙁)
Attachments
Member
Joined 2002
Caps
PedroPo
As i can see from the picture, you really haven't many caps to change. I count 16, PSU-caps included. I think the fastest way to solve your problem is to replace them all. I would stick to the actual values. Mods can be done later. We really push you to the limit, don’t we?😉
Hugo
PedroPo
As i can see from the picture, you really haven't many caps to change. I count 16, PSU-caps included. I think the fastest way to solve your problem is to replace them all. I would stick to the actual values. Mods can be done later. We really push you to the limit, don’t we?😉
Hugo
JasonL said:I realy don't see how removing the glue will remove Humm from a amplifier. ?
Jason,
Now if I blow to if it hums. So I don't find very hard to believe that something like glue is making the noise.
You see that I have allready changed some of the components in the area marked above.
Let's get on with the killing😡
Reading And Comprehension Test.
"I realy don't see how removing the glue will remove Humm from a amplifier. ?"
"Also look for contact glue - this ages, goes dark in colour and becomes conductive - bad news."
JasonL - Clear enough for you ?. 🙄
Eric.
"I realy don't see how removing the glue will remove Humm from a amplifier. ?"
"Also look for contact glue - this ages, goes dark in colour and becomes conductive - bad news."
JasonL - Clear enough for you ?. 🙄
Eric.
Member
Joined 2002
I should have added that the glue can become corrosive too.
Years ago I had a similar hum fault in a different Sony amplifier, and the cause turned out to be contact glue under the main filter caps that had gone conductive and caused leakage currents to a jumper wire under one of the main caps.
The fault was also temperature and vibration sensitive.
Pedro, are you reading this ?.
Eric.
Guys!
Good news and bad news
The good new is that I manage to remove the hum totally with the gule removal and couple of small caps substitution.
The BAD news is that when I was ready to close the box, I acidentaly shorted something, a flare apeared, and...
...I blew out the left channel 🙁
The hole amp makes a terrible hum on both channel, but if I disconnect the juice from the left channel, I get good quality sound with a minor hum. I Feel so stupid!!!
Now I need your help AGAIN.
the situation is the following:
In my pictures you can see two white power resistors.
These resistors now heat up in just a second, after power on.
Does this mean that I have killed the Power transistors?
If so how will I be able to replace them, since they are SONY, and therefore, coded??
hope someone can help me, cause I feel so sad.
Just when I was going to thank all of you that helped me...
PedroPO said:Guys!
...I blew out the left channel 🙁
The hole amp makes a terrible hum on both channel, but if I disconnect the juice from the left channel, I get good quality sound with a minor hum. I Feel so stupid!!!
Now I need your help AGAIN.
the situation is the following:
In my pictures you can see two white power resistors.
These resistors now heat up in just a second, after power on.
Does this mean that I have killed the Power transistors?
If so how will I be able to replace them, since they are SONY, and therefore, coded??
hope someone can help me, cause I feel so sad.
Just when I was going to thank all of you that helped me...
Too bad... If the transistors are too expensive you might not be bothered repairing it... If you were using the amp, then repair it, if it was just one you acquired, I'd say put it aside if you can do without it... But thats just a poor student with -$115 opinion.. 🙂 Yeah, I reccon you blew out a transistor... although I am not sure that that explains the reoccuring bUzZ.. 🙂
SkinnyBoy said:
Too bad... If the transistors are too expensive you might not be bothered repairing it... If you were using the amp, then repair it, if it was just one you acquired, I'd say put it aside if you can do without it... But thats just a poor student with -$115 opinion.. 🙂 Yeah, I reccon you blew out a transistor... although I am not sure that that explains the reoccuring bUzZ.. 🙂
PedroPo
As SkinnyBoy states, unless you really love that amp you should stop. However, (an maybe we can push you a little further) you have a good chance that only two transistors have to be replaced, maybe four. Two outputs and, if i were you, the 2 drivers: the blue and the black one. (TO-126) If your Source resistors are still ok i would give it a try. If you give us the part numbers we can try to find good substitutes. Hope you manage to measure a transistor?
Life is hard sometimes...🙂

Hugo
sony
Pedro,
Just to push you a little further:
The Service manual for the TA-212 with full schematics, parts list, adjustment procedures, board layout etc is available from www.schaltungsdienst.de for a meager 9 euro + shipping. They take VISA and AMEX, not MasterCard. The site is in German, if you need help email me privately.
Jan Didden
I have a multimeter that has hfe reading capability
I guess I should inser the transistor in the slots and get a reading of some kind.
If the resistor is faulty what is the expected result ? 0?
I made a quick measure with the ohmmeter, and the resistence between the power transistor terminals is almost zero in the "burned ones" the other channel is different and bigger, so I guess I'll will replace them🙁
Dam!
I had the amp runnig so cool! Why do I allways want to fix "a bit more"??
(I was measuring the voltage across the power resistors with aligator clips, when the barbecue happened)
Jan, thanks for the tip- I ordered the manual just now 😉. Do you think that the sony components aren't coded?
here are the transistor references.
Blue one(TO-126): B548R
black one(TO-126)😀414R
black ones(little ones)(TO-92):C945
power transistors(TO-220)😀743A
Hope you can help me.
you are really great pals that now this stuff alot. thank you all.
I guess that without you, I just would go to the mall and buy a 500W new black ugly SONY or something like that.
http://www.eatel.net/~amptech/elecdisc/ampfail.htm is the link to learn how to measure transistors.
Blue one(TO-126): B548R = 2SB548R
black one(TO-126)414R = 2SD414R
black ones(little ones)(TO-92):C945 = 2SC945
power transistors(TO-220)743A = 2SD743
Substitutes
2SB548R: BD 140, BD 231, 2SA1184, 2SA1220(A)
2SD414R: 2SC2690(A), 2SD1382, 2SD1563(A)
2SC945: 2SD767
2SD743: BD 243C, BD 539C, BD 953, 2SD726
Of course, try to stick to the originals and avoid mixing Europe with Asia...🙂 🙂
Hugo
Alligator clips suck for troubleshooting in tight spaces. You need the small spring clip leads.Dam!
I had the amp runnig so cool! Why do I allways want to fix "a bit more"??
(I was measuring the voltage across the power resistors with aligator clips, when the barbecue happened)
..and in addition, power down, move clips, power up, observe and measure. If you need to check a new component, repeat the above...
- Status
- Not open for further replies.
- Home
- Amplifiers
- Solid State
- Help on sony Amplifier