Forgot to mention: ignore R2 in the sim - it's there just for the purposes of looking at current consumption.
Thanks heaps jReave your help has been awesome!
Im mostly the way through building this thing, a few things changed in the design.
I've ended up taking the plunge and obtaining some test gear namely a DATs3 and a Omnimic V2😀
I gave the RS180-4's a good 40hrs of break in measuring the TS parameters every few hours until they seem to stabilize, they measure pretty close to Daytons specs.
I've ended up shrinking the sealed enclosures for them too 6ltrs(from10)which increased the Qtc to .93 I know that is pretty high but Im aiming to have them start rolling off at around 100hz going by Winisd's predictions they are 3db down by 70 and 6db by 57hz, Im hoping this should help them survive having no highpass from the sub bass with the 2.1 amp Im using.
Also went back to the slot ports for the sub, but this time the are on the outer edges of the main drivers using the rear and side walls, all ends are flared to combat port chuff Winisd predicts about 10msec at 100w and 17msec at 250w(I only have 100w anyway). I've still kept the volume at 50ltrs but changed the port tuning up to 32Hz from 30Hz to keep the port length down a bit.
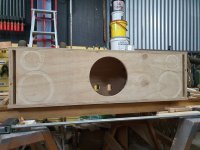
And decided to use ply instead of MDF, cant get hold of decent ply here not without paying well over $200 per sheet(needed 2)so had to put up with pretty much the lowest grade thats not even structural rated full of voids and surface finish of about 40grit on the good side!
The whole thing is a double thickness of 17mm ply(34mm), a bit over 1 1/4" thick with bracing along each side and front to back.
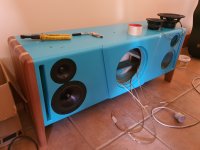
It chipped out everywhere and had to grain fill it and seal it with shellac before putting any finish on it, I was intending to do a dark stain/glaze over it but right at the last minute I made a booboo with the 2" roundover bit... I forgot about the the flush mount recess for one of the tweeters and as you would guess it got plunged into when the router bit bearing found it😡😡😡😡
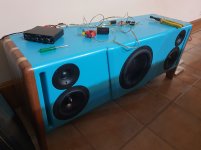
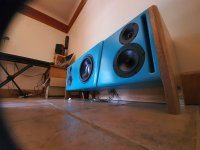
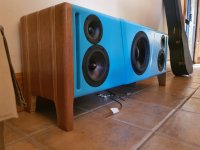
So yes now its a lovely shade of sea foam teal blue, sorta gives it a bit of retro almost art decor vibe especially with the Tasmanian Oak/ply combo end plates that have integrated legs.
Seeming I now have the mic to measure with I've built the test Xover to your design(jReaves design that is ) as a basis to start from sounds pretty good so far but my hearing isnt the best, so when I work out how to use this mic and get an actual FR graph we will see 😀

Im mostly the way through building this thing, a few things changed in the design.
I've ended up taking the plunge and obtaining some test gear namely a DATs3 and a Omnimic V2😀
I gave the RS180-4's a good 40hrs of break in measuring the TS parameters every few hours until they seem to stabilize, they measure pretty close to Daytons specs.
I've ended up shrinking the sealed enclosures for them too 6ltrs(from10)which increased the Qtc to .93 I know that is pretty high but Im aiming to have them start rolling off at around 100hz going by Winisd's predictions they are 3db down by 70 and 6db by 57hz, Im hoping this should help them survive having no highpass from the sub bass with the 2.1 amp Im using.
Also went back to the slot ports for the sub, but this time the are on the outer edges of the main drivers using the rear and side walls, all ends are flared to combat port chuff Winisd predicts about 10msec at 100w and 17msec at 250w(I only have 100w anyway). I've still kept the volume at 50ltrs but changed the port tuning up to 32Hz from 30Hz to keep the port length down a bit.
And decided to use ply instead of MDF, cant get hold of decent ply here not without paying well over $200 per sheet(needed 2)so had to put up with pretty much the lowest grade thats not even structural rated full of voids and surface finish of about 40grit on the good side!
The whole thing is a double thickness of 17mm ply(34mm), a bit over 1 1/4" thick with bracing along each side and front to back.
It chipped out everywhere and had to grain fill it and seal it with shellac before putting any finish on it, I was intending to do a dark stain/glaze over it but right at the last minute I made a booboo with the 2" roundover bit... I forgot about the the flush mount recess for one of the tweeters and as you would guess it got plunged into when the router bit bearing found it😡😡😡😡
So yes now its a lovely shade of sea foam teal blue, sorta gives it a bit of retro almost art decor vibe especially with the Tasmanian Oak/ply combo end plates that have integrated legs.
Seeming I now have the mic to measure with I've built the test Xover to your design(jReaves design that is
) as a basis to start from sounds pretty good so far but my hearing isnt the best, so when I work out how to use this mic and get an actual FR graph we will see 😀 Attachments
-
 flushmountscut.jpg947.4 KB · Views: 110
 -
 testwiring.jpg760.8 KB · Views: 95
 -
 lowviewassembled.jpg814.1 KB · Views: 214
 -
 assembled.jpg888.7 KB · Views: 94
 -
 assembling.jpg800.8 KB · Views: 99
 -
 beforepaint.jpg542.1 KB · Views: 85
 -
 glueup2.jpg918.4 KB · Views: 142
 -
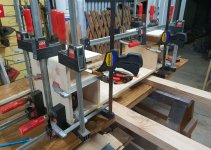 glueup1.jpg524.9 KB · Views: 114
 -
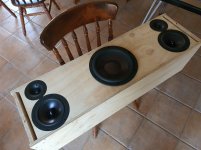 mockupwithdrivers.jpg849.2 KB · Views: 116
 -
 mockupwithoutbracing.jpg803.5 KB · Views: 114
Last edited:
Excellent. They look great. Nicely done.
With them that low to the ground, you might want to play with the tweeter padding. Maybe reduce the series resistor value because you are listening so far off-axis vertically so you might want to increase the HF output just a little bit.
With them that low to the ground, you might want to play with the tweeter padding. Maybe reduce the series resistor value because you are listening so far off-axis vertically so you might want to increase the HF output just a little bit.
When it gets put out in my workshop its going to be about head height so that shouldn't be a problem.
Im going to have to set up some sort of area to test the FR as most of my house is echo central being tiled floors and concrete walls... much researching ahead.
Im going to have to set up some sort of area to test the FR as most of my house is echo central being tiled floors and concrete walls... much researching ahead.
Well at least its still the same year as my last post🙄
This is the results of a full range sweep with the mic at about 2m, the room has no sound treatments and is quite echoing


This is the results of a full range sweep with the mic at about 2m, the room has no sound treatments and is quite echoing
- Home
- Loudspeakers
- Multi-Way
- Harry's "Dayton Im a sumo sized soundbar"