Dave, Chris and myself (i.e. the people who designed it).
our prototype pair was built as test bed for up to 4 different drivers, so I made removable mounting plates which were fitted with countersunk pin jacks for direct connection to drivers
I'm not as "hair shirt" about this as some guys - hell, I use a little cheapie 2" plastic cup with 5-way binding posts. On the next iteration(s) ( I almost said "if " 😛), I'd be inclined to install the input terminals on the slanted rear panel, a couple of inches below the center of driver cut-out.
but from the original inception, the "Frugel-Horn project" was about collaborative design and builder experimentation - so fill yer boots
Royal Plural or Holy Trinity?
Probably the "music" after the DC silenced speaker will tell us.
The witnesses during the party can tell us later 😉
Hi David,
I am interested to build these speakers. What is the latest version of the plans?
Norbert
I am interested to build these speakers. What is the latest version of the plans?
Norbert
our prototype pair was built as test bed for up to 4 different drivers, so I made removable mounting plates which were fitted with countersunk pin jacks for direct connection to drivers
It sounds like you made the mounting plates so you could simply screw the various plates to the front panel, is that right?
If yes, is there a down side to doing the same sort of 'mounting plate' for a permanent installation, and extending the plate well beyond the edges of the box in order to take advantage of a larger front baffle area?
Also, if the answer is that there is no downside and one can do that to good effect, then should the speaker be mounted off-center on the larger baffle a-la the Arpeggio driver location that avoids centering on the baffle? Or perhaps use the EnABL technique on the baffle?
Just trying to combine some seemingly good ideas that I've come across here on diyaudio into an even better speaker. . .
...is there a down side to doing the same sort of 'mounting plate' for a permanent installation, and extending the plate well beyond the edges of the box in order to take advantage of a larger front baffle area?
Also, if the answer is that there is no downside and one can do that to good effect, then should the speaker be mounted off-center on the larger baffle a-la the Arpeggio driver location that avoids centering on the baffle? Or perhaps use the EnABL technique on the baffle?...
All good questions that have not yet been answered.
dave
It sounds like you made the mounting plates so you could simply screw the various plates to the front panel, is that right?
pretty much
Due to the cabinet's dimensions, there'd be a limit to how far off the driver could be offset from interior center line, but certainly there's no reason not to get creative with a non symmetrical "supra-baffle". See the builder's gallery for original FH for some interesting ideas.If yes, is there a down side to doing the same sort of 'mounting plate' for a permanent installation, and extending the plate well beyond the edges of the box in order to take advantage of a larger front baffle area?
Also, if the answer is that there is no downside and one can do that to good effect, then should the speaker be mounted off-center on the larger baffle a-la the Arpeggio driver location that avoids centering on the baffle? Or perhaps use the EnABL technique on the baffle?
Just trying to combine some seemingly good ideas that I've come across here on diyaudio into an even better speaker. . .
Bud applied a "stealth" EnABL block pattern to a pair of enclosures of which we have several on hand for comparison ( i.e. FE127 Fonken) and as far as we could determine, it didn't get in the way of the enclosure "disappearing" 🙄
Bud applied a "stealth" EnABL block pattern to a pair of enclosures of which we have several on hand for comparison ( i.e. FE127 Fonken) and as far as we could determine, it didn't get in the way of the enclosure "disappearing" 🙄
This was put on the enclosure not the driver, right? Ever tried it on drivers?
Last edited:
Neat!
This does lend itself to larger drivers by using another fold in back...
Is there an "ideal" driver ratio, ie., location along the line?
I think an added fold opens up the range within which the driver may be positioned, hence the question.
This does lend itself to larger drivers by using another fold in back...
Is there an "ideal" driver ratio, ie., location along the line?
I think an added fold opens up the range within which the driver may be positioned, hence the question.
Last edited:
This was put on the enclosure not the driver, right? Ever tried it on drivers?
yes, on the boxes, and yes on drivers as well ( I just don't paint the dots myself)
Neat!
This does lend itself to larger drivers by using another fold in back...
Is there an "ideal" driver ratio, ie., location along the line?
Ed, one of the objectives of the most recent version was to reduce the complexity (including number of folds, etc) over the MkI. Having built multiples of the first, as well as the A126, BH MKI & II, I can say that goal was certainly achieved.
No doubt that as with many elegantly simple looking designs, the topology would be "scalable" to larger drivers; but of course the line length and overall cabinet dimensions would increase.
Thanks Chris
I'm looking at a 6.5" driver. Early sim's show a falling response parallel to the infinite baffle profile and ~4 dB above.
No sooner do you boil it down when I come along and spin it..😀
I'm looking at a 6.5" driver. Early sim's show a falling response parallel to the infinite baffle profile and ~4 dB above.
No sooner do you boil it down when I come along and spin it..😀
speakers are ready to go, really tested my limited woodworking skills,now in awe of anyone who builds anything as complex as earlier versions,
how much stuffing should i start with (alpair 7's) ? i have a couple of pounds of polyfill to play with.
simon
how much stuffing should i start with (alpair 7's) ? i have a couple of pounds of polyfill to play with.
simon
Now i'm going to have to quit procrastinating and pull the stuffing out of mine and weigh it. Depending on room, you'll need to play with stuffing in the 2nd part of the pipe.
dave
dave
Finally finished one FH3 with Pioneer A11 driver and 18mm thk. pine veneered plywood. Couldn't find half round moulding at Home Depot so used 2 pieces of 11/16" (actually measured at 16mm) quarter rounds instead. With 2mm thk shims it worked out great with a little bit of sanding. The wood was cut for me by a master carpenter but I screwed up a bit on the assembly so the box didn't come out perfectly true, though it's pretty good enough for me. It's much easier to do a regular box. Stuffing material is polyfill approx. 12mm thk., on the front of the internal panel and both side walls. The "V" formed by the internal panel and the back panel is also stuffed full with the same material. The polyfill is attached with 3M double sided carpet tape and it worked out fine. The whole baffle is removable, at present held down with 8 screws, so the box is not properly sealed yet. Initial listening impression is very good. The bass is there and is getting a bit better after 2 days, though I wish I could have some more bass that go deeper (I've been spoiled by the G Chang!). It certainly isn't one-note bass. Total outlay so far is about $80 - cheap & cheerful. If a $15 driver can be so good, then the Fostex 126 or the Mark Audio CHR 70 should be fantastic. If the design can be scaled up for 8' drivers, I will definitely give it a go. The Pioneer B20 is my prime candidate. 3 cheers to the designers!
I pulled the driver baffle off one of the prototypes. The ayyached picture shows the cotton felt we used to line around the chamber. The part on the partition folds over and reaches 2-3 cm into the back chamber. The piece on the back is about even or a little below the top of the partition. Turns out there isn't much polyfluff in the pointy bit. It comes up level to about the bottom of the piece of felt on the front of the partition. I estimate 0.3-0.4 lbs per foot cubed density of polyfluff (i could not remove it to weigh).
This could be thot of as a minimum quantity and suitable for FE126En away from corners. Progressively more will be required to reduce bass levels depending on room or driver.
dave
This could be thot of as a minimum quantity and suitable for FE126En away from corners. Progressively more will be required to reduce bass levels depending on room or driver.
dave
Attachments

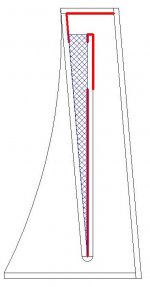
I looked at the photos and read the descriptions about the stuffing and visualized what it's supposed to be and made a drawing. The thick red line is where I think the stuffing is supposed to be. The blue hatched area is where I put the stuffing in the "V" chamber. If less stuffing means more bass then I definitely will pull the stuffing from the "V" chamber. I have located the driver 10mm too high on the baffle so I have to go back to my carpenter friend to beg him to cut the baffles for me again. Finished the second speaker but don't have the chance to hear the FH3 as a pair yet.
Cheers and thanks to Dave and others who have any comment.
Cheers and thanks to Dave and others who have any comment.
Attachments
There is a damping diagram in the beta document (page 6). I have updated it to reflect the latest info.
New beta doc with all the drawings to date.
FH Mk3 beta document 25-oct-10
dave
New beta doc with all the drawings to date.
FH Mk3 beta document 25-oct-10
dave
There is a damping diagram in the beta document (page 6). I have updated it to reflect the latest info.
New beta doc with all the drawings to date.
FH Mk3 beta document 25-oct-10
dave
It's interesting to see this come together. Planning on building an Alpair 7 implementation. Really looking forward to getting started!
There's a small inconsistency in the latest docs in the stuffing info on pg. 6: "1.2" (12mm) cotton or wool felt"
Also: Is the green fluff denser than the orange fluff?
 (Those paragraphs' clarity would be ensured by specifying which colour is denser.)
I hope these comments are useful, and not a nuisance 🙂
The chord method is pretty cool. Do I understand correctly - we simply rely on the curvature that the flexed board provides, yes?
The chord method is pretty cool. Do I understand correctly - we simply rely on the curvature that the flexed board provides, yes?
yup
It is of course easier to draw one line than cut 4 by hand - I'd use the method to make a template, and rough cut with jig or band saw, and finish up with router and flush trim or collared template bit
- Home
- Loudspeakers
- Full Range
- Frugel-Horn Mk3 Builds & Build Questions