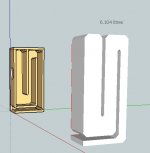
The first image should be a layout for ONE PAIR from a single sheet of Ply/MDF.
The second should be THREE(3) PAIR from a single sheet.
HAPPY CUTTING! Keep safe....
Thank you very much - that was very nice of you!
Beau
Optimized Plan
After tinkering with the design for a few, (and finding out that the Aura drivers are no longer available from Madisound)...I have Made a plan for the Dayton Dayton Audio ND91-4 drivers which are availible from Parts-Express for $28.65 (as of the time of this post). Quite a bit more expensive but worth the extra change. The new design followed a criteria which is optimized for build time, reduced complexity and budget. Just my take on a small DIY build anyway. Enjoy! Below is the link to download the Sketchup file.
After tinkering with the design for a few, (and finding out that the Aura drivers are no longer available from Madisound)...I have Made a plan for the Dayton Dayton Audio ND91-4 drivers which are availible from Parts-Express for $28.65 (as of the time of this post). Quite a bit more expensive but worth the extra change. The new design followed a criteria which is optimized for build time, reduced complexity and budget. Just my take on a small DIY build anyway. Enjoy! Below is the link to download the Sketchup file.
Attachments

Thank you.
As for the Aura's availability, I believe they are still availbale for $12.50 each.
The Madisound Speaker Store
As for the Aura's availability, I believe they are still availbale for $12.50 each.
The Madisound Speaker Store
@BeauB - Sorry. I didn't mention it was the 4ohm not in stock. I use a SURE Electronics amp. So I chose 4ohm speakers to go with the amp. You may use whatever your hearts desire! The original plan called for HiVi B3N/8ohm.
Thanks for the input P10.
Thanks for the input P10.
Thanks for the all the info on this design. I'm very new to DIY speakers and the thought of a FR in a TL has intrigued me. Once I came across this thread, I had to build these boxes since I already have a pair of NS3-193-8A1's which were used in a Sprite Boombox.
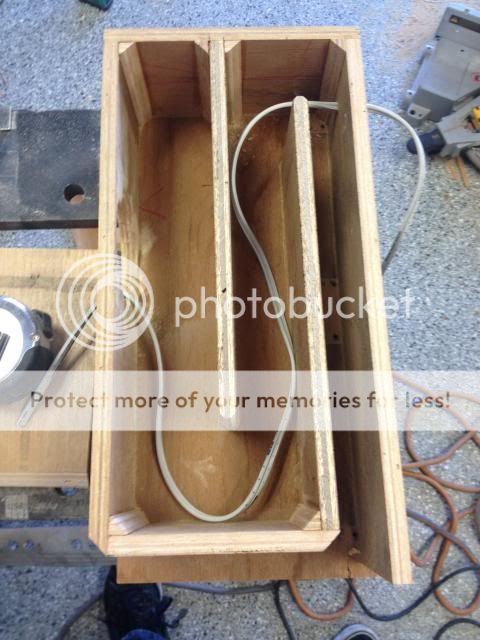
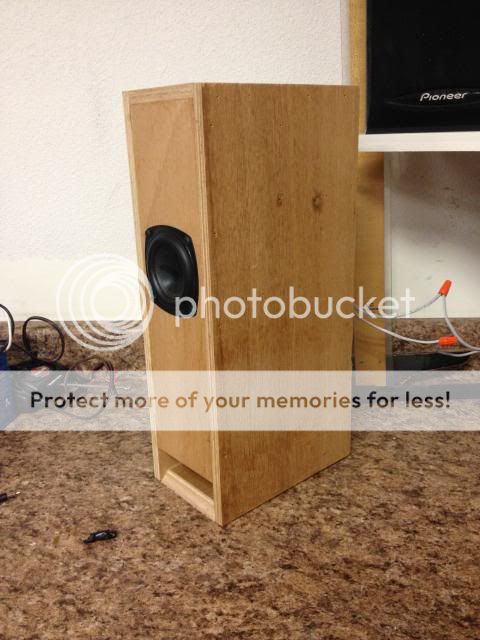
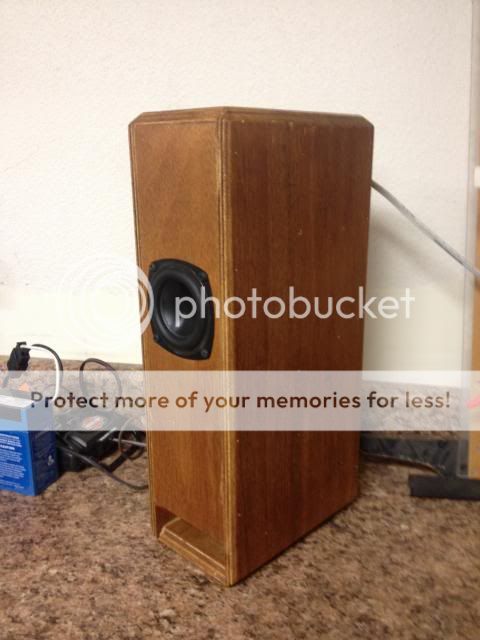
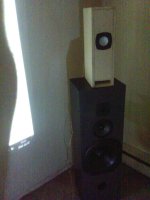
This was a quick and dirty build for a set of garage speakers. Wood, is from an old cabinet; I raided my wife's sewing closet for the stuffing; drivers were purchased when they were $12.50 (I'm kicking myself for not buying more at this price); including incidentals (speaker wire, nails, glue, sandpaper and Danish Oil) I'm in these for around $35 and a few hours of labor. I love em. I certainly don't have an ear, but I'm impressed these. At this point they need a little more love to minimize air leaks along the line. A gasket for the driver is definitely needed (mounting flange is slightly bowed) and a proper terminal (speaker wire is ran through a hole in the back and sealed with caulking which isn't holding up to my abuse).
Also my boxes ended up about 1/8" taller because of the thickness of wood used. I didn't compensate for this on the depth so the cross section of the line is slightly less.
Some Pics:


I cut and installed a gasket for the driver and I applied more caulk around the speaker wire. This cleaned up the sound and really brought out the highs. I hooked up Paul's filter (.90 mH inductor in parallel with a 20 ohm resistor) and it brought down the highs more to my liking. Since the Sprite has a larger baffle I assume the F3 of the BSC is lower than it should be in this configuration, so I want to tweak it. Although, after plugging Paul's values into MJK's BSC equation the circuit is doing something else because I ended up with an f3 of 3.5.
So, what inductor and resistor values should I pick up to try out?
I used the calculator on diyaudioprojects and this is what I got:
f3 = 950Hz
3dB correction = .5 mH and 3.1 ohms
4dB correction = .7 mH and 4.4 ohms
*I'm using these correction values strictly based on MJK's paper Simple Sizing of the Components in a Baffle Step Correction Circuit
Could I pick up 1 size inductor (possibly .6mH?) and a couple different resistor sizes (3 - 4.4 ohms)?
Last edited:
Looks great. Did it take you long to build? My first pair took me a week of "On and Off" build time. Was there a big difference with and without the filter?....thinking of doing the same to mine when I'm done building the second pair.
Didn't take long at all. I was able to knock them out over a couple long afternoons. Fun and easy build. There is a substantial difference using Paul's Sprite filter. Without it, mids and highs were too forward for me. Considering his was designed for a larger baffle, I am trying to figure out what values would be good to try out for this design.
Yea....I'm no good at even understanding crossovers, let alone their design. I'd like to know what the values would be for the 4ohm drivers. Keep us posted!
I make a pair of this design with ns3 driver and WWOW its unbelivable
the sound is realy good the bass is incredible for a 3 incher
tank for sharing this design. easy to built ,dirt cheap,excelent sound
down side now all my body whant a pair of those speaker loll
marc
the sound is realy good the bass is incredible for a 3 incher
tank for sharing this design. easy to built ,dirt cheap,excelent sound
down side now all my body whant a pair of those speaker loll
marc

I for the life of me cannot determine the mounting depth of the backwall for the speaker chamber...
The t-line is dictated by the butt joints. What is the depth, from the front wall, of the speaker chamber?
The t-line is dictated by the butt joints. What is the depth, from the front wall, of the speaker chamber?
Download the Sketchup file
Check post #42, download the sketchup file. That should help you more than any description I can give you.
Check post #42, download the sketchup file. That should help you more than any description I can give you.
- Home
- Loudspeakers
- Full Range
- Francesco Campedelli T-Line