actually, it would be verry interresting to see if Scott could adjust the design to be the same height as the Victor and tuned to M10.2 instead of 10p, in Fonken design, box design is smaller for m10.2
Yves
Yves
Last edited by a moderator:
It is likley doable, to maintain path length it wouldneed another fold.
We have also been playing with the (basic) idea of “halving” the height, doubling the width to get a chunkier box with similar performance.
Horns & TLs have the box dominate more than the driver, so while miniOnkens are tightly tuned for a specific driver, they have greater tolerance of different drivers.
dave
the idea of a wider box half the height is certainly a remainer for me, if a beta is needed you got me in...I saw a similar approach with Lii drivers for the crystal 6 but the way it's done looks amazing but doesn't seems to be really optimized as the first speaker chamber is much bigger in the folded design compares to the straight one...
btw I tested recently the silver 10 and silver8 and sent them back for refund, quality of assambly was really too bad...and they where screaming more than playing...
Yves
btw I tested recently the silver 10 and silver8 and sent them back for refund, quality of assambly was really too bad...and they where screaming more than playing...
Yves
Well, you can always add the pioneer's 'wings' to the existing speaker designs to get the desired in-room acoustic baffle step roll-off in lieu of a power robbing BSC filter: http://www.lansingheritage.org/html/altec/specs/pro-speakers/800.htm

after adding driver.Hello all, I recently purchased a set of Fostex FE168NS, I own different Mark audio's and wanted to try the competition...they have been playing on the shelf for 200h at low volumes for breaking in, but now it's time to fit them inside a cabinet...I have built all frugal horn sizes with different speakers used, some where amazing, some not that great imo...I also have a set of Joan playing now with Mark Audio CHN120 ( playing great, the highs are really crisp but not fatiguing at all, bottom is still to be fine tuned but allready great) but my all time favourite is still and by far the fhxl with MAOP 10.2, this one kicks any speaker I have owned out of the game (many and some really expensive ones like wilson audio, bw 801d, etc...) . I also built the adjustable duct type with maop 10.2 with mitigated results ( https://sites.google.com/site/speak...iver/-diy-adjustable-duct-type-sddbh-sddbh-ad ), bass extenssion is better compare to FHXL, but that's all, no live feelings, no details in mids, no wide open scene, etc etc, whatever the settings I tried... anyway it was worth a try and they play great in the garage... last but not least, I am also building a set of Fonkens with A11MS and will add a set of Fonkens with MAOP's that I will recover from the adjustable ducts and replace with A10.3 or pluvias (no need of MAOPs if there is no detail and just to play loud IMO...)
Now comes the questions...
By listening to the fostex open air next to MAOPs or 11MS or ch120 , they are much much crisper and agressive in the upper range, and this scares me a bit...
I am not sure about what cabinet to use, I planned to use the adjustable ducts when purchased, but with the mitigated results I had with MAOP's I won't be using this design...
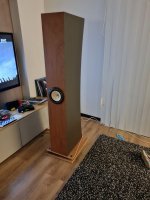
I would like to use floor standing speakers, not 2m high, and maybe a front mouth this time...
Are there any floor standing Fonken designs for this speaker, can I use designs made for other Fostex like FE168∑, in case of Frugel-Horns, should I use the XL or the Joan???,
Does anyone have some great experience with them?
And if I would like to calm them, does anyone EnAbled them allready, are there any other mods I could do, I just don't want any bsc filters...
Thank's,
Yves
Dont bother about the joints looking with some gaps. Its actually newspaper not fully removed.
The edge joints came out pretty perfect.
Greets!
Curious what you're referring to in the attached post and in the future please only attach what portion(s) is relevant.
TIA
Curious what you're referring to in the attached post and in the future please only attach what portion(s) is relevant.
TIA
Hello,
still listening every single day to my Victors and they keep on doing better and better, now playing on psvane 300B WE mono blocs and they are so good...
I'm asking myself if filling the closed rear chamber that sits behind the speaker rear chamber with concrete would be anygood ?
As from my understanding we want to eliminate as much frequencies resonance from the cabinets, I'm guessing that adding mass there could only help...
Kr
Yves
Resonance control is, as I understand it, is converting energy into heat &/or moving the resonances into a less impactful frequency range. I have seen many inner/outer subwoofer enclosures with the void space filled with sand which is more about energy dissipation and as such I am going to be filling the rear chamber (in my current Silbury build) with play-sand rather the just mass. I also plan on coating the interior surfaces with surface applied Acoust-X https://www.acrytech.com/product/acoust-x-sound-damping-coating-5-gallons/ It might not be a efficient vs CLD but it's water based and low cost.
Please do not use Acoust-X in any of my designs unless specifically stated. The panel resonance has already been calculated in the given materials / thicknesses (void free BB ply being the default); if there was any advantage to such products for these particular cabinets, I would recommend it from the outset.
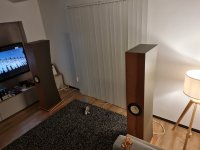
bass is a bit crisper and scene is deeper too now that it sits on spikes. It allowed me also to play a bit with speaker tilt angle and eight, I find them best 7 cm from the floor and 2 deg tilted back
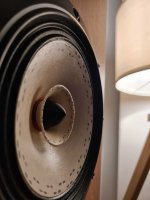
Went a step further...first time Enabling a speaker, I guess I better practiced on less expenssive speakers, anyway I'm still learning a lot of things which is just great...
step 1 was the modpodge layer, I forgot to dilue it 50% so it was a bit thick when applied and didn't dried clean and smooth,
you can see on the first picture that I have some structured circle lines...
Left it for drying for 24 hours and did my second mistake, didn't listened to them before going to step2...so I have no idea what the outcome of this modification really was... really stupid.
step 2 was the EnAbl template, I used the generic template and printed it to correct size, practiced on a sheet of paper and than jumped in...outside circomference was easy, but whizzler cone was a whole different story and I realize now that I started with the wrong side, I should have started from the exterior and add patterns going more inside, and yes, that was my third mistake... it was really hard to addd the last pattern as I was allready too close to the edges...
I also was not really confident with the dust cap treatment and it came out not really great, so I was scared to add 2 more rings under the whizler on the main cone and finally didn't made them...
step 3 was clear coat, I used the recommended acrylic gloss coat and applied 1 layer both on whizler and main cone.
After 24h of drying and waiting it was time to listen... and it was a simple DISASTER...they became really boomy and super harsh at the same time,
vocals where so bad I couldn't beleive it...impossible to listen to them for more than 15minutes... I felt so bad and stupid.
Tried them again and again couple of days later and they where still verry boomy maybe slightly less harsh, anyway far behind what they where before the mod. and unlistenable.
Instead of throwing them in a trash can and buy new ones I decided to keep learning with them and to try other things...
Step 4, I cutted the dust cap and replaced it with a phase plug, I designed 10 different shapes, different lengths...and 3d printed them, one of the design was far supperior to the others, the "roundest one" and 39mm long, the result was really good, harshness was almost gone still the vocals sounded flat and too far behind but at least I could listen to them again, I started to play with different printing materials and surface finish untill I reached what I found by far the best result.
Still, they where verry boomy,
In fact because of this and to try to minimize the bass, I had to move them away from the back wall more than 1m, before the mods they where playing amazing at only 35cm away, So I decided to place them back there and to try to solve the boomy part in another way.
Step 5 playing with damping material like in my Frugel horn's...
after 2 weeks of travel and work, I finally had the time needed to start...
BADABOOOOM, several trials with damping behind the speaker, removing some cotton fill from the side walls, adding damping in the first part of the horn, the second and third part of the horn, up and down not the same weight... ( a lot of fun that took me 2 days and 3 bottles of good red whine...and a couple of whisky's) I was finally there, unbeleivable crisp, fast and powerfull bass, vocals just spot on, guitars strings like hardly heard before... I was back in heaven.
Now some more questions comes to my mind...any help is appreciated...
1 do I have to add the Enabl patterns on the inside of the cone ( behind the whizzler cone) to enjoy the real thing? I am ready to screw the whole thing again if needed just to try and see, but would rather know if it's worth trying or not...
2 did I had to add modpodge on the whizler cone like I did? because I think that this is what was making it sounding so harsh
3 is the surface finish you ca see on my picture a problem? and could I have avoid it with diluted modpodge?
4 are my dots thick enough as from some pictures I can see from other EnAbled speakers mine looks like too flush...
5 How can I know if I added enough modpoge and clearcoat?
6 do I have to do those mods on both sides of the cone?, I just did them on the outside,
7 and does the treatment improves with time when the modpodge and clearcoat keeps drying?
Yves
Attachments

...first time Enabling a speaker
If you need some help email me.
50% is way too much water. If it is not thin enuff you suffer from what happened to you, too dleted you warp the paper.step 1 was the modpodge layer, I forgot to dilue it 50% so it was a bit thick when applied and didn't dried clean and smooth,
Working with the larger nibs and spots is easier than the little one. On the Fostex i put the first whizzer pattern on the top/flat termination of the whizzer (this should also get massaged and some ZUIG 2-way glue on the bottom of the whizzer lip). then use that as a refwrenace for 2 more rings on the inside of the whizzer. with the whizzered Fostex i have done, the paterrn at the bottom of the main cone falls right under the edge of the cone (the top ring just outside so you can use the whizzer ring as a template, and then use that ring to complete the pattern on the lower cone. The lower ring in the whizzer is the hardest, it is tricky to keep the template in the right place and the spots are close together. The phase plugs should also get EnABLed....outside circomference was easy
More examples if needed, https://www.diyaudio.com/community/threads/its-not-easy-being-green-just-pictures.213294/
step 3 was clear coat, I used the recommended acrylic gloss coat and applied 1 layer both on whizler and main cone.
Did you thin the gloss? This is a 50:50 with water,
After 24h of drying and waiting it was time to listen... and it was a simple DISASTER...they became really boomy and super harsh at the same time,
The drivers will need some further break-in, but gerenerally, well done they are better eben without it.
You did let things dry for 24 hrs, the only time i heard anything simialr was when we listened to an FE126 with fresh spits on the dustcap and the driver changed as we listened, getting really bad, then better, then bad, a and so forth.
Pictures? I’d be happy to send the drawing of the one we did if you want to try it. We generally like the tip of the plug to extend to just beyond the edge of thee whizzer (which you no longer have).a phase plug, I designed 10 different shapes, different lengths...
1 do I have to add the Enabl patterns on the inside of the cone ( behind the whizzler cone) to enjoy the real thing? I am ready to screw the whole thing again if needed just to try and see, but would rather know if it's worth trying or not...
EnABL 1 had the spots right near the junction with the wizzer, that was really hard. EnABL 2 tap test revealed the just under th etop edge of the whizzer in al the 166/206 vrints i treated.
You need some, but your midpodge is likely to thick to do the best job.2 did I had to add modpodge on the whizler cone like I did?
I doubt the surface finish has an effect but more mass of modpodge will. Thinner modPodge goes on more smoothly but you ghave to get fast and practised to get it tobe smooth.3 is the surface finish you ca see on my picture a problem? and could I have avoid it with diluted modpodge?
The outer ring spots are the right size (A3), but not placed correctly and the 2 rings are too far apart. Did you tap-test to find the correct ring positions?4 are my dots thick enough as from some pictures I can see from other EnAbled speakers mine looks like too flush...
General rile-of-thimb is as little as you can get away with. The Gloss is 2 coats (1 on the whizzer)5 How can I know if I added enough modpoge and clearcoat?
On all the fostex (both FE & FF) 2 coats of ZIG 2-way glue at the surround/cone interface/junction.6 do I have to do those mods on both sides of the cone?, I just did them on the outside,
7 and does the treatment improves with time when the modpodge and clearcoat keeps drying?
For awile but not as much time as needed to work the spider gently.
dave
Apologies if abit off topic but, I have a pair of FE166 enroute to me and wonder where I can obtain the plans for the Victor. I assume from reading several threads that they are an optimal choice for this driver.
- Home
- Loudspeakers
- Full Range
- Fostex FE168NS best enclosure