I believe what you call a Stanley knife in the UK is referred to as a utility knife here in the US. If so, then I wouldn’t recommend it for the reasons you discovered.
This will do the job quite nicely:
Stainless Steel Snap-Off Graphics Knife (SAC-1) | OLFA - Craft OLFA – Craft
This will do the job quite nicely:
Stainless Steel Snap-Off Graphics Knife (SAC-1) | OLFA - Craft OLFA – Craft
I use dollar store snap off utility knives too. For precise round or curved cuts I use x-acto pointy triangular blade.
anyone have a solution for keeping the blade at 90 deg to the cut, my homebrew blocks/clamps aren't working for me in one way or another.
would a Dremel saw work? or would the spinning blade melt the foam?
would a Dremel saw work? or would the spinning blade melt the foam?
anyone have a solution for keeping the blade at 90 deg to the cut, my homebrew blocks/clamps aren't working for me in one way or another.
would a Dremel saw work? or would the spinning blade melt the foam?
Cut with several 5-7 strokes each one a little deeper. Hold your blade at about 90deg and it’s close enough as Board is only 3/16in thick. The glue will fill in the gaps.
My most recent jig worked well. It was made with a table, a fence and two strips of metal for the blade guide.anyone have a solution for keeping the blade at 90 deg to the cut, my homebrew blocks/clamps aren't working for me in one way or another.
Dremel, no I don't think so. I even tried a plywood blade both forward and reversed. No luck. It 'chunked' the foam like you see two posts up.would a Dremel saw work? or would the spinning blade melt the foam?
Anybody try a hot knife? Even something as simple as just heating the craft knife or X-acto blade? I wonder if that would help clean up the foam edge.
Anybody try a hot knife? Even something as simple as just heating the craft knife or X-acto blade? I wonder if that would help clean up the foam edge.
Edge is clean when cut with a sharp knife. I thought of hot wire cutting but there might be wobble and the heat is not what you want for the paper facer.
My most recent jig worked well. It was made with a table, a fence and two strips of metal for the blade guide.
any chance of a picture of your jig?
Sort of, I'll explain.
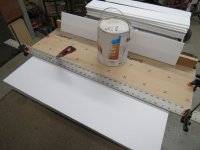
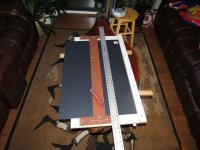
The first pic is of the bottom of one of them. Note the slot on the left is much wider than the blade but not cut the full length of the Sure Ply. The wood ruler is the fence.
The second pic is the top side with the metal ruler used as a straight edge. Picture a second metal ruler creating a guide or keyway.
Attachments

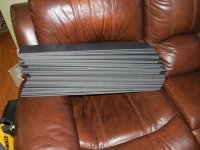
Here's another. This is using the black foam core. The brown piece is a retainer, it is elevated above the foam core so you slide the foam on top of the jig under the retainer and up against the fence on the right. Picture two metal rulers clamped to the table spaced just wider than a blade width.
Attachments
thanks Cal, so simple my Homer like mind could not visualize it...so as long as the jig is larger than the biggest dimension of the foamcore all should be well, now to find a small kerf blade for the slot in the jig...
In either case it took no more than a couple strokes to go through the board. The olfa knife was stropped about every 20 cuts or so.
I've been wanting to build some enclosures like this for light weight. Would a high speed band saw cut this with minimal "chunking"? Heh, or how about laser cutting! I once visited a factory near/in Chicago that did that by moving a 10' granite table about at high speed underneath the laser...now it seems you can get a small maker space version for $600!I even tried a plywood blade both forward and reversed. No luck. It 'chunked' the foam like you see two posts up.
I don't remember but it was probably a regular carbide blade on the table saw to make sure the slot was good and wide. I simply dropped it onto the blade making sure to use the fence so it was semi straight and of course the metal rulers did the final adjustment. As you say, it's pretty elementary but it's also very effective.now to find a small kerf blade
see that's where i have the problem i'm hoping to get cuts with a single stroke, it's the multiple passes that turn things into a mess when a minor change in angle makes the cut take off producing long thin slivers or simply cause the cut to go off.
i've been trying to create blocks to hold the knife at 90 deg (would be nice if any angle could be selected for mitered cuts)
i've been trying to create blocks to hold the knife at 90 deg (would be nice if any angle could be selected for mitered cuts)
Last edited:
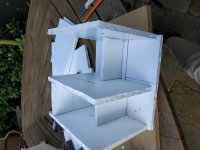
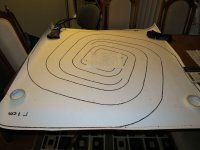
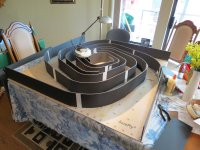
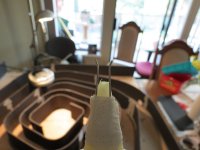
I think you want to avoid heat at all cost. You also need precision cuts as when you go to glue the second side on, you really need near perfect edges. Those are 6.5" drivers so you can see these are the large 48" units. The last pic is the guide I attached to the glue bottle so I didn't have to freehand a bead of glue onto all those feet of foam edge.
Attachments


You can use the guide to your advantage. A soft touch goes a long way toward having the blade maintain it's course on multiple passes. Especially if you use a two piece guide system.
see that's where i have the problem i'm hoping to get cuts with a single stroke, it's the multiple passes that turn things into a mess when a minor change in angle makes the cut take off producing long thin slivers or simply cause the cut to go off.
The tutorials I’ve seen (as well as my own methods) recommend a scoring cut through the paper face followed by a second cut through the foam and bottom paper layer. As Cal has mentioned a sharp blade is the key regardless of method.
- Home
- Loudspeakers
- Full Range
- Foam Core Board Speaker Enclosures?