Finally got my vifa 2 ways done today.
I decided a couple of days ago that these cabinets would not be finished, but would serve as test units only - unhappy with final joins, T-nuts not lining up well, unanticipated clearances for T-nuts etc etc, hammering in T-nuts also buggered the seal on rear panel too 🙁
well got them hooked up tonight, and am very happy audio wise, both CD and DVD.... much beter than my slightly aging wharfdales.....
now to redesign cabinets, remake crossovers nicely and then work on centre channel!
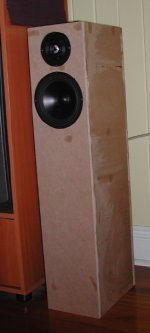
I used vifa d25ag3506 tweeters, and vifa p17wj0008 woofers in a 11-12L sealed box, nice crisp bass and a better treble response clearly audible....
I decided a couple of days ago that these cabinets would not be finished, but would serve as test units only - unhappy with final joins, T-nuts not lining up well, unanticipated clearances for T-nuts etc etc, hammering in T-nuts also buggered the seal on rear panel too 🙁
well got them hooked up tonight, and am very happy audio wise, both CD and DVD.... much beter than my slightly aging wharfdales.....
now to redesign cabinets, remake crossovers nicely and then work on centre channel!
I used vifa d25ag3506 tweeters, and vifa p17wj0008 woofers in a 11-12L sealed box, nice crisp bass and a better treble response clearly audible....
Attachments
plasmodium wrote
Justa little hint: If you forget to hammer the T-nuts in before attaching the baffle (or if there is any other reason to do it later) you can screw them in using a screw from the front side. Be sure to use someting to prevent the screw's head to be pulled into the wood. I usually use a flat piece of metal with an appropriately sized whole in it. You also have to grease or oil the screw a little, but make sure it's not too much.
Regards
Charles
hammering in T-nuts also buggered the seal on rear panel too
Justa little hint: If you forget to hammer the T-nuts in before attaching the baffle (or if there is any other reason to do it later) you can screw them in using a screw from the front side. Be sure to use someting to prevent the screw's head to be pulled into the wood. I usually use a flat piece of metal with an appropriately sized whole in it. You also have to grease or oil the screw a little, but make sure it's not too much.
Regards
Charles
phase_accurate said:Justa little hint: If you forget to hammer the T-nuts in before attaching the baffle (or if there is any other reason to do it later) you can screw them in using a screw from the front side. Be sure to use someting to prevent the screw's head to be pulled into the wood. I usually use a flat piece of metal with an appropriately sized whole in it. You also have to grease or oil the screw a little, but make sure it's not too much.
Hey, I like that idea. I'll keep that one in mind!

Crossover/cabinets
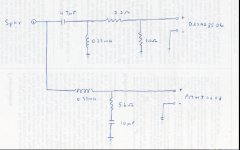
This is the crossover I used, credit to www.mass.com.au.
All resistors are 10W wirewound, all capacitors are 250V metallised polypropylene, the tweeters inductor is a store bought 0.8mm coil, the woofers are homemade 2mm coils.
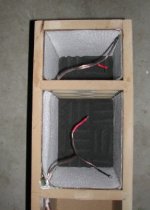
The cabinets are mainly stands, with the woofer section being about 11-12L in volume, sealed. There is a ventilated brace between the two drivers, and sides/top/bottom lined with barium impregnated vinyl sound deadening stuff, the backs lined with acoustic foam. (see pic)
All cabinets are made of 18mm MDF, glued and clamped.
external dimensions 190mm*280mm*900mm (woofer section about 340mm high)
lee
This is the crossover I used, credit to www.mass.com.au.
All resistors are 10W wirewound, all capacitors are 250V metallised polypropylene, the tweeters inductor is a store bought 0.8mm coil, the woofers are homemade 2mm coils.
The cabinets are mainly stands, with the woofer section being about 11-12L in volume, sealed. There is a ventilated brace between the two drivers, and sides/top/bottom lined with barium impregnated vinyl sound deadening stuff, the backs lined with acoustic foam. (see pic)
All cabinets are made of 18mm MDF, glued and clamped.
external dimensions 190mm*280mm*900mm (woofer section about 340mm high)
lee
Attachments
I use a C-clamp to press the T-nuts into the MDF, this works the best IMHO. You and put them in after you attach the front panel and apply the veneer, just use a wood block on the front panel so it doesn't get mared
Rob
Rob
don't mean to hijack, but may i ask what are these T-Nuts you speak of, where they go, and their purpose?
thanks
thanks
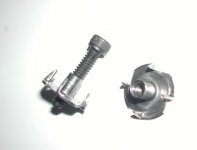
T-nuts
The nut is driven (or otherwise) into the rear of the baffle, and gives you a thread for using bolts to attach drivers, instead of wood screws, which may become loose after being removed and replaced a few times, also, the Allen-key socket heads look great....
With my project revision, I am going to make a slightly larger hole than is required for the T-nut, and flatten out the spikes on the nut, this way it will allow some room for error in hole placement (because even the tiniest error and you won't get all of the bolts in 🙁 🙁 )
I'll just use some epoxy glue to hold the T-nuts in place, the driver and bolts will effectively clamp the nuts in the perfect spot while the glue dries.
Beware though that the nuts take up considerable room, as they are 18mm in diameter - this may cause probs with clearances from driver rebates to side panels etc etc - I found this out the hard way...... take this into account with planning.
(I picked up these at Queensland Fasteners at Eagle Farm if you are interested, seeing you are in Brisbane too - the T-nuts were hard to find in such a small size - I use 1024 (3/16") threads.)
cheers
lee
Attachments
T-nuts
The nut is driven (or otherwise) into the rear of the baffle, and gives you a thread for using bolts to attach drivers, instead of wood screws, which may become loose after being removed and replaced a few times, also, the Allen-key socket heads look great....
With my project revision, I am going to make a slightly larger hole than is required for the T-nut, and flatten out the spikes on the nut, this way it will allow some room for error in hole placement (because even the tiniest error and you won't get all of the bolts in 🙁 🙁 )
I'll just use some epoxy glue to hold the T-nuts in place, the driver and bolts will effectively clamp the nuts in the perfect spot while the glue dries.
Beware though that the nuts take up considerable room, as they are 18mm in diameter - this may cause probs with clearances from driver rebates to side panels etc etc - I found this out the hard way...... take this into account with planning.
(I picked up these at Queensland Fasteners at Eagle Farm if you are interested, seeing you are in Brisbane too - the T-nuts were hard to find in such a small size - I use 1024 (3/16") threads.
Attachments

I just bought these woofers, but I'm planning to use 2 of them per speaker in a TL design I found here: www.theloudspeakerkit.com/downloads/ tl6instructions.doc
It seems a good project.
BTW why did you use a tower enclosure if the woofers work in a 12l sealed volume?
Cheers
Andrea
It seems a good project.
BTW why did you use a tower enclosure if the woofers work in a 12l sealed volume?
Cheers
Andrea
aesthetics!
I like the slim tower look..... I also don't have, and don't want a bookshelf to sit them on, and my TV unit is too narrow.... and it is easier than making separate stands.
I like the slim tower look..... I also don't have, and don't want a bookshelf to sit them on, and my TV unit is too narrow.... and it is easier than making separate stands.
Ok, that's my thought also.
But to avoid waste of space you might give a TL a try, I have seen a project that employs your drivers that way.
This could give you deeper bass, of course unless you are planning to use the extra-space in other ways as I'd like to do... (to put a amp in...)
Cheers
Andrea
But to avoid waste of space you might give a TL a try, I have seen a project that employs your drivers that way.
This could give you deeper bass, of course unless you are planning to use the extra-space in other ways as I'd like to do... (to put a amp in...)
Cheers
Andrea
Lemme guess... most of the xover parts and drivers came from Jaycar? 😉
Out of interest, what does the 12L sealed volume tune the P17WJs at?
Out of interest, what does the 12L sealed volume tune the P17WJs at?
caps and resistors yes, inductors homemade.
not sure, winisd gave this volume, I think it is between 50-100 Hz somewhere.
not sure, winisd gave this volume, I think it is between 50-100 Hz somewhere.
plasmodium said:...T-nuts not lining up well, unanticipated clearances for T-nuts etc etc, hammering in T-nuts also buggered the seal on rear panel too 🙁
You might want to try propell nuts next time.
http://www.leevalley.com/hardware/page.asp?SID=&ccurrency=2&page=40361&category=3,41306,41321
(figure D and H)
They have some teeth on their shaft which prevents them from turning. They work better for mdf/particle board or end-grain wood. The spikes on a normal T-nut can split the wood.
MWP said:Lemme guess... most of the xover parts and drivers came from Jaycar? 😉
Out of interest, what does the 12L sealed volume tune the P17WJs at?
Looks like we were wrong... but the ones from jaycar are 6bux cheaper each.. 😛 lol.. did you pay $105 per driver?? Hope not... too bad if ya did.
- Status
- Not open for further replies.
- Home
- Loudspeakers
- Multi-Way
- Finished 2 ways..... mixed result